UNIVERSAL MULTI-CD SYSTEM SYSTEME DE CD MULTIPLE UNIVERSEL Operation Manual CDX-FM1277 Mode d’emploi
Contents/Table des matières 2 English Français Dear Customer ............................................ 3 Precautions ................................................. 4 Preparing to Use the Remote Controller Unit ..... 5 Precautions .......................................................... 5 Loading Battery .................................................... 5 Cher Client ................................................ 27 Précautions ...............................................
English We Want You Listening For A Lifetime Selecting fine audio equipment such as the unit you’ve just purchased is only the start of your musical enjoyment. Now it’s time to consider how you can maximize the fun and excitement your equipment offers. This manufacturer and the Electronic Industries Association’s Consumer Electronics Group want you to get the most out of your equipment by playing it at a safe level.
Precautions CAUTION: USE OF CONTROL OR ADJUSTMENT OR PERFORMANCE OF PROCEDURES OTHER THAN THOSE SPECIFIED HEREIN MAY RESULT IN HAZARDOUS RADIATION EXPOSURE. CAUTION: THE USE OF OPTICAL INSTRUMENTS WITH THIS PRODUCT WILL INCREASE EYE HAZARD. NOTES: THIS DEVICE COMPLIES WITH PART 15 OF THE FCC RULES.
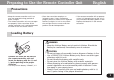
Preparing to Use the Remote Controller Unit English Precautions • Keep the remote controller unit in an area not exposed to long periods of direct sunlight. • The remote controller unit may not operate properly if the transmitter of the remote controller unit is pointed towards the floor or the seat of the vehicle. • Since the transmitter employs an infrared system, it may not operate properly while car stereo unit is exposed to direct sunlight.
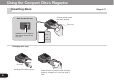
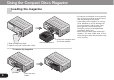
Using the Compact Discs Magazine Inserting discs [Page 6~7] Position the disc with the label upward. Slide out the disc tray Disc tray Hold down the magazine lock button and, pull the tray out. 1 2 3 4 5 6 7 8 9 10 11 12 Disc 1 to Disc 12 Changing disc trays Disc tray Gently pull the disc tray out. 6 Align the disc tray with the left and right grooves, and push it in until you hear it click.
English • Be sure to remove the disc before changing a disc tray. • If the tray is not aligned with the right and left grooves, it cannot be pushed to the end. Do not bend or force the tray. • Always load 12 trays in a magazine to prevent loss or warping of trays. • If you load a disc with the label generally printed in black facing down, not only will the player not be able to recognize whether the disc is set or not, but also, the display unit will not display an error message to let you know about it.
Using the Compact Discs Magazine Loading the magazine • Do not put your fingers in the magazine tray as this may lead to incorrect operation and damage to the player. • If the label on the magazine is coming off or wrinkled up, it may damage the eject mechanism, and in some cases, the magazine may not be ejected. Therefore, remove a damaged label completely before use. • Never leave the door open while playing discs. The entry of dirt, dust, or any other foreign matter into the player may cause it to fail.
Playing Compact Discs English Start the CD player 1. Switch the radio on and tune to Modulating Frequencies. • The initial value is 89.1 MHz. (See Page 21 regarding switching CD player transmission frequency.) • If your radio does not have muting, there may be some noise before power switch of control unit is ON. If this happens, turn down the volume of the radio. 2. Press button to switch on and start the player. or Disc Number Search : increase the number. or : decrease the number.
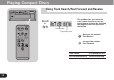
Playing Compact Discs Using Track Search/Fast Forward and Reverse This product lets you select the track search function or fast forward/reverse function by changing the length of the time you press the button. or Track Number Elapsed play time : decrease the number. : Fast Reverse : increase the number. : Fast Forward 10 Track search 0.
English Pausing Press button to pause during disc playback. Press button again to release pause. MEMO or You can select a track using the track search during pause. (“PAUSE” is off while a track is being searched.) When the track search ends, the found track is paused at its beginning. Repeat Track Repeat Play the current track repeatedly. Disc Repeat Play the same disc repeatedly.
Playing Compact Discs Random Play Example: Disc Repeat (See Page 11.) 1. Select the desired repeat mode. or Displayed during random play. 2. Hold down button for more than 2 second. or Random play will be performed within the selected repeat mode. Once the current track has been played, the microprocessor will randomly select the next and subsequent tracks. To cancel random play, hold down button for more than 2 seconds again.
English ITS (Instant Track Selection) [Page 13~15] This function lets you program and play the tracks you want. You can listen to just your favorite tracks. Programming 1. Play the track you want to program. 2. Press button to program the track. It will be displayed for about 2 seconds to indicate memory storage. MEMO • The ADPS function* of the multi-play CD player lets you program up to 100 discs. * ADPS: Automatic Disc Program Selection.
Playing Compact Discs ITS Play Example : Disc Repeat (See Page 11.) 1. Select the desired repeat mode. or Displayed during ITS play. 2. Hold down button for more than 2 seconds. To cancel ITS play, hold down button for more than 2 seconds again. ITS play will be performed within the selected repeat mode. MEMO • If track repeat is selected as the repeat mode in step 1, it will automatically switch to disc repeat mode and ITS play will begin.
English Erasing the ITS Play To erase a single track program: During ITS play, select the track you wish to erase by using track search. Hold down button for more than 2 seconds to erase the program. (When there are no more memorized tracks, “EMPTY” is displayed, and ITS play is canceled.) To erase the disc program: It will be displayed for about 2 seconds to indicate deletion of memory contents in play. During normal play, select the disc you wish to erase by using disc number search.
Playing Compact Discs Disc Title [Page 16~20] You can enter a title for the disc in the CD player. The title stored for the disc can be displayed. Entering Title 1. Select the disc for which you want to enter a title. 2. Hold down button for more than 2 seconds to select title input mode. MEMO • You cannot switch to the Title Input mode while playing a CD TEXT disc. • The ADPS function* of the CD player lets you enter titles for up to 100 discs. (Up to 100 discs, including ITS, can be programmed.
English or 3. Press the or side of button to select the input position. The input position moves continuously when you hold down either side of the button. 4. Select characters using the side of button. or When you hold down either side of the button, the character changes continuously. or or 5. Select the input position farthest to the right and press the button to memorize. The title will appear on the display. MEMO To interrupt title input, press the button for 2 seconds or more.
Playing Compact Discs Display Switching Normal Operation Disc Title • Normal Operation • Disc Title • Disc Artist Name • Track Title • Track Artist Name Each press of the button switches between display of track number (elapsed play time) and disc title indications. When playing a CD TEXT disc, indications switch as shown on the left. MEMO • When you perform any operation while the disc title is being displayed, the normal operation display will appear for 8 seconds.
English CD TEXT Title Scroll Press the button for more than 2 seconds to scroll CD TEXT titles. Disc Title List You can list all discs loaded in the magazine being played. This function is convenient for checking discs in the magazine being played. Each press of button displays the titles of the discs in magazine being played in ascending order of disc number. MEMO • The disc title is displayed for about 8 seconds, then the normal operation display returns.
Playing Compact Discs Select the disc to be played from the disc list display 1. Press button to display the disc title list. 2. When the title of the disc you want to listen to is displayed, press button for more than 2 seconds. That disc is played.
English Setting Player to Play Discs via Radio Modulating frequencies selector This system can change the frequency at which the FM car radio receives the CD audio signals within the range of 87.9 to 90.1 MHz in 0.2-MHz increments. (The initial setting is 89.1 MHz.) If there is a strong broadcast station signal near the current frequency, radio interference may occur. If it occurs, change the frequency.
Playing Compact Discs Item Button Display or Frequency Level or Preemphasis or 2. Set the items while referring to the chart on the left. The last adjustment is kept as final. or 22 3. Press the button for 2 seconds or more to return to normal play.
English Display shows this message Take action according to the chart below. Check discs and magazine once more. Message No MAGAZINE (appears) No MAGAZINE (flashes for 5 seconds) READY Err 11, Err 12, Err 14, Err 17 Err 30 Err 11, Err 14 Err 14 Err 44 NO DISC Err 10, Err 11, Err 12, Err 14, Err 17 Err 19, Err 30, Err 50, Err 60, Err 70 Err A0, Err A1 If it still doesn’t work after checking. Press the CD player’s Clear button. (See Page 24.) Cause Removing the magazine from the CD player during CD play.
Pressing the Clear Button After connecting everything up, press the clear button with the tip of a pencil. If the power will not switch on, or if the CD player does not operate, when the button on the control unit is pressed, or if the control unit display is incorrect, press this button with the tip of a pencil to restore normal operation. (This button is located inside the door.
Transportation of multi-CD player English Seal After removing the transport screw, cover the hole with the supplied seal. A transport screw has been attached to the set in order to protect it during transportation. After removing the transport screw, cover the hole with the supplied seal. Be sure to remove the transport screw before mounting the set. The removed transport screw should be retained in the accessory bag for use the next time the set is transported.
Specifications CD Player unit System .......... Compact disc audio system Usable discs ......................... Compact Disc Signal format ................. Sampling frequency: 44.1 kHz Number of quantization bits: 16; linear Power source ....... 14.4 V DC (10.8 — 15.1 V allowable) Max. current consumption ................ 1.0 A Weight .................................. 2.2 kg (4.9 lbs) Dimensions .................
Français Nous voulons que vous écoutiez pendant toute votre vie Cher Client: La sélection d’un équipement audio de qualité comme l’unité que vous venez d’acheter n’est que le début de votre plaisir musical. Maintenant, il est temps de penser à la manière de profiter au maximum des plaisirs que vous offre votre équipement.
Précautions PRECAUTION: L’USAGE OU LE REGLAGE, OU ENCORE LA PERFORMANCE DES PROCEDURES AUTRES QUE CELLES SPECIFIEES PEUVENT RESULTER EN UNE EXPOSITION DANGEREUSE AUX RADIATIONS. PRECAUTION: L’USAGE D’INSTRUMENTS OPTIQUES AVEC CE PRODUIT AUGMENTERA DES RISQUES NUISIBLES AVEC LES YEUX. • Lorsque vous utilisez ce système de CD multiple universel, la sensibilité effective de votre radio est légèrement réduite. • Lorsque l’on met hors tension l’autoradio, le système reste en opération.
Avant d’utiliser la télécommande Français Précautions • Conservez la télécommande dans une zone non exposée au plein soleil pendant une période prolongée de temps. • La télécommande risque de ne pas fonctionner correctement si le transmetteur de la télécommande est dirigé vers le sol ou vers le siège du véhicule. • La télécommande utilisant un système à infrarouge, elle risque de ne pas fonctionner correctement si vous l’exposez au plein soleil.
Utilisation du chargeur de disque compact Mise en place des disques [Page 30~31] Introduisez les disques de façon que l’étiquette soit tournée vers le haut. Extrayez le plateau à disque Plateau Appuyez sur le bouton de verrouillage et tirez à vous un plateau. 1 2 3 4 5 6 7 8 9 10 11 12 Ordre des 12 disques Remplacement des plateaux pour disque Plateau Tirez doucement le plateau à vous. 30 Engagez à fond le plateau pour disque dans les rainures droite et gauche.
Français • N’oubliez pas de retirer le disque avant de changer un plateau. • Si la plateau n’est pas alignée avec les rainures à droite et à gauche, elle ne pourra pas être poussée jusqu’au fond. Ne pas plier ou forcer la plateau. • Toujours charger les 12 plateaux dans un chargeur pour éviter toute perte ou déformation des plateaux.
Utilisation du chargeur de disque compact Mise en place d’un chargeur 2 1 1 Faites glisser le volet. 2 Ouvrez-le complètement; il se verrouille et vous entendez un déclic. Pour retirer le chargeur 32 Appuyez sur la touche d’éjection. Introduisez le chargeur. Introduisez le chargeur de manière que la face portant la flèche soit tournée vers le haut. • Ne pas mettre les doigts dans le tiroir du chargeur car cela peut entraîner une anomalie de fonctionnement et un endommagement du lecteur.
Lecture de disques compacts Français Commandez la lecture du CD 1. Enclencher la radio et accorder et choisissez la modulation de fréquence. • La valeur initiale est de 89,1 MHz. (Pour le choix de la fréquence porteuse du signal du lecteur de CD, reportez-vous à la page 45.) • Si la radio ne possède pas de silencieux, on risque d’entendre des parasites avant que l’interrupteur d’alimentation du bloc de commande ne soit mis sur ON (marche). Dans ce cas, baisser le volume de la radio. 2.
Lecture de disques compacts Utilisation de la recherche de plage/ de l’avance rapide et de l’inversion ou Numéro de la plage musicale Temps écoulé Selon la durée de la pression exercée sur la touche, cet appareil vous donne la faculté d’utiliser soit la fonction de recherche soit la fonction de l’avance rapide et de l’inversion. : le numéro décroît. : l’inversion rapide : le numéro croît.
Français Pause Appuyer sur la touche pour effectuer une pause pendant la lecture des disques. Appuyer à nouveau sur la touche pour libérer la pause. ou Remarque On peut sélectionner une plage en utilisant la recherche de numéro de plage durant la pause. (“PAUSE” est désactivée tandis qu’une plage est recherchée.) Lorsque la recherche de plage est complétée, la plage localisée sera interrompue à son début. Répétition Répétition plage Reproduire la plage courante plusieurs fois.
Lecture de disques compacts Lecture aléatoire Exemple: Répétition d’un disque (Reportez-vous à la page 35.) 1. Sélectionner le mode de répétition. ou Indication affichée pendant la lecture au hasard. ou La lecture au hasard s’effectue en tenant compte du mode de répétition choisi. 2. Maintenir pressée la touche pendant plus de 2 secondes. Une fois la plage en cours terminée, le microprocesseur incorporé effectue une sélection aléatoire parmi les plages de tous les disques situés dans le chargeur.
Français ITS (Sélection de plage instantanée) [Page 37~39] Cette fonction permet de programmer et reproduire les pistes. On peut écouter les plages préférées dans ce cas. Programmation 1. Reproduire la plage que l’on veut programmer. 2. Appuyer sur la touche pour programmer la plage. Cette indication est affichée pendant 2 secondes pour signaler la mise en mémoire. Remarque • La fonction ADPS* du lecteur CD vous permet de programmer jusqu’à 100 disques.
Lecture de disques compacts Reproduction ITS Exemple: Répétition d’un disque (Reportez-vous à la page 35.) 1. Choisissez le mode de répétition désiré. ou Indication affichée pendant la lecture (ITS). 2. Maintenir pressée la touche pendant plus de 2 secondes. Pour effacer la lecture aléatoire, maintenir de nouveau enfoncée la touche pendant plus de 2 secondes. La lecture des plages musicales sélectionnées (ITS) s’effectue selon le mode de répétition choisi.
Français Comment effacer le programme ITS Pour effacer une seule sélection: ITS joue le disque dont le numéro ne doit plus faire partie du programme. Maintenez la pression d’un doigt sur la touche pendant plus de 2 secondes pour obtenir l’effacement. (Lorsque la mémoire ne contient plus aucun numéro de plage musicale, l’indication “EMPTY” s’affiche et la lecture ITS est abandonnée.
Lecture de disques compacts Titre de disques [Page 40~44] On peut entrer un titre pour le disque dans le lecteur CD. Le titre mémorisé pour le disque peut être affiché. Comment entrer les titres 1. Sélectionner le disque pour lequel on veut entrer un titre. 2. Maintenir pressée la touche pendant plus de 2 secondes pour sélectionner le mode d’entrée du titre. Remarque • Vous ne pouvez pas accéder au mode de frappe de titre pendant la lecture d’un disque CD TEXT.
Français ou 3. Appuyer sur le côté ou de la touche pour sélectionner la position d’entrée. La position d’entrée se déplace continuellement lorsque l’on maintient enfoncée les deux côtés de la touche. 4. Sélectionner les caractères en utilisant le côté ou de la touche. Lorsque l’on maintient enfoncés les deux côtés de la touche, les caractères changent continuellement. ou ou 5. Choisissez la position de frappe la plus à droite puis appuyez sur la touche pour effectuer la mise en mémoire.
Lecture de disques compacts Commutation d’affichage Fonctionnement normal Chaque pression sur la touche provoque alternativement l’affichage du numéro de plage musicale (temps écoulé) ou du titre du disque. Titre du disque • • • • • Fonctionnement normal Titre du disque Nom de l’interprète Titre de la plage musicale Nom de l’interprète de la plage musicale Pendant la lecture d’un disque CD TEXT, les indications défilent dans l’ordre figuré ci-contre.
Français Défilement du titre d’un disque CD TEXT Pour obtenir le défilement du titre d’un disque CD TEXT, appuyez, pendant au moins 2 secondes, sur la touche. Liste des titres de disque On peut lister tous les disques chargés dans le chargeur en cours de lecture. Cette fonction est commode pour le contrôle des disques dans le chargeur en cours de lecture. Chaque pression sur la touche affichera les titres des disques dans le chargeur en cours de lecture, selon l’ordre ascendant du numéro de disque.
Lecture de disques compacts Sélectionner le disque, qui doit être reproduit, de l’affichage de la liste des disques 1. Appuyez sur la touche pour afficher la liste des titres des disques. 2. Lorsque le titre du disque que l’on veut écouter est affiché, appuyer sur la touche pendant plus de 2 secondes. Ce disque sera reproduit dans ce cas.
Français Réglage du lecteur pour la lecture de disques via la radio [Page 45~46] Sélecteur de fréquence de modulation Ce système peut changer la fréquence à laquelle la radio FM de la voiture reçoit les signaux audio CD dans la plage de 87,9 a 90,1 MHz par incréments de 0,2 MHz. (Le réglage initial est de 89,1 MHz.) S’il y a un signal de station de transmission fort à proximité de la fréquence courante, une interférence radio pourrait se produire. Si ce fait se présente, changer la fréquence.
Lecture de disques compacts Poste Fréquence Touche Affichage ou Niveau ou Préaccentuation ou 2. Réglez chaque poste en vous inspirant du tableau ci-contre. Le dernier réglage est conservé. ou 46 3. Appuyez sur la touche pendant plus de 2 secondes pour commander la lecture normale.
Français Affichage du message Procédez comme suggéré dans le tableau ci-dessous. Si, après cette vérification, le lecteur ne fonctionne toujours pas. Si cette opération ne permet pas de remettre le lecteur en fonctionnement. Vérifiez une fois encore les disques et les chargeurs. Appuyez sur la touche d’effacement du lecteur. (Reportez-vous à la page 48.) Reportez-vous au paragraphe “Service après-vente des produits PIONEER” et demandez à ce que le lecteur soit réparé.
En appuyant sur la touche d’effacement Touche d’effacement Après avoir terminé les connexions, appuyer sur la touche d’effacement avec la pointe d’un crayon. Si l’appareil n’est pas mis sous tension, si la lecteur de disque compact ne fonctionne pas lorsque la touche de l’unité de commande est enfoncée ou si l’affichage de l’unité de commande est incorrect, appuyer sur cette touche avec la pointe d’un crayon pour rétablir l’opération normale. (Ce bouton est placé à l’intérieur de la porte.
Transport du lecteur de CD à chargeur Français Cache Après avoir retiré la vis de transport, bouchez le trou au moyen du cache fourni. Des vis sont fixées sur le lecteur de façon à le protéger pendant le transport. Après avoir retiré une vis de transport, bouchez le trou au moyen du cache fourni. Veillez à retirer ces vis avant d’installer le lecteur. Conservez les vis dans le sac contenant les accessoires de manière à ne pas les égarer et à être en mesure de les remettre en place en cas de transport.
Spécifications Unité de lecteur CD Système .... Système audio compact disque Disques utilisables .............. Compact disque Format du signal ...... Fréquence d’échantillonnage: 44,1 kHz Nombre de bits de quantification: 16, linéaires Alimentation ........ 14,4 V CC (10,8 — 15,1 V admissible) Consommation de courant max .......... 1,0 A Poids ........................................................ 2,2 kg Dimensions ........................
PIONEER CORPORATION 4-1, MEGURO 1-CHOME, MEGURO-KU, TOKYO 153-8654, JAPAN PIONEER ELECTRONICS (USA) INC. P.O. Box 1760, Long Beach, California 90801, U.S.A. TEL: (800) 421-1404 PIONEER EUROPE NV Haven 1087, Keetberglaan 1, B-9120 Melsele, Belgium TEL: (0) 3/570.05.11 PIONEER ELECTRONICS AUSTRALIA PTY. LTD. 178-184 Boundary Road, Braeside, Victoria 3195, Australia TEL: (03) 9586-6300 PIONEER ELECTRONICS OF CANADA, INC.