MULTI PLAYER CDJ-2000NXS CDJ-2000nexus http://pioneerdj.com/support/ The Pioneer website shown above offers FAQs, information on software and various other types of information and services to allow you to use your product in greater comfort. http://rekordbox.com/ For inquiries on rekordbox™, please see the support site indicated above.
Contents How to read this manual In this manual, names of screens and menus displayed on the computer screen, as well as names of buttons and terminals on the product, etc., are indicated within brackets. Examples: — Press the [CUE] button. — The [UTILITY] screen is displayed. — Click on the Windows [Start] menu button, then [All Programs] > [Pioneer] > [rekordbox 2.x.x] > [rekordbox 2.x.x]. — Connect the LAN cable properly to the [LINK] terminal. Before start Features......................................
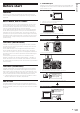
SD & USB Export Features rekordbox music files and management data can be exchanged using storage devices (SD, USB). This eliminates the need to take the computer to discos or clubs. At home or in a studio This unit is a multi player for professional DJs, offering the variety of functions, durability and operability required for working in discos and nightclubs.
rekordbox LINK Export When this unit and a computer are connected by LAN cable, the rekordbox music files and management data can be exchanged directly. This eliminates the need to export the data to a storage device (SD, USB). Wireless connection using a wireless LAN router (or wireless LAN access point) is also possible. At home or in a studio rekordbox ! ! Add music files to collections and analyze them. Make the preparations on rekordbox.
Before you start About the included CD-ROM This unit can be used in combination with a computer when the software is installed onto the computer from the included CD-ROM. The included CD-ROM contains the following two software programs. ! rekordbox (Mac/Windows) music management software ! Driver software Usable media About discs CD Supported file systems About CD-R/-RW discs Music files (MP3/AAC/WAV/AIFF) recorded on CD-R/-RW discs can be played. Folder layers Max.
About SD memory cards About USB devices Music files (MP3/AAC/WAV/AIFF) recorded on SD memory cards conforming to SD standards can be played. Such data as disc identification information, cue points, loop points and hot cues can be recorded on SD memory cards. In this manual, “SD memory card” collectively refers to SD memory cards, SDHC memory cards, mini-SD memory cards mounted in SD memory card adapters and micro-SD memory cards mounted in SD memory card adapters.
Playable music file formats This unit supports music files in the formats shown below. MP3 AAC File extension Compatible formats Bit depth Bit rate Sampling frequency Encoding method MPEG-1 AUDIO LAYER-3 16 bit 32 kbps to 320 kbps 32 kHz, 44.1 kHz, 48 kHz CBR, VBR MPEG-2 AUDIO LAYER-3 16 bit 8 kbps to 160 kbps 16 kHz, 22.05 kHz, 24 kHz CBR, VBR MPEG-4 AAC LC 16 bit 16 kbps to 320 kbps 16 kHz, 22.05 kHz, 24 kHz, 32 kHz, 44.
Functions usable in combination with a computer About the included CD-ROM This unit can be used in combination with a computer when the software is installed onto the computer from the included CD-ROM. The included CD-ROM contains the following two software programs. rekordbox (Mac/Windows) music management software rekordbox is a software program allowing users who have purchased a Pioneer DJ player supporting rekordbox to manage music files to be used for DJ performances.
Cautions on copyrights rekordbox restricts playback and duplication of copyright-protected music contents. ! When coded data, etc., for protecting the copyright is embedded in the music contents, it may not be possible to operate the program normally. ! When rekordbox detects that coded data, etc., for protecting the copyright is embedded in the music contents, processing (playback, reading, etc.) may stop.
2 When the CD-ROM’s menu is displayed, select [rekordbox: Install Music Management Software], then click [Start]. 4 When the license agreement screen appears, read the Software end user license agreement carefully. If you agree to the Software end user license agreement, click [Agree]. ! If you do not consent to the provisions of the Software end user license agreement, click [Cancel] and stop installation. 5 Install rekordbox by following the instructions on the screen.
! Before you start ! When making inquiries regarding rekordbox, please be sure to furnish your computer type and specifications (CPU, installed memory, other connected peripherals, etc.), the operating system and version used, as well as concrete information regarding the issue at hand. — To inquire about configuring your computer with non-Pioneer peripheral devices and to obtain the corresponding technical support, contact the specific manufacturer or retailer.
Connections ! ! ! ! ! Be sure to turn off the power and unplug the power cord from the power outlet whenever making or changing connections. Refer to the operating instructions for the component to be connected. Connect the power cord after all the connections between devices have been completed. When using a LAN cable for connection, be sure to use either the LAN cable included with this product or an STP (shielded twisted pair) cable.
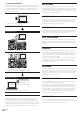
Connecting to a mixer with only one LAN port When connecting to a mixer with only one LAN port using a switching hub, in order to use rekordbox’s music file management functions to their maximum, set the channel number of the mixer to which the audio or coaxial digital cable is connected and the player number displayed at the bottom left of the main unit display to the same number. (Ex.
PRO DJ LINK (LINK Export) ! ! ! ! Tracks in rekordbox can be selected and played when the computer is taken into a DJ booth and connected to a computer on which rekordbox is installed by LAN cable (CAT5e) or wireless LAN (Wi-Fi) router. Performances can be held using such information as playlists, cues, loops and hot cues that have been set ahead of time with rekordbox.
Cautions To use rekordbox’s music file management functions to their maximum, set the channel of the audio or coaxial digital input cable connected to the mixer and the player number to the same number. If the player number is different, change the [PLAYER No.] setting on the [UTILITY] screen. ! When a storage device is connected to this unit, [PLAYER No.] is displayed in gray and cannot be changed. Disconnect the storage device or LAN cable to turn the link off, then change the setting.
Part names and functions Control panel qr p o n m l k j s u t v w x rekordbox LINK INFO LINK i USB DISC TIME MODE AUTO CUE TAG LIST INFO UTILITY BACK TAG TRACK / REMOVE MENU OFF ON POWER STANDBY LINK USB STOP h g f e d SD QUANTIZE BROWSE rekordbox DISC EJECT y z USB SD DISC SD QUANTIZE VINYL SPEED ADJUST TIME MODE A TOUCH / BRAKE HOT CUE AUTO CUE B RELEASE / START •IN/-4BEAT OUT RELOOP / EXIT NEEDLE SEARCH 1/2X LOOP IN ADJUST a •IN/-4BEAT OUT JOG ADJUST b VIN
d SD memory card indicator This flashes when communicating with the SD memory card. = Inserting and ejecting SD memory cards (p.22) e SD memory card door Open and close this door to insert or remove SD memory cards. = Inserting and ejecting SD memory cards (p.22) f SD memory card insertion slot g USB STOP button Press for at least 2 seconds before disconnecting the USB device. = Connecting and disconnecting USB devices (p.
I BEAT SYNC MASTER button Use this to set the track loaded in this unit as the master for the beat sync function. = Using the beat sync function (p.31) J BEAT SYNC button Use this to turn on the beat sync function. = Using the beat sync function (p.31) K TEMPO ±6/±10/±16/WIDE button Use this to switch the playing speed adjustment range. = Adjusting the playing speed (Tempo control) (p.24) L MASTER TEMPO button Use this to turn the master tempo function on and off.
Rear panel POWER CONTROL Part names and functions 1 2 For the terminals used for connections, see Descriptions of terminals on page 12. 1 POWER ON/OFF button Press to turn the power on and off.
Main unit display Normal playback screen 8 a 9 b c d 7 e f 6 5 4 3 2 g h i j 1 m 1 CUE The positions of cue points, loop points and hot cues are displayed as marks. 2 MEMORY Cue points, loop points and hot cues stored on storage devices (SD, USB) are displayed as marks. 3 A. CUE This lights when auto cue is set. = Setting auto cue (p.26) 4 PLAYER This indicates the player number (1 – 4) assigned to this unit. 5 TRACK This indicates the track number (01 – 99).
Jog dial display section Part names and functions 1 2 3 4 5 1 Operation display This indicates the playing position, with one revolution equal to 135 frames. It turns during playback and stops in the pause mode. 2 Cue point display/slip play display 3 Audio memory status display This flashes when the audio memory is being written. It stops flashing, remaining lit, when writing is completed. It may not be possible to perform the real time cue operation while the audio memory is being written.
Pioneer DJ player is connected, the number of discs stored in the disc information memory is displayed for several seconds on the main unit display. = For details on storing disc information, see Procedure for calling out hot cues (for discs) on page 28. Basic Operation Turning the power on Ejecting discs 1 Make all the connections, then plug the power cord into a power outlet. = Connections (p.12) 1 Press the [DISC EJECTh] button to eject the disc. The disc is ejected from the disc insertion slot.
Inserting SD memory cards 1 Press the [POWER ON/OFF] button to turn on this unit’s power. 2 Open the SD memory card door. 3 Insert the SD memory card. Insert the SD memory card vertically, with the back side facing forward and the notch facing down. Push the card in slowly until it stops. 4 Close the SD memory card door. 1 Open the SD memory card door. The SD memory card indicator flashes for several seconds, then turns off.
! ! When multiple media are connected, a screen for selecting the medium appears. If the storage device (SD, USB) contains rekordbox library information, the rekordbox library is displayed. = For details on rekordbox library browsing, see Playing the rekordbox library on a computer or mobile device on page 24. 3 Turn the rotary selector. 3 Turn the rotary selector to select the track, then press the rotary selector to set playback.
Playing in reverse 3 Spin the jog dial in the desired direction and at the desired speed. ! The sound is played according to the direction and speed at which the jog dial is spun by spinning the top of the jog dial while pressing it. When the quantize function is on, there may be a slight delay in operation of this function in order to synchronize the beat. Move the [DIRECTION FWD/REV] lever to the [REV] side. Operating the jog dial ! ! The top of the jog dial has an embedded switch.
! Advanced Operation Setting Cue 1 During playback, press the [PLAY/PAUSE f] button. Playback is paused. 2 Press the [CUE] button. The point at which the track is paused is set as the cue point. The [PLAY/PAUSEf] indicator flashes and the [CUE] indicator lights. No sound is output at this time. ! When a new cue point is set, the previously set cue point is canceled. Adjusting the cue point position 1 Press the [SEARCH m, n] buttons while pausing at the cue point.
Returning to Loop playback (Reloop) Using active loops After canceling loop playback, press the [RELOOP/EXIT] button during playback. 1 Connect a storage device (SD, USB) to this unit. Playback returns to the previously set Loop In Point, and Loop playback resumes. Setting loops automatically (4-beat Loop) 2 Load a track for which an active loop has been set with rekordbox. One loop stored in rekordbox can be set as the active loop.
! After calling out a loop stored at a [HOT CUE] button, loop playback can be canceled using the [RELOOP/EXIT] button and the loop in and out points can be fine-adjusted using the [LOOP IN(IN ADJUST)] and [LOOP OUT(OUT ADJUST)] buttons. The adjustment directly changes the information stored at the [HOT CUE] (A, B or C) button. Storing cue or loop points 1 Connect a storage device (SD, USB) to this unit. 2 Set Cue Point or Loop Point.
4 Press the [DELETE] button. 3 Turn the rotary selector then press it. Select the acoustic pressure level or [MEMORY]. [ DELETE] or [ DELETE] is displayed on the main unit display, and the selected point information is deleted. ! When a stored loop set as an active loop is deleted, the active loop is also deleted. Deleting points in units of discs 1 Load a disc in this unit. When tracks from a medium other than a disc are loaded, load any track from the disc.
2 Press the [SLIP] button. The mode switches to the slip mode. 3 During playback, press the top of the jog dial. The scratch play mode is set. Normal playback continues in the background even while scratching. The [SLIP] button flashes in beat with the sound playing in the background. 4 Release your hand from the top of the jog dial. Normal playback of the sound that was playing in the background resumes. The [SLIP] button flashes in beat with the sound playing in the background.
Using the beat sync function When beat sync is turned on, the BPM and beat position of tracks played on this unit can automatically be synchronized with the DJ player connected by PRO DJ LINK that is set as the sync master. ! The beat sync function does not operate for tracks that have not be analyzed with rekordbox. 1 Press the [BEAT SYNC MASTER] button on the DJ player you want to set as the sync master. 4 Move the DJ mixer’s channel fader or cross fader.
Description of the screen 1 2 3 4 Moving back up to a higher layer 5 1List of contents The contents of the selected medium are displayed. 2Uppermost level Displays the name of the upper folder or media of the displayed item. 3Jacket photo Part of the artwork registered in rekordbox is displayed here. When the [INFO/LINK INFO] button is pressed, the jacket photo turns off and the track names are displayed along the left edge.
3 Use the [NEEDLE SEARCH] pad to input a character. Only the tracks including the character you have input are displayed. = Inputting characters using the [NEEDLE SEARCH] pad (p.33) ! When more characters are input, only the tracks including the character string you have input are displayed. ! When the [BACK] button is pressed, the category selection screen reappears. In the page jump mode 1 Display a list not sorted in alphabetical order.
Checking the playing history (HISTORY) The track playing history is stored and displayed at the [HISTORY] category on the browse screen. ! Playlists can be created based on the playing history at [HISTORY] using rekordbox. For details, see rekordbox (Mac/Windows)’s operating instructions. Storing the playing history Editing tag lists Tracks to be played next or tracks selected according to DJ situations can be marked and collected on lists. The list of collected tracks is called the “tag list”.
1 Switch to the browse screen and select a category or folder that has tracks directly under it. Removing one track at a time A list of the tracks is displayed on the right half of the information display screen. 1 Press the [TAG LIST] button. 2 Set the cursor to the category or folder, then press the [TAG TRACK/REMOVE] button. 2 Use the rotary selector to select and enter the storage device (SD, USB).
! When tag lists include both tracks being managed with rekordbox and tracks not being managed with rekordbox, only the tracks being managed with rekordbox are converted into playlists. Displaying the details of the currently loaded track 2 3 4 1Track details The details of the tracks loaded in the DJ player are displayed here. 2Medium/player number The place where the track information is stored is displayed here.
Changing the settings Storing the settings on a storage device (SD, USB) Press the [MENU/UTILITY] button for over 1 second. The [UTILITY] screen is displayed. Description of the screen 1 2 1Setting item This unit’s settings items are displayed here. 2Setting The settings for the various items are displayed here. Changing the settings The [UTILITY] settings and other settings can be stored on a storage device (SD, USB). The stored settings can be exported to rekordbox.
Options settings Setting the auto standby mode Setting ranges Descriptions ON AIR DISPLAY ON*/OFF Selects the method of display when connected by PRO DJ LINK to an ON AIR DISPLAY compatible mixer. Also refer to the operating instructions of the ON AIR DISPLAY compatible mixer (DJM-2000, etc.). JOG BRIGHTNESS OFF/1/2* Selects the brightness of the JOG RING ILLUMINATION. JOG INDICATOR ON*/OFF Selects whether the JOG RING ILLUMINATION flashes or not when the track’s remaining time is low.
Duplicating the settings onto DJ players connected by PRO DJ LINK The [UTILITY] settings and other settings can be duplicated onto DJ players connected by PRO DJ LINK. ! The duplicated settings are as shown below.
Adjusting the buffer size (Windows) This unit functions as an audio device conforming to the ASIO standards. ! If an application using this unit as the default audio device (DJ software, etc.) is running, quit that application before adjusting the buffer size. Click the Windows [Start] menu>[All Programs]>[Pioneer]>[Pioneer CDJ]>[Pioneer CDJ ASIO Settings Utility].
Using other brands of DJ software Operating DJ software by MIDI interface This unit also outputs the operating data for the buttons and dials in MIDI format. If you connect a computer with a built-in MIDI-compatible DJ software via a USB cable, you can operate the DJ software on this unit. The sound of music files being played on the computer can also be output from the CDJ-2000NXS. To use this unit as an audio device, install the driver software on the computer beforehand (page 39).
List of MIDI Messages SW Name JOG (TOUCH) 42 SW Type — MIDI Messages MSB Bn 10 dd Notes A linear value corresponding to the speed, from stop to 4X: 64 for stop, 65 (0.06X) – 127 (4X) in the forward direction, 63 (0.06X) – 0 (4X) in the reverse direction. TEMPO SLIDER VR Bn 1D dd 0 – 127, 0 on the – side, 127 on the + side TOUCH/ BRAKE VR Bn 1E dd 0 – 127, 0 (min.) on the left side, 127 (max.) on the right side RELEASE/ START VR Bn 1F dd 0 – 127, 0 (min.
Additional information Troubleshooting ! ! Incorrect operation is often mistaken for trouble or malfunction. If you think that there is something wrong with this component, check the points below. Sometimes the trouble may lie in another component. Inspect the other components and electrical appliances being used. If the trouble cannot be rectified after checking the items below, ask your nearest Pioneer authorized service center or your dealer to carry out repair work.
Problem Check Remedy The playing address display is not — displayed in the remaining time mode. When playing files recorded in VBR, it may happen that the set cannot detect the length of the track immediately and that some time is required for the playing address display to appear. Much time is required for reading storage devices (SD, USB) (flash memory devices or hard disks).
Error messages When this unit cannot operate normally, an error code appears on the display. Check the table below and take the measures indicated. If an error code not shown on the table below is displayed, or if the same error code is displayed again after taking the indicated action, contact your store of purchase or a nearby Pioneer service station. Error code Error type Description of error Cause and action E-7201 CANNOT READ DISC TOC data cannot be read.
Cautions on use About condensation Water droplets (condensation) may form inside the unit (on operating parts and lenses) in the winter, for example, if the unit is moved from a cold place into a warm room or if the temperature in the room in which the unit is installed rises suddenly (through heating, etc.). The unit will not operate properly and will not be playable with condensation inside.
About trademarks and registered trademarks ! ! ! ! ! ! Pioneer and rekordbox are trademarks or registered trademarks of the PIONEER CORPORATION. Microsoft®, Windows Vista®, Windows® and Internet Explorer® are either registered trademarks or trademarks of Microsoft Corporation in the United States and/or other countries. Pentium is a registered trademark of Intel Corporation.