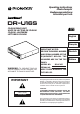
Operating instructions Mode d'emploi Bedienungsanleitung Istruzioni per l'uso DR-U16S CD-ROM DRIVE UNIT UNITE DE LECTEUR DE CD-ROM CD-ROM –LAUFWERK LETTORE DI CD-ROM English Français IMPORTANT NOTICE: CD -R OM D RI VE PH ON RECORD THE MODEL NUMBER ES Deutsch AND SERIAL NUMBER OF THIS BU SY EQUIPMENT BELOW. THE NUMBERS ARE ON THE TOP Italiano PANEL. MODEL NO. DR-U16S WARNING : TO PREVENT FIRE OR SERIAL NO. SHOCK HAZARD, DO NOT EXPOSE THIS APPLIANCE TO RAIN OR MOISTURE.
This product complies with the EMC Directives (89/336/EEC, 92/31/EEC) and CE Marking Directive (93/68/EEC). Ce produit est conforme aux directives relatives à la compatibilité électromagnétique (89/336/CEE, 92/31/CEE) et à la directive CE relative aux marquages (93/68/CEE). Dieses Produkt entspricht den EMV-Richtlinien (89/336/EEC, 92/31/EEC) und CE-Markierungsrichtlinien (93/68/EEC). Questo prodotto è conforme alle direttive EMC (89/336/CEE, 92/31/CEE) e alla direttiva sul marchio CE (93/68/CEE).
SAFETY INSTRUCTIONS To ensure your personal safety and to maximize the full operating potential of your Drive, read and follow these safety precautions: ENVIRONMENT - Please do not use the unit at places with much dust, high temperature, or high humidity. Please use the unit at a place where it is not subjected to vibrations or shocks. POWER - Power-off your system and attached hardware devices before installation. READ INSTRUCTIONS - Read all safety and operating instructions before the Drive is operated.
SAFETY INSTRUCTIONS RADIO SIGNAL INTERFERENCE - This equipment has been tested and found to comply with the limits for a Class B digital device, pursuant to Part 15 of the FCC Rules. These limits are designed to provide reasonable protection against harmful interference in a residential installation. This equipment generates, uses, and can radiate radio frequency energy and, if not installed and used in accordance with the instructions, may cause harmful interference to radio communications.
HOW TO USE THIS MANUAL The following conventions are used throughout the manual: Bold Type Bold lettering is used to emphasize the importance of a statement being made. Italics Italics are used when indicating a reference to another section in the manual and to emphasize a point. A triangle with an exclamation point is used as a Warning symbol. Warning bring attention to instructions that must be followed exactly.
TABLE OF CONTENTS INTRODUCTION ....................................................................................................................................... 7 FEATURES……. ........................................................................................................................................ 7 SYSTEM REQUIREMENTS ....................................................................................................................... 8 OPERATING SYSTEM COMPATIBILTY ....................
INTRODUCTION Congratulations, you have purchased the most advanced CD-ROM drive in the world. This is a CD-ROM drive with built-in SCSI-2 specifications, and it must be used with a SCSI host adapter. This Manual was written to guide you through a simple and straight forward installation and operation of the product. For best results, we recommend that you review this manual before installing your CD-ROM Drive.
SYSTEM REQUIREMENTS OPERATING SYSTEM COMPATIBILITY The Drive is bundled with software drivers for MS-DOS/Windows systems, however, drivers for many other systems are also available. BASIC SYSTEM REQUIREMENTS: IBM PC/XT/AT/386 SYSTEMS 640 KB RAM 516 KB of Available Disk Space DOS Version 3.1 or higher SCSI Interface Card if your system dose not have one. Empty slot for drive expansion One Expansion Slot if a SCSI Interface Card is needed.
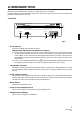
A HARDWARE TOUR Illustrations are provided in this chapter as a visual introduction to the Drive. Please Familiarize yourself with these illustrations and refer to them when necessary to complete the installation and operation of the unit. Front View CD-ROM DRIVE 1 PHONES 6 BUSY 5 4 3 2 Fig.1 1 Disc loading slot Insert the CD-ROM with the label facing up. PRECAUTIONS ON PLAYING CD SINGLES (8 cm Discs): ¶ When playing CD singles (8 cm discs), always use the adapter for 8 cm discs.
A HARDWARE TOUR Rear View The display is on the top panel. 4 1 4 8 1 3 49 50 1 2 2 DC INPUT +5 G G +12 1 Fig.2 1 DC Input This is the input for DC +5 V and +12 V. Connect the computer power supply. 2 SCSI interface This is a 50-pin I/O connector according to the SCSI-2 specifications. Use a flat ribbon SCSI connector to connect to the SCSI host adapter. 3 Function switch Use the accessory short-circuit sockets to set the SCSI ID number and the drive function.
INSTALLATION HARDWARE SETUP OVERVIEW This chapter describes the steps required to connect your Pioneer Drive to your PC. Prior to installation, there are a few things you should know about this product. ♦ First, the Drive is a SCSI device. What is a SCSI device? SCSI is an acronym for Small Computer System Interface.
INSTALLATION SETTING THE SCSI ID SCSI devices are identified by a SCSI ID number from 0 through 7 with ID number 7 typically reserved for the SCSI interface card. The basic rule for assigning a SCSI ID number requires that: Each SCSI device have a unique ID number (address) on the SCSI bus. If two SCSI devices are assigned the same ID number, your computer will not operate properly.
INSTALLATION SCSI TERMINATION SCSI termination is a technique used to absorb line reflections at the beginning and end of a SCSI daisy chain that would otherwise interfere with legitimate SCSI signals and cause errors. To minimize interference with data transfer, SCSI termination is absolutely required for proper operation of your Drive. WHEN TERMINATION IS REQUIRED If you are installing the Drive as the only SCSI device or as the last SCSI device in the chain, termination must be enabled.
INSTALLATION SWITCH SETTING TABLE The display is on the top panel. 2048/512 Switch 4 - Reserved TERMINATION (SHORT – OFF) DISABLE EJECT RESERVED RESERVED SCSI ID 2 1 0 MUST BE SET TO OFF (OPEN) Switch 5: SCSI Terminator The built-in switch which enables or disables SCSI Switch # termination. 8 7 6 5 4 3 2 1 Short = SCSI Termination OFF : SCSI termination disabled (factory default setting). Open = SCSI Termination ON: SCSI termination enabled.
TO INSTALL THE DRIVE CD -RO M DR IVE PH ON ES BU SY Fig.3 ÷ Switch off the power of the personal computer and remove the cover or the front panel. ÷ Remove the blank panel installed at the front of the 5.25 inch slot. Installation is not possible when there is no empty slot. ÷ Install the fixation slide rails on the drive. (If slide rails are required, contact the shop where you bought the computer or the computer manufacturer.) ÷ Insert the drive into the slot.
CONNECTING THE DRIVE IN THE MIDDLE OF A SCSI CHAIN Sound Board DR - U16S Audio Cable SCSI HOST Adapter Pin 1 Pin 1 SCSI hard disk SCSI Interface Cable Into an expansion slot of the personal computer To the power supply of the personal computer Fig.4 When a SCSI hard disk or other SCSI equipment also is installed in the computer, please connect according to the following method. ¶ Switch off the power supply of the personal computer.
CONNECTING THE DRIVE AS THE ONLY SCSI DEVICE Sound Board Audio Cable SCSI HOST Adapter Pin 1 SCSI Interface Cable Into an expansion slot of the personal computer Power Cable To the power supply of the personal computer Fig.5 When no SCSI hard disk or other SCSI equipment is used, connect according to the following connection method. ¶ Switch off the power supply of the personal computer. ¶ Set the SCSI ID number. ¶ Set the termination ON. ¶ Connect the power supply cable from the personal computer.
DISC OPERATION DISC SETTING METHOD ¶ Disc setting Insert the disc into the disc loading slot with the label facing up. When using 8 cm discs, attach a CD adapter (available at stores) to the disc, and insert the disc into the disc loading slot. 8 cm disc CD adapter Fig.6 Do not insert 8 cm discs by themselves. When using a CD adapter, attach it properly to the disc, and check that it does not come off to prevent damage to the disc and adapter.
DISC OPERATION DISC REMOVAL METHOD ¶ Confirm that the BUSY indicator of the drive is not lit, and then press the Eject button (0). ¶ Remove the disc after it has been ejected. Do not place anything within 12 cm in front of the unit as this may obstruct the disc ejection operation of the unit. CD-ROM DISC INFORMATION/FORMATS SUPPORTED ¶ High Sierra, CD-ROM XA, (Mode 2, Form 1 and 2), Rock Ridge and, CD-DA audio Discs. MEDIA DIAMETER ¶ 120 mm/12 cm/4.72" disc and 80 mm/8 cm/3.
DISC OPERATION DO NOT use non-standard discs, as these may adversely influence this unit and other equipment. DO NOT play a CD having other shape than a circular disc, such as heart shaped disc. Otherwise malfunction may occur. USING THE AUDIO FEATURES This unit has a function for playback of audio discs by itself. This is a function for audio playback without using computer software. ¶ Set an audio disc into the drive.
TROUBLESHOOTING Incorrect operations are often mistaken for trouble and malfunctions. If you think that there is something wrong with this unit, check the points below according to the symptom.
TROUBLESHOOTING Disc cannot be ejected: ¶ Has the Function Switch for the eject button been pushed to the ON disabled position ? Function Switch #7. If yes, move the switch to the OFF position. PLACEMENT, CARE, AND CLEANING CLEANING DISCS ¶ Fingerprints or smudges on the surface of the disc will not directly affect the recorded signals. However, data might not be read properly because of reduced brightness of the light reflected from the data surfaces.
SPECIFICATIONS [General functions] Disc diameter Transfer rate Sustained 12 cm ( 4.72 in ), 8 cm (3.15 in ) 2,100 – 5,400 kBytes/sec* * The data transfer rate may not be output for some disc conditions (scratches, etc.). Seek time Random (average) 60 ms Access time Random (average) Data buffer capacity 70 ms 128 kBytes [Audio output part] Line 0.7 Vrms ± 0.
La production de bruits acoustiques est inférieure à 70 dB. (ISO7779/DIN45635) ATTENTION Ce produit renferme une diode à laser d’une catégorie supérieure à 1. Pour garantir une sécurité constante, ne pas retirer les couvercles ni essayer d’accéder à l’intérieur de l’appareil. Pour toute réparation, s’adresser à un personnel qualifié. L’étiquette d’avertissement suivante apparaît sur votre appareil.
INSTRUCTIONS DE SECURITE Pour garantir votre sécurité personnelle et obtenir le maximum de votre lecteur, lire et suivre ces consignes de sécurité: ENVIRONNEMENT - Ne pas utiliser cet appareil dans des endroits avec beaucoup de poussière, une température ou une humidité élevée. Utiliser l’appareil à un endroit où il n’est pas soumis à des vibrations ou des chocs. PUISSANCE - Couper l’alimentation du système et des dispositifs joints avant l’installation.
COMMENT UTILISER CE MANUEL Les conventions suivantes sont utilisées tout au long du manuel: Type gras Les lettres grasses sont utilisées pour souligner l’importance d’une affirmation faite. Italiques Les caractères italiques sont utilisés pour indiquer une référence à un autre chapitre dans le manuel et souligner un point. Un triangle avec un point d’exclamation est utilisé comme symbole d’avertissement. L’avertissement suscite l’attention aux instructions qui doivent être suivies de manière exacte.
TOUR DU MATERIEL Des illustrations sont fournies dans ce chapitre comme introduction visuelle au lecteur. Nous vous prions de vous familiariser avec ces illustrations et de vous y reporter en cas de nécessité pour compléter l’installation et l’opération de l’appareil. Vue avant CD-ROM DRIVE 1 PHONES 6 BUSY 5 4 3 2 Fig.1 1 Chargeur de disque Insérez le CD-ROM l’étiquette vers le haut.
TOUR DU MATERIEL Vue arrière L’affichage est sur le panneau supérieur. 4 1 4 8 1 3 49 50 1 2 2 DC INPUT +5 G G +12 1 Fig.2 1 Entrée CC Cette entrée est l’entrée de +5 V et +12 V CC. Connecter l’alimentation de l’ordinateur. 2 Interface SCSI Cette interface est un connecteur E/S 50 broches selon les spécifications SCSI-2. Utiliser un connecteur SCSI à ruban plat pour connecter l’adaptateur hôte SCSI.
INSTALLATION TABLEAU DE REGLAGE DES COMMUTATEURS 2048/512 TERMINATION (SHORT – OFF) DISABLE EJECT L’affichage est sur le panneau supérieur. RESERVED RESERVED SCSI ID 2 1 0 Commutateur 1 - 3: ID SCSI L’ID SCSI est réglée avec un commutateur binaire à 3 bits. Le réglage d’usine est ID 2.
POUR INSTALLER LE LECTEUR CD -RO M DR IVE PH ON ES BU SY Fig.3 ÷ Couper l’alimentation de l’ordinateur personnel, et déposer le couvercle du panneau avant. ÷ Déposer le panneau vierge installé à l’avant de la fente de 5,25 pouces. L’installation n’est pas possible s’il n’y a pas de fente vide. ÷ Installer les rails coulissants de fixation sur le lecteur. (Si des rails coulissants sont nécessaires, contacter le magasin où a été acheté l’ordinateur ou le fabricant d’ordinateur.
CONNEXION DU LECTEUR AU MILIEU D’UNE CHAINE SCSI Plaque sonore DR - U16S Câble audio Adaptateur hôte SCSI Broche 1 Broche 1 Câble d'interface SCSI Disque dur SCSI Vers l'alimentation de l'ordinateur personnel Dans une fente d'extension de l'ordinateur personnel Fig.4 Lorsqu’un disque dur SCSI ou un autre équipement SCSI est également installé dans l’ordinateur, connecter en fonction de la méthode suivante. ¶ Couper l’alimentation de l’ordinateur personnel.
CONNEXION DU LECTEUR COMME UNIQUE DISPOSITIF SCSI Plaque sonore Câble audio Adaptateur hôte SCSI Broche 1 Câble d'interface SCSI Vers l'alimentation de l'ordinateur personnel Câble d'alimentation Dans une fente d'extension de l'ordinateur personnel Fig.5 Lorsqu’aucun disque dur SCSI ni autre équipement SCSI n’est utilisé, connecter en fonction de la méthode de connexion suivante. ¶ Couper l’alimentation de l’ordinateur personnel. ¶ Régler le numéro ID SCSI. ¶ Mettre la terminaison ON.
OPERATION DES DISQUES METHODE DE MISE EN PLACE DES DISQUES ¶ Mise en place des disques Insérez le disque dans le chargeur avec l’étiquette vers le haut. En utilisant des disques de 8 cm, montez un adaptateur CD (disponible dans le commerce) sur le disque, puis insérez le disque dans le chargeur de disque. Disque 8 cm adaptateur pour CD Fig.6 N’insérez pas de disque 8 cm sans adaptateur.
OPERATION DES DISQUES METHODE DE RETRAIT DES DISQUES ¶ Confirmer que le témoin BUSY du lecteur n’est pas allumé, puis appuyer sur la touche d’éjection/ arrêt. ¶ Retirez le disque après son éjection. Ne placez aucun objet à une distance inférieure à 12 cm devant la partie frontale de l’unité, cela risquerait de gêner la fonction d’éjection des disques de l’unité. INFORMATIONS SUR LES DISQUES CD-ROM/FORMATS ACCEPTES ¶ High Sierra, CD-ROM XA (Mode 2, forme 1 et 2), Rock Ridge et disques audio CD-DA.
OPERATION DES DISQUES NE PAS utiliser de disques non standard, car ils peuvent avoir une mauvaise influence sur cet appareil et d'autres équipements. Sous peine de provoquer des défaillances, ne reproduisez pas de CD ayant une forme autre que circulaire, telle que des disques en forme de coeur. UTILISATION DES CARACTERISTIQUES AUDIO Cet appareil comprend une fonction de lecture de disques audio en lui-même. C’est une fonction de lecture audio sans utilisation de logiciel informatique.
GUIDE DE DEPANNAGE Des erreurs de manipulation sont souvent prises pour une défaillance ou un mauvais fonctionnement. Si vous pensez qu’il y a quelque chose de défectueux dans cet appareil, prière de vérifier les points cidessous en fonction du symptôme.
GUIDE DE DEPANNAGE Si la musique ne peut pas être reproduite: ¶ Etes-vous sûr qu’un CD audio est utilisé ? ¶ L’amplificateur audio, les haut-parleurs ou le casque d’écoute sont-ils connectés ? ¶ Utilisez-vous un CD-DA audio ? Certains formats audio nécessitent une plaque sonore audio dans l’ordinateur pour décoder le CDDA audio digital.
FICHE TECHNIQUE [Généralités] Diamètre du disque 12 cm, 8 cm Vitesse de transmission Continu 2.100 à 5.400 KO/s* * Il se peut que le taux de transfert de données ne soit pas affiché à cause de l’état du disque (rayures, etc.).
Das Geräuschaufkommen beträgt weniger als 70 dB. (ISO 7779/DIN 45635) VORSICHT Dieses Gerät enthält eine Laserdiode mit einer höheren Klasse als 1. Um einen stets sicheren Betrieb zu gewährleisten, weder irgendwelche Abdeckungen entfernen, noch versuchen, sich zum Geräteinneren Zugang zu verschaffen. Alle Wartungsarbeiten sollten qualifiziertem Kundendienstpersonal überlassen werden. Das nachstehende Hinweisschild befindet sich am Gerät. Anbringstelle: auf der Deckeloberseite.
SICHERHEITSANWEISUNGEN Um Ihre eigene Sicherheit sicherzustellen, und um die volle Funktion Ihres CD-ROM-Laufwerks zu maximieren, lesen Sie diese Sicherheitsvorschriften bitte sorgfältig durch: BETRIEBSBEDINGUNGEN - Betreiben Sie das Gerät nicht an Orten, wo starkes Staubaufkommen, hohe Temperaturen und hohe Luftfeuchtigkeiten vorherrschen. Wählen Sie einen Ort, wo keine Vibrationen bzw. starke Erschütterungen auf das Gerät einwirken können.
VERWENDUNG DIESER BEDIENUNGSANLEITUNG In dieser Bedienungsanleitung werden die folgenden Kennzeichnungen verwendet: Fettdruck Wichtige Informationen werden durch Fettdruck hervorgehoben. Kursivdruck Für Bezugnahme auf andere Abschnitte in der Bedienungsanleitung sowie zur Hervorhebung von wichtigen Informationen wird Kursivdruck verwendet. Das Dreieck mit Ausrufungszeichen ist ein Warnsymbol. Die Anweisungen, die mit diesem Symbol gekennzeichnet sind, müssen exakt befolgt werden.
BESCHREIBUNG DER HARDWARE In diesem Abschnitt wird das Laufwerk vorgestellt. Bitte verwenden Sie die Abbildungen und die zugehörigen Erläuterungen, um sich mit dem Gerät vertraut zu machen, damit Sie es richtig installieren und bedienen können. Vorderansicht CD-ROM DRIVE 1 PHONES 6 BUSY 5 4 3 2 Abb.1 1 Disk-Schlitz Die CD-ROM mit der Beschriftung nach oben einführen.
BESCHREIBUNG DER HARDWARE Rückansicht Das Bedienfeld befindet sich auf der Oberseite. 4 1 4 8 1 3 49 50 1 2 2 DC INPUT +5 G G +12 1 Abb.2 1 Gleichstromeingang Über diesen Anschluß werden Gleichstrom +5 V und +12 V zugeführt. Schließen Sie das Spannungskabel vom Computer hier an. 2 SCSI-Schnittstelle Dieser 50polige E/A-Anschluß entspricht der SCSI-2-Spezifikation. Verwenden Sie einen FlachkabelSCSI-Stecker für die Verbindung zum SCSI-Computeradapter.
INSTALLATION TABELLE FÜR SCHALTEREINSTELLUNG 2048/512 TERMINATION (SHORT – OFF) DISABLE EJECT Das Bedienfeld befindet sich auf der Oberseite. RESERVED RESERVED SCSI ID 2 1 0 Schalter 1 - 3: SCSI-ID Die SCSI-ID wird mit einem 3stelligen Binärschalter eingestellt. Die Werkseinstellung ist ID-Nr. 2.
INSTALLATION DES LAUFWERKS CD -RO M DR IVE PH ON ES BU SY Abb.3 ÷ Schalten Sie die Spannungsversorgung des Personal-Computers aus und nehmen Sie die Abdeckung oder die Frontplatte ab. ÷ Entfernen Sie die Blende von einem leeren 5,25-Zoll-Laufwerkschacht. Die Installation ist nur möglich, wenn ein freier Laufwerkschacht vorhanden ist. ÷ Befestigen Sie die Klemmschiebeschienen an das Laufwerk.
ANSCHLUSS DES LAUFWERKS IN DER MITTE EINER SCSI-KETTE Soundboard DR - U16S Audiokabel SCSI-Computeradapter Stift 1 Stift 1 SCSI-Festplatte SCSISchnittstellenkabel zum Netzteil des Computers in einen Steckplatz des Computers Abb.4 Wenn bereits eine SCSI-Festplatte oder ein anderes SCSI-Gerät im Computer installiert ist, nehmen Sie den Anschluß gemäß dem nachstehenden Verfahren vor. ¶ Schalten Sie die Spannungsversorgung des Computers aus.
ANSCHLUSS DES LAUFWERKS ALS EINZIGES SCSI-GERÄT Soundboard Audiokabel SCSI-Computeradapter Stift 1 Spannungskabel SCSI-Schnittstellenkabel zum Netzteil des Computers in einen Steckplatz des Computers Abb.5 Wenn keine SCSI-Festplatte und kein anderes SCSI-Gerät im Computer installiert ist, nehmen Sie den Anschluß gemäß dem nachstehenden Verfahren vor. ¶ Schalten Sie die Spannungsversorgung des Computers aus. ¶ Stellen Sie die SCSI-ID-Nummer ein. ¶ Deaktivieren Sie den Abschlußschalter (ON).
VERWENDUNG LADEN EINER CD-ROM ¶ Einlegen der CD-ROM Die Disk mit der Beschriftung nach oben in den Schlitz einführen. Bei der Verwendung von 8 cm-Disks, einen Adapter (im Handel erhältlich) an der Disk befestigen und die Disk in den Schlitz einführen. 8 cm CD CD-Adapter Abb.6 Keine 8 cm-Disks ohne Adapter einführen. Um Schäden an der Disk und am Adapter zu vermeiden, bei der Verwendung eines CD-Adapters darauf achten, daß dieser ordnungsgemäß an der Disk befestigt ist und sich nicht lösen kann.
VERWENDUNG ENTNEHMEN DER CD-ROM ¶ Vergewissern Sie sich, daß die BUSY-Anzeige am Laufwerk nicht leuchtet, und betätigen Sie dann die Auswurf-/Stopptaste. ¶ Die Disk wegnehmen, nachdem sie ausgeworfen worden ist. In einem Abstand von 12 cm vor dem Gerät keine Gegenstände stellen, da diese den Auswurf der Disk durch das Gerät behindern können.
VERWENDUNG Verwenden Sie keine nicht standardisierten Disketten, da diese einen nachteiligen Einfluß auf die Funktion dieses Geräts und anderer Komponenten ausüben können. Keine nicht kreisförmigen CDs (herzförmige, achteckige Discs) abspielen. Anderenfalls kann eine Funktionsstörung auftreten. AUDIO-FUNKTIONEN Dieses Gerät verfügt über eine Funktion zur unabhängigen Wiedergabe von Audio-CDs ohne Verwendung von Computer-Software. ¶ Legen Sie eine Audio-CD in das Laufwerk ein.
BEI STÖRUNGEN Bedienungsfehler werden oft für Probleme oder Fehlfunktionen gehalten. Wenn Sie der Meinung sind, daß das Gerät nicht in Ordnung ist, überprüfen Sie es gemäß den nachstehenden Angaben.
BEI STÖRUNGEN Wenn Musikwiedergabe nicht möglich ist: ¶ Vergewissern Sie sich, daß wirklich eine Audio-CD eingelegt wurde. ¶ Sind ein Audio-Verstärker, aktive Lautsprecher oder ein Kopfhörer angeschlossen? ¶ Verwenden Sie CD-DA Audio? Einige Audio-Formate erfordern, daß eine Audio-Soundkarte zur Decodierung von Digital-AudioCD-DA im Computer vorhanden ist.
TECHNISCHE DATEN [Allgemeine Funktionen] CD-ROM-Durchmesser Datentransferrate Dauerbetrieb 12 cm, 8 cm 2.100 – 5.400 kBytes/s * * Die Datentransferrate kann möglicherweise bei einer Beeinträchtigung der Disc (Kratzer usw.) nicht eingehalten werden. Zugriffszeit Zufallszugriff (durchschn.) 60 ms Zugriffszeit Zufallszugriff (durchschn.
La Produzione di Disturbo Acustico di Fondo è Minore di 70 dB. (ISO7779/DIN45635) PRECAUZIONE Questo prodotto contiene un diodo al laser di classe superiore alla classe 1. Per motivi di sicurezza, non smontare i coperchi e non procedere ad interventi sulle parti interne. Per qualsiasi riparazione rivolgersi a personale qualificato. La seguente etichetta di avvertimento appare sul lettore. Posizione: sul coperchio superiore.
ISTRUZIONI PER LA SICUREZZA Leggere e seguire queste precauzioni per la sicurezza, per garantire la sicurezza personale e per sfruttare al massimo le capacità di funzionamento del Lettore. AMBIENTE - Si raccomanda di non usare l’unità in un luogo con molta polvere, a temperatura elevata o molto umido. Si raccomanda inoltre di utilizzarla in un posto dove non sia soggetta a vibrazioni o colpi violenti. ALIMENTAZIONE - Prima dell’installazione accendere il sistema e i dispositivi hardware collegati.
GUIDA ALL’USO DEL MANUALE In tutto il manuale si utilizzano i seguenti segni convenzionali. Grassetto Il grassetto viene utilizzato per sottolineare l’importanza di quanto si afferma. Corsivo Il corsivo viene utilizzato per fare riferimento ad un altro capitolo del manuale e per sottolineare un aspetto. Un triangolo con un punto esclamativo viene utilizzato come simbolo di “Attenzione” allo scopo di evidenziare istruzioni che si devono seguire attentamente.
UN’ESCURSIONE NELL’HARDWARE Le illustrazioni fornite in questo capitolo sono da intendersi come una descrizione visiva del Lettore. Si prega di comprendere bene queste illustrazioni e far riferimento ad esse quand’è necessario per completare l’installazione e per il funzionamento dell’unità. Vista frontale CD-ROM DRIVE 1 PHONES 6 BUSY 5 4 3 2 Fig.1 1 Fessura per il caricamento del disco Inserire il disco CD-ROM con l’etichetta rivolta in alto.
UN’ESCURSIONE NELL’HARDWARE Vista posteriore Il display si trova sul pannello superiore 4 1 4 8 1 3 49 50 1 2 2 DC INPUT +5 G G +12 1 Fig.2 1 Ingresso CC Ingresso per corrente continua a + 5V e + 12 V. Collegare l’alimentazione elettrica del computer. 2 Interfaccia SCSI Connettore I/O a 50 pin in base alle specifiche SCSI-2. Utilizzare un connettore piatto SCSI.
INSTALLAZIONE TABELLA DI IMPOSTAZIONE DEI COMMUTATORI 2048/512 Il display si trova sul pannello superiore TERMINATION (SHORT – OFF) DISABLE EJECT RESERVED RESERVED SCSI ID 2 1 0 Commutatore 1-3: numero di ID SCSI Imposta il numero di ID SCSI con un commutatore binario a 3 bit. L’impostazione di fabbrica corrisponde al numero di ID n° 2.
INSTALLAZIONE DEL LETTORE CD -RO M DR IVE PH ON ES BU SY Fig.3 ÷ Spegnere il personal computer e rimuovere il coperchio o il pannello anteriore. ÷ Rimuovere il pannello finto installato a copertura dell’alloggiamento di 5,25 pollici. L’installazione non si può eseguire se non c’è un alloggiamento libero. ÷ Installare i binari guida di fissaggio sul lettore. (Se i binari guida sono necessari, contattare il negozio dove è stato comprato il computer o il fabbricante del computer.
COLLEGAMENTO DEL DRIVE ALL’INTERNO DI UNA CATENA SCSI Scheda audio DR - U16S Cavo audio Adattatore SCSI HOST Pin 1 Pin 1 Disco fisso SCSI Cavo di interfaccia SCSI Ad una porta di espansione del personal computer All'alimentazione elettrica del personal computer Fig.4 Se su un computer è installato anche un disco fisso SCSI o un’altra apparecchiatura SCSI effettuare il collegamento nel modo seguente. ¶ Disconnettere l’alimentazione elettrica del personal computer.
COLLEGAMENTO DEL DRIVE COME UNICO DISPOSITIVO SCSI Scheda audio Cavo audio Adattatore SCSI HOST Pin 1 Cavo di interfaccia SCSI Ad una porta di espansione del personal computer Cavo di alimentazione All'alimentazione elettrica del personal computer Fig.5 Se non si utilizzano un disco fisso SCSI o altre apparecchiature SCSI effettuare il collegamento nel modo seguente. ¶ Disconnettere l’alimentazione elettrica del personal computer.
FUNZIONAMENTO DEL DISCO METODO DI INSERIMENTO DEL DISCO ¶ Inserimento del disco Inserire il disco nella fessura di caricamento con l’etichetta rivolta verso l’alto. Se s’impiega un disco da 8 cm. applicare un adattatore CD (reperibile nei negozi) al disco ed inserire il disco nella fessura di caricamento. CD da 8 cm Adattatore per CD Fig.6 Non inserire dischi da 8 cm. da soli.
FUNZIONAMENTO DEL DISCO METODO DI RIMOZIONE DEL DISCO ¶ Assicurarsi che l’indicatore di occupato (BUSY) del lettore non sia acceso, quindi premere il tasto Espulsione/Arresto. ¶ Rimuovere il disco dopo che è stato espulso. Non collocare nulla a meno di 12 cm. di distanza dalla parte frontale dell’unità perché ciò può ostacolare l’operazione di espulsione del disco. INFORMAZIONI SUI CD-ROM / FORMATI SUPPORTATI ¶ High Sierra, CD-ROM XA (modo 2, forma 1 e 2), Rock Ridge e dischi audio CD-DA.
FUNZIONAMENTO DEL DISCO NON usare dischi non standard, potrebbero influenzare avversamente questa unità e le altre apparecchiature. NON riprodurre compact disc di forme diverse da quella circolare convenzionale, quali, ad esempio, dischi a forma di cuore o simili. Questi tipi di dischi possono causare disfunzioni.
RICERCA GUASTI Operazioni scorrette vengono spesso fraintese per guasti o malfunzionamenti. Se pensate che il lettore abbia qualche problema controllate i punti indicati sotto a seconda del sintomo evidenziato. Se il vostro computer non si è acceso correttamente perché la diagnostica iniziale non ha riconosciuto la presenza di un dispositivo SCSI controllare quanto segue.
RICERCA GUASTI Se non si riesce a riprodurre la musica ¶ Siete sicuri che quello che state utilizzando sia un CD audio? ¶ Gli amplificatori audio, le casse o le cuffie sono collegati? ¶ State utilizzando un CD-DA audio? Alcuni formati audio necessitano di una scheda audio nel computer per decodificare i CD-DA audio digitali.
DATI CARATTERISTICI [Funzioni generali] Diametro disco 12 cm, 8 cm Velocità di trasmissione dati Sostenuta 2,100 – 5,400 kBytes/sec* * La velocità di trasferimento dati può non essere raggiunta a causa di particolari condizioni dei dischi (graffi ecc.).
AFTER-SALES SERVICE FOR PIONEER PRODUCTS Please contact the dealer or distributor from where you purchased the product for its after-sales service (including warranty conditions) or any other information. In case the necessary information is not available, please contact the Pioneer’s subsidiaries (regional service headquarters) listed below: PLEASE DO NOT SHIP YOUR PRODUCT TO THE COMPANIES at the addresses listed below for repair without advance contact, for these companies are not repair locations.