DJ controller DDJ-RR http://pioneerdj.com/support/ http://rekordbox.com/ For FAQs and other support information for this product, visit the above site.
Contents How to read this manual ! ! ! ! ! Thank you for buying this Pioneer DJ product. Be sure to read both this manual and the Operating Instructions (Quick Start Guide). Both contain important information that you should understand before using this product. For how to obtain the rekordbox Operating Instructions, see Viewing the Operating Instructions of rekordbox (p.5).
Before start Before start Features This unit is a dedicated controller equipped with interfaces for the intuitive operation of various functions of rekordbox dj.
What’s in the box ! ! ! ! ! ! 1 AC adapter Power cord USB cable Warranty (for some regions)1 Operating Instructions (Quick Start Guide) rekordbox dj license key card 2 The warranty is included for European region only. — For the Japanese region, the corresponding information is provided on the back cover of the “Operating Instructions (Quick Start Guide)”.
Installing rekordbox Minimum operating environment for rekordbox Supported operating systems Mac OS X: 10.11/10.10/10.9 (latest update) Windows: Windows 10/ Windows 8.1/Windows 7 (latest service pack) 32-bit version, 64-bit version CPU and required memory Intel® processor Core™ i3/i5/i7, ® Intel processor Core™ 2 Duo 4 GB or more of RAM Intel® processor Core™ i3/i5/i7, Intel® processor Core™ 2 Duo 4 GB or more of RAM Others USB port A USB 2.0 port is required to connect the computer with this unit.
About the installation procedure 3 Read the terms of the license agreement carefully, and if you agree, select [Agree], then click [Next]. The installation procedure depends on the operating system (OS) on the computer you are using. Do not connect this unit and the computer until installation is completed. ! If any other programs are running on the computer, quit them. Installation procedure (Mac OS X) 1 Unzip the downloaded rekordbox software file.
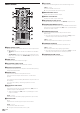
Part names and functions Part names and functions Top panel of unit 1 Browser section 2 Deck section 3 Mixer section 4 Effect section Browser section 3 BACK button 1 2 1 3 4 1 LOAD button Press: The selected tracks are loaded to the respective decks. ! When the [LOAD] button is pressed twice, the tracks loaded in the deck on the opposite side are loaded into the deck on the side that the [LOAD] button was pressed.
Deck section This section is used to control the four decks. The buttons and controls for operating decks 1 and 3 are located on the left side of the controller, those for operating decks 2 and 4 are located on the right side of the controller. Switches the loop saved in the track between active and non-active. (Active Loop) ! If you press the button while pressing the [SHIFT] button during playback, the loop set closest to the playback position among the loops saved in the track will be active.
Recording operation information (sequence) is started if the sampler is operated when the sequencer is on standby for recording. Press the button again to stop recording. [SHIFT] + press: Saves the recorded sequence to the sequencer slot. Starts the sequence playback when the sequence recording is stopped. Overdubs the new sequence onto the sequence being played back while recording a sequence. [SHIFT] + press: Selects the sequencer slot. e HOT CUE mode button Sets the hot cue mode.
8 Crossfader Mixer section Outputs the sound assigned with the crossfader assign switch. [SHIFT] + move: Uses the crossfader start function. = Using the crossfader start function (p.23) 1 1 2 2 3 9 6 d Adjusts the master sound level output. a Master level indicator Displays the master output’s audio level. b b Booth monitor level control c c HEADPHONES MIXING control f 5 3 9 MASTER LEVEL control e Adjusts the audio level output from the [BOOTH] output terminal.
Effect section Jog dial display section 1 1 1 2 1 3 3 3 4 5 1 Effect parameter controls Adjusts the beat FX parameter. Part names and functions The effect units consist of beat FX and release FX. This section is used to control the two effect units (FX1 and FX2). There are controls and buttons for operating FX1 on the left side of the controller and FX2 on the right side of the controller. Furthermore, which channel to apply an effect can be set by the effect assign buttons in rekordbox.
Rear panel 1 2 3 4 5 6 78 5 ! 1 Kensington security slot 9 These are the output terminals for a booth monitor. Compatible with balanced or unbalanced output for 1/4” TRS connectors. The master channel sound can be output from the [BOOTH] output terminals regardless of the audio level set for the master channel. ! The sound will be distorted if the level is raised too high when using unbalanced outputs. ! The booth monitor output is set to output the microphone sound by default.
Connections ! ! ! ! ! ! Do not pull out the AC adapter during operation. If the AC adapter is pulled out, this unit restarts by using USB bus power. Connect this unit and the computer directly using the included USB cable. A USB hub cannot be used. Refer to the operating instructions for the component to be connected. Notes on running this unit with USB bus power ! Function restrictions, such a reduction in the output level and reduction in the LED brightness, may apply depending on the computer used.
Connecting output terminals Rear panel R L Component, amplifier, powered speaker, etc. Power amplifier (for booth monitor), Powered speakers, etc. Power amplifier, powered speakers, etc.
Basic Operation Connections 1 Connect headphones to one of the [PHONES] output terminals. 5 Connect the AC adapter. To power outlet Connect headphones with an impedance of 32 W or higher. Headphones with an impedance less than 32 W are not supported. Power cord (included) Basic Operation AC adapter (included) 2 Connect devices such as powered speakers, a power amplifier, and components to the [MASTER 1] or [MASTER 2] output terminals.
Starting the system Launching rekordbox This manual consists mainly of explanations of functions of this unit as hardware. For detailed instructions on operating rekordbox dj, see the rekordbox software’s manual. When the rekordbox software is started up for the first time, enter the rekordbox dj license key and activate the software. Prepare the rekordbox dj license key included with this unit. ! There is no need for this product’s users to purchase the rekordbox dj license key separately.
Installation procedure (Windows) Do not connect this unit and the computer until installation is completed. ! ! Log on as the user which was set as the computer’s administrator before installing. If any other programs are running on the computer, quit them. Adding music files to [Collection] [Collection] is a screen for displaying a list of the music files managed by rekordbox.
2 Press the [PLAY/PAUSEf] button to play the track. 3 Move the channel fader away from you. 4 Turn the [TRIM] control. Adjust [TRIM] so that the orange indicator on the channel level indicator lights at the peak level. 5 Turn the [MASTER LEVEL] control to adjust the audio level of the speakers. Adjust the sound level output from the [MASTER 1] and [MASTER 2] terminals to an appropriate level. ! Sound is output from the speakers according to your audio environment.
Advanced Operation The descriptions from this point on are for functions that are specific for when this unit and rekordbox dj are used in combination and are not described in the rekordbox Operating Instructions. Using the performance pads Use the pad mode buttons ([HOT CUE] mode button, [PAD FX 1] mode button, [SLICER] mode button and [SAMPLER] mode button) to switch the functions. 2 Press the [LOOP IN] button during playback, and then press the [LOOP OUT] button. Loop playback starts.
2 Press performance pad 8. The pad FX effect that was on up until now turns off and the release FX effect is added. Using the Slicer function The specified range is divided into eight equal sections, and these eight sliced sections are assigned to the respective performance pads. While one of the performance pads is pressed, the sound for the section assigned to that pad is played in a loop. During loop playback of the pad’s sound, normal playback with the original rhythm continues in the background.
Loading the slicer target area in sampler slots 1 Press the [SLICER] mode button while pressing the [SHIFT] button during track playback. The mode switches to the slicer loop mode. ! Alternatively, press the [SLICER] mode button to switch to the slicer mode. page7 4 beats/8 beats/16 beats/8 bars page8 8 beats/16 beats/8 bars/16 bars page9 16 beats/8 bars/16 bars/32 bars For example, when set to “1 beat from 1/8 beat”, the pad’s setting is as shown below.
4 Press the [OVERDUB] button. The sequencer switches to the recording standby state. Using sequence calling 5 Create a performance using the performance pads. Up to eight saved sequences can be called and played directly from a pad. Recording of the sequence begins. ! Only a sampler slot with the PLAY mode of the sampler set to [One Shot] can record a sequence. ! When [QUANTIZE] of the sampler panel is on, the operation timing of the performance pads is quantized and the sequence is recorded.
Slip scratching Manual slip looping 1 Check that VINYL mode is on. 1 Press the [SLIP] button. While pressing the [SHIFT] button, check that the [SLIP] button lights. The mode switches to the slip mode. 2 Press the [SLIP] button. The mode switches to the slip mode. 2 Press the [LOOP IN] button during playback, and then press the [LOOP OUT] button. 3 During playback, operate the top of the jog dial to scratch. Loop playback starts.
Calling out a cue point or loop point stored in a track 1 Load the track whose cue or loop points you want to call out. 2 Press the [HOT CUE] mode button. Switches to hot cue mode. 3 Press the [PARAMETERc] or [PARAMETERd] button. To call out a cue point set before the current playback position, press the [PARAMETERc] button. To call out a cue point set after the current playback position, press the [PARAMETERd] button. The track cues to the called out point and pauses.
Operating beat FX in the single mode 1 Press the [RELEASE FX] control while pressing the [SHIFT] button to switch the FX mode of rekordbox dj to the single mode. The mode switches between the multi mode and single mode each time the buttons are operated. 2 Press the effect parameter 1 button while pressing the [SHIFT] button to select the beat FX type. The selected beat FX is displayed on the rekordbox dj screen. 3 Press the effect parameter 1 button to turn beat FX on.
Using external inputs Mixing the sound of the microphone Two external input systems and one MIC input system are provided to connect to DJ players, analog players, etc. The audio of these devices can be output from this unit via a computer or output from this unit not via a computer. The output method can be switched with the [PC MIX] switch on this unit’s rear panel. 1 Connect the microphone to the [MIC] input terminal.
Changing the settings Launching utilities mode If the utilities mode is launched while the unit and a computer are connected by a USB cable, the set status may not be displayed properly. The “MIDI controller setting” can be set in the utilities mode. The unit automatically changes operation as follows depending on whether rekordbox is running. ! When rekordbox is running, controller operation depends on the rekordbox dj functions.
Cross Fader Cut Lag setting Adjust the play (cut lag) of both ends of the crossfader. Adjustment can be made from 0.3 mm to 5.5 mm in 0.1 mm increments. ! By default, the level is set to 1.0 mm. Output setting of microphone to Booth monitor Change whether or not to output microphone sound to the booth output. If the [Mic Output On Booth] check box is cleared, microphone sound is output to the booth output. If it is selected, microphone sound is not output to the booth output.
About the driver software and setting utility software This unit functions as an audio device conforming to the ASIO standards. Using the settings utility software This function can only be used by those using a Windows operating system. Launching the settings utility software For Windows 10/8.1 From [Apps view], click [Pioneer] > [DDJ_RR ASIO Settings Utility].
Additional information Troubleshooting ! ! If you think that there is something wrong with this unit, check the items below and access the Pioneer DJ site and check [FAQ] for the [DDJ-RR]. http://www.pioneerdj.com/ Sometimes the problem may lie in another component. Inspect the other components and electrical appliances being used. If the problem cannot be rectified, ask your nearest Pioneer authorized service center or your dealer to carry out repair work.
Problem Check Remedy The indicator flashes and operation is strange. — Normal operation can be restored by disconnecting the AC adapter, waiting at least 1 minute, then reconnecting the AC adapter. If the same symptom persists, disconnect the AC adapter, then request repairs. Operation of rekordbox dj becomes unstable. Are you using softwares other than rekordbox at the same time? Quit other applications to decrease the load on the computer.
Using as a controller for other DJ software This unit also outputs the operating data for the buttons and controls in MIDI format. If you connect a computer with a built-in MIDI-compatible DJ software via a USB cable, you can operate the DJ software on this unit. The sound of music files being played on the computer can also be output from the DDJ-RR. To use as a controller for operating DJ software other than the rekordbox software, also configure the DJ software audio and MIDI-related settings.
Documentation, and any derivative works thereof. You do not acquire any other rights, express or implied, beyond the limited license set forth in this Agreement. 4 No Support. Pioneer DJ has no obligation to provide support, maintenance, upgrades, modifications or new releases for the Program or Documentation under this Agreement. 3 WARRANTY DISCLAIMER THE PROGRAM AND DOCUMENTATION ARE PROVIDED “AS IS” WITHOUT ANY REPRESENTATIONS OR WARRANTIES, AND YOU AGREE TO USE THEM AT YOUR SOLE RISK.
About trademarks and registered trademarks ! "Pioneer DJ" is a trademark of PIONEER CORPORATION, and is used under license. ! rekordbox is a trademark or registered trademark of the Pioneer DJ Corporation. ! Windows is a registered trademark of Microsoft Corporation in the United States and other countries. ! Adobe and Reader are either registered trademarks or trademarks of Adobe Systems Incorporated in the United States and/or other countries. ! Mac, Mac OS, and Finder are trademarks of Apple Inc.