DJ Controller DDJ-SX http://pioneerdj.com/support/ The Pioneer DJ support site shown above offers FAQs, information on software and various other types of information and services to allow you to use your product in greater comfort. http://serato.com/ For the latest version of the Serato DJ software, access Serato.com and download the software from there.
For US customer only FEDERAL COMMUNICATIONS COMMISSION DECLARATION OF CONFORMITY This device complies with part 15 of the FCC Rules. Operation is subject to the following two conditions: (1) This device may not cause harmful interference, and (2) this device must accept any interference received, including interference that may cause undesired operation. Product Name: DJ Controller Model Number: DDJ-SX Responsible Party Name: PIONEER ELECTRONICS (USA) INC. SERVICE SUPPORT DIVISION Address: 1925 E.
Contents How to read this manual ! ! ! ! Thank you for buying this Pioneer product. Be sure to read both this leaflet and Read Before Use (Important)/ Quick Start Guide! Both documents include important information that you must understand before using this product. For instructions on obtaining the Serato DJ software’s manual, see Acquiring the manual (p.31). In this manual, names of screens and menus displayed on the product and on the computer screen, as well as names of buttons and terminals, etc.
Before start Features Flexible Connectivity This unit is an all-in-one DJ system combining a Pioneer DJ device with high operability and an excellent reputation among professional DJs with Serato DJ, a DJ software program by Serato. This unit is equipped with an control interface optimized for operating Serato DJ. The interface controls are positioned on a large body with room to spare, so the various functions of Serato DJ can be operated intuitively and accurately.
! ! ! ! ! ! 1 CD-ROM (Installation Disc) AC adapter Power plug1 USB cable Warranty (for some regions only)2 Read Before Use (Important)/Quick Start Guide The number of power plugs included differs depending on the region. 2 Japanese and European models only. (For North American models, warranty information is provided at the end of the “Read Before Use (Important)/Quick Start Guide” booklet.
Mounting the power plug Slide the power plug along the guide rails in the AC adapter unit as shown on the diagram below, then press in until a click is heard. About the Serato DJ software Serato DJ is a DJ software application by Serato. DJ performances are possible by connecting the computer on which this software is installed to this unit. Minimum operating environment Supported operating systems CPU and required memory ® Mac OS X: 10.6.8, 10.7.4 and 10.
! 12 Read the terms of the license agreement carefully, and if you agree, select [I agree to the license terms and conditions], then click [Install]. To close the CD-ROM menu, click [Exit]. 3 Proceed with installation according to the instructions on the screen. Before start 2 When the CD-ROM menu appears, select [Install Driver Software (Pioneer_DDJ_SX_Driver_x.xxx.exe)], then click [Start].
! ! — Following the instructions on the screen, input your e-mail address and the password you want to set, then select the region in which you live. — If you check [E-mail me Serato newsletters], newsletters providing the latest information on Serato products will be sent from Serato. — Once user account registration is completed, you will receive an e-mail at the e-mail address you have input. Check the contents of the e-mail sent from “Serato.com”.
Connections and part names ! ! ! ! Wait until all connections between devices have been completed before connecting the AC adapter. Be sure to turn off the power and unplug the AC adapter from the power outlet before making or changing connections between devices. ! ! Refer to the operating instructions for the component to be connected. Only use the AC adapter included with this unit. Power is supplied to this unit by the AC adapter.
Front panel 1 2 3 4 1 PHONES jacks 4 3 5 6 4 INPUT SELECT switch Connect headphones here. Both stereo phone plugs (Ø 6.3 mm) and stereo mini phone plugs (Ø 3.5 mm) can be used. ! There are two input jacks, both a stereo phones jack and a mini phones jack, but do not use both simultaneously. If both are used simultaneously, when one is disconnected and/or connected, the volume of the other may increase or decrease suddenly.
Connecting output terminals Part names and functions Rear panel Connections and part names R L 1 Browser section 2 Deck section Components, amplifiers, powered speakers, etc. Power amplifier, powered speaker, etc. 3 Mixer section Power amplifier (for booth monitor), powered speaker, etc. 4 Effect section Browser section Front panel 1 1 2 3 1 1 4 1 LOAD button Headphones Cord hook Hook the AC adapter’s power cord in the top of the cord hook, the USB cable in the bottom.
3 BACK button Press: The cursor moves between the [CRATES] panel and library each time the button is pressed. The cursor on the [Files] panel moves to a higher layer. The cursor on the [Browse] panel moves to the previous category. [SHIFT] + press: Switches the Serato DJ layout. 4 LOAD PREPARE (AREA) button Press: Loads tracks to the [Prepare] panel. [SHIFT] + press: The panel display switches each time the button is pressed. Panel display off l Files l Browse l PREPARE l History l Panel display off.
b LOOP OUT button Press: The loop out point is set, and loop playback begins. When this button is pressed during loop playback, the loop out point can be fine-adjusted using the jog dial. [SHIFT] + press: Cancels loop playback. (Loop Exit) After loop playback is canceled, playback returns to the previously set loop in point and loop playback resumes. (Reloop) c HOT CUE mode button Press: Sets the hot cue mode. [SHIFT] + press: This will be used with future function enhancements of the Serato DJ software.
r CENSOR button 5 Channel Level Indicator Press: The track is played in the reverse direction while the [CENSOR] button is pressed, and normal playback resumes when the button is released. ! Even during playback in the reverse direction, normal playback continues in the background. When the button is released, playback resumes from the point reached in the background. [SHIFT] + press: The track is played in the reverse direction.
f HEADPHONES MIXING control Adjusts the balance of the monitor volume between the sound of the channels for which the headphones [CUE] button is pressed and the sound of the master channel. Connections and part names g MASTER CUE button Turns monitoring of the master output’s sound on and off. h SAMPLER VOLUME fader Adjusts the sampler’s overall sound level. Effect section This section is used to control the two effect units (FX1 and FX2).
Basic Operation 3 Connect this unit to your computer via a USB cable. Connections 1 Connect headphones to one of the [PHONES] terminals. 4 Turn on the computer’s power. 5 Connect the power plug to the AC adapter. 2 Connect powered speakers, a power amplifier, components, etc., to the [MASTER OUT 1] or [MASTER OUT 2] terminals. R Slide the power plug into the AC adapter’s guide rails as shown on the diagram and press in until a click is heard.
6 Connect the AC adapter. To power outlet AC adapter (included) Basic Operation 7 Press the [STANDBY/ON] switch on this unit’s rear panel to turn this unit’s power on. Turn on the power of this unit. ! For Windows users The message [Installing device driver software] may appear when this unit is first connected to the computer or when it is connected to a different USB port on the computer. Wait a while until the message [Your devices are ready for use] appears.
Starting the system Launching Serato DJ For Windows From the Windows [Start] menu, click the [Serato DJ] icon under [All Programs] > [Serato] > [Serato DJ]. For Mac OS X In Finder, open the [Applications] folder, then click the [Serato DJ] icon.
Importing tracks The following describes the typical procedure for importing tracks. ! There are various ways to import tracks with the Serato DJ software. For details, see the Serato DJ software manual. ! If you are already using Serato DJ software (Scratch Live, ITCH or Serato DJ Intro) and have already created track libraries, the track libraries you have previously created can be used as such. Basic Operation 1 Click the [Files] key on the Serato DJ software screen to open the [Files] panel.
2 Press the rotary selector, move the cursor to the library on the computer’s screen, then turn the rotary selector and select the track. a b a b Library Crates panel 3 Press the [LOAD] button to load the selected track onto the deck. Playing tracks and outputting the sound The following describes the procedure for outputting the channel 1 sound as an example. ! Set the volume of the devices (power amplifier, powered speakers, etc.
2 Press the [f] button to play the track. Basic Operation 3 Move the channel fader away from you. 4 Turn the [TRIM] control. Adjust [TRIM] so that the orange indicator on the channel level indicator lights at the peak level. 5 Turn the [MASTER LEVEL] control to adjust the audio level of the speakers. Adjust the sound level output from the [MASTER OUT 1] and [MASTER OUT 2] terminals to an appropriate level. Monitoring sound with headphones Set the positions of the controls, etc., as shown below.
Advanced Operation The descriptions from this point on are for functions not described in the Serato DJ software manual that are specifically for when this unit and Serato DJ are used in combination. For example, with the “8 beats from 1/16” setting, the pads’ settings are as shown below. 1/16 beat 1/8 beat 1/4 beat 1/2 beat 1 beat 2 beats 4 beats 8 beats Using the performance pads The performance pads are used to control the hot cue, loop roll, slicer and sampler functions.
The domain can be set to one of six settings: 2 beats, 4 beats, 8 beats, 16 beats, 32 beats or 64 beats. The eight equal sections into which the range specified with the domain setting have been sliced are assigned to the respective performance pads as shown below. Using the sampler function Tracks loaded in the sampler slots of the sampler (SP-6) can be played with the performance pads. 1 Press the [PANEL SELECT] button to open the [SP-6] panel on the computer’s screen.
2 Set the hot cue. ! To cancel the slip mode, press the [SLIP] button again. Press a performance pad to set the hot cue. 3 Press the [SLIP] button. The mode switches to the slip mode. 4 During playback, press and hold a performance pad. Playback starts from the position at which the hot cue was set. Playback continues as long as the performance pad is pressed. Normal playback continues in the background while the hot cue is playing. 5 Release your finger from the performance pad.
Functions that can be controlled in the dual deck mode The functions below can be controlled on the two decks simultaneously in the dual deck mode. ! ! It is also possible to change the setting in the utility settings so that the sync mode is set simultaneously when playback is started with the channel fader start function. When the channel fader is moved from the back to the position nearest you while pressing the [SHIFT] button when standing by at a cue, track playback starts from the set cue.
5 Press the [STANDBY/ON] switch on this unit’s rear panel to set this unit’s power to standby. To save the settings, set the [STANDBY/ON] switch on this unit’s rear panel to standby and quit the utility settings mode. Changing the settings Using DJ software other than Serato DJ To use this unit as a controller for operating DJ software other than Serato DJ, change this setting. ! By default, the unit is set to use Serato DJ.
Enabling the sampler velocity mode’s after touch setting Pattern 3 Advanced Operation When the sampler velocity mode is turned on for this unit’s performance pads, the after touch setting can be turned on and off. After touch setting disabled: The sampler volume changes according to the strength with which the performance pad is initially pressed, but does not keep changing while the pad is held after it is initially pressed.
4 Operate the [TRIM] control and the channel faders to adjust the audio level output from the respective decks. Mixer section ! 1 2 1 a 3 3 b 2 3 2 3 d 3 Set the [INPUT SELECT] switch to [CD] or [LINE]. 7 8 4 Operate the [TRIM] control and the channel faders to adjust the audio level output from the respective decks. ! 6 8 7 9 2 3 3 = Starting the system (p.18) 3 Set the [INPUT SELECT] switch to [PHONO].
Additional information Troubleshooting ! ! Incorrect operation is often mistaken for trouble or malfunction. If you think that there is something wrong with this component, check the points below. Sometimes the trouble may lie in another component. Inspect the other components and electrical appliances being used. If the trouble cannot be rectified after checking the items below, ask your nearest Pioneer authorized service center or your dealer to carry out repair work.
Problem Check Remedy Serato DJ operation is unstable. Are you using the latest version of the software? Free updates of Serato DJ can be downloaded from the website. Use the most recent version. (page 6) Are you using softwares other than Serato DJ at the same time? Quit other applications to decrease the load on the computer. If operation continues to be unstable, try disabling the wireless network or other wireless connections, antivirus software, the screen saver, the low power mode, etc.
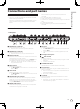
Block Diagram MIDI OUT CH3 CD MIC2 PC Trim LINE CH1 PHONO Trim PC CH4 PHONO Trim PC CD MIC2 PC Trim 3BAND EQ FILTER CH LEVEL METER CH3 CUE/ TALK OVER CH1 CUE FILTER 3BAND EQ FILTER 3BAND EQ FILTER CROSS FADER ASSIGN CH FADER CH FADER CH2 CUE CH FADER CH4 CUE/ TALK OVER CH FADER LEVEL CROSS FADER CURVE MASTER LEVEL METER MASTER OUT1 (XLR) CROSS FADER LEVEL MASTER CUE CH3 CUE CH1 CUE CH2 CUE CH4 CUE BOOTH OUT MIX LEVEL MASTER OUT2 (RCA) HEADPHONES (Ø 6.
About MIDI messages For details on this unit’s MIDI messages, see “List of MIDI Messages”. ! “List of MIDI Messages” can be acquired from the following URL: http://pioneerdj.com/support/ About the driver software (Windows) This driver software is an exclusive ASIO driver for outputting audio signals from the computer. ! There is no need to install the driver software when using Mac OS X. ! First read the Software end user license agreement on page 32 carefully.
void. Subject to the foregoing, this Agreement will be binding upon and will inure to the benefit of the parties and their respective successors and assigns. 5 Entire Agreement. This Agreement constitutes the entire agreement between the parties and supersedes all prior or contemporaneous agreements or representations, whether written or oral, concerning its subject matter.