
Operation Manual


2 Mounting sleeve
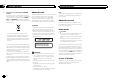
3 Install the unit as illustrated.
1
2
3
4
5
1 Nut
2 Firewall or metal support
3 Metal strap
4 Screw
5 Screw (M4 × 8)
# Make sure that the unit is installed securely in
place. An unstable installation may cause skipping
or other malfunctions.
DIN Rear-mount
1 Determine the appropriate position
where the holes on the bracket and the side
of the unit match.
2 Tighten two screws on each side.
1
2
3
1 Tapping screw (5 mm × 8 mm)
2 Mounting bracket
3 Dashboard or console
Removing the unit
1 Remove the trim ring.
1 Trim ring
2 Notched tab
! Releasing the front panel allows easier ac-
cess to the trim ring.
! When reattaching the trim ring, point the
side with the notched tab down.
2 Insert the supplied extraction keys into
both sides of the unit until they click into
place.
3 Pull the unit out of the dashboard.
Removing and re-attaching the front
panel
You can remove the front panel to protect your
unit from theft.
Press the detach button and push the front
panel upward and pull it toward you.
For details, refer to Removing the front panel to
protect your unit from theft and Re-attaching the
front panel on page 4.
Troubleshooting
Symptom Cause Action
The display il-
lumination
turns on and
off at random.
Demo mode is
on.
Turn off the demo
display setting.
The clock is
not displayed
when the
clock display
is turned on.
Demo mode is
on.
Turn off the demo
display setting.
The display
automatically
returns to the
ordinary dis-
play.
You did not per-
form any opera-
tion within
about 30 sec-
onds.
Perform operation
again.
The repeat
play range
changes un-
expectedly.
Depending on
the repeat play
range, the se-
lected range
may change
when another
folder or track is
being selected
or during fast
forwarding/re-
versing.
Select the repeat
play range again.
A subfolder is
not played
back.
Subfolders can-
not be played
when FLD (fold-
er repeat) is se-
lected.
Select another re-
peat play range.
NO XXXX ap-
pears when a
display is
changed (NO
TITLE, for ex-
ample).
There is no em-
bedded text in-
formation.
Switch the display
or play another
track/file.
Symptom Cause Action
The unit is
malfunction-
ing.
There is inter-
ference.
You are using a
device, such as
a cellular
phone, that
transmits elec-
tric waves near
the unit.
Move electrical
devices that may
be causing the in-
terference away
from the unit.
Error messages
When you contact your dealer or your nearest
Pioneer Service Center, be sure to note the error
message.
Built-in CD Player
Message Cause Action
ERROR-07,
11, 12, 17, 30
The disc is dirty. Clean the disc.
The disc is
scratched.
Replace the disc.
ERROR-07,
10, 11, 12,
15, 17, 30,
A0
There is an elec-
trical or me-
chanical error.
Turn the ignition
switch OFF and
back ON, or
switch to a differ-
ent source, then
back to the CD
player.
ERROR-15 The inserted
disc is blank.
Replace the disc.
ERROR-23 Unsupported
CD format.
Replace the disc.
FRMT READ Sometimes
there is a delay
between the
start of playback
and when you
start to hear any
sound.
Wait until the
message disap-
pears and you
hear sound.
English
Installation
9
Section
Additional information
En
03