English Multi-CD control High power CD player with RDS tuner Español Deutsch Italiano DEH-P4400R DEH-P4400RB Français Operation Manual Nederlands
Section 00 Contents Thank you for buying this Pioneer product. Please read through these operating instructions so you will know how to operate your model properly. After you have finished reading the instructions, put them away in a safe place for future reference.
Section Contents 00 English Deutsch Additional Information CD player and care 41 CD-R/CD-RW discs 41 Understanding built-in CD player error messages 42 Specifications 43 Français Audio Adjustments Introduction of audio adjustments 30 Setting the sound focus equalizer 31 Using balance adjustment 31 Using the equalizer 32 • Recalling equalizer curves 32 • Adjusting equalizer curves 32 • Equalizer curve fine adjustment 33 Adjusting bass 33 Adjusting treble 34 Adjusting loudness 34 Using subwoofer output
Section 01 Before You Start About this unit This product complies with the EMC Directives (89/336/EEC, 92/31/EEC) and CE Marking Directive (93/68/EEC). The tuner frequencies on this unit are allocated for use in Western Europe, Asia, the Middle East, Africa and Oceania. Use in other areas may result in improper reception. The RDS function operates only in areas with FM stations broadcasting RDS signals.
Section Before You Start 01 Removing the front panel English 1 Press OPEN to open the front panel. 2 Grip the left side of the front panel and pull it gently outward. Take care not to grip it tightly or drop it. Español Deutsch 3 Put the front panel into the protective case provided for safe keeping. Attaching the front panel Français Replace the front panel by holding it upright to this unit and clipping it securely into the mounting hooks.
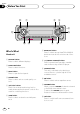
Section 01 Before You Start q !2 w e AUDIO TA !1 SELECT EQ !0 o What’s What Head unit 1 DISPLAY button Press to select different displays. 2 FUNCTION button Press to select functions. 3 OPEN button Press to open the front panel. t SFEQ i u y 7 BAND/ESC button Press to select among three FM or MW/LW bands and cancel the control mode of functions. 8 1–6 (PRESET TUNING) buttons Press for preset tuning and disc number search when using a multi-CD player.
Section Before You Start 01 English ~ 7 9 5 Español ! 2 4 ~ ATT button Press to quickly lower the volume level, by about 90%. Press once more to return to the original volume level. Source Function name Page Tuner BSM (on/off) (Hold for 2 seconds) 12 Built-in CD player Pause (on/off) 20 Multi-CD player Pause (on/off) 24 TV BSSM (on/off) (Hold for 2 seconds) Italiano ! VOLUME button Press to increase or decrease the volume.
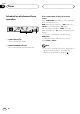
Section 02 Power ON/OFF Selecting a source • External unit refers to a Pioneer product (such as one available in the future) that, although incompatible as a source, enables control of basic functions by this unit. Only one external unit can be controlled by this unit. • When this unit’s blue/white lead is connected to the car’s auto-antenna relay control terminal, the car’s antenna extends when this unit’s source is switched on. To retract the antenna, switch the source off.
Section Tuner 03 4 To perform manual tuning, press 2 or 3 with quick presses. The frequencies move up or down step by step. 1 4 2 3 Deutsch 1 BAND indicator Shows which band the radio is tuned to, MW, LW or FM. 5 To perform seek tuning, press and hold 2 or 3 for about one second and release. The tuner will scan the frequencies until a broadcast strong enough for good reception is found. • You can cancel seek tuning by pressing either 2 or 3 with a quick press.
Section 03 Tuner Introduction of advanced tuner operation 1 2 Press FUNCTION to display the function names. Press FUNCTION repeatedly to switch between the following functions: BSM (best stations memory)—REG (regional)— LOCAL (local seek tuning)—TA (traffic announcement standby)—NEWS (news program interruption)—AF (alternative frequencies search) • To return to the frequency display, press BAND/ESC. 1 FUNCTION display Shows the function status.
Section Tuner If you press any of the PRESET TUNING buttons you can easily store up to six broadcast frequencies for later recall with the touch of a button. 2 Press 5 to turn local seek tuning on. Local seek sensitivity (e.g., LOCAL 2) appears in the display. 3 Press 2 or 3 to set the sensitivity.
Section 03 Tuner Storing the strongest broadcast frequencies BSM (best stations memory) lets you automatically store the six strongest broadcast frequencies under PRESET TUNING buttons 1–6 and once stored there you can tune in to those frequencies with the touch of a button. 1 Press FUNCTION to select BSM. Press FUNCTION until BSM appears in the display. 2 Press 5 to turn BSM on. BSM begins to flash.
Section RDS 04 Introduction of RDS operation 2 13 4 Notes • If you do not operate the function within about 30 seconds, the display is automatically returned to the frequency display. • RDS service may not be provided by all stations. • RDS functions like AF and TA are only active when your radio is tuned to a RDS station. Français 2 NEWS indicator Shows when NEWS (news program interruption) function is on. • If MW/LW band is selected, you can only select BSM or LOCAL.
Section 04 RDS Switching the RDS display When you tune in a RDS station its program service name is displayed. If you want to know the frequency you can. Press DISPLAY. Press DISPLAY repeatedly to switch between the following settings: Program service name—PTY information— Frequency PTY (program type ID code) information is listed on page 17. • PTY information and the frequency of the current station appears on the display for eight seconds.
Section RDS Using auto PI seek for preset stations TA (traffic announcement standby) lets you receive traffic announcements automatically, no matter what source you are listening to. TA can be activated for both a TP station (a station that broadcasts traffic information) or an enhanced other network’s TP station (a station carrying information which cross-references TP stations). 1 Tune in a TP or enhanced other network’s TP station.
Section 04 RDS Notes • You can also turn the TA function on or off by pressing FUNCTION. • The system switches back to the original source following traffic announcement reception. • TA can be activated from sources other than the tuner if the tuner was last set to the FM band but not if it was last set to the MW/LW band. • If the tuner was last set to FM, turning on TA lets you operate other tuning functions while listening to sources other than the tuner.
Section RDS 04 PTY list Français Italiano News Current affairs General information and advice Sports Weather reports/meteorological information Stock market reports, commerce, trading, etc.
Section 05 Built-in CD Player 3 Close the front panel. • After a CD has been inserted, press SOURCE to select the built-in CD player. Playing a CD 1 2 These are the basic steps necessary to play a CD with your built-in CD player. More advanced CD operation is explained starting on page 19. 1 TRACK NUMBER indicator Shows the track currently playing. 2 PLAY TIME indicator Shows the elapsed playing time of the current track. 1 Press OPEN to open the front panel. CD loading slot appears.
Section Built-in CD Player REPEAT :OFF appears in the display. The track presently playing will continue to play and then play the next track. English Introduction of advanced built-in CD player operation 05 Note 1 FUNCTION display Shows the function status. Playing tracks in a random order Random play lets you play back tracks on the CD in a random order. 1 Press FUNCTION to select RANDOM. Press FUNCTION until RANDOM appears in the display. Deutsch Press FUNCTION to display the function names.
Section 05 Built-in CD player Scanning tracks of a CD Scan play lets you hear the first 10 seconds of each track on the CD. 1 Press FUNCTION to select T-SCAN. Press FUNCTION until T-SCAN appears in the display. 2 Press 5 to turn scan play on. T-SCAN :ON appears in the display. The first 10 seconds of each track is played. 3 When you find the desired track press ∞ to turn scan play off. T-SCAN :OFF appears in the display. The track will continue to play.
Section Built-in CD Player You can display the title of any disc that has had a disc title entered. Press DISPLAY. Press DISPLAY repeatedly to switch between the following settings: PLAY TIME (playback time)—DISC TITLE (disc title) When you select DISC TITLE, the title of the currently playing disc is shown in the display. • If no title has been entered for the currently playing disc, NO TITLE is displayed. Español Deutsch 4 Press 3 to move the cursor to the next character position.
Section 06 Multi-CD Player 5 To skip back or forward to another track, press 2 or 3. Pressing 3 skips to the start of the next track. Pressing 2 once skips to the start of the current track. Pressing again will skip to the previous track. Playing a CD 2 3 1 Notes You can use this unit to control a multi-CD player, which is sold separately. These are the basic steps necessary to play a CD with your multi-CD player. More advanced CD operation is explained starting on page 23.
Section Multi-CD Player 1 FUNCTION display Shows the function status. 2 Press 2 or 3 to select the repeat range. Press 2 or 3 until the desired repeat range appears in the display. • MCD — Repeat all discs in the multi-CD player • TRK — Repeat just the current track • DSC — Repeat the current disc Notes • If you select other discs during repeat play, the repeat play range changes to MCD (multiCD player repeat).
Section 06 Multi-CD Player Playing tracks in a random order Random play lets you play back tracks in a random order within the repeat range, MCD (multiCD player repeat) and DSC (disc repeat). 1 Select the repeat range. Refer to Repeating play on page 23. 2 Press FUNCTION to select RANDOM. Press FUNCTION until RANDOM appears in the display. 3 Press 5 to turn random play on. RANDOM :ON appears in the display.
Section Multi-CD Player Using ITS playlists Note • After data for 100 discs has been stored in memory, data for a new disc will overwrite the oldest one. English ITS (instant track selection) lets you make a playlist of favorite tracks from those in the multiCD player magazine. After you have added your favorite tracks to the playlist you can turn on ITS play and play just those selections. 06 Playback from your ITS playlist 1 Play a CD that you want to program. Press 5 or ∞ to select a CD.
Section 06 Multi-CD Player Erasing a track from your ITS playlist When you want to delete a track from your ITS playlist, you can if ITS play is on. If ITS play is already on, skip to step 2. If ITS play is not already on, press FUNCTION. 1 Play a CD you want to delete a track from your ITS playlist, and turn ITS play on. Refer to Playback from your ITS playlist on page 25. 2 Press FUNCTION and hold until TITLE IN appears in the display, then press FUNCTION to select ITS.
Section Multi-CD Player 06 3 Press 5 or ∞ to select a letter of the alphabet. Each press of 5 will display a letter of the alphabet in A B C ... X Y Z, numbers and symbols in 1 2 3 ... @ # < order. Each press of ∞ will display a letter in the reverse order, such as Z Y X ... C B A order. 6 Press BAND/ESC to return to the playback display. Deutsch Displaying disc titles You can display the title of any disc that has had a disc title entered. Italiano Press DISPLAY.
Section 06 Multi-CD Player Selecting discs from the disc title list Disc title list lets you see the list of disc titles that have been entered into the multi-CD player and select one of them to playback. 1 Press FUNCTION to select TITLE LIST. Press FUNCTION until TITLE LIST appears in the display. 2 Press 2 or 3 to scroll through the list of titles that have been entered. • Nothing is displayed for disc whose titles have not been input. 3 Press 5 to play your favorite CD title.
Section Multi-CD Player 06 English Using compression and bass emphasis Español You can use these functions only with a multi-CD player that supports them. Using COMP (compression) and DBE (dynamic bass emphasis) functions let you adjust the sound playback quality of the multi-CD player. Each of the functions have a two-step adjustment. The COMP function balances the output of louder and softer sounds at higher volumes. DBE boosts bass levels to give playback a fuller sound.
Section 07 Audio Adjustments Introduction of audio adjustments 1 4 5 3 2 1 AUDIO display Shows the audio adjustments status. 2 LOUD indicator Appears in the display when loudness is turned on. 3 SW indicator Appears in the display when subwoofer is turned on. 4 F1 or F2 indicator The F1 or F2 indicator lights depending on the SFEQ setting. 5 CUSTOM indicator Appears in the display when equalization is adjusted. 30 En Press AUDIO to display the audio function names.
Section Audio Adjustments 07 Clarifying the sound image of vocals and instruments allows the simple staging of a natural, pleasant sound environment. Even greater listening enjoyment will be obtained if seating positions are chosen carefully. • FRT1 boosts the treble on the front output and the bass on the rear output. FRT2 boosts the treble and the bass on the front output and the bass on the rear output. (The bass boost is the same for both front and rear.
Section 07 Audio Adjustments Using the equalizer The equalizer lets you adjust the equalization to match car interior acoustic characteristics as desired. Press EQ to select the equalizer. • If the equalizer has been previously set to an equalizer curve other than POWERFUL then the title of that previously selected equalizer curve will be displayed, such as NATURAL, VOCAL, CUSTOM1, CUSTOM2, EQ FLAT or SUPER BASS.
Section Audio Adjustments Equalizer curve fine adjustment You can adjust the cut-off frequency and the bass level. In FRT1 mode, bass adjustment affects only the rear output: front output cannot be adjusted. Q=2N Q=2W Frequency (Hz) 1 Press AUDIO and hold until frequency and the Q factor (e.g., F-80 Q-1W) appears in the display. 3 Press 5 or ∞ to adjust the bass level. Each press of 5 or ∞ increases or decreases the bass level. +6 – –6 displayed as the level is increased or decreased.
Section 07 Audio Adjustments Adjusting treble Using subwoofer output You can adjust the cut-off frequency and the Treble level. In FRT1 and FRT2 modes, treble adjustment affects only the front output: rear output cannot be adjusted. This unit is equipped with a subwoofer output which can be switched on or off. When a subwoofer is connected to the rear output, first, switch the rear output setting to subwoofer, then turn the subwoofer output on.
Section Audio Adjustments Adjusting subwoofer settings 2 Press AUDIO to select SLA. Press AUDIO until SLA appears in the display. 3 Press 5 or ∞ to adjust the source volume. Each press of 5 or ∞ increases or decreases the source volume. • SLA :+4 – SLA :–4 is displayed as the source volume is increased or decreased. Notes Italiano • Since the FM tuner volume is the control, it is not possible to apply source level adjustments to the FM tuner.
Section 08 Initial Settings Adjusting initial settings Setting the FM tuning step Normally the FM tuning step employed by seek tuning is 50 kHz. When AF or TA are on the tuning step automatically changes to 100 kHz. It may be preferable to set the tuning step to 50 kHz when AF is on. 1 Initial settings lets you perform initial set up of different settings for this unit. 1 FUNCTION display Shows the function status. 1 Press SOURCE and hold until the unit turns off.
Section Initial Settings Switching the warning tone 2 Select WARN on or off with 5/∞. Pressing 5/∞ will switch WARN between on and off and that status will be displayed (e.g., WARN :ON). 1 Press FUNCTION to select AUX. Press FUNCTION repeatedly until AUX appears in the display. Switching the dimmer setting 2 Select full-range speaker or subwoofer with 2/3. Pressing 2/3 will switch between FRT+REAR (full-range speaker) and FRT+S/W (subwoofer) and that status will be displayed.
Section 08 Initial Settings Switching the handsfree telephoning You can switch the handsfree telephoning on/off in accordance with the connection of the cellular telephone you use. When using the handsfree telephone unit (commercially available), select HANDS-F:ON. 1 Press FUNCTION to select HANDS-F. Press FUNCTION repeatedly until HANDS-F appears in the display. 2 Switch the handsfree telephoning on/off with 5/∞. Pressing 5/∞ will switch HANDS-F between on and off and that status will be displayed (e.g.
Section Other Functions Using the AUX source 4 Move the cursor to the last position by pressing 3 after entering the title. When you press 3 one more time, the entered title is stored in memory. English An IP-BUS-RCA Interconnector such as the CD-RB20 or CD-RB10 (sold separately) lets you connect this unit to auxiliary equipment featuring RCA output. For more details, refer to the IP-BUS-RCA Interconnector owner‘s manual. 09 5 Press BAND/ESC to return to the playback display.
Section 09 Other Functions Using the telephone muting/attenuation and handsfree telephoning function Telephone muting/attenuation function Sound from this system is muted or attenuated automatically when a call is made or received using a cellular telephone connected to this product. When HANDS-F:OFF in the handsfree telephoning mode is selected in the Initial Setting Menu, cellular telephone muting/attenuation mode is activated (refer to page 38).
Section Additional Information 10 • CD-R (CD-Recordable)/CD-RW (CDRewritable) discs recorded on CD-R/CD-RW units other than a music CD recorder may not play properly on this CD player. • Music CD-R/CD-RW discs, even recorded on a music CD recorder, may not play properly on this CD player due to differing disc characteristics, scratches or dirt on the disc. Dirt or condensation on the lens inside this unit may also prevent playback.
Section 10 Additional Information Understanding built-in CD player error messages When problems occur during CD play an error message may appear on the display. If an error message appears on the display refer to the table below to see what the problem is and the suggested method of correcting the problem. If the error cannot be corrected, contact your dealer or your nearest Pioneer Service Center. 42 Message Cause Action ERROR-11, 12, 17, 30 Dirty disc Clean disc.
Section Additional Information Specifications Amplifier System ................................ Compact disc audio system Usable discs ....................... Compact disc Signal format: Sampling frequency ... 44.1 kHz Number of quantization bits ..................................... 16; linear Frequency characteristics ............................................. 5 – 20,000 Hz (±1 dB) Signal-to-noise ratio ........... 94 dB (1 kHz) (IEC-A network) Dynamic range ...................
Sección 00 Contenido Gracias por haber comprado este producto Pioneer. Sírvase leer con detención estas instrucciones sobre la operación de modo que aprenda el modo de operar correctamente su modelo. Una vez que haya leído las instrucciones, consérvelas en un lugar seguro para consultarlas en el futuro.
Sección Contenido 00 English Italiano Informaciones adicionales Lector de CD y cuidados 41 Discos CD-R/CD-RW 41 Comprensión de los mensajes de error del lector de CD incorporado 42 Especificaciones 43 Français Otras funciones Uso de la fuente AUX 39 • Selección de AUX como la fuente 39 • Ajuste del título del componente auxiliar 39 Uso de la función de enmudecimiento/atenuación del teléfono y de conversación telefónica de manos libres 40 • Función de enmudecimiento/atenuación del teléfono 40 • Función
Sección 01 Antes de empezar Acerca de este producto Este producto cumple con las Directivas EMC (89/336/CEE, 92/31/CEE) y Directiva de Marcación CE (93/68/CEE). Las frecuencias del sintonizador en este producto se han repartidas para uso en Europa Occidental, Asia, Oriente Medio, Africa y Oceanía. El uso en otras áreas puede resultar en una recepción incorrecta. Las funciones RDS funcionan solamente en áreas con emisoras FM que transmiten señales RDS.
Sección Antes de empezar 01 Extracción del panel delantero English 1 Presione OPEN para abrir el panel delantero. Español 2 Agarre el lado izquierdo del panel delantero y tire suavemente hacia fuera. Tenga cuidad en no agarrar con mucha fuerza y no dejar caer. Deutsch 3 Coloque el panel delantero en su caja protectora proveída para almacenamiento seguro.
Sección 01 Antes de empezar q !2 w e AUDIO TA !1 SELECT EQ !0 o Qué es cada cosa Unidad principal 1 Botón DISPLAY Presione para seleccionar las diferentes visualizaciones. 2 Botón FUNCTION Presione para seleccionar las funciones. 3 Botón OPEN Presione para abrir el panel delantero. 4 Botón AUDIO Presione para seleccionar los diversos controles de calidad del sonido. 5 Botones 5/∞/2/3 Presione para los controles de sintonía de búsqueda manual, avance rápido, inversión y búsqueda musical.
Sección Antes de empezar 01 English ~ 7 9 5 Español ! 2 4 ! Botón VOLUME Presione para aumentar o disminuir el volumen.
Sección 02 Encendido y Apagado Encendido del sistema Presione SOURCE para encender el sistema. Cuando se selecciona una fuente, la unidad se encende. Selección de una fuente Puede seleccionar la fuente que desea escuchar. Para cambiar al lector de CD incorporado, coloque un disco en el sistema (refiérase a la página 18). Presione SOURCE para seleccionar una fuente.
Sección Sintonizador 03 1 4 2 3 3 Indicador PRESET NUMBER Visualiza la emisora preajustada seleccionada. Nota • Cuando la frecuencia seleccionada está siendo transmitida en estéreo, el indicador STEREO () se ilumina. Italiano 4 Indicador STEREO () Visualiza que la frecuencia seleccionada está siendo transmitida en estéreo. Français 2 Indicador FREQUENCY Visualiza la frecuencia en que el sintonizador está sintonizado.
Sección 03 Sintonizador Introducción a las operaciones avanzadas del sintonizador 1 1 Visualización FUNCTION Visualiza el estado de función. 2 Indicador PRESET NUMBER Visualiza la emisora preajustada seleccionada. 10 Sp 2 Presione FUNCTION para visualizar los nombres de las funciones.
Sección Sintonizador Si se presiona uno de los botones PRESET TUNING, se puede fácilmente almacenar hasta seis frecuencias de emisoras para una llamada subsiguiente con la presión de un botón. 2 Presione 5 para activar la sintonía por búsqueda local. La sensibilidad de búsqueda local (LOCAL 2, por ejemplo) aparece en la pantalla. 3 Presione 2 o 3 para ajustar la sensibilidad.
Sección 03 Sintonizador Almacenaje de las frecuencias de radio más fuertes La función BSM (memoria de las mejores emisoras) le permite almacenar automáticamente las seis emisoras más fuertes bajo los botones PRESET TUNING 1–6. Después de almacenadas, las emisoras más fuertes se pueden sintonizar con la presión de un botón. 1 Presione FUNCTION para seleccionar BSM. Presione FUNCTION hasta que BSM aparezca en la pantalla. 2 Presione 5 para activar la función BSM. BSM comienza a destellar.
Sección RDS 04 Introducción a la operación RDS 2 13 4 • Si no se opera la función dentro de aproximadamente 30 segundos, la pantalla vuelve automáticamente a la visualización de la frecuencia. • El servicio RDS puede no se proveer por todas las emisoras. • Las funciones RDS como AF y TA son activas solamente cuando la radio está sintonizada a una emisora RDS. Français 2 Indicador NEWS Visualiza cuando la función NEWS (interrupción por programa de noticias) está activada.
Sección 04 RDS Cambio de la visualización RDS Cuando se sintoniza una emisora RDS, se visualiza su nombre de servicio de programa. Se puede saber la frecuencia en que está. Presione DISPLAY. Presione DISPLAY repetidamente para cambiar entre los siguientes ajustes: Nombre de servicio de programa—Información PTY—Frecuencia La información PTY (código de identificación de tipo de programa) se enumera en la página 17.
Sección RDS Limitación de las emisoras para programación regional 1 Presione FUNCTION para seleccionar REG. Presione FUNCTION hasta que aparezca REG en la pantalla. Notas 4 Presione TA mientras un anuncio de tráfico está siendo recibido para cancelar el anuncio. El sintonizador vuelve a la fuente original pero permanece en el modo de espera hasta que se presione TA de nuevo.
Sección 04 RDS Notas • También se puede activar o desactivar la función TA presionando FUNCTION. • El sistema cambia de nuevo ala fuente original después de la recepción de anuncio de tráfico. • La función TA se puede activar de fuente diferentes del sintonizador si el sintonizador se hubiera sido ajustado por último a la banda FM pero no si hubiera sido ajustado a la banda MW/LW.
Sección RDS 04 Lista PTY English POP MUS ROCK MUS EASY MUS OTH MUS JAZZ COUNTRY NAT MUS OLDIES FOLK MUS L. CLASS CLASSIC EDUCATE DRAMA CULTURE SCIENCE VARIED CHILDREN SOCIAL RELIGION PHONE IN TOURING LEISURE DOCUMENT Italiano Noticias Temas de actualidad Información general y consejos Programas deportivos Informes del tiempo/Información meteorológica Informes del mercado de valores, comercio, operaciones de compraventa, etc.
Sección 05 Lector de CD incorporado Reproducción de un CD 1 2 Estos son los pasos básicos necesarios para reproducir un CD con su lector de CD incorporado. Las operaciones más avanzadas del lector de CD se proveen desde la página 19. 1 Indicador TRACK NUMBER Visualiza la pista que está siendo reproducida actualmente. 2 Indicador PLAY TIME Visualiza el tiempo transcurrido de reproducción de la pista actual. 1 Presione OPEN para abrir el panel delantero. La abertura para CD aparece.
Sección Lector de CD incorporado 1 Visualización FUNCTION Visualiza el estado de la función. Nota • Si no se realiza una búsqueda musical o avance rápido/retroceso, la reproducción repetida se cancela automáticamente. Reproducción de pistas en un orden aleatorio La reproducción aleatoria le permite reproducir las pistas en el CD en un orden aleatorio. 1 Presione FUNCTION para seleccionar RANDOM. Presione FUNCTION hasta que RANDOM aparezca en la pantalla.
Sección 05 Lector de CD incorporado Exploración de las pistas de un CD La reproducción con exploración le permite escuchar los primeros 10 segundos de cada pista de un CD. 1 Presione FUNCTION para seleccionar PAUSE. Presione FUNCTION hasta que PAUSE aparezca en la pantalla. 2 Presione 5 para activar la pausa. PAUSE :ON aparece en la pantalla. La reproduc- 1 Presione FUNCTION para seleccionar T-SCAN. Presione FUNCTION hasta que T-SCAN aparezca en la pantalla.
Sección Lector de CD incorporado Se puede visualizar el título de cualquier disco que tenga sido almacenado con un título. Presione DISPLAY. Presione DISPLAY repetidamente para cambiar entre las siguientes visualizaciones: PLAY TIME (tiempo de reproducción)—DISC TITLE (título del disco) Cuando se selecciona DISC TITLE, el título del disco que está siendo reproducido actualmente se visualiza en la pantalla. • Si no ha sido introducido un título para el disco, se visualizará NO TITLE.
Sección 06 Lector de Multi-CD 4 Para realizar el avance rápido o retroceso, mantenga presionado 2 o 3. Reproducción de un CD 2 3 1 Se puede usar este sistema para controlar un lector de Multi-CD, que se vende separadamente. Estos son los pasos básicos necesarios para reproducir un CD con su lector de Multi-CD. Las operaciones más avanzadas del lector de MultiCD se proveen desde la página 23. 1 Indicador DISC NUMBER Visualiza el disco que está siendo reproducido actualmente.
Sección Lector de Multi-CD Repetición de reproducción Hay tres gamas de repetición para el lector de Multi-CD: MCD (repetición de todos los discos en el lector de Multi-CD), TRK (repetición de una pista), y DSC (repetición de disco) English Introducción a las operaciones avanzadas de lector de Multi-CD 06 1 Presione FUNCTION para seleccionar 1 Visualización FUNCTION Visualiza el estado de la función. 2 Presione 2 o 3 para seleccionar la gama de repetición.
Sección 06 Lector de Multi-CD Reproducción de las pistas en un orden aleatorio La reproducción aleatoria le permite reproducir las pistas en un orden aleatorio dentro da gama de repetición MCD (repetición de todos los discos en el lector de Multi-CD) y DSC (repetición de disco). 1 Seleccione la gama de repetición. Consulte Repetición de reproducción en la página 23. 2 Presione FUNCTION para seleccionar RANDOM. Presione FUNCTION hasta que RANDOM aparezca en la pantalla.
Sección Lector de Multi-CD Creación de una lista de reproducción con la programación ITS 3 Seleccione la pista deseada presionando 2 o 3. 3 Presione 5 para activar la reproducción ITS. ITS-P :ON aparece en la pantalla. La reproducción de las pistas en la lista de reproducción comienza dentro de la gama de repetición MCD (repetición de todos los discos en el lector de Multi-CD) o DSC (repetición de disco) seleccionada anteriormente.
Sección 06 Lector de Multi-CD Borrado de una pista de la lista de reproducción ITS Cuando se desea borrar una pista de la lista de reproducción ITS, se puede hacerlo si la reproducción ITS está activada. Si la reproducción ITS ya está activada, salte al paso 2. Si la reproducción ITS todavía no está activada, presione FUNCTION. 1 Reproduzca el CD que desea borrar una pista de la lista de reproducción ITS, y active la reproducción ITS. Consulte Reproducción de la lista de reproducción ITS en la página 25.
Sección Lector de Multi-CD TITLE IN (introducción de título de disco)—ITS Notas • Los títulos permanecen en la memoria, aún después que se quita el disco del cargador, y se llaman cuando se colocan los discos correspondientes de nuevo. • Después que datos para 100 discos han sido almacenados en la memoria, los datos para un nuevo disco sobreponen los dados más antiguos. Español 3 Presione 5 o ∞ para seleccionar una letra del alfabeto.
Sección 06 Lector de Multi-CD Selección de disco de la lista de títulos de disco La lista de títulos de disco le permite ver la lista de los títulos de los discos que han sido introducidos en el lector de Multi-CD y seleccionarlos para reproducción. 1 Presione FUNCTION para seleccionar TITLE LIST. Presione FUNCTION hasta que TITLE LIST aparezca en la pantalla. 2 Presione 2 o 3 para desplazar a través de la lista de títulos que han sido introducidos.
Sección Lector de Multi-CD 06 English Uso de la compresión y énfasis de los graves Español Estas funciones se pueden usar solamente con un lector de Multi-CD que las soporta. El uso de las funciones COMP (compresión) y DBE (énfasis de graves dinámicos) le permite ajustar la calidad sonora de la reproducción del lector de Multi-CD. Cada una de las funciones tiene un ajuste de dos pasos. La función COMP equilibra la salida de los sonidos más fuertes y más suaves en volúmenes altos.
Sección 07 Ajustes de audio Introducción a los ajustes de audio 1 4 5 3 2 1 Visualización AUDIO Visualiza el estado de los ajustes de audio. 2 Indicador LOUD Aparece en la pantalla cuando se activa la sonoridad. 3 Indicador SW Aparece en la pantalla cuando se activa el altavoz de subgraves. 4 Indicador F1 o F2 El indicador F1 o F2 se ilumina dependiendo del ajuste SFEQ. 5 Indicador CUSTOM Aparece en la pantalla cuando se ajusta la ecualización.
Sección Ajustes de audio 2 Presione 5 o ∞ para ajustar el equilibrio de loa altavoces delanteros/traseros. Cada presión de 5 o ∞ mueve el equilibrio de los altavoces delanteros/traseros hacia adelante o hacia atrás. • FADER :F15 – FADER :R15 se visualiza mientras el equilibrio de los altavoces delanteros/traseros se mueve hacia adelante o hacia atrás. • FADER : 0 es el ajuste apropiado cuando se usan solamente dos altavoces.
Sección 07 Ajustes de audio Uso del ecualizador El ecualizador le permite ajustar la ecualización de acuerdo a las características del interior del coche. Llamada de las curvas de ecualización Hay siete curvas de ecualizadas almacenadas que se pueden llamar fácilmente a cualquier momento.
Sección Ajustes de audio 07 Ajuste fino de la curva del ecualizador Nivel (dB) Frecuencia central Usted puede ajustar la frecuencia de corte y el nivel de los graves. En el modo FRT1, el ajuste de los graves afecta únicamente a la salida trasera: no es posible ajustar la salida delantera. 1 Presione AUDIO para seleccionar BASS. Presione AUDIO hasta que BASS aparezca en la pantalla. Frecuencia (Hz) 2 Seleccione la frecuencia deseada con 2/3.
Sección 07 Ajustes de audio Ajuste de los agudos Uso de la salida de subgraves Usted puede ajustar la frecuencia de corte y el nivel de los agudos. En los modos FRT1 y FRT2, el ajuste de los agudos afecta únicamente la salida delantera: no es posible ajustar la salida trasera. Este sistema se equipa con una salida de subgraves que se puede activar y desactivar. Cuando se conecta un altavoz de subgraves a la salida trasera, primero cambie el ajuste de salida trasera a subgraves.
Sección Ajustes de audio Cuando la salida de subgraves está activada, se puede ajustar la frecuencia de corte y el nivel de salida de subgraves. 2 Presione AUDIO para seleccionar SLA. Presione AUDIO hasta que SLA aparezca en la pantalla. 3 Presione 5 o ∞ para ajustar el volumen de la fuente. Cada presión de 5 o ∞ aumenta o disminuye el volumen de la fuente. • SLA :+4 – SLA :–4 se visualiza mientras se aumenta o disminuye el volumen de la fuente.
Sección 08 Ajustes iniciales Configuración de los ajustes iniciales 1 Los ajustes iniciales le permiten realizar una configuración inicial de los diferentes ajustes de este sistema. 1 Visualización FUNCTION Visualiza el estado de la función. 1 Presione SOURCE y sostenga hasta que se apague el sistema. 2 Presione FUNCTION y sostenga hasta que FM STEP aparezca en la pantalla. 3 Presione FUNCTION para seleccionar uno de los ajustes iniciales.
Sección Ajustes iniciales 08 Si el panel delantero se extrae de la unidad principal dentro de cinco segundos después de desconectar la llave de encendido, un tono de advertencia sonará. Se puede desactivar este tono de advertencia. 2 Active o desactive DIMMER con 5/∞. Presionar 5/∞ cambia el DIMMER entre activado y desactivado, y tal estado se visualiza (DIMMER :ON, por ejemplo). 1 Presione FUNCTION para seleccionar WARN. Presione FUNCTION repetidamente hasta que aparezca WARN en la pantalla.
Sección 08 Ajustes iniciales Conmutación de la conversación telefónica de manos libres Conmutación de la espera de teléfono Es posible cambiar la conversación telefónica de manos libres entre activación/desactivación según la conexión de su teléfono celular. Si está usando un teléfono de manos libres (disponible comerciamente), seleccione HANDS-F:ON. Si desea utilizar el teléfono de manos libres sin reproducir otras fuentes de este producto, active el modo de espera de teléfono.
Sección Otras funciones Uso de la fuente AUX 5 Presione BAND/ESC para volver a la visualización de reproducción. Deutsch Presione SOURCE para seleccionar AUX como la fuente. Presione SOURCE hasta que AUX aparezca en la pantalla. • Si no se activa el ajuste auxiliar, no se puede seleccionar AUX. Consulte Cambio del ajuste de componente auxiliar en la página 37 para los detalles. 4 Mueva el cursor a la última posición presionando 3 después de introducir el título.
Sección 09 Otras funciones Uso de la función de enmudecimiento/atenuación del teléfono y de conversación telefónica de manos libres Función de enmudecimiento/atenuación del teléfono El sonido de este sistema se enmudece o atenúa automáticamente cuando se hace o se recibe una llamada usando un teléfono celular conectado a este producto.
Sección Informaciones adicionales Lector de CD y cuidados cualquier disco húmedo con un paño suave para eliminar la humedad. • Vibraciones en la calle pueden interrumpir la reproducción de CD. English • Utilice solamente CDs que levan marca Compact Disc Digital Audio que se muestra a continuación. 10 Discos CD-R/CD-RW Deutsch Français Italiano • Verifique todos los CDs para ver si no hay grietas, arañazos o alabeos antes de reproducirlos.
Sección 10 Informaciones adicionales Comprensión de los mensajes de error del lector de CD incorporado Cuando ocurren problemas durante la reproducción de CD, un mensaje de error puede aparecer en la pantalla. Cuando esto ocurra, refiérase a la tabla a continuación para ver la causa del problema y la acción correctiva sugerida. Si no es posible corregir el error, póngase en contacto con su revendedor o centro de servicios autorizado de PIONEER más cercano.
Sección Informaciones adicionales Especificaciones Amplificador Sistema ............................... Sistema de audio de discos compactos Discos usables ................... Disco compacto Formato de la señales: Frecuencia de muestreo ..................................... 44,1 kHz Número de cuantización de bits ...................................... 16; lineal Características de la frecuencia ............................................. 5 – 20.000 Hz (±1 dB) Relación de señal a ruido ...
Abschnitt 00 Inhalt Vielen Dank, daß Sie sich für dieses Pioneer-Produkt entschieden haben. Lesen Sie diese Bedienungsanleitung bitte aufmerksam durch, so daß Sie mit der richtigen Bedienungsweise Ihres Modells vertraut werden. Nachdem Sie die Bedienungsanleitung gelesen haben, sollten Sie sie an einer sicheren Stelle griffbereit aufbewahren.
Abschnitt Inhalt 00 Audio-Einstellungen Einführung zu Audio-Einstellungen 30 Einstellen des Klangfokus-Equalizers 31 Gebrauch der Balance-Einstellung 31 Gebrauch des Equalizers 32 • Abrufen von Entzerrungskurven 32 • Einstellen von Entzerrungskurven 32 • Equalizer-Kurven-Feineinstellung 33 Baßeinstellung 33 Höheneinstellung 34 Einstellen von Loudness 34 Gebrauch des Subwoofer-Ausgangs 34 • Einstellen der Subwoofer-Einstellungen 35 Einstellen von Programmquellenpegeln 35 Zusätzliche Informationen CD-Play
Abschnitt 01 Bevor Sie beginnen Zu diesem Gerät Dieses Produkt entspricht den EMCRichtlinien (89/336/EEC, 92/31/EEC) und CE-Markierungsrichtlinien (93/68/EEC). Die Tuner-Frequenzen dieses Geräts sind für West-Europa, Asien, den Mittleren Osten, Afrika und Ozeanien bestimmt. Gebrauch in anderen Gebieten kann zu mangelhaftem Empfang führen. Die RDS-Funktion arbeitet nur in Gebieten mit UKW-Sendern, die RDS-Signale ausstrahlen.
Abschnitt Bevor Sie beginnen Diebstahlschutz Abnehmen der Frontplatte 1 Drücken Sie OPEN, um die Frontplatte zu öffnen. Español 2 Halten Sie die Frontplatte an der linken Seite und ziehen Sie sie vorsichtig heraus. Achten Sie darauf, die Platte nicht zu stark anzufassen oder fallen zu lassen. English Zur Diebstahlverhinderung kann die Frontplatte vom Hauptgerät abgenommen und im mitgelieferten Schutzgehäuse aufbewahrt werden.
Abschnitt 01 Bevor Sie beginnen q !2 w e AUDIO TA !1 SELECT EQ !0 o Die einzelnen Teile Hauptgerät 1 Taste DISPLAY Zur Wahl verschiedener Anzeigen. 2 Taste FUNCTION Zur Wahl von Funktionen. 3 Taste OPEN Zum Öffnen der Frontplatte. 4 Taste AUDIO Zur Wahl verschiedener Klangregler. 5 Tasten 5/∞/2/3 Für manuelle Suchlauf-Abstimmung, Schnellvorlauf, Rücklauf und Titelsuchlauf. Dient auch zur Steuerung von Funktionen. 6 Taste SFEQ Für einen natürlichen Klang mit Präsenz.
Abschnitt Bevor Sie beginnen 01 English ~ 7 9 5 Español ! 2 4 ! Taste VOLUME Zur Erhöhung oder Verminderung der Lautstärke. Dieses Gerät kann auch mit der im Handel erhältlichen Fernbedienung CD-R600 gesteuert werden. Sie besitzt eine PGM-Taste (Programmtaste), unter der häufig benutzte Funktionen für jede Programmquelle vorprogrammiert sind.
Abschnitt 02 Ein-/Ausschalten Einschalten des Geräts Drücken Sie SOURCE, um das Gerät einzuschalten. Das Gerät wird durch Wahl einer Programmquelle eingeschaltet. Wählen einer Programmquelle Wählen Sie die gewünschte Programmquelle. Zum Umschalten auf den eingebauten CDPlayer legen Sie eine Disc in dieses Gerät ein (siehe Seite 18). Drücken Sie SOURCE, um eine Programmquelle zu wählen.
Abschnitt Tuner 03 1 4 2 3 3 Anzeige PRESET NUMBER Zeigt, welche Vorprogrammierung gewählt ist. Français 2 Anzeige FREQUENCY Zeigt an, auf welche Frequenz der Tuner abgestimmt ist. Deutsch 1 Anzeige BAND Zeigt, auf welchen Wellenbereich das Radio abgestimmt ist, MW, LW oder UKW. 5 Für Suchlauf-Abstimmung drücken Sie 2 oder 3 etwa eine Sekunde lang. Der Tuner durchläuft den Frequenzbereich, bis er einen empfangswürdigen Sender gefunden hat.
Abschnitt 03 Tuner Einführung zu weitergehenden Tuner-Operationen 1 2 1 Anzeige FUNCTION Zeigt den Funktionsstatus. 2 Anzeige PRESET NUMBER Zeigt, welche Vorprogrammierung gewählt ist. 10 Ge Drücken Sie FUNCTION, um die Funktionsnamen anzuzeigen.
Abschnitt Tuner 03 Abstimmen von Stationen mit starken Sendesignalen Durch Drücken einer der Tasten PRESET TUNING können mühelos bis zu sechs Sendefrequenzen gespeichert und dann jederzeit per Tastendruck abgerufen werden. Mit Lokal-Suchlauf-Abstimmung wird nur nach empfangswürdigen Stationen mit ausreichender Signalstärke gesucht. 3 Drücken Sie 2 oder 3, um die Empfindlichkeit einzustellen.
Abschnitt 03 Tuner Speichern von Stationen mit den stärksten Sendesignalen Mit BSM (Best-Sender-Memory) lassen sich die sechs stärksten Sender automatisch den PRESET TUNING-Tasten 1–6 zuordnen, speichern, und dann per Tastendruck abrufen. 1 Drücken Sie FUNCTION, um BSM zu wählen. Drücken Sie FUNCTION, bis BSM angezeigt wird. 2 Drücken Sie 5, um BSM einzuschalten. BSM beginnt zu blinken.
Abschnitt RDS 04 Einführung zum RDS-Betrieb 2 13 4 Italiano 3 Anzeige TA Erscheint, wenn die TA-Funktion (Verkehrsdurchsage-Bereitschaft) eingeschaltet ist. Français 2 Anzeige NEWS Erscheint, wenn die NEWS-Funktion (Nachrichten-Unterbrechung) eingeschaltet ist. • Falls die Funktion nicht innerhalb von 30 Sekunden aktiviert wird, schaltet das Display automatisch wieder auf die Frequenzanzeige zurück. • RDS-Service wird unter Umständen nicht von allen Stationen geboten.
Abschnitt 04 RDS Umschalten der RDS-Anzeige Bei Abstimmung einer RDS-Station wird deren Programm-Service-Name angezeigt. Zum Anzeigen der Frequenz. Drücken Sie DISPLAY. Drücken Sie DISPLAY wiederholt, um zwischen den folgenden Einstellungen umzuschalten: Programm-Service-Name—PTY-Information— Frequenz PTY-Information (Programmtyp-Kenncode) ist auf Seite 17 aufgeführt. • PTY-Information und die Frequenz der momentanen Station werden acht Sekunden lang angezeigt.
Abschnitt RDS Begrenzen von Stationen auf regionale Programmierung 2 Drücken Sie 5, um die Regionalfunktion einzuschalten. Drücken Sie 5, und REG :ON wird angezeigt. Hinweise 4 Durch Drücken von TA während Empfangs einer Verkehrsmeldung wird diese abgebrochen. Der Tuner schaltet auf die ursprüngliche Programmquelle zurück, bleibt jedoch auf Bereitschaft geschaltet, bis TA erneut gedrückt wird.
Abschnitt 04 RDS Hinweise • Die TA-Funktion kann auch durch Drücken von FUNCTION ein- oder ausgeschaltet werden. • Bei Beendigung einer Verkehrsmeldung schaltet das System auf die ursprüngliche Programmquelle zurück. • TA kann von anderen Programmquellen als Tuner aus aktiviert werden, wenn der Tuner zuletzt auf UKW eingestellt war, jedoch nicht, wenn zuletzt MW/LW gewählt war.
Abschnitt RDS 04 PTY-Liste Français Italiano Nachrichten Tagesereignisse Allgemeine Informationen und Tipps Sport Wetterberichte/Wetterinformationen Aktien, Wirtschaft, Handel usw.
Abschnitt 05 Eingebauter CD-Player 3 Schließen Sie die Frontplatte. • Nachdem Sie eine CD eingelegt haben, drücken Sie SOURCE, um den eingebauten CDPlayer anzuwählen. Abspielen einer CD 1 2 Nachfolgend sind die grundlegenden Schritte zum Abspielen einer CD mit dem eingebauten CD-Player beschrieben. Weitergehende CDOperationen werden ab Seite 19 beschrieben. 1 Anzeige TRACK NUMBER Zeigt den momentan spielenden Titel. 2 Anzeige PLAY TIME Zeigt die abgelaufene Spielzeit des momentanen Titels.
Abschnitt Eingebauter CD-Player 2 Drücken Sie 5, um die Wiederholwiedergabe einzuschalten. REPEAT :ON erscheint im Display. Der momentane Titel wird zu Ende gespielt und dann wiederholt. 3 Drücken Sie ∞, um die Wiederholwiedergabe auszuschalten. REPEAT :OFF erscheint im Display. Der momentane Titel wird zu Ende gespielt, dann beginnt die Wiedergabe des nächsten Titels. Hinweis 1 Anzeige FUNCTION Zeigt den Funktionsstatus. Wiederholwiedergabe Derselbe Titel kann wiederholt abgespielt werden.
Abschnitt 05 Eingebauter CD-Player Anspielwiedergabe von Titeln einer CD Die ersten 10 Sekunden jedes Titels einer CD können gespielt werden. 1 Drücken Sie FUNCTION, um T-SCAN zu wählen. Drücken Sie FUNCTION, bis T-SCAN angezeigt wird. 2 Drücken Sie 5, um die Anspielwiedergabe einzuschalten. T-SCAN :ON erscheint im Display. Die ersten 10 Sekunden jedes Titels werden gespielt. 3 Bei Erreichen des gewünschten Titels drücken Sie ∞, um die Anspielwiedergabe auszuschalten. T-SCAN :OFF erscheint im Display.
Abschnitt Eingebauter CD-Player Der Titel einer Disc, der zuvor eingegeben worden ist, kann angezeigt werden. Drücken Sie DISPLAY. Drücken Sie DISPLAY wiederholt, um zwischen den folgenden Einstellungen umzuschalten: PLAY TIME (Wiedergabezeit)—DISC TITLE (Disc-Titel) Bei Wahl von DISC TITLE wird der Titel der momentan spielenden Disc angezeigt. • Wenn kein Titel für die momentan spielende Disc gespeichert ist, erscheint NO TITLE.
Abschnitt 06 Multi-CD-Player 4 Für schnellen Vorlauf oder Rücklauf drücken und halten Sie 2 oder 3 gedrückt. Abspielen einer CD 2 3 1 Mit diesem Gerät kann ein als Sonderzubehör erhältlicher Multi-CD-Player gesteuert werden. Nachfolgend sind die grundlegenden Schritt zum Abspielen einer CD mit Ihrem Multi-CDPlayer beschrieben. Weitergehende CDOperationen werden ab Seite 23 beschrieben. 1 Anzeige DISC NUMBER Zeigt die momentan spielende Disc.
Abschnitt Multi-CD-Player 1 Anzeige FUNCTION Zeigt den Funktionsstatus. Hinweise • Wenn während Wiederholwiedergabe andere Discs gewählt werden, ändert sich der Wiederholwiedergabebereich zu MCD (MultiCD-Player-Wiederholbetrieb). • Falls während TRK (Einzeltitel-Wiederholung) Titelsuchlauf oder schneller Vor-/Rücklauf aktiviert wird, ändert sich der Wiederholwiedergabebereich zu DSC (DiscWiederholung).
Abschnitt 06 Multi-CD-Player Abspielen von Titeln in zufälliger Reihenfolge Die Funktion Random ermöglicht die zufallsgesteuerte Wiedergabe der Titel innerhalb des Wiederholbereichs, MCD (MultiCD-Player-Wiederholung) und DSC (DiscWiederholung). 1 Wählen Sie den Wiederholbereich. Siehe Wiederholwiedergabe auf Seite 23. 2 Drücken Sie FUNCTION, um RANDOM zu wählen. Drücken Sie FUNCTION, bis RANDOM angezeigt wird. 3 Drücken Sie 5, um die zufallsgesteuerte Wiedergabe einzuschalten.
Abschnitt Multi-CD-Player Gebrauch von ITS-Spiellisten 1 Spielen Sie die CD ab, die Sie programmieren wollen. Drücken Sie 5 oder ∞, um eine CD zu wählen. ITS-Wiedergabe gestattet das Abspielen von Titeln der ITS-Spielliste. Nach Aktivierung der ITS-Wiedergabe beginnt der Multi-CD-Spieler mit dem Abspielen der Titel in der ITS-Spielliste. 1 Wählen Sie den Wiederholbereich. Siehe Wiederholwiedergabe auf Seite 23. 2 Drücken Sie FUNCTION, um ITS-P zu wählen. Drücken Sie FUNCTION, bis ITS-P angezeigt wird.
Abschnitt 06 Multi-CD-Player Löschen eines Titels aus der ITSSpielliste Bei eingeschalteter ITS-Wiedergabe kann ein Titel aus der ITS-Spielliste gelöscht werden. Wenn ITS-Wiedergabe bereits eingeschaltet ist, fahren Sie mit Schritt 2 fort. Wenn ITSWiedergabe noch nicht eingeschaltet ist, drücken Sie FUNCTION. 1 Spielen Sie die CD ab, die einen Titel enthält, den Sie aus Ihrer ITS-Spielliste löschen wollen, und schalten Sie ITSWiedergabe ein. Siehe Wiedergabe von der ITS-Spielliste auf Seite 25.
Abschnitt Multi-CD-Player 6 Zum Zurückschalten auf die Wiedergabeanzeige drücken Sie BAND/ESC. Hinweise Deutsch • Titel bleiben gespeichert, auch wenn Discs vom Magazin entnommen werden, und können nach erneutem Einsetzen der entsprechenden Discs wieder abgerufen werden. • Nachdem Daten für 100 Discs gespeichert worden sind, werden die ältesten Daten durch die für eine neue Disc überschrieben. Español 3 Drücken Sie 5 oder ∞, um ein Zeichen zu wählen.
Abschnitt 06 Multi-CD-Player Wählen von Discs aus der DiscTitelliste Mit Disc-Titelliste können Sie sich eine Liste der Disc-Titel anzeigen lassen, die in den Multi-CDPlayer eingegeben worden sind, und einen davon für Wiedergabe auswählen. 1 Drücken Sie FUNCTION, um TITLE LIST zu wählen. Drücken Sie FUNCTION, bis TITLE LIST angezeigt wird. 2 Drücken Sie 2 oder 3, um durch die Liste der eingegebenen Titel zu scrollen. • Im Falle einer Disc, deren Titel nicht eingegeben worden sind, erfolgt keine Anzeige.
Abschnitt Multi-CD-Player 06 English Gebrauch von Kompression und Baßverstärkung Español Diese Funktionen können Sie nur mit einem Multi-CD-Player einsetzen, der diese unterstützt. Mit den Funktionen COMP (Kompression) und DBE (Dynamische Baßverstärkung) können Sie die Klangwiedergabequalität des Multi-CDPlayers einstellen. Jede der Funktionen ermöglicht eine Einstellung in zwei Stufen. Die COMP-Funktion balanciert den Ausgang der lauteren und weicheren Töne bei größeren Lautstärken aus.
Abschnitt 07 Audio-Einstellungen Einführung zu AudioEinstellungen 1 4 5 3 2 1 Anzeige AUDIO Zeigt den Audio-Einstellstatus. 2 Anzeige LOUD Erscheint im Display, wenn Loudness eingeschaltet ist. Drücken Sie AUDIO, um die AudioFunktionsbezeichnungen zur Anzeige zu bringen. Drücken Sie AUDIO wiederholt, um zwischen den folgenden Audio-Funktionen umzuschalten: FADER (Balance-Einstellung)—EQ (EqualizerKurven-Feineinstellung)—BASS (Tiefen)— TRE (Höhen)—LOUD (Loudness)—SUB.
Abschnitt Audio-Einstellungen 07 Sie können eine Überblend-/BalanceEinstellung wählen, die eine ideale Hörumgebung für alle Insassen bietet. 1 Drücken Sie SFEQ, um den gewünschten SFEQ-Modus zu wählen. Drücken Sie SFEQ wiederholt, um zwischen den Hinweis Ge Nederlands • Wenn Sie die Bässe bzw. Höhen einstellen, speichert CUSTOM einen SFEQ-Modus, in dem Bässe und Höhen nach Ihrem persönlichen Geschmack eingestellt sind. 3 Betätigen Sie 2 oder 3, um die Links-/Rechts-Lautsprecherbalance einzustellen.
Abschnitt 07 Audio-Einstellungen Gebrauch des Equalizers Mit dem Equalizer können Sie die Entzerrung wunschgemäß an die akustischen Eigenschaften des Fahrgastraums anpassen. Drücken Sie EQ, um den Equalizer zu wählen. • Wurde der Equalizer zuvor auf eine andere Entzerrungskurve als POWERFUL eingestellt, wird der Name dieser Kurve angezeigt, z.B. NATURAL, VOCAL, CUSTOM1, CUSTOM2, EQ FLAT oder SUPER BASS. Abrufen von Entzerrungskurven Sieben Entzerrungskurven sind jederzeit abrufbar gespeichert.
Abschnitt Audio-Einstellungen Equalizer-Kurven-Feineinstellung Baßeinstellung Sie können die Grenzfrequenz und den Baßpegel einstellen. Im Modus FRT1 hat die Baßeinstellung nur auf den hinteren Ausgang Einfluß, der vordere Ausgang kann nicht eingestellt werden. English Die Mittenfrequenz und der Q-Faktor (Kurvencharakteristik) jedes momentan gewählten Kurvenbands (EQ-LOW/EQ-MID/EQHIGH) kann eingestellt werden. 07 Pegel(dB) Mittelfrequenz 1 Drücken Sie AUDIO, um BASS zu wählen.
Abschnitt 07 Audio-Einstellungen Höheneinstellung 4 Drücken Sie ∞, um Loudness auszuschalten. LOUD :OFF erscheint im Display. Sie können die Grenzfrequenz und den Höhenpegel einstellen. Im Modus FRT1 und FRT2 hat die Höheneinstellung nur auf den vorderen Ausgang Einfluß, der hintere Ausgang kann nicht eingestellt werden. 1 Drücken Sie AUDIO, um TRE zu wählen. Drücken Sie AUDIO, bis TRE im Display erscheint. 2 Die gewünschte Frequenz mit 2/3 wählen.
Abschnitt Audio-Einstellungen Wenn der Subwoofer-Ausgang eingeschaltet ist, können Absperrfrequenz und Ausgangspegel des Subwoofers eingestellt werden. 2 Drücken Sie AUDIO, um SLA zu wählen. Drücken Sie AUDIO, bis SLA angezeigt wird. 3 Betätigen Sie 5 oder ∞, um die Programmquellen-Lautstärke einzustellen. Mit jedem Druck auf 5 oder ∞ wird die Programmquellen-Lautstärke erhöht oder gesenkt. • SLA :+4 – SLA :–4 wird angezeigt, während die Programmquellen-Lautstärke erhöht oder gesenkt wird.
Abschnitt 08 Grundeinstellungen Bestimmen der Grundeinstellungen Einstellen des UKW-Kanalrasters Bei Suchlauf-Abstimmung wird normalerweise das 50-kHz-UKW-Kanalraster verwendet. Wenn AF oder TA eingeschaltet ist, ändert sich das Kanalraster automatisch zu 100 kHz. Es könnte vorteilhaft sein, das Kanalraster für AF-Betrieb auf 50 kHz einzustellen. 1 Die Grundeinstellungen bestimmen die Ausgangswerte für verschiedene Geräteeinstellungen. 1 Anzeige FUNCTION Zeigt den Funktionsstatus.
Abschnitt Grundeinstellungen 08 Umschalten der Dimmer-Einstellung Wenn die Frontplatte nicht innerhalb von fünf Sekunden nach Ausschalten der Zündung abgenommen wird, ertönt ein Warnton. Dieser Warnton kann abgeschaltet werden. Um zu vermeiden, daß das Display bei Dunkelheit zu hell wird, blendet es automatisch ab, wenn die Scheinwerfer des Wagens eingeschaltet werden. Der Dimmer kann ein- oder ausgeschaltet werden. 2 Wählen Sie DIMMER Ein oder Aus mit 5/∞.
Abschnitt 08 Grundeinstellungen 1 Drücken Sie FUNCTION, um den Heckausgang-Einstellmodus zu wählen. Drücken Sie FUNCTION wiederholt, bis FRT+REAR angezeigt wird. • In der Heckausgang-Einstellung “Subwoofer” wird FRT+S/W angezeigt. 2 Wählen Sie Vollbereichslautsprecher oder Subwoofer mit 2/3. Durch Drücken von 2/3 wird zwischen FRT+REAR (Vollbereichslautsprecher) und FRT+S/W (Subwoofer) umgeschaltet, und der entsprechende Status wird angezeigt.
Abschnitt Andere Funktionen Wählen von AUX als Programmquelle 5 Zum Zurückschalten auf die Wiedergabeanzeige drücken Sie BAND/ESC. Deutsch Drücken Sie SOURCE, um AUX als Programmquelle zu wählen. Drücken Sie SOURCE, bis AUX angezeigt wird. • Wenn die AUX-Einstellung nicht eingeschaltet ist, kann AUX nicht gewählt werden. Weitere Einzelheiten hierzu finden Sie auf Seite 37 unter Umschalten der AUX-Einstellung.
Abschnitt 09 Andere Funktionen Gebrauch der TelefonStummschaltungs-/Dämpfungsund Freisprech-Funktion Telefon-Stummschaltungs/Dämpfungsfunktion Der Ton von diesem System wird automatisch stummgeschaltet oder gedämpft, wenn eine Verbindung über ein an dieses Gerät angeschlossenes Zellular-Telefon zustande kommt. Wenn Sie HANDS-F:OFF für die FreisprechBetriebsart im Ausgangseinstellmenü wählen, wird die Mobiltelefon-Stummschaltungs/Dämpfungsfunktion aktiviert (siehe Seite 38).
Abschnitt Zusätzliche Informationen CD-Player und Pflege Nederlands Ge Italiano • Wenn die Wagenheizung bei niedrigen Temperaturen läuft, kann sich Feuchtigkeit auf Bauteilen im Inneren des CD-Players niederschlagen. Kondensation kann dazu führen, Français • CD-R (CD-Recordable)und CD-RW (CDRewritable)-Discs, die mit einem anderen CDR/CD-RW-Gerät als einem Musik-CDRecorder bespielt worden sind, können mit diesem CD-Player unter Umständen nicht richtig wiedergegeben werden.
Abschnitt 10 Zusätzliche Informationen Bedeutung der Fehlermeldungen des eingebauten CD-Players Wenn Störungen während CDWiedergabebetriebs auftreten, erscheint unter Umständen eine Fehlermeldung im Display. Wenn eine Fehlermeldung im Display erscheint, identifizieren Sie das Problem anhand der nachstehenden Tabelle und versuchen Sie es wie vorgeschlagen zu beheben. Falls der Fehler nicht aufgehoben werden kann, wenden Sie sich bitte an Ihren Händler oder ein Pioneer Service-Center in Ihrer Nähe.
Abschnitt Zusätzliche Informationen Technische Daten Verstärker Typ ....................................... Compact-Disc-DigitalAudiosystem Kompatible Disc ................. Compact-Disc Signalformat: Abtastfrequenz ........... 44,1 kHz Anzahl der Quantelungsbits ...................................... 16; linear Frequenzgang ..................... 5 – 20.000 Hz (±1 dB) Signal-Rauschabstand ....... 94 dB (1 kHz) (IEC-A-Netz) Dynamikbereich ................. 92 dB (1 kHz) Anzahl der Kanäle ..............
PIONEER CORPORATION 4-1, MEGURO 1-CHOME, MEGURO-KU, TOKYO 153-8654, JAPAN PIONEER ELECTRONICS (USA) INC. P.O. Box 1540, Long Beach, California 90801-1540, U.S.A. TEL: (800) 421-1404 PIONEER EUROPE NV Haven 1087, Keetberglaan 1, B-9120 Melsele, Belgium TEL: (0) 3/570.05.11 PIONEER ELECTRONICS AUSTRALIA PTY. LTD. 178-184 Boundary Road, Braeside, Victoria 3195, Australia TEL: (03) 9586-6300 PIONEER ELECTRONICS OF CANADA, INC.