DJ Controller DDJ-SZ http://pioneerdj.com/support/ The Pioneer DJ support site shown above offers FAQs, information on software and various other types of information and services to allow you to use your product in greater comfort. http://serato.com/ For the latest version of the Serato DJ software, access Serato.com and download the software from there.
IMPORTANT CAUTION RISK OF ELECTRIC SHOCK DO NOT OPEN The lightning flash with arrowhead symbol, within an equilateral triangle, is intended to alert the user to the presence of uninsulated “dangerous voltage” within the product’s enclosure that may be of sufficient magnitude to constitute a risk of electric shock to persons. CAUTION: TO PREVENT THE RISK OF ELECTRIC SHOCK, DO NOT REMOVE COVER (OR BACK). NO USER-SERVICEABLE PARTS INSIDE. REFER SERVICING TO QUALIFIED SERVICE PERSONNEL.
WARNING This equipment is not waterproof. To prevent a fire or shock hazard, do not place any container filled with liquid near this equipment (such as a vase or flower pot) or expose it to dripping, splashing, rain or moisture. AVERTISSEMENT Cet appareil n’est pas étanche.
FEDERAL COMMUNICATIONS COMMISSION DECLARATION OF CONFORMITY This device complies with part 15 of the FCC Rules. Operation is subject to the following two conditions: (1) This device may not cause harmful interference, and (2) this device must accept any interference received, including interference that may cause undesired operation. Product Name: DJ Controller Model Number: DDJ-SZ, DDJ-SZ-N Responsible Party Name: PIONEER ELECTRONICS (USA) INC. SERVICE SUPPORT DIVISION Address: 1925 E. DOMINGUEZ ST.
Contents How to read this manual ! ! ! ! Thank you for buying this Pioneer product. Be sure to read this booklet and the “Operating Instructions” provided on the Pioneer DJ support site. Both include important information that should be fully understood before using this product. After you have finished reading the instructions, put them away in a safe place for future reference. For instructions on obtaining the Serato DJ software’s manual, see Acquiring the manual (p.6).
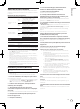
Before start Downloading the Serato DJ software manual 1 Insert the CD-ROM into the computer’s optical drive. What’s in the box ! ! ! ! 1 CD-ROM (Installation Disc) Power cord USB cable1 Operating Instructions (Basic Edition) Only one USB cable is included with this unit. To connect two units, use a cable conforming to USB 2.0 standards. Acquiring the manual The operating instructions may be in a file in PDF format. Adobe® Reader® must be installed to read files in PDF format.
Serato DJ is a DJ software application by Serato. DJ performances are possible by connecting the computer on which this software is installed to this unit. Minimum operating environment Supported operating systems CPU and required memory 32-bit version Intel® processor, Core™ i3, i5 and i7 1.07 GHz or better, Intel® processor, Core™ 2 Duo 2.0 GHz or better 64-bit version Intel® processor, Core™ i3, i5 and i7 1.07 GHz or better, Intel® processor, Core™ 2 Duo 2.
18 Read the terms of the license agreement carefully, and if you agree, select [I agree to the license terms and conditions], then click [Install]. 8 Double-click [DDJ-SZ_AudioDriver.pkg]. The driver installation screen appears. 9 Check the details on the screen and click [Continue]. 10 When the end user license agreement appears, read Software end user license agreement carefully, then click [Continue]. 11 If you consent to the provisions of the Software end user license agreement, click [Agree].
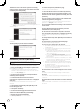
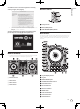
Browser section Before start 21 Read the terms of the license agreement carefully, and if you agree, click [Agree]. 1 2 3 1 Rotary selector ! If you do not agree to the contents of the usage agreement, click [Disagree] to cancel installation. 22 If the following screen appears, drag and drop the [Serato DJ] icon on the [Applications] folder icon. 2 BACK (VIEW) button 3 LOAD PREPARE (AREA) button Deck section This section is used to control the four decks.
c LOOP IN button 6 MASTER CUE button d LOOP OUT button 7 Master level indicator e PARAMETERc button, PARAMETERd button 8 BOOTH MONITOR control f HOT CUE mode button 9 MASTER OUT COLOR control g ROLL mode button a OSCILLATOR SELECT button h SLICER mode button b OSCILLATOR VOLUME control i SAMPLER mode button c OSCILLATOR PARAMETER control j Performance pads d OSC ASSIGN selector switch k PLAY/PAUSE f button e HEADPHONES LEVEL control l CUE button f HEADPHONES MIXING control m SYNC button
Before start Effect section This section is used to control the two effect units (FX1 and FX2). Controls and buttons to operate the FX1 unit are located on the left side of the controller, those to operate the FX2 unit are located on the right side of the controller. The channels to which the effect is to be applied are set using the effect assign buttons.
5 Connect the power cord. Operation To power outlet Power cord (included) Connections 1 Connect headphones to one of the [PHONES] terminals. 6 Press the [u] switch on this unit’s rear panel to turn this unit’s power on. 2 Connect powered speakers, a power amplifier, components, etc., to the [MASTER OUT 1] or [MASTER OUT 2] terminals. Turn on the power of this unit.
Starting the system Operation Launching Serato DJ For Windows From the Windows [Start] menu, click the [Serato DJ] icon under [All Programs] > [Serato] > [Serato DJ]. For Mac OS X In Finder, open the [Application] folder, then click the [Serato DJ] icon.
Importing tracks The following describes the typical procedure for importing tracks. ! There are various ways to import tracks with the Serato DJ software. For details, see the Serato DJ software manual. ! If you are already using Serato DJ software (Scratch Live, ITCH or Serato DJ Intro) and have already created track libraries, the track libraries you have previously created can be used as such.
Playing tracks and outputting the sound c Names of controls, etc. Position MASTER LEVEL control Turned fully counterclockwise CD, USB selector switch [USB] position TRIM control Turned fully counterclockwise ISO (HI, MID, LOW) controls Center Channel fader Moved forward Crossfader assign selector switch [THRU] position Operation The following describes the procedure for outputting the channel 1 sound as an example. ! Set the volume of the devices (power amplifier, powered speakers, etc.
Audio Section Additional information Changing the settings ! For detailed instructions on changing this unit’s settings, see Changing the settings in the Operating Instructions. Troubleshooting ! ! Incorrect operation is often mistaken for trouble or malfunction. If you think that there is something wrong with this component, check the items in the “Troubleshooting” section of this unit’s operating instructions and the [FAQ] for the [DDJ-SZ] on the Pioneer DJ support site.
Additional information 17 En
En
PIONEER ELECTRONICS (USA) INC. WARRANTY Pioneer Electronics (USA) Inc. (PUSA) warrants that products distributed by PUSA in the U.S.A. and Canada that fail to function properly under normal use due to a manufacturing defect when installed and operated according to the owner ’s manual enclosed with the unit will be repaired or replaced with a unit of comparable value, at the option of PUSA, without charge to you for parts or actual repair work.
To register your product, find the nearest authorized service location, to purchase replacement parts, operating instructions, or accessories, please go to one of following URLs : Pour enregistrer votre produit, trouver le service après-vente agréé le plus proche et pour acheter des pièces de rechange, des modes d’emploi ou des accessoires, reportez-vous aux URL suivantes : In the USA & Canada/Aux Etats-Unis & Canada http://www.pioneerelectronics.com S018_B1_EnFr_PSV © 2013 PIONEER CORPORATION.