DVD PLAYER REPRODUCTOR DVD DVJ-1000 Operating Instructions Manual de instrucciones
Entorno de funcionamiento IMPORTANT CAUTION RISK OF ELECTRIC SHOCK DO NOT OPEN The lightning flash with arrowhead symbol, within an equilateral triangle, is intended to alert the user to the presence of uninsulated "dangerous voltage" within the product's enclosure that may be of sufficient magnitude to constitute a risk of electric shock to persons. IMPORTANTE CAUTION: TO PREVENT THE RISK OF ELECTRIC SHOCK, DO NOT REMOVE COVER (OR BACK). NO USER-SERVICEABLE PARTS INSIDE.
Contents Before Operating Features ................................................................................... 2 Handling Precautions ............................................................... 4 Discs Usable with This Unit ..................................................... 5 Names and Functions of Parts ................................................. 8 Operation panel .................................................................. 8 Display ..............................................
Before Operating (Features) Features This player has been designed to provide CD/DVD playback features and functions demanded by professional disco club DJs and VJs. It is a professional DVD player equipped with operational ease, sound quality, and functions superior to those found on the professional analog players conventionally used by DJs.
Before Operating (Features) Once set, a loop can be returned to any number of times After canceling loop play, pressing the RELOOP/EXIT button causes playback to return and begin again from the previously set loop. Turning the function ON/OFF in time with the track’s rhythm allows a variety of new performance possibilities.
Before Operating (Handling Precautions) Handling Precautions Installation location About the carrying case ¶ Placing and using the player for long periods on heat-generating sources such as amplifiers or near spotlights, etc. will affect product performance. Avoid placing the player on heatgenerating sources. ¶ Install this player as far as possible away from tuners and TV sets. The player installed in close proximity to such equipment may cause noise or degradation of the picture.
Before Operating (Discs Usable with This Unit) Discs Usable with This Unit The following marks and logos are displayed on disc labels, packaging, or jackets.
Before Operating (Discs Usable with This Unit) Marks displayed on DVD The following symbols and marks may be displayed on DVD labels or packaging: Mark Number of recorded audio tracks 2 2 Number of recorded subtitles Some DVDs are designed explicitly to prevent the use of certain operations or to prevent changing operation methods. As a result, the methods used to operate each disc may vary, and some techniques may not be usable with certain discs.
Before Operating (Discs Usable with This Unit) Handling discs Digital Versatile Discs (DVD) DVD video, DVD-R or DVD-RW discs are recorded in units called “titles,” with each title being divided into one or more sub-divisions called “chapters.” Further, some, discs are furnished with menus for navigating the disc, but menus may not be included with all titles. In the case of commercial films, a single movie normally corresponds to a single title.
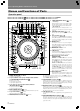
Before Operating (Names and Functions of Parts) Names and Functions of Parts Operation panel Buttons and controls with the Buttons and controls with the 1 2 POWER 45 OFF TIME MODE mark are disabled when the NORMAL/DJ switch is set to NORMAL. mark are disabled when the NORMAL/DJ switch is set to DJ.
Before Operating (Names and Functions of Parts) Each time pressed, sets VINYL mode alternately ON/OFF. VINYL mode ON: If surface of jog dial is touched during playback, playback stops, and if the dial is then rotated, image and sound are output in response to the amount of rotation. (if the angled surface of the jog dial is rotated without touching the top, pitch bend operation is enabled.) ¶ The current jog mode is memorized even when power is turned off.
Before Operating (Names and Functions of Parts) Display 1 2 3 4 5 6 7 8 9 10 11 24 12 23 22 21 20 19 18 17 16 1. Title/Folder number display (TITLE/FLD 00 to 99) Indicates the DVD title number. During MP3 playback, displays folder number. Not displayed during CD playback. 2. Chapter number (CHP 000 to 999) Indicates the DVD chapter number. During CD/MP3 playback, “CHP” does not appear. 3. Track number (TRACK 00 to 99/000 to 999 (MP3)) Indicates CD or MP3 track number.
Before Operating (Names and Functions of Parts) Jog dial display Displays play position, with one revolution equivalent to 135 frames. The display rotates during playback, and stops during pause. 2 2. Cue point position display 3 4 Displays the position of cue points. 3. Audio/video memory status display Flashes during writing to the audio/video memory. While indicator is flashing, it may not be possible to record real time cue points or hot cue points. 5 4.
Before Operating (Names and Functions of Parts) Main video output (VIDEO OUT) and preview video output (PREVIEW OUT) ★ The example shown here is an illustration meant to depict the general display contents, and may differ somewhat from actual monitor appearance. This unit is equipped with both main video output (VIDEO OUT) and preview video output (PREVIEW OUT) connectors. In NORMAL mode, both VIDEO OUT and PREVIEW OUT produce the same video signals.
Before Operating (Connections) Connections English Before making or changing the connections, switch off the power and disconnect the power cord from the AC outlet. 1. Connections to a Pioneer DJ mixer (sold separately) (audio output and control connector) Using the accessory audio cable, connect the white plug to the L (left) connector, and connect the red plug to the R (right) connector.
Before Operating (Connections) 2. Control cord connection for relay play By using the accessory control cord to connect two DJ players, automatic relay play can be performed between the two units. (☞ P.41) DVJ-1000 AUDIO OUT R L DVJ-1000 AUDIO OUT CONTROL NORMAL DJ R CONTROL NORMAL DJ L COMPOSITE COMPOSITE VIDEO OUT DIGITAL OUT POWER OFF S AC IN VIDEO OUT ON Accessory control cord DIGITAL OUT S PREVIEW OUT POWER OFF ON S AC IN S SYNC IN PREVIEW OUT SYNC IN 3.
Before Operating (Connections) English Note: Most DJ functions (cue, loop, reloop, tempo adjust, hot cue, jog dial, reverse play) are not supported when the NORMAL/DJ switch is set to “NORMAL”. In addition, the pause mode is silent, not audible. 5.
Before Operating (Connections) 6. Connection to video mixer Use a standard video cable (RCA plug) or S-Video cable for these connections.
Preparations (Setup) Setup Initial setup is required before playing DVDs. TV system setting for video output This setting is used to switch the TV system used for video output. Confirm on the following table the TV system format in which each kind of disc will be output. Player setting Disc type DVD (NTSC) DVD (PAL) CD or no disc AUTO mode NTSC mode PAL mode NTSC NTSC PAL NTSC NTSC or PAL NTSC PAL PAL PAL The “Setup Navigator” uses a dialog format to make basic television and amplifier settings.
Preparations (Setup) Select type of television connected Sets the type of television connected to the player. Press the cursor button’s up/down sides ( / ) to move the cursor to the item desired, then press ENTER button to confirm. Audio1 A2 Video1 V2 Language General Setup Navigator TV Connection TV Type ENTER Select SETUP Exit ★ Digital output during DJ mode is automatically converted to linear PCM only. Set the type of digital signal supported by the amplifier connected to the player.
Preparations (Setup) Setup Menu items ¶ ❚ indicates factory default values. ¶ settings are displayed in the Setup Menu’s [Expert] mode. Audio1 A2 V1 Video2 Language General Background Video Adjust Still Picture On Screen Display Angle Indicator Audio1 A2 Video1 V2 Language General Audio DRC Dolby Digital Out DTS Out 96kHz PCM Out MPEG Out Digital Out Off On Dolby Digital Dolby Digital PCM Off DTS 96kHz 48kHz 96kHz MPEG MPEG PCM On Off P.21 P.21 OSD Language P.
Preparations (Setup) To return all settings to their factory defaults Use this command to return all changed settings to their factory default values. 1. Turn power OFF. 2. While holding the STOP button depressed, set the POWER switch to ON, and continue holding the STOP button until the “POWER ON” indication goes off. ¶ All setting contents will be returned to their factory default values.
Preparations (Setup) Digital output setting The Setup Menu includes two mode levels, [Basic] and [Expert]; the [Expert] mode allows more advanced settings. Audio1 A2 Video1 V2 Language General Setup Menu Mode — Expert Setup Navigator Basic Parental Lock — Off (us) Change menu mode Move SETUP Exit Expert: Displays advanced settings. Basic: ) are displayed Displays basic settings; simple explanations ( for the items selected (factory default settings).
Preparations (Setup) [Audio2] settings MPEG output Set this option to [MPEG] if the connected amplifier supports MPEG audio. Audio1 A2 Video1 V2 Language General Surround setting Audio DRC — Off Dolby Digital Out — Dolby Digital DTS Out — Off 96kHz PCM Out — MPEG MPEG Out — MPEG 3 PCM Change MPEG audio output mode Move ★ This option is not supported in DJ mode. This function is supported only when connected to the audio output connectors. Not supported during use of DTS audio, linear PCM 96 kHz audio.
Preparations (Setup) Hi-Bit function (Expert Mode) By converting 16-bit to 20-bit audio data to 24-bit, smooth, detailed sound quality is produced even at low listening levels. Virtual Surround — Off Legato PRO — Off Hi–Bit — On Off English On: Hi-Bit function is enabled (factory default setting) Off: Hi-Bit function is disabled. A1 Audio2 Video1 V2 Language General ¶ In DJ mode, 24-bit processing is normally used, regardless of the setting selected. Move SETUP Exit [Video1] settings ¶ See P.
Preparations (Setup) Select S-Video output (Expert Mode) Set this option to select the video signal output from the S-Video connector. ¶ When the S-Video connector is used to connect the player to a television set, the image may appear vertically compressed (or stretched horizontally). In this case, select [S1].
Preparations (Setup) INDEX 1. Use the four sides of the cursor button ( / / / ) to select [Video2] \ [Video Adjust] \ [Start], then press the ENTER button. The Picture Quality Controls menu will appear. 2. Use the cursor button’s up/down sides ( / ) to select [Video Setup] and press the ENTER button. 5. Repeat steps 3 and 4 for all desired setting items.
Preparations (Setup) Turn on-screen display ON/OFF (Expert Mode) Select the Audio Language Sets player’s onscreen display ON/OFF. Select the language heard in audio channels. This setting cannot be changed during playback.
Preparations (Setup) INDEX This function selects either automatic audio and subtitle language selection, or manual selection via the Setup Menu are used. This setting cannot be changed during playback. Audio1 A2 Video1 V2 Language General OSD Language — Audio Language — Subtitle Language — Auto Language — English English English On Off The Language selection menu will appear.
Preparations (Setup) Set Subtitle Display ON/OFF (Expert Mode) Set language for forced subtitles (Expert Mode) Select whether to turn subtitles ON, OFF, or to display assist subtitles. ¶ This setting cannot be changed during playback. On some DVDs, even when the [Subtitle Display] is set to [Off], some subtitles may be displayed automatically. Use this command to select the language used for such subtitles. ¶ This setting cannot be changed during playback.
Preparations (Setup) INDEX Setting Parental Lock Change the Parental Lock level 1. Select [Level] and press the ENTER button. The [Confirm Code Number] screen will appear. Audio1 A2 Video1 V2 Language General Level: Confirm Code Number Enter 4—Digit Code Recording a password A password must be recorded before the [Level] and [Country Code] can be selected. SETUP Return Exit 2. Input the previously recorded 4-digit password (code number).
Preparations (Setup) Country/Area Code List 3. Press the ENTER button. The [Change Code Number] screen will appear.
Basic Operations (Loading and Removing Discs) Forced eject function In event of a player malfunction or if the EJECT (0) button does not respond to allow removal of a disc, the disc can be removed by inserting the accessory pin into the forced eject hole on the front of the player. When using the forced eject function, be sure to following the accompanying precautions. 1 Turn off the player’s power and wait for at least one minute. Insert with label surface upwards Hold evenly when inserting 1.
Basic Operations Buttons and controls with the Buttons and controls with the Basic Operations mark are disabled when the NORMAL/DJ switch is set to NORMAL. mark are disabled when the NORMAL/DJ switch is set to DJ.
Basic Operations ■ Setting auto cue ON/OFF Hold the TIME MODE/AUTO CUE button depressed for 1 second or more to alternate the auto cue function ON/OFF. The display’s auto cue indicator (A.CUE) lights when the auto cue function is active. ¶ The auto cue function ON/OFF status is memorized even when the player’s power is turned off. ¶ The auto cue sensitivity level can be changed if desired. ■ Changing the auto cue sensitivity level 1. Hold the TIME MODE/AUTO CUE button depressed for 5 seconds or more.
Basic Operations NORMAL/DJ Fast forward/fast reverse Press the REV1/FWD¡ button during playback or when in the pause mode. ANGLE POWER OFF TIME MODE DVD TITLE MP3 FOLDER / ON DVJ-1000 STOP LOCK UNLOCK AUTO CUE EJECT TEXT MODE DVD TITLE MP3 FOLDER HOT CUE ANGLE SUBTITLE AUDIO REALTIME CUE IN OUT IN ADJUST OUT ADJUST DISPLAY RELOOP/ EXIT DELETE 4-BEAT ONE-TRACK MEMORY MENU T.
Basic Operations Use the PREVIOUS 4/NEXT¢ buttons. ¶ Each time the button is pressed, playback skips to the next chapter (DVD) or track (CD) in the direction indicated by the button pressed. To return to the start of the currently playing track, press the PREVIOUS 4 button once. To return to the beginning of the track preceding the currently playing track, press the PREVIOUS 4 button twice. ¶ Hold the button depressed to perform continuous track search.
Basic Operations ■ Setting a cue point with VINYL mode ON NORMAL/DJ POWER OFF TIME MODE ON DVJ-1000 STOP LOCK UNLOCK AUTO CUE EJECT TEXT MODE TEXT MODE DVD TITLE MP3 FOLDER HOT CUE DVD TITLE MP3 FOLDER / IN/ REAL TIME CUE/ IN ADJUST ANGLE SUBTITLE AUDIO REALTIME CUE IN OUT IN ADJUST OUT ADJUST DISPLAY RELOOP/ EXIT DELETE 4-BEAT ONE-TRACK MEMORY MENU T.
Basic Operations During playback, press the MASTER TEMPO button. The master tempo indicator lights and the “MT” indicator appears on the display. In this way, the music pitch will not vary even if the TEMPO control slider is used to change the tempo (speed). ¶ Note that sound quality will deteriorate, however, due to digital processing of the audio signals. ¶ When power is first turned on, this function defaults to OFF.
Basic Operations Mixing different tracks (splicing) NORMAL/DJ POWER OFF TIME MODE ON DVJ-1000 STOP LOCK UNLOCK AUTO CUE EJECT TEXT MODE TEXT MODE ★ This function is not supported when the rear panel NORMAL/DJ switch is set to the NORMAL position. (Example) To splice the next track (B) to the currently playing track (A). ¶ Connect the first player A to DJ mixer CH-1, and second player B to CH-2.
Advanced Operations Advanced Operations OFF TIME MODE DVJ-1000 STOP LOCK UNLOCK EJECT TEXT MODE DVD TITLE MP3 FOLDER HOT CUE A ON AUTO CUE HOT CUE ANGLE SUBTITLE AUDIO REALTIME CUE IN OUT IN ADJUST OUT ADJUST DISPLAY RELOOP/ EXIT DELETE 4-BEAT ONE-TRACK MEMORY MENU T.
Advanced Operations OUT/ OUT ADJUST BACK& RELOOP/ FORTH EXIT POWER IN/ REALTIME CUE/ IN ADJUST OFF TIME MODE ON DVJ-1000 STOP LOCK UNLOCK AUTO CUE EJECT TEXT MODE DVD TITLE MP3 FOLDER HOT CUE A NORMAL/DJ HOT CUE ANGLE SUBTITLE AUDIO REALTIME CUE IN OUT IN ADJUST OUT ADJUST DISPLAY RELOOP/ EXIT DELETE 4-BEAT ONE-TRACK MEMORY MENU T.
Advanced Operations During playback, press the 4-BEAT/ONE-TRACK button. ¶ The normal loop playback indicators will appear (OUT/OUT ADJUST and IN/REALTIME CUE/IN ADJUST buttons will flash). ¶ The point at which the button is pressed will become the loop-in point, and a loop-out point will be set automatically as described below; loop playback will then continue between the two points. · If the immediately preceding BPM value is known, a point four beats afterwards will become the loop-out point.
Advanced Operations To view guide displays Press the DISPLAY button to turn the guide displays ON/OFF. POWER TIME MODE OFF ON DVJ-1000 STOP LOCK UNLOCK AUTO CUE DISPLAY EJECT TEXT MODE DVD TITLE MP3 FOLDER ANGLE SUBTITLE AUDIO DISPLAY DELETE MEMORY MENU T.
Advanced Operations (Operations Using Memory Cards) Operations Using Memory Cards POWER OFF TIME MODE ON DVJ-1000 STOP LOCK UNLOCK AUTO CUE Open the memory card door and wait until the CARD indicator lamp goes out, then press in the memory card slightly and allow it to eject; grasp the end of the card and pull out carefully.
Advanced Operations (Operations Using Memory Cards) ■ Recording a loop point MEMORY POWER OFF TIME MODE ON DVJ-1000 STOP LOCK UNLOCK AUTO CUE EJECT TEXT MODE DVD TITLE MP3 FOLDER HOT CUE A HOT CUE ANGLE SUBTITLE AUDIO REALTIME CUE IN OUT IN ADJUST OUT ADJUST DISPLAY RELOOP/ EXIT DELETE 4-BEAT ONE-TRACK MEMORY MENU T.MENU CUE / LOOP CALL RETURN SETUP TOUCH/BRAKE ENTER ENTER LOOP JOG ADJUST B RELEASE/START LIGHT BACK & FORTH HEAVY REC MODE C HOT CUE REC MODE 1.
2. Use the cursor button ( / / / ) to select the desired thumbnail image, and press the ENTER button. While reading data from a memory card, the main unit’s display will show the “CUE Readin” or “LOOP Readin” message. ¶ When playing a copy-protected disc, thumbnail image of set point data cannot be recorded to the memory card. If thumbnail images are not recorded, the 1–001 1–002 1–003 1–004 memory point time 0.23 0.04 0.05 0.02 data for the cue points 1–004 1–006 1–006 1–006 or loop points will be 0.
Advanced Operations (Operations Using Memory Cards) DELETE POWER OFF TIME MODE ON To copy memory card data MEMORY 1. With no disc or memory card loaded: Hold the MEMORY button pressed for 5 seconds or more. DVJ-1000 STOP UNLOCK AUTO CUE ¶ The display will scroll the “COPY MODE” “CARD A IN” messages. LOCK EJECT TEXT MODE DVD TITLE MP3 FOLDER HOT CUE ANGLE SUBTITLE AUDIO REALTIME CUE IN OUT IN ADJUST OUT ADJUST DISPLAY RELOOP/ EXIT DELETE 4-BEAT ONE-TRACK MEMORY MENU T.
Other (Troubleshooting) Incorrect operations can be mistaken as malfunctions. If you believe the unit is not operating correctly, consult the chart below. Sometimes incorrect operation may be due to a malfunction in another component. If the problem is not fixed, check the other components used with the player. If the problem still persists, contact your nearest Pioneer authorized service center or dealer for service. Remedy Probable Diagnosis Symptom No power. ¶ Power cord isn’t connected.
Other (Troubleshooting) Symptom Jog dial doesn’t respond. Jog dial performs different operation from that intended. Probable Diagnosis ¶ NORMAL/DJ switch is set to “NORMAL”. ¶ Jog mode is incorrect. ¶ Hyper-jog mode is incorrect. ¶ With DVD, some discs do not support point DJ operations during playback. Remedy ¶ Set NORMAL/DJ switch to “DJ”. ¶ Press the JOG MODE button to select desired jog mode (VINYL ON/OFF). ¶ Press the HYPERJOG MODE button to select desired mode.
¶ This component may fail to operate properly due to influence of static electricity or other external influences. In this case, try turning off the POWER switch, and turn on the power again only when the disc has fully stopped rotating. ¶ This unit cannot play DVD-R/DVD-RW discs recorded in video format unless they have been finalized. ¶ This unit cannot play DVD-R/DVD-RW discs recorded in VR format. ¶ This unit cannot play partially recorded CD-R/CD-RW discs that have not been finalized.
Other (Dot Matrix Guide Display Messages) Dot Matrix Guide Display Messages Message Event/Display Timing LOAD IN Displayed when loading a disc. END EJECT NO DISC Displayed when no disc is loaded. STOP RESUME STILL Displayed when playing a still image during DVD playback in NORMAL mode. PLAY Displayed during DVD playback in NORMAL mode. PAUSE Message Event/Display Timing Displayed at end of playback.
Other (Specifications) 1. General 4. Audio Output System ............................................................... DVD-Video, CD Power requirements ................ AC 110 V to 240 V, 50 Hz/60 Hz Power consumption .......................................................... 40 W Operating temperature ...................................... +5 ˚C to +35 ˚C Operating humidity ................................................. 5 % to 85 % (There should be no condensation of moisture.) Weight .............
52 En
Antes de la operación Enhorabuena por la adquisición de este producto Pioneer. Lea completamente este manual de instrucciones para aprender a operar correctamente el aparato. Después de haber terminado la lectura de las instrucciones, guarde el manual en un lugar seguro para poderlo consultar en el futuro. En algunos países o regiones, la forma de la clavija de alimentación y del enchufe de corriente pueden ser diferentes de la mostrada en las ilustraciones de explicación.
Antes de la operación (Características) Características Este reproductor ha sido diseñado para que ofrezca las características y funciones de reproducción de discos CD/DVD que demandan los DJ y VJ profesionales de discotecas. Es un reproductor de discos DVD profesional, fácil de utilizar, con sonido de calidad, y con funciones superiores a las encontradas en los reproductores analógicos que normalmente utilizan los DJ.
Antes de laBefore operación Operating (Características) (Features) Una vez establecido un bucle, éste podrá repetirse las veces que se desee. Después de cancelar la reproducción de bucle, si presiona el botón RELOOP/EXIT la reproducción volverá y comenzará de nuevo desde el bucle previamente establecido. La activación/desactivación de esta función en combinación con el ritmo de la pista permitirá una gran variedad de nuevas posibilidades de actuación.
Antes de la operación (Precauciones de manejo) Precauciones de manejo Lugar de instalación Acerca de la caja de transporte ¶ La colocación y utilización del reproductor durante mucho tiempo sobre fuentes de generación de calor, tales como amplificadores, o cerca de lámparas, etc. Afectará el rendimiento del reproductor. Evite colocar el reproductor sobre fuentes que generan calor. ¶ Instale este reproductor lo más alejado posible de sintonizadores y televisores.
Antes de la operación (Discos utilizables con esta unidad) Tipos de discos reproducibles en esta unidad Las marcas y logotipos siguientes están indicados en las etiquetas, las envolturas, o las fundas de los discos.
Antes de la operación (Discos utilizables con esta unidad) Marcas indicadas en los discos DVD Los símbolos y marcas siguientes pueden estar indicados en las etiquetas o las envolturas: Marca Número de pistas de audio grabadas 2 2 Número de subtítulos grabados Número de ángulos grabados 3 16 : 9 LB 4 Significado ALL Relación de aspecto de la grabación Número de región Este reproductor podrá reproducir discos marcados con “4” o “ALL”.
Antes de la operación (Discos utilizables con esta unidad) Manejo de los discos Discos versátiles digitales (DVD) Los discos de vídeo DVD, DVD-R, o DVD-RW están grabados en unidades denominadas “títulos”, y cada título se divide en una o más subdivisiones denominadas “capítulos”. Además, algunos discos disponen de menús para navegar por ellos, pero los menús pueden no estar incluidos en todos los títulos. En el caso de películas comerciales, una sola película normalmente corresponde a un solo título.
Antes de la operación (Nomenclatura y funciones de las partes) Nomenclatura y funciones de las partes Panel de operación Los botones y controles marcados con Los botones y controles marcados con 1 2 POWER 45 OFF TIME MODE estarán inhabilitados cuando el selector NORMAL/DJ esté ajustado en NORMAL. estarán inhabilitados cuando el selector NORMAL/DJ esté ajustado en DJ.
Antes de la operación (Nomenclatura y funciones de las partes) 20. Indicador de modo VINYL Se encenderá cuando ajuste el modo de lanzadera a VINYL. 21. Botón selector de margen de control de tempo (TEMPO) Cada vez que presione este botón, el margen variable del control deslizable TEMPO cambiará (±6 %, ±10 %, ±16 %, WIDE). Cuando seleccione WIDE, el margen variable se ajustará de +70 % a –100 % durante la reproducción de discos DVD y MP3, y de ±100 % durante la reproducción de discos CD. 22.
Antes de la operación (Nomenclatura y funciones de las partes) Visualizador 1 2 3 4 5 6 7 8 9 10 11 24 12 23 22 21 20 19 18 17 16 1. Visualizador del número de título/carpeta (TITLE/FLD 00 a 99) Indica el número de título del disco DVD. Durante la reproducción de MP3, visualiza el número de carpeta. No se visualizará durante la reproducción de un disco CD. 2. Número de capítulo (CHP 000 a 999) Indica el número de capítulo del disco DVD.
Antes de la operación (Nomenclatura y funciones de las partes) Visualizador del mando de lanzadera 1 1. Visualizador de operación Visualizará la posición de reproducción, con una revolución equivalente a 135 tramas. El visualizador girará durante la reproducción, y se parará durante la pausa. 2 2. Visualizador de posición de puntos de localización 3 4 Visualizará la posición de los puntos de localización. 3.
Antes de la operación (Nomenclatura y funciones de las partes) Salida de vídeo principal (VIDEO OUT) y salida de vídeo para comprobación previa (PREVIEW OUT) ★ El ejemplo mostrado aquí es una ilustración que tiene como fin representar el contenido general del visualizador, y puede diferir un poco del aspecto real del monitor. Esta unidad dispone de conectores de salida de vídeo principal (VIDEO OUT) y de salida para comprobación previa (PREVIEW OUT).
Antes de la operación (Conexiones) Conexiones Antes de hacer o cambiar las conexiones, desconecte la alimentación y desenchufe el cable de la alimentación de la toma de CA. Utilizando el cable de audio accesorio, conecte la clavija blanca en el conector L (izquierdo), y la roja en el conector R (derecho). Conectando el cable de control accesorio, el reproductor podrá controlarse desde el mezclador, lo que permitirá operaciones de reproducción con fundido y de localización regresiva.
Antes de la operación (Conexiones) 2. Conexión del cable de control para reproducción con relevo Utilizando el cable de control accesorio para conectar dos reproductores DJ, podrá realizarse la reproducción con relevo entre las dos unidades. (☞ P.
Antes de la operación (Conexiones) Nota: La mayoría de las funciones de DJ (localización, bucle, repetición de bucle, ajuste de tempo, localización rápida, mando de lanzadera, reproducción regresiva) no podrán utilizarse cuando el selector NORMAL/DJ esté ajustado a “NORMAL”. Además, el modo de pausa será silencioso, no habrá sonido.
Antes de la operación (Conexiones) 6. Conexión a un mezclador de vídeo Utilice un cable de vídeo estándar (clavija RCA) o un cable de vídeo S para estas conexiones.
Preparativos (Configuración) Antes de reproducir discos DVD será necesario realizar la configuración inicial. Ajuste del sistema de televisión para la salida de vídeo Este ajuste se emplea para cambiar el sistema de televisión utilizado para la salida de vídeo. Confirme en la tabla siguiente el formato del sistema de televisión en el que deba salir cada tipo de discos.
Preparativos (Configuración) Seleccionar el tipo de televisor conectado (TV Type) Establece el tipo de televisor conectado al reproductor. Presione los lados superior/inferior ( / ) del botón del cursor para mover éste hasta el elemento deseado, y después presione el botón ENTER para confirmar.
Preparativos (Configuración) Elementos de Setup Menu (Menú de configuración) ¶ ❚ indica valores predeterminados en fábrica. los ajustes se visualizarán en el Menú de ¶ configuración en el modo [Expert].
Preparativos (Configuración) Para devolver todos los ajustes a sus valores predeterminados en fábrica Utilice este comando para devolver todos los ajustes cambiados a sus valores predeterminados en fábrica. 1. Ponga el interruptor POWER en OFF. 2. Manteniendo presionado el botón STOP, ponga el interruptor POWER en la posición ON, y continúe manteniendo presionado el botón STOP hasta que se apague la indicación “POWER ON”.
Preparativos (Configuración) Ajuste de salida digital El Menú de configuración incluye dos niveles de modo [Basic] y [Expert]. El modo [Expert] es el que permite ajustes más avanzados. Audio1 A2 Video1 V2 Language General Setup Menu Mode — Expert Setup Navigator Basic Parental Lock — Off (us) Change menu mode Move SETUP Exit Expert (Experto): Visualizará ajustes avanzados. Basic (Básico): Visualizará ajustes básicos.
Preparativos (Configuración) Salida de MPEG(MPEG Out) Ajuste este elemento a [MPEG] cuando el amplificador conectado sea compatible con audio de MPEG. Audio1 A2 Video1 V2 Language General Ajustes de [Audio2] Audio DRC — Off Dolby Digital Out — Dolby Digital DTS Out — Off 96kHz PCM Out — MPEG MPEG Out — MPEG 3 PCM Change MPEG audio output mode Move ¶ Con respecto a las instrucciones del menú, consulte P. 20.
Preparativos (Configuración) Función Hi-Bit (Modo Expert) Convirtiendo los datos de audio de 16 bits a 20 bits a 24 bits, podrá obtenerse sonido uniforme y detallado incluso a bajos niveles de escucha. On (Activar): La función Hi-Bit se habilitará (ajuste predeterminado en fábrica). Off (Desactivar): La función Hi-Bit se inhabilitará. ¶ En el modo DJ, normalmente se emplea el proceso de 24 bits, independientemente del ajuste seleccionado.
Preparativos (Configuración) Seleccionar salida de vídeo S (S-Video Out) (Modo Expert) Ajuste esta opción para seleccionar la salida de la señal de vídeo a través del conector de vídeo S. ¶ Cuando utilice el conector de vídeo S para conectar el reproductor a un televisor, la imagen puede aparecer comprimida verticalmente (o alargada horizontalmente). En este caso, seleccione [S1].
Preparativos (Configuración) INDEX Ajuste de la calidad de la imagen 1. Utilice los cuatro lados ( / / / ) del botón del cursor para seleccionar [Video2] \ [Video Adjust] \ [Start], y después presione el botón ENTER. Aparecerá el menú de Controles de calidad de imagen. 2. Utilice los lados superior/inferior ( / ) del botón del cursor para seleccionar [Video Setup] y presione el botón ENTER. Off Memory Move ENTER Select 1 2 DISPLAY 3 Check Se cerrará el menú de Controles de calidad de imagen.
Preparativos (Configuración) Activar visualización en pantalla (On Screen Display) (Modo Expert) Activa/desactiva la visualización en pantalla. Audio1 A2 V1 Video2 Language General Background — Pioneer Logo Video Adjust Still Picture — Auto On Screen Display — On Angle Indicator Off Move Seleccionar el idioma de audio (Audio Language) Seleccione el idioma escuchado a través de los canales de audio. Este ajuste no podrá cambiarse durante la reproducción.
Preparativos (Configuración) INDEX Establecer automáticamente el idioma de audio y los subtítulos (Auto Language) ■ Cuando seleccione [Other] para el idioma de subtítulos, idioma de audio, o idioma del disco DVD Esta función le permitirá elegir entre la selección automática del idioma de audio y de los subtítulos, y la selección manual a través del Menú de configuración. Este ajuste no podrá cambiarse durante la reproducción. Realice esta selección consultando la “Lista de códigos de idiomas” de P. 28.
Preparativos (Configuración) Activar/desactivar la visualización de subtítulos (Subtitle Display) (Mode Expert) Seleccione el activar o desactivar los subtítulos, o el visualizar subtítulos de asistencias. ¶ Este ajuste no podrá cambiarse durante la reproducción.
Preparativos (Configuración) INDEX Algunos discos DVD que contienen escenas violentas o material de otra naturaleza disponen de una función de censura de los padres para limitar la visión de dichos discos (con respecto a la información, consulte las fundas de los discos). Ajustando el nivel de censura del reproductor a uno inferior que el de un disco, podrá limitar qué discos podrán verse con el reproductor.
Preparativos (Configuración) Lista de códigos de países/zonas 3. Presione el botón ENTER. Aparecerá la pantalla [Change Code Number]. Audio1 A2 Video1 V2 Language General País/zona Parental Lock: Change Code Number Enter 4—Digit Code RETURN +/– Move SETUP Return Exit 4. Introduzca una nueva contraseña de 4 dígitos (número de código).
Operaciones básicas (Carga y extracción de discos) Carga y extracción de discos En caso de un mal funcionamiento del reproductor y si el botón EJECT (0) no responde para permitir la extracción del disco, podrá extraer el disco insertando el pasador accesorio en el orificio de expulsión forzada que hay en la parte frontal del reproductor. Cuando utilice la función de expulsión forzada, tenga en cuenta las precauciones siguientes. 1 Desconecte la alimentación del reproductor y espere un minuto por lo menos.
Operaciones básicas Operaciones básicas Los botones y controles marcados con MAL/DJ esté ajustado en NORMAL. Los botones y controles marcados con NORMAL/DJ esté ajustado en DJ. UNLOCK/LOCK STOP POWER OFF TIME MODE ON DVJ-1000 STOP UNLOCK AUTO CUE LOCK DVD TITLE MP3 FOLDER / DVD TITLE MP3 FOLDER HOT CUE ANGLE SUBTITLE AUDIO REALTIME CUE IN OUT IN ADJUST OUT ADJUST DISPLAY RELOOP/ EXIT DELETE 4-BEAT ONE-TRACK MEMORY MENU T.
Operaciones básicas ■ Activación/desactivación de la localización automática Mantenga presionado el botón TIME MODE/AUTO CUE durante 1 segundo o más para activar/desactivar alternativamente la función de localización automática. El indicador de localización automática (A.CUE) del visualizador se encenderá cuando se active la función de localización automática.
Operaciones básicas NORMAL/DJ Presione el botón REV1/FWD¡ durante la reproducción o en el modo de pausa. ANGLE POWER OFF TIME MODE DVD TITLE MP3 FOLDER / ON DVJ-1000 STOP LOCK UNLOCK AUTO CUE EJECT TEXT MODE DVD TITLE MP3 FOLDER HOT CUE ANGLE SUBTITLE AUDIO REALTIME CUE IN OUT IN ADJUST OUT ADJUST DISPLAY RELOOP/ EXIT DELETE 4-BEAT ONE-TRACK MEMORY MENU T.
Operaciones básicas Emplee los botones PREVIOUS 4/NEXT¢. ¶ Cada vez que presione el botón, la reproducción saltará al siguiente capítulo (disco DVD) o pista (disco CD) en el sentido indicado por el botón presionado. Para volver al comienzo de la pista actualmente en reproducción, presione una vez el botón PREVIOUS 4. Para volver al comienzo de la pista anterior a la actualmente en reproducción, presione dos veces el botón PREVIOUS 4.
Operaciones básicas 3. Busque el nuevo punto de localización realizando los pasos 2 y 3 de la sección de arriba “■ Ajuste de un punto de localización con el modo VINYL desactivado”.
Operaciones básicas Presione el botón TEMPO RESET. El indicador TEMPO RESET se encenderá y el régimen de cambio del tempo se repondrá a “0” (tempo normal), independientemente de la posición del control deslizable TEMPO. ¶ Si vuelve a presionar el botón TEMPO RESET, la reposición del tempo se cancelará, y el tempo volverá al valor ajustado con el control deslizable TEMPO.
Operaciones básicas Mezcla de diferentes canciones (empalme) NORMAL/DJ POWER OFF TIME MODE ON DVJ-1000 STOP LOCK UNLOCK AUTO CUE EJECT TEXT MODE TEXT MODE ★ Esta función estará inhabilitada cuando el selector NORMAL/DJ del panel posterior esté ajustado en la posición NORMAL. (Ejemplo) Para empalmar la canción siguiente (B) con la actualmente en reproducción (A). ¶ Conecte el primer reproductor A a CH-1 del mezclador para DJ, y el segundo reproductor B a CH-2.
Operaciones avanzadas Operaciones avanzadas OFF TIME MODE DVJ-1000 STOP LOCK UNLOCK EJECT TEXT MODE DVD TITLE MP3 FOLDER HOT CUE A ON AUTO CUE ANGLE SUBTITLE REALTIME CUE IN HOT CUE AUDIO DISPLAY RELOOP/ EXIT OUT DELETE 4-BEAT ONE-TRACK MEMORY MENU T.
Operaciones avanzadas Reproducción de bucle OUT/ OUT ADJUST POWER IN/ REALTIME CUE/ IN ADJUST OFF TIME MODE ON STOP LOCK UNLOCK EJECT TEXT MODE HOT CUE ANGLE SUBTITLE AUDIO REALTIME CUE IN OUT IN ADJUST OUT ADJUST DISPLAY RELOOP/ EXIT DELETE 4-BEAT ONE-TRACK MEMORY MENU T.
Operaciones avanzadas Después de haber cancelado el bucle, presione botón RELOOP/EXIT durante la reproducción normal. ¶ La reproducción volverá al punto de entrada de bucle previamente establecido, y se reanudará la reproducción de bucle. ¶ En el caso de MP3, la repetición de bucle sólo podrá realizarse dentro de la misma carpeta. ■ Ajuste automático de bucle Bucle de 4 tiempos Durante la reproducción, presione el botón 4-BEAT/ONETRACK.
Operaciones avanzadas Para ver las visualizaciones de guía Presione el botón DISPLAY para activar/desactivar las visualizaciones de guía. POWER TIME MODE OFF ON DVJ-1000 STOP LOCK UNLOCK AUTO CUE DISPLAY EJECT TEXT MODE DVD TITLE MP3 FOLDER ANGLE SUBTITLE AUDIO DISPLAY DELETE MEMORY MENU T.
Operaciones avanzadas (Operaciones utilizando tarjetas de memoria) Operaciones utilizando tarjetas de memoria ¶ Extracción de una tarjeta de memoria MEMORY POWER OFF TIME MODE ON DVJ-1000 STOP LOCK UNLOCK AUTO CUE Abra la puerta de la tarjeta de memoria y espere a que se apague la luz del indicador CARD, luego presione ligeramente la tarjeta de memoria hacia dentro y déjela que salga expulsada; tómela por el extremo de la tarjera y extráigala con cuidado.
Operaciones avanzadas (Operaciones utilizando tarjetas de memoria) ■ Grabación de un punto de bucle MEMORY POWER OFF TIME MODE ON DVJ-1000 STOP LOCK UNLOCK AUTO CUE EJECT TEXT MODE DVD TITLE MP3 FOLDER HOT CUE A HOT CUE ANGLE SUBTITLE AUDIO REALTIME CUE IN OUT IN ADJUST OUT ADJUST DISPLAY RELOOP/ EXIT DELETE 4-BEAT ONE-TRACK MEMORY MENU T.
Operaciones avanzadas (Operaciones utilizando tarjetas de memoria) Durante la lectura de datos de una tarjeta de memoria, el visualizador de la unidad mostrará el mensaje “CUE Readin” o “LOOP Readin”. ¶ El punto de localización o el punto de bucle se leerá en el reproductor, y se visualizará el tiempo de punto de memoria. El reproductor buscará el punto de localización y entrará aquí en el modo de espera de localización.
Operaciones avanzadas (Operaciones utilizando tarjetas de memoria) DELETE POWER OFF TIME MODE ON Para copiar datos de una tarjeta de memoria MEMORY DVJ-1000 UNLOCK AUTO CUE 1. Sin haber cargado disco ni tarjeta de memoria: Mantenga presionado el botón MEMORY durante 5 segundos o más. STOP LOCK ¶ En el visualizador se desplazarán los mensajes “COPY MODE” “CARD A IN”.
Otros (Solución de problemas) Solución de problemas Las operaciones incorrectas pueden confundirse con mal funcionamiento. Si cree que su unidad no está funcionando correctamente, consulte la tabla siguiente. Algunas veces el funcionamiento incorrecto puede deberse a un mal funcionamiento en otro componente. Si no puede solucionar el problema, compruebe los demás componente utilizados con el reproductor.
Otros (Solución de problemas) Síntoma Causa probable Solución No se retiene el ajuste de localización automática. No puede reponerse todos los ajustes a sus ajustes predeterminados en fábrica. ¶ Se desconectó la alimentación justo antes de realizarse o cambiarse los ajustes. ¶ Después de cambiar los ajustes, espere 10 segundos antes de desconectar la alimentación. El del mando de lanzadera no responde. El mando de lanzadera realiza operaciones diferentes a las pretendidas.
Otros (Solución de problemas) Síntoma Causa probable Solución ¶ Durante la reproducción de discos DVD/MP3, la tarjeta de memoria insertada fue grabada en un CDJ-1000 o CDJ-1000MK2. No es posible utilizar tarjetas de memorias. ¶ No hay tarjeta de memoria SD cargada. ¶ La tarjeta de memoria SD está protegida contra escritura. ¶ La tarjeta de memoria SD no está apropiadamente formateada. ¶ Inserte una tarjeta de memoria SD.
Otros (Mensajes del visualizador de la guía de matriz de puntos) Mensajes del visualizador de la guía de matriz de puntos Mensaje Momento del evento/visualización LOAD IN Se visualiza cuando se carga un disco. END Se visualiza al terminar la reproducción. EJECT Se visualiza durante la expulsión de un disco. NO DISC Se visualiza cuando no hay ningún disco cargado. STOP Se visualiza cuando se presiona el botón STOP.
Otros (Mensajes del visualizador de la guía de matriz de puntos) Momento del evento/visualización Se visualiza cuando se inicia el modo de copia de tarjeta de memoria. CARD A IN Se visualiza en el modo de copia cuando no hay ninguna tarjeta de memoria de origen cargada. READING Se visualiza en el modo de copia cuando se leen datos de la tarjeta de memoria de origen. CARD B IN Se visualiza en el modo de copia cuando no hay ninguna tarjeta de memoria de destino cargada.
Otros (Especificaciones) (Solución de problemas) Especificaciones 1. General 4. Salida de audio Sistema .............................................................. DVD-Vídeo, CD Alimentación ............................. 110 V a 240 V CA, 50 Hz/60 Hz Consumo de energía ......................................................... 40 W Temperatura de funcionamiento ......................... +5 ˚C a +35 ˚C Humedad de funcionamiento ..........................
Español 53 Sp
Published by Pioneer Corporation. Copyright © 2006 Pioneer Corporation. All rights reserved. PIONEER CORPORATION 1-1, Shin-ogura, Saiwai-ku, Kawasaki-shi, Kanagawa 212-0031, Japan PIONEER ELECTRONICS AUSTRALIA PTY. LTD. 5 Arco Lane, Heatherton, Victoria, 3202, Australia TEL: +61-3-9586-6300 PIONEER ELECTRONICS DE MEXICO S.A. DE C.V. Blvd.Manuel Avila Camacho 138 10 piso Col.Lomas de Chapultepec, Mexico, D.F.