
Operating instructions


The Initial Setup menu
18
134
En
Chapter 18
The Initial Setup menu
Using the Initial Setup menu
The Initial Setup menu is where you can set various recorder options for sound, picture,
language and so on.
Some settings can only be changed when the recorder is stopped. During playback and
recording these settings are grayed out in the Initial Setup menu.
Except for the Setup Navigator, menu screens are exited automatically after 20 minutes of
inactivity.
• Press HOME MENU and select ‘Setup’ > ‘Initial Setup’.
In the table below, the default option is marked with a •.
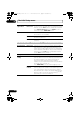
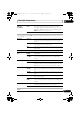
Setting Options Explanation
Basic
Clock Setting Auto Set the channel that broadcasts a clock signal and the clock
will be set automatically.
Manual • If there is no channel that broadcasts a clock signal in your
area, you can set the time and date manually.
• If any digital TV channels are set then the clock will automatically be set.
• The clock must be set in order to use timer recording.
Input Line
System
525 System Use for NTSC or PAL-60 recording from an external input.
625 System • Use for standard PAL or SECAM recording.
• This setting is applicable only when recording from an external input.
• See also About the input line system on page 148 for more information on this setting.
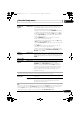
Power Save Mode 1 Only signals arriving at the antenna input are passed
through to the antenna output when the recorder is in
standby.
Mode 2 No input signals are passed through to the outputs when the
recorder is in standby.
Off • When the recorder is in standby, all signals arriving at the
SCART and antenna inputs are passed along to the outputs.
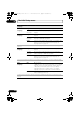
HELP Setting On • Switches on the automatic Help screens for GUI displays.
Off Switches off the automatic Help screens for GUI displays.
(Press HELP on the remote to manually display the Help
screen.)
EPG Type
Select
GUIDE Plus+ Use the Gemstar GUIDE Plus+ EPG.
Digital EPG Use the EPG based on informatio
n provided by D.TV
broadcasts.
DVR560HX_WV_EN.book 134 ページ 2008年2月22日 金曜日 午後7時26分