
Operating instructions


Getting started
31
En
04
Chapter 4
Getting started
Switching on and setting up
When you switch the recorder on for the first
time, you can make several basic settings
using the Setup Navigator feature. This takes
you through setting the clock, the internal TV
tuner and the video output.
If you’re using the recorder for the first time,
we strongly recommend you use the Setup
Navigator before starting to use the
recorder.
1 Switch on your TV and set the video
input to this recorder.
2 Switch on the recorder.
When you switch on for the first time, your TV
should display the Setup Navigator screen (If
the Setup Navigator doesn’t appear, you can
also access it from the Initial Setup menu;
see page 130).
• If this recorder is connected to a
compatible TV using a fully-wired 21-pin
SCART cable, the recorder will take a few
seconds to download country, TV screen
size and language information. (Check
the manual that came with your TV for
compatibility information.)
3 Choose a language (then press
ENTER).
4 Start the Setup Navigator.
• If you don’t want to use the Setup
Navigator, press to select Cancel,
then press ENTER to exit the Setup
Navigator.
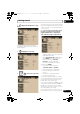
5 Select an Aerial Power setting
1
for the built-in digital tuner.
• On: power is always supplied to the
connected aerial, whether the recorder
is on or in standby.
• Auto: power is only supplied when this
recorder is on.
• Off: power is never supplied to the
aerial.
6 Select ‘Auto Scan’ to start
scanning for D.TV channels.
• Select Do not set if you want to skip
D.TV channel setup (because they have
already been set up, for example), then
skip to step 8 below.
7 Select your country.
The recorder starts scanning for new
channels. After the scan is complete the
recorder will let you know how many new
channels were found.
• The country setting will apply to both the
digital and analog TV tuners.
• The clock will also be set automatically
here if D.TV channels are found.
STANDBY/ON
ENTER
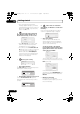
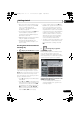
Initial Setup
Basic
Digital Tuner
Analogue Tuner
Video In/Out
Audio In
Audio O ut
Language
Recording
Clock Setting
Input Line System
Power Save
HELPp
EPG Type Selectaor
Setup N
avig ator
Language
Basic
Note
1 If the recorder does not accept the On or Auto setting (the highlight jumps back to Off), check that the antenna
is properly connected and that it is not shorted, then try making the setting again.
ENTER
k
Setting
t
Line System
e
r Save
P
p
Navigator
p
Navigator
Start
Cancel
Start
Complete this setup before you
start using your recorder.
Please use the Initial Setup if you
want to make more detailed settings.
ENTER
ENTER
ENTER
DVRLX70D_WV_EN.book 31 ページ 2007年7月6日 金曜日 午後2時6分