HTP-700_VYXCN_It.book 1 ページ 2009年9月17日 木曜日 午後3時42分 HTP-700 Sistema surround a 5.1 canali Sistema de sonido Surround de 5.1 canales 5.1-kanalige Surround-Anlage SX-SWR1 Subwoofer con amplificatore audio/video multicanale Subwoofer con Receptor Multicanal de Audio/Vídeo Mehrkanaliger Audio/Video-Receiver-Subwoofer Sistema di diffusori Sistema de altavoces Lautsprechersystem S-DV595T HTP-600 Sistema surround a 5.1 canali Sistema de sonido Surround de 5.1 canales 5.
HTP-700_VYXCN_It.book 2 ページ 2009年9月17日 木曜日 午後3時42分 IMPORTANTE CAUTION RISK OF ELECTRIC SHOCK DO NOT OPEN Il simbolo del lampo con terminale a forma di freccia situato all’interno di un triangolo equilatero serve ad avvisare l’utilizzatore della presenza di una “tensione pericolosa” non isolata nella struttura del prodotto che potrebbe essere di un’intensità tale da provocare scosse elettriche all’utilizzatore.
HTP-700_VYXCN_It.book 3 ページ 2009年9月17日 木曜日 午後3時42分 Informazioni per gli utilizzatori finali sulla raccolta e lo smaltimento di vecchi dispositivi e batterie esauste Simbolo per il prodotto Questi simboli sui prodotti, confezioni, e/o documenti allegati significano che vecchi prodotti elettrici ed elettronici e batterie esauste non devono essere mischiati ai rifiuti urbani indifferenziati.
HTP-700_VYXCN_It.book 4 ページ 2009年9月17日 木曜日 午後3時42分 1 Guida allestimento (HTP-700) Contenuto della confezione Controllare che quanto segue sia presente.
HTP-700_VYXCN_It.
HTP-700_VYXCN_It.book 6 ページ 2009年9月17日 木曜日 午後3時42分 1 Guida allestimento (HTP-600) Contenuto della confezione Controllare che quanto segue sia presente.
HTP-700_VYXCN_It.
HTP-700_VYXCN_It.book 8 ページ 2009年9月17日 木曜日 午後3時42分 1 Guida allestimento (HTP-FS500) Contenuto della confezione Controllare che quanto segue sia presente.
HTP-700_VYXCN_It.
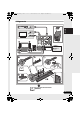
HTP-700_VYXCN_It.book 10 ページ 2009年9月17日 木曜日 午後3時42分 2 Per il proprio divertimento (MCACC) SYSTEM TV CONTROL System Setup INPUT CH 1.Auto MCACC 2.Manual SP Setup Return ENTER 1.Auto MCACC Now Analyzing Environment Check Ambient Noise Speaker YES/NO ENTER Return (HTP-700) (HTP-700) ? 45 -47 VIDEO1 Acceso 1.Auto MCACC System Setup Check! Front Center Surr Surr. Back Subwoofer 10:Next SYSTEM SOURCE Acceso 10 It 1.Auto MCACC 2.
HTP-700_VYXCN_It.
HTP-700_VYXCN_It.book 12 ページ 2009年9月17日 木曜日 午後3時42分 Grazie per avere acquistato questo prodotto Pioneer. Si prega di leggere queste istruzioni d’uso per adoperare il proprio modello in modo corretto. Dopo avere letto le istruzioni, porle in un luogo sicuro per poterle consultare in futuro. Indice Guida allestimento (HTP-700) .........4 Guida allestimento (HTP-600) .........6 Guida allestimento (HTP-FS500) .....8 Per il proprio divertimento (MCACC) .........................................
HTP-700_VYXCN_It.book 13 ページ 2009年9月17日 04 Come iniziare 08 Il menu System Setup 45 47 47 48 05 Riproduzione iPod/USB 49 49 51 51 51 52 53 Ascolto della radio . . . . . . . . . . . . . . . . . . Miglioramento del suono FM stereo . . . Salvataggio preselezione stazioni . . . . . . . Ascolto delle stazioni preselezionate . . . Come dare un nome alle stazioni preselezionate . . . . . . . . . . . . . . . . . . . . Introduzione alla funzione RDS . . . . . . . . Ricerca di programmi RDS . . . . . . . . . .
HTP-700_VYXCN_It.book 14 ページ 01 2009年9月17日 木曜日 午後3時42分 Allestimento diffusori (HTP-700) Capitolo 1-1 Allestimento diffusori (HTP-700) Precauzioni per l’installazione Nell’installare i diffusori, stenderli su di un lato per evitare incidenti e infortuni. Usare sempre una superficie stabile per il montaggio, l’impostazione e la messa in posa dei diffusori.
HTP-700_VYXCN_It.book 15 ページ 2009年9月17日 木曜日 午後3時42分 Allestimento diffusori (HTP-700) Nero (–) Rosso (+) Deutsch Anteriore sinistro: Bianco Anteriore destro: Rosso Centrale: Verde Surround sinistro: Blu Surround destro: Grigio Far corrispondere il filo colorato all’indicatore colorato, quindi inserire il filo colorato nel terminale rosso (+) e l’altro nel terminale nero (–). Español Dietro 3 Collegare i vari diffusori. Collegare i fili al diffusore.
HTP-700_VYXCN_It.book 16 ページ 01 2009年9月17日 木曜日 午後3時42分 Allestimento diffusori (HTP-700) Attenzione • Questi terminali portano voltaggio PERICOLOSO. Per evitare il rischio di folgorazioni quando si collegano o scollegano i diffusori, scollegare il cavo di alimentazione prima di toccare parti non isolate. • Non collegare alcun diffusore che non sia uno di quelli in dotazione a questo sistema. • Non collegare i diffusori in dotazione ad un amplificatore che non sia quello in dotazione a questo sistema.
HTP-700_VYXCN_It.book 17 ページ 2009年9月17日 木曜日 午後3時42分 Allestimento diffusori (HTP-700) Attenzione Vite di montaggio (non in dotazione) 5 mm 10 mm Da 5 mm a 7 mm Note addizionali sulla posizione dei diffusori • Installare i diffusori principali anteriore sinistro e destro ad uguale distanza dal televisore. Deutsch • Pioneer non è responsabile per incidenti o danni risultanti da un’installazione impropria. • I diffusori anteriori, centrale e surround in dotazione sono schermati magneticamente.
HTP-700_VYXCN_It.book 18 ページ 01 2009年9月17日 木曜日 午後3時42分 Allestimento diffusori (HTP-600) Capitolo 1-2 Allestimento diffusori (HTP-600) Precauzioni per l’installazione Nell’installare i diffusori, stenderli su di un lato per evitare incidenti e infortuni. Usare sempre una superficie stabile per il montaggio, l’impostazione e la messa in posa dei diffusori. Se i diffusori devono essere utilizzati nella impilati, usare sempre le staffe in dotazione per fissarli uno con l’altro (pagina 19).
HTP-700_VYXCN_It.book 19 ページ 2009年9月17日 木曜日 午後3時42分 Allestimento diffusori (HTP-600) Sinistra Indicatore colorato Destra Verde Diffusore centrale Verde Bianco Diffusore anteriore Rosso Nero (–) Rosso (+) Deutsch Etichetta modello Anteriore sinistro: Bianco Anteriore destro: Rosso Centrale: Verde Surround sinistro: Blu Surround destro: Grigio Far corrispondere il filo colorato all’indicatore colorato, quindi inserire il filo colorato nel terminale rosso (+) e l’altro nel terminale nero (–).
HTP-700_VYXCN_It.book 20 ページ 01 2009年9月17日 木曜日 午後3時42分 Allestimento diffusori (HTP-600) Collegare l’altra estremità dei terminali colorati dei diffusori al retro del ricevitore con subwoofer.
HTP-700_VYXCN_It.book 21 ページ 2009年9月17日 木曜日 午後3時42分 Allestimento diffusori (HTP-600) Note addizionali sulla posizione dei diffusori Staffa di montaggio (in dotazione) • Installare i diffusori surround leggermente al di sopra del livello degli orecchi per ottenere un effetto ottimale. Español • Installare i diffusori principali anteriore sinistro e destro ad uguale distanza dal televisore.
HTP-700_VYXCN_It.book 22 ページ 01 2009年9月17日 木曜日 午後3時42分 Allestimento diffusori (HTP-FS500) Capitolo 1-3 Allestimento diffusori (HTP-FS500) Precauzioni per l’installazione 2 Inserire il supporto dai fori dietro la base e fissare con le quattro viti. Nell’installare i diffusori, stenderli su di un lato per evitare incidenti e infortuni. Usare sempre una superficie stabile per il montaggio, l’impostazione e la messa in posa dei diffusori.
HTP-700_VYXCN_It.book 23 ページ 2009年9月17日 木曜日 午後3時42分 Allestimento diffusori (HTP-FS500) • Una volta terminati i collegamenti, fissare i cavi dei diffusori. Fissare i cavi nella scanalatura dei diffusori. Italiano 4 Inserire il cavo del diffusore dal foro dietro alla base e attraverso il supporto.
HTP-700_VYXCN_It.book 24 ページ 01 2009年9月17日 木曜日 午後3時42分 Allestimento diffusori (HTP-FS500) 6 Assicurare il diffusore ed il supporto con 2 viti. • Accertarsi che il cavo del diffusore non venga pizzicato tra il supporto ed il diffusore. Installazione dei diffusori anteriori su una parete I diffusori anteriori possiedono un foro di installazione che può venire usato per installare i diffusori su una parete. Prima del montaggio • Mettere il cavo del diffusore nel retro della base della base.
HTP-700_VYXCN_It.book 25 ページ 2009年9月17日 木曜日 午後3時42分 Allestimento diffusori (HTP-FS500) Il diffusore anteriore del può essere montato a parete in verticale o orizzontale. Utilizzare un foro per fissarlo in verticale e due per installarlo in orizzontale. • Non fissare il subwoofer alla parete o al soffitto. Esso potrebbe cadere e causare lesioni.
HTP-700_VYXCN_It.book 26 ページ 02 2009年9月17日 木曜日 午後3時42分 Collegamenti Capitolo 2 Collegamenti Pannello posteriore 1 2 1 2 1 3 5 4 7 6 9 8 1 Ingressi audio digitali coassiali/ottici (x3) Usarli per fonti audio digitali, lettori/registratori di DVD inclusi, sintonizzatori digitali satellitari, lettori CD, ecc.. 5 Uscite preamplificatore canali di surround posteriori Usarle per collegare amplificatori separati per i canali di surround posteriori.
HTP-700_VYXCN_It.book 27 ページ 2009年9月17日 木曜日 午後3時42分 Collegamenti 02 Attenzione Collegamenti video in uscita Questo sistema non è stato caricato con un convertitore video. Quando si utilizzano cavi HDMI per il collegamento col dispositivo in ingresso, usare gli stessi cavi per collegare il televisore.
HTP-700_VYXCN_It.book 28 ページ 02 2009年9月17日 木曜日 午後3時42分 Collegamenti Importante • A paragone dei formati di trasmissione audio digitale esistenti (a fibre ottiche e coassiali), le trasmissioni audio digitale HDMI richiedono un tempo più lungo per essere riconosciute. Per questo motivo possono verificarsi interruzioni dell’audio quando si commutano i formati o si avvia la riproduzione.
HTP-700_VYXCN_It.book 29 ページ 2009年9月17日 木曜日 午後3時42分 Collegamenti 02 Ciò permette di riprodurre i suoni via il sintonizzatore integrato del televisore. Selezionarne uno AUDIO OUT 1 Deutsch DIGITAL OUT OPTICAL R ANALOG L Español TV Italiano Collegare il proprio televisore (per audio televisore) 2 1 • Collegare le uscite audio analogiche del televisore agli ingressi TV/SAT di questo sistema. Utilizzare un cavo fono RCA stereo.
HTP-700_VYXCN_It.book 30 ページ 02 2009年9月17日 木曜日 午後3時42分 Collegamenti Collegamento del televisore e componenti di riproduzione Collegamento con HDMI Se si dispone di un componente (lettore dischi Blu-ray, ecc.) dotato di HDMI o DVI (con HDCP), è possibile collegarlo a questo sistema utilizzando un cavo HDMI disponibile sul mercato.
HTP-700_VYXCN_It.book 31 ページ 2009年9月17日 木曜日 午後3時42分 Collegamenti 02 Questo schema mostra i collegamenti di un televisore e di un lettore DVD (o altro componente di riproduzione) privi di terminali HDMI al sistema. TV Selezionarne uno VIDEO IN R ANALOG L 2 1 VIDEO OUT AUDIO OUT Deutsch DIGITAL OUT COAXIAL OPTICAL Español Lettore DVD, ecc.
HTP-700_VYXCN_It.book 32 ページ 02 2009年9月17日 木曜日 午後3時42分 Collegamenti Collegamento di un registratore HDD/DVD, di un VCR e di altre fonti video Questo sistema è fornito di ingressi ed uscite audio/video adatti per il collegamento di videoregistratori analogici o digitali, inclusi i VCR ed i registratori HDD/DVD. 1 2 1 3 OPTICAL COAXIAL DIGITAL OUT R ANALOG L AUDIO OUT Selezionarne uno 4 R ANALOG L AUDIO IN 2 VIDEO IN 1 VIDEO OUT HDMI OUT Selezionarne uno Lettore DVR, VCR, LD, ecc.
HTP-700_VYXCN_It.book 33 ページ 2009年9月17日 木曜日 午後3時42分 Collegamenti 02 Ricevitori satellitari e via cavo e sintonizzatori per TV digitale terrestre sono tutti esempi di ciò che viene chiamato ‘set-top box’.
HTP-700_VYXCN_It.book 34 ページ 02 2009年9月17日 木曜日 午後3時42分 Collegamenti Collegamento di altri componenti audio Il numero ed il tipo di collegamento dipende dal tipo di componente che si sta collegando.1 Seguire i passi sottoindicati per collegare un CD-R, MD, DAT, registratore nastro o altri componenti audio. 1 2 1 1 COAXIAL OPTICAL DIGITAL OUT 2 R ANALOG L R ANALOG L AUDIO IN AUDIO OUT Selezionarne uno CD-R, MD, DAT, ecc.
HTP-700_VYXCN_It.book 35 ページ 2009年9月17日 木曜日 午後3時42分 Collegamenti 02 • Per istruzioni sulla riproduzione con l’iPod vedere Riproduzione di un iPod a pagina 49. VIDEO INPUT VIDEO INPUT iPod iPhone iPod iPhone USB VIDEO L AUDIO R USB VIDEO Deutsch • Rimuovere la copertura del pannello quando si eseguono dei collegamenti al pannello anteriore. • Per il collegamento del cavo, vedere anche le istruzioni per l’uso dell’iPod.
HTP-700_VYXCN_It.book 36 ページ 02 2009年9月17日 木曜日 午後3時42分 Collegamenti • Per istruzioni sulla riproduzione col dispositivo USB vedere Riproduzione di un dispositivo USB a pagina 51. Collegamento di antenne esterne Per migliorare la ricezione FM, collegare una antenna FM esterna a FM UNBAL 75 Ω. VIDEO INPUT iPod iPhone USB VIDEO L AUDIO R 75 Ω cavo coassiale Dispositivo di memorizzazione di massa USB Collegamento antenna FM Collegare l’antenna FM a filo come indicato in basso.
HTP-700_VYXCN_It.book 37 ページ 2009年9月17日 木曜日 午後3時42分 Collegamenti 02 1 2 Collegare il sistema all’alimentazione solo dopo aver collegato ad esso tutti i componenti inclusi i diffusori. 1 Inserire la spina del cavo di alimentazione in dotazione nella presa AC IN sul retro del sistema.
HTP-700_VYXCN_It.book 38 ページ 03 2009年9月17日 木曜日 午後3時42分 Comandi e display Capitolo 3 Comandi e display Pannello anteriore 1 ST/MONO TUNE TUNE 2 3 FUNCTION 4 5 AUTO/DIRECT 6 STANDBY/ON VOLUME 7 8 VIDEO INPUT 9 USB 1 Display del pannello anteriore Per maggiori dettagli, consultare Display a pagina 39. 2 Tasti di comando del sintonizzatore ST/MONO Esegue la commutazione tra il modo auto stereo e il modo di ricezionemono (pagina 54). TUNE +/– Usato per trovare frequenze radio (pagina 54).
HTP-700_VYXCN_It.book 39 ページ 2009年9月17日 木曜日 午後3時42分 Comandi e display 03 2 1 3 4 5 6 7 8 Italiano Display Español 10 1 PHASE Si illumina quando Phase Control è attivo (pagina 61). 2 AUTO Si illumina quando la caratteristica Auto Surround è attiva (Riproduzione automatica a pagina 58). 3 RDS Si illumina quando viene ricevuta una trasmissione RDS (pagina 56). 4 ST Si illumina quando una trasmissione stereo FM viene ricevuta in modalità stereo automatica.
HTP-700_VYXCN_It.book 40 ページ 03 2009年9月17日 2D Si illumina quando viene rilevato un segnale codificato Dolby Digital. 2D+ Si illumina quando viene rilevata una fonte con segnali audio codificati Dolby Digital Plus. 2HD Si illumina quando viene rilevata una fonte con segnali audio codificati Dolby TrueHD. EX Si illumina quando viene rilevata una fonte con segnali audio codificati Dolby Digital EX.
HTP-700_VYXCN_It.book 41 ページ 2009年9月17日 木曜日 午後3時42分 Comandi e display 03 SYSTEM SOURCE 1 3 SYSTEM 4 TV CONTROL 5 INPUT CH VOL DIMMER SIGNAL SEL 7 BD MENU 8 9 10 12 ENTER 5 Tasti TV CONTROL Questi tasti sono dedicati al controllo del televisore assegnato al tasto TV. Perciò, se si possiede un solo televisore da collegare a questo sistema, assegnarlo al tasto TV (vedere pagina 71 per ulteriori dettagli).
HTP-700_VYXCN_It.book 42 ページ 03 2009年9月17日 9 Tasti dei modi di ascolto AUTO/DIRECT Esegue la commutazione tra il modo auto surround (Riproduzione automatica a pagina 58) e la riproduzione Stream Direct. La riproduzione Stream Direct bypassa i comandi dei toni per ottenere la più accurata riproduzione di una fonte(pagina 60). STEREO/A.L.C.
HTP-700_VYXCN_It.book 43 ページ 2009年9月17日 木曜日 午後3時42分 Comandi e display Premere prima per accedere a: TRE –/+ Usarlo per regolare Treble1 DTV/TV Esegue la commutazione tra i modi di ingresso DTV e TV analogico per i televisori a schermo piatto Pioneer. 14 MUTE Silenzia/riattiva il suono. 15 Tasti numerici e altri comandi Utilizzare i tasti numerici per selezionare direttamente la frequenza radio (pagina 54) o i brani di un CD, DVD, ecc..
HTP-700_VYXCN_It.book 44 ページ 03 2009年9月17日 木曜日 午後3時42分 Comandi e display Inserimento delle batterie nel telecomando Utilizzo del telecomando 30° 30° 7m Attenzione Un utilizzo errato delle batterie può causare danni, ad esempio la perdita di liquido ed esplosioni. Si consiglia di seguire le seguenti precauzioni: • Non utilizzare contemporaneamente batterie vecchie e nuove.
HTP-700_VYXCN_It.book 45 ページ 2009年9月17日 木曜日 午後3時42分 Come iniziare 04 Italiano Capitolo 4 Come iniziare Se si possiede un treppiedi, usarlo per posizionare il microfono in modo che esso sia circa all’altezza dell’orecchio nella normale posizione di ascolto. Altrimenti, posizionare il microfono al livello dell’orecchio usando un tavolo o una sedia.
HTP-700_VYXCN_It.book 46 ページ 04 2009年9月17日 木曜日 午後3時42分 Come iniziare 4 Selezionare ‘Auto MCACC’ dal menu System Setup e quindi premere ENTER.1 System Setup 1.Auto MCACC 2.Manual SP Setup Return Cercare di restare per quanto possibile in silenzio dopo aver premuto ENTER. Il sistema produce una serie di test sonori per determinare il livello di rumore ambiente. 5 Seguire le istruzioni sullo schermo. • Accertarsi che il microfono sia collegato.
HTP-700_VYXCN_It.book 47 ページ 2009年9月17日 木曜日 午後3時42分 Come iniziare 04 Uso di base Now Analyzing Procedure per l’ascolto dell’audio di una radio o di un altro componente collegato. Surround Analyzing Speaker System Speaker Distance Channel Level Acoustic Cal EQ Italiano 1.Auto MCACC Return INPUT SELECT SOURCE TUNER EDIT MASTER VOLUME TOOLS AUDIO PARAMETER Nuovamente, cercare di restare per quanto possibile in silenzio durante questa procedura. Possono essere necessari da 1 a 3 minuti.
HTP-700_VYXCN_It.book 48 ページ 04 2009年9月17日 木曜日 午後3時42分 Come iniziare Selezione del segnale in ingresso Su questo sistema è possibile commutare i segnali in ingresso tra i diversi ingressi come descritto in basso.1 SYSTEM Con l’impostazione su DIGITAL o HDMI, 2 si illumina quando vi è un segnale Dolby Digital in ingresso, e DTS si illumina nel caso di un segnale DTS in ingresso. Quando si seleziona HDMI, gli indicatori A e DIGITAL sono spenti (vedere pagina 38).
HTP-700_VYXCN_It.book 49 ページ 2009年9月17日 木曜日 午後3時42分 Riproduzione iPod/USB 05 Italiano Capitolo 5 Riproduzione iPod/USB Questo sistema possiede un terminale dedicato per iPod che permette di controllare la riproduzione di contenuti audio dal proprio iPod usando i comandi di questo sistema.1 2 Premere il tasto iPod USB per commutare il sistema su iPod/USB. Il display del pannello anteriore visualizza Loading mentre il sistema verifica il collegamento e recupera i dati dall’iPod.
HTP-700_VYXCN_It.book 50 ページ 05 2009年9月17日 木曜日 午後3時42分 Riproduzione iPod/USB 2 Usare i tasti / per navigare nella categoria selezionata (es. album). • Usare / per spostarsi ai livelli precedente/successivo. 3 Continuare a scorrere fino ad arrivare a ciò che si desidera riprodurre e quindi premere per avviare la riproduzione.
HTP-700_VYXCN_It.book 51 ページ 2009年9月17日 木曜日 午後3時42分 Riproduzione iPod/USB Importante Apple non può essere considerata responsabile di questo dispositivo o della sua osservanza delle norme di sicurezza e dei vari regolamenti. Español Per guardare delle fotografie o del video sul proprio iPod, dato che il controllo del video non è possibile usando questo sistema, si devono usare invece i comandi principali dell’iPod stesso.
HTP-700_VYXCN_It.book 52 ページ 05 2009年9月17日 木曜日 午後3時42分 Riproduzione iPod/USB 3 Collegare il dispositivo USB.1 Consultare Collegamento di un dispositivo USB a pagina 35. Tasto A cosa serve / Tenere premuto durante la riproduzione per avviare la scansione. Loading appare sull’OSD mentre questo sistema inizia a riconoscere il dispositivo USB collegato. Dopo la ricognizione, una schermata di riproduzione appare sull’OSD e la riproduzione inizia automaticamente.
HTP-700_VYXCN_It.book 53 ページ 2009年9月17日 木曜日 午後3時42分 Riproduzione iPod/USB Per ulteriori informazioni sui messaggi di errore vedere Messaggi USB a pagina 83. Compatibilità audio compresso • MP3 (MPEG-1/2/2.5 Audio Layer 3) – Tassi campionamento: Da 8 kHz a 48 kHz; Bit rate: Da 8 kbps a 320 kbps (si raccomanda 128 kbps o di più alto); Estensione file: .
HTP-700_VYXCN_It.book 54 ページ 06 2009年9月17日 木曜日 午後3時42分 Uso del sintonizzatore Capitolo 6 Uso del sintonizzatore Miglioramento del suono FM stereo Ascolto della radio Le fasi seguenti mostrano come sintonizzare trasmissioni FM utilizzando le funzioni di sintonizzazione automatica (ricerca) e manuale (a passi).
HTP-700_VYXCN_It.book 55 ページ 2009年9月17日 木曜日 午後3時42分 Uso del sintonizzatore Ascolto delle stazioni preselezionate • Premere PRESET / per selezionare la stazione preselezionata desiderata. • E’anche possibile usare i tasti numerici del telecomando per richiamare la preselezione. Come dare un nome alle stazioni preselezionate Tutte le stazioni preselezionate possono avere un nome per una più facile identificazione. 1 Selezionare la stazione preselezionata che si desidera nominare.
HTP-700_VYXCN_It.book 56 ページ 06 2009年9月17日 木曜日 午後3時42分 Uso del sintonizzatore Ricerca di programmi RDS È possibile cercare i seguenti tipi di programmi:1 NEWS – Notizie AFFAIRS – Attualità INFO – Informazioni generali SPORT – Sport EDUCATE – Programmi didattici DRAMA – Sceneggiati radiofonici, ecc. CULTURE – Cultura nazionale o regionale, teatro, ecc. SCIENCE – Scienza e tecnologia VARIED – Solitamente materiali quali talk-show, quiz o interviste.
HTP-700_VYXCN_It.book 57 ページ 2009年9月17日 木曜日 午後3時42分 Uso del sintonizzatore Usare il tasto DISPLAY per visualizzare i diversi tipi di informazioni RDS disponibili.1 • Modo di ascolto Español • Premere DISPLAY per le informazioni RDS. Ad ogni pressione il display cambia nel modo seguente: Italiano Visualizzazione delle informazioni RDS 06 • Master volume Deutsch • Radio Text (RT) – Messaggi inviati dalla stazione radio.
HTP-700_VYXCN_It.book 58 ページ 07 2009年9月17日 木曜日 午後3時42分 Ascolto del sistema Capitolo 7 Ascolto del sistema Importante • I modi di ascolto e molte delle caratteristiche descritte in questa sezione potrebbero non essere disponibili a seconda della fonte corrente, delle impostazioni e dello stato del sistema. Riproduzione automatica L’opzione di ascolto più semplice e diretta consiste nell’uso della funzione Auto Surround.
HTP-700_VYXCN_It.book 59 ページ 2009年9月17日 木曜日 午後3時42分 Ascolto del sistema • DOLBY PLII MOVIE – Suono fino a 5.1 canali, particolarmente adatto per i film • DOLBY PLII GAME – Suono fino a 5.1 canali, particolarmente adatto ai videogiochi • NEO:6 CINEMA – Suono fino a 5.1 canali, particolarmente adatto ai film • NEO:6 MUSIC – Suono fino a 5.1 canali, particolarmente adatto alla musica2 • DOLBY PRO LOGIC – Suono surround a 4.
HTP-700_VYXCN_It.book 60 ページ 07 2009年9月17日 木曜日 午後3時42分 Ascolto del sistema Utilizzo di Front Stage Surround Advance La funzione Front Stage Surround Advance consente di creare effetti sonori surround naturali utilizzando solo i diffusori anteriori ed il subwoofer. • Durante l’ascolto di una fonte, premere STEREO/A.L.C. per selezionare i modi Front Stage Surround Advance. • STEREO – Per maggiori dettagli, vedere Ascolto in stereo a pagina 59. • A.L.C.
HTP-700_VYXCN_It.book 61 ページ 2009年9月17日 木曜日 午後3時42分 Ascolto del sistema 07 • Impostazione predefinita: ON SYSTEM TV CONTROL INPUT DVD S.RETRIEVER EQ SB CH PHASE CH VCR DISPLAY CH SELECT SLEEP CH MIDNGIHT CH SHIFT • Mentre si ascolta una fonte, premere e quindi premere EQ per attivare o disattivare la funzione Acoustic Calibration EQ.
HTP-700_VYXCN_It.book 62 ページ 07 2009年9月17日 木曜日 午後3時42分 Ascolto del sistema Funzioni disponibili quando i diffusori surround posteriori sono collegati Per HTP-700/HTP-600: Quando i diffusori surround posteriori sono collegati ad un amplificatore surround posteriore, è possibile ottenere suoni 7.1 canali surround. In questo caso è possibile selezionare un modo di ascolto ed eseguire altre impostazioni supportate dalla riproduzione 7.1 canali.
HTP-700_VYXCN_It.book 63 ページ 2009年9月17日 木曜日 午後3時42分 Ascolto del sistema 07 • Impostazione predefinita: SB ON SYSTEM TV CONTROL INPUT S.RETRIEVER EQ SB CH PHASE CH SELECT SLEEP CH MIDNGIHT CH CH SHIFT ENTER • Premere , quindi premere ripetutamente SB CH per scorrere tra le opzioni per il canale surround posteriore. Ciascuna pressione scorre tra le opzioni come segue: Impostazione delle funzione Up Mix In un sistema surround a 7.
HTP-700_VYXCN_It.book 64 ページ 07 2009年9月17日 木曜日 午後3時42分 Ascolto del sistema 1 Commutare il sistema in standby. AUDIO PARAMETER MASTER VOLUME TOOLS MENU 2 Tenendo premuto il tasto PRESET + sul pannello anteriore, tenere premuto il tasto STANDBY/ON per circa due secondi. UP MIX: OFF appare e la funzione Up Mix viene disattivata. Per attivare questa funzione, eseguire di nuovo le operazioni dei punti 1 e 2.
HTP-700_VYXCN_It.book 65 ページ 2009年9月17日 木曜日 午後3時42分 Ascolto del sistema 07 Se dei dati audio vengono rimossi durante il processo OFF di compressione WMA/MP3c, la qualità del suono ON spesso ne soffre, producendo una immagine acustica inaffidabile. La caratteristica Sound Retriever usa nuova tecnologia DSP che aiuta a riportare la qualità sonora di un CD ad un audio compresso a 2 canali ripristinando la pressione sonora e livellando gli artefatti irregolari rimasti dalla compressione.
HTP-700_VYXCN_It.book 66 ページ 07 2009年9月17日 木曜日 午後3時42分 Ascolto del sistema Impostazione A cosa serve Opzione(i) A.DLY Questa funzione corregge automaticamente il ritardo OFF (Ritardo automatico) da audio a video tra i componenti collegati con un ON cavo HDMI. Il tempo di ritardo audio viene impostato a seconda dello stato operativo del display collegato con un cavo HDMI. Il tempo di ritardo video viene regolato automaticamente in funzione del tempo di ritardo audio.
HTP-700_VYXCN_It.book 67 ページ 2009年9月17日 木曜日 午後3時42分 Il menu System Setup 08 Italiano Capitolo 8 Il menu System Setup TUNER EDIT MASTER VOLUME TOOLS AUDIO PARAMETER MENU SYSTEM INPUT SELECT SOURCE TOP MENU ENTER SYSTEM TV CONTROL HOME MENU SETUP INPUT iPod CTRL CH PTY SEARCH RETURN ST/MONO 1 Accendere il sistema ed il proprio televisore. Usare il tasto SYSTEM per l’accensione. 2 Premere sul telecomando e quindi premere il tasto SETUP.
HTP-700_VYXCN_It.book 68 ページ 08 2009年9月17日 木曜日 午後3時42分 Il menu System Setup 2 Selezionare l’impostazione che si vuole regolare. Se l’impostazione avviene per la prima volta, può essere utile effettuare le seguenti impostazioni in ordine: • Speaker Setting – Specificare dimensioni e numero dei diffusori collegati (vedere in basso). • Channel Level – Regolare il bilanciamento complessivo del sistema di diffusori (vedere in basso).
HTP-700_VYXCN_It.book 69 ページ 2009年9月17日 木曜日 午後3時42分 Il menu System Setup 2 2b.Channel Level Test Tone [ Manual ] Distanza diffusore Per una buona profondità sonora ed un’ottima separazione dal sistema, è necessario specificare la distanza dei diffusori dalla posizione d’ascolto. Il sistema sarà poi in grado di aggiungere il ritardo necessario per un suono surround efficiente. Deutsch 3 Confermare la selezione dell’opzione di impostazione. I toni di prova inizieranno dopo aver premuto ENTER.
HTP-700_VYXCN_It.book 70 ページ 09 2009年9月17日 木曜日 午後3時42分 Controllo del resto del sistema Capitolo 9 Controllo del resto del sistema Impostazione del telecomando per il controllo di altri componenti Alla maggior parte dei componenti è possibile assegnare uno dei tasti MULTI CONTROL usando il codice di preselezione che il fabbricante del componente ha memorizzato nel telecomando.
HTP-700_VYXCN_It.book 71 ページ 2009年9月17日 木曜日 午後3時42分 Controllo del resto del sistema 09 Questo telecomando è in grado di controllare componenti dopo aver inserito i codici relativi o aver memorizzato i comandi nel sistema (vedere Controllo del resto del sistema a pagina 70 per ulteriori dettagli). Usare i tasti MULTI CONTROL per selezionare il componente. Tasto(i) Funzione TV CONTROL Accende o spegne il DTV. Componenti DTV TV CONTROL INPUT Commuta l’ingresso TV.
HTP-700_VYXCN_It.book 72 ページ 09 2009年9月17日 木曜日 午後3時42分 Controllo del resto del sistema Comandi per altri componenti Questo telecomando è in grado di controllare dei componenti dopo aver inserito i codici relativi o aver memorizzato i comandi nel sistema (vedere Controllo del resto del sistema a pagina 70 per ulteriori dettagli). Usare i tasti MULTI CONTROL per selezionare il componente. Tasto(i) It Componenti Lettore BD/DVD, DVR, VCR Premere per tornare all’inizio del brano corrente.
HTP-700_VYXCN_It.book 73 ページ 2009年9月17日 木曜日 午後3時42分 Controllo del resto del sistema 09 Componenti Naviga tra il menù e le opzioni del BD/DVD. Lettore BD/DVD, DVR HOME MENU Visualizza la schermata HOME MENU. Lettore BD/DVD, DVR CH +/– Seleziona i canali. DVR, VCR Registratore HDD/DVD/VCR DVD Passa ai comandi DVD quando si usa un registratore (SHIFT + 2) HDD/DVD. Registratore HDD/DVD/VCR VCR Passa ai comandi VCR quando si usa un registratore (SHIFT + 3) HDD/DVD/VCR.
HTP-700_VYXCN_It.book 74 ページ 09 2009年9月17日 木曜日 午後3時42分 Controllo del resto del sistema Elenco dei codici preimpostati Non si dovrebbero avere problemi a comandare un componente il cui fabbricante è indicato nella lista, si fa però rilevare che in alcuni casi i codici corrispondenti al fabbricante riportato nella lista possono non funzionare con il modello in uso. In alcuni casi, inoltre, è possibile che risultino controllabili solo alcune funzioni dopo l’assegnazione del corretto codice preimpostato.
HTP-700_VYXCN_It.
HTP-700_VYXCN_It.
HTP-700_VYXCN_It.
HTP-700_VYXCN_It.
HTP-700_VYXCN_It.book 79 ページ 2009年9月17日 木曜日 午後3時42分 Informazioni aggiuntive Informazioni aggiuntive Italiano Diagnostica Español Capitolo 10 10 • Se il sistema non funziona normalmente a causa di effetti esterni quali l’elettricità statica, scollegare la spina dalla presa e quindi inserirla nuovamente per tornare alle normali condizioni operative. Problema Soluzione L’alimentazione non si accende. • Scollegare la spina di alimentazione dalla presa e inserirla nuovamente.
HTP-700_VYXCN_It.book 80 ページ 10 2009年9月17日 木曜日 午後3時42分 Informazioni aggiuntive Problema Soluzione • Controllare che l’impostazione della distanza dei diffusori sia corretta La funzione PHASE per tutti i diffusori (vedere Distanza diffusore a pagina 69). CONTROL non sembra produrre un effetto udibile. Rumore considerevole nelle trasmissioni radio. • Collegare l’antenna (pagina 36) e regolarne la posizione in modo da ottenere una ricezione ottimale.
HTP-700_VYXCN_It.book 81 ページ 2009年9月17日 木曜日 午後3時42分 Informazioni aggiuntive Soluzione Il telecomando non funziona. • Sostituire le batterie (vedere pagina 44). • Usarlo entro 7 m, 30° dal sensore di telecomando (vedere pagina 44). • Rimuovere gli ostacoli o utilizzare da un’altra posizione. • Evitare di esporre il telecomando sul pannello anteriore alla luce diretta.
HTP-700_VYXCN_It.book 82 ページ 10 2009年9月17日 木曜日 午後3時42分 Informazioni aggiuntive Informazioni importanti riguardanti il collegamento HDMI In alcuni casi può risultare impossibile inviare segnali HDMI attraverso questo sistema (ciò dipende dal componente HDMI che si sta collegando - per informazioni sulla compatibilità HDMI rivolgersi direttamente al fabbricante).
HTP-700_VYXCN_It.book 83 ページ 2009年9月17日 木曜日 午後3時42分 Informazioni aggiuntive 10 Sintomo Causa Azione iPod/USB Error 1 Vi è un problema con il percorso dei segnali dall’iPod al sistema. (I/U ERR1) Spegnere il sistema e ricollegare l’iPod al sistema. Se questa operazione non risolve il problema, provare a resettare l’iPod. iPod/USB Error 3 Quando l’iPod non risponde. (I/U ERR3) Aggiornare il software dell’iPod installando la versione più recente.
HTP-700_VYXCN_It.book 84 ページ 10 2009年9月17日 Sintonizzatore con subwoofer SXSWR1 • Sezione audio Potenza nominale in uscita Anteriore, Centrale, Surround . . . . . . . . . 100 W per canale (1 kHz, 4 Ω, 10 %) Subwoofer . . . . . . . . 100 W (100 Hz, 4 Ω, 10 %) • Sezione sintonizzatore FM Gamma frequenza . . . . . da 87,5 MHz a 108 MHz Ingresso antenna . . . . . . . . . 75 Ω, non bilanciata • Accessori Telecomando . . . . . . . . . . . . . . . . . . . . . . . . . . . . .
HTP-700_VYXCN_It.book 85 ページ 2009年9月17日 木曜日 午後3時42分 Informazioni aggiuntive • Diffusori anteriori/surround Diffusore centrale Struttura . . . . . . . . . . . . . . Box chiuso tipo libreria (magneticamente schermato) Sistema. . . . . . . . . . . . . . . . . . . . da 6,6 cm a 1 via Diffusori . . . . . . . . . . . . . . . . . . . da 6,6 cm a cono Impedenza . . . . . . . . . . . . . . . . . . . . . . . . . . . . .8 Ω Gamma di frequenza . . . . . . . . .da 82 Hz a 20 kHz Massimo ingresso di potenza. . .
HTP-700_VYXCN_Es.book 2 ページ 2009年9月17日 木曜日 午後3時3分 IMPORTANTE CAUTION RISK OF ELECTRIC SHOCK DO NOT OPEN La luz intermitente con el símbolo de punta de flecha dentro un triángulo equilátero. Está convenido para avisar el usuario de la presencia de “voltaje peligrosa” no aislada dentro el producto que podría constituir un peligro de choque eléctrico para las personas.
HTP-700_VYXCN_Es.book 3 ページ 2009年9月17日 木曜日 午後3時3分 Información para los usuarios en la recogida y tratamiento de los equipos al final de su vida y de las pilas y baterías usadas. Símbolo para equipos Estos símbolos en los productos, embalaje, y/o en los documentos que los acompañan significa que los productos eléctricos y electrónicos al final de su vida, las pilas y baterías no deben mezclarse con los residuos generales de su hogar.
HTP-700_VYXCN_Es.book 4 ページ 2009年9月17日 木曜日 午後3時3分 1 Guía para la configuración (HTP-700) Contenido de la caja Confirme que haya recibido todos los elementos siguientes.
HTP-700_VYXCN_Es.
HTP-700_VYXCN_Es.book 6 ページ 2009年9月17日 木曜日 午後3時3分 1 Guía para la configuración (HTP-600) Contenido de la caja Confirme que haya recibido todos los elementos siguientes.
HTP-700_VYXCN_Es.
HTP-700_VYXCN_Es.book 8 ページ 2009年9月17日 木曜日 午後3時3分 1 Guía para la configuración (HTP-FS500) Contenido de la caja Confirme que haya recibido todos los elementos siguientes.
HTP-700_VYXCN_Es.
HTP-700_VYXCN_Es.book 10 ページ 2009年9月17日 木曜日 午後3時3分 2 Para disfrute personal (MCACC) SYSTEM TV CONTROL System Setup INPUT CH 1.Auto MCACC 2.Manual SP Setup Return ENTER 1.Auto MCACC Now Analyzing Environment Check Ambient Noise Speaker YES/NO ENTER Return (HTP-700) (HTP-700) ? 45 -47 VIDEO1 Encendido 1.Auto MCACC System Setup Check! Front Center Surr Surr. Back Subwoofer 10:Next SYSTEM SOURCE Encendido 10 Es 1.Auto MCACC 2.
HTP-700_VYXCN_Es.
HTP-700_VYXCN_Es.book 12 ページ 2009年9月17日 木曜日 午後3時3分 Gracias por comprar un producto Pioneer. Le sugerimos que lea atentamente estas manual de instrucciones a fin de que aprenda a utilizar su equipo de manera adecuada. Después de leer las instrucciones, guárdelas en un lugar seguro para consultarlas en el futuro. Contenido Guía para la configuración (HTP-700) ..........................................4 Guía para la configuración (HTP-600) ..........................................
HTP-700_VYXCN_Es.book 13 ページ 2009年9月17日 03 Controles y visualizaciones 38 39 41 44 44 04 Primeros pasos 08 El menú System Setup 45 47 47 48 05 Reproducción de iPod/USB 49 49 51 51 51 52 53 06 Uso del sintonizador Audición de la radio . . . . . . . . . . . . . . . . . Mejora del sonido FM estéreo . . . . . . . . Presintonización de emisoras . . . . . . . . . Audición de emisoras presintonizadas . . . . . . . . . . . . . . . . . . . Nombre de las emisoras presintonizadas . . . . . . . . . . . . . . . .
HTP-700_VYXCN_Es.book 14 ページ 01 2009年9月17日 木曜日 午後3時3分 Configuración de los altavoces (HTP-700) Capítulo 1-1 Configuración de los altavoces (HTP-700) Precauciones de seguridad al configurar Cuando instale los altavoces, colóquelos planos sobre un lado para evitar accidentes o lesiones. Cerciórese de utilizar una superficie estable cuando instale, configure, y coloque los altavoces.
HTP-700_VYXCN_Es.book 15 ページ 2009年9月17日 木曜日 午後3時3分 Configuración de los altavoces (HTP-700) Delantero izquierdo: Blanco Delantero derecho: Rojo Central: Verde Sonido Surround izquierdo: Azul Sonido Surround derecho: Gris Haga coincidir el cable con código de color con el indicador de color de la etiqueta y, a continuación, inserte el cable con código de color en el lado rojo (+) y el otro cable en el lado negro (–). Negro(–) Rojo (+) Deutsch Parte frontal 3 Conecte cada altavoz.
HTP-700_VYXCN_Es.book 16 ページ 01 2009年9月17日 木曜日 午後3時3分 Configuración de los altavoces (HTP-700) Precaución • Estos terminales de altavoces poseen tensión PELIGROSA. Para evitar el riesgo de descargas eléctricas cuando conecte o desconecte los cables de los altavoces, desconecte el cable de corriente antes de tocar las partes que no están aisladas. • No conecte ningún altavoz que no haya sido suministrado con este sistema.
HTP-700_VYXCN_Es.book 17 ページ 2009年9月17日 木曜日 午後3時3分 Configuración de los altavoces (HTP-700) Precaución • Si tiene dudas acerca de la calidad y la solidez de la pared, consulte a un profesional. • Pioneer no se hace responsable de accidentes, daños o lesiones como resultado de una instalación inadecuada.
HTP-700_VYXCN_Es.book 18 ページ 01 2009年9月17日 木曜日 午後3時3分 Configuración de los altavoces (HTP-600) Capítulo 1-2 Configuración de los altavoces (HTP-600) Precauciones de seguridad al configurar Cuando instale los altavoces, colóquelos planos sobre un lado para evitar accidentes o lesiones. Cerciórese de utilizar una superficie estable cuando instale, configure, y coloque los altavoces. 1 Fije las pastillas antideslizantes a la parte inferior de cada altavoz y del altavoz de subgraves receptor.
HTP-700_VYXCN_Es.
HTP-700_VYXCN_Es.book 20 ページ 01 2009年9月17日 木曜日 午後3時3分 Configuración de los altavoces (HTP-600) Conecte el otro extremo a los terminales del altavoz con código de color de la parte posterior del altavoz de subgraves receptor.
HTP-700_VYXCN_Es.book 21 ページ 2009年9月17日 木曜日 午後3時3分 Configuración de los altavoces (HTP-600) Notas adicionales sobre la ubicación de los altavoces Ménsula de montaje (suministrada) • Para obtener el efecto óptimo, instale los altavoces de sonido Surround a un nivel ligeramente superior al de sus oídos. Español • Instale los altavoces delanteros izquierdo y derecho principales a igual distancia del televisor.
HTP-700_VYXCN_Es.book 22 ページ 01 2009年9月17日 木曜日 午後3時3分 Configuración de los altavoces (HTP-FS500) Capítulo 1-3 Configuración de los altavoces (HTP-FS500) Precauciones de seguridad al configurar 2 Inserte el poste desde los orificios que hay detrás de la base y fíjelo con los 4 tornillos. Cuando instale los altavoces, colóquelos planos sobre un lado para evitar accidentes o lesiones. Cerciórese de utilizar una superficie estable cuando instale, configure, y coloque los altavoces.
HTP-700_VYXCN_Es.book 23 ページ 2009年9月17日 木曜日 午後3時3分 Configuración de los altavoces (HTP-FS500) Conecte el otro extremo a los terminales del altavoz con código de color de la parte posterior del altavoz de subgraves receptor. Negro(–) • Cuando se hayan realizado las conexiones, sujete los cables de los altavoces. Fije los cables a la ranura de los altavoces. 5 Conecte cada altavoz. Conecte los cables al altavoz.
HTP-700_VYXCN_Es.book 24 ページ 01 2009年9月17日 木曜日 午後3時3分 Configuración de los altavoces (HTP-FS500) • Después de conectar las clavijas, empuje ligeramente los cables para asegurarse de que los extremos de los cables estén conectados a los terminales de forma segura. Las conexiones defectuosas pueden producir ruidos e interrupciones en el sonido.
HTP-700_VYXCN_Es.book 25 ページ 2009年9月17日 木曜日 午後3時3分 Configuración de los altavoces (HTP-FS500) El altavoz delantero puede colgarse de la pared en posición vertical u horizontal. Utilice un agujero para colgarlo verticalmente y dos agujeros para colgarlo horizontalmente. • No fije el altavoz de subgraves a una pared ni al techo. Podrían caerse y provocar lesiones.
HTP-700_VYXCN_Es.book 26 ページ 02 2009年9月17日 木曜日 午後3時3分 Conexión Capítulo 2 Conexión Panel trasero 1 2 1 2 1 3 5 4 7 6 9 8 1 Entradas de audio digital coaxiales/ ópticas (x3) Utilice estas entradas para fuentes de audio digital, incluidos reproductores/grabadoras de DVD, receptores de satélite digitales, reproductores de CD, etc. 2 Tomas de entrada (x3)/salida (x1) HDMI Entradas múltiples y una salida para la conexión de audio/vídeo de alta calidad a dispositivos HDMI compatibles.
HTP-700_VYXCN_Es.book 27 ページ 2009年9月17日 木曜日 午後3時3分 Conexión 02 Precaución Acerca de la conexión de las salidas de vídeo Este sistema no está dotado de ningún convertidor de vídeo. Cuando emplee un cable HDMI para conectar el dispositivo de entrada, deberá utilizar los mismos cables para la conexión del televisor.
HTP-700_VYXCN_Es.book 28 ページ 02 2009年9月17日 木曜日 午後3時3分 Conexión Importante • En comparación con los formatos existentes de transmisión de audio digital (óptica y coaxial), las transmisiones de audio digital en el formato HDMI tardan más en reconocerse. Por tal razón, es posible que se produzca interrupción del sonido cuando se cambia entre formatos o cuando se inicia la reproducción.
HTP-700_VYXCN_Es.book 29 ページ 2009年9月17日 木曜日 午後3時3分 Conexión 02 De este modo podrá reproducir el sonido del sintonizador incorporado en el televisor. Seleccione una AUDIO OUT 1 Deutsch DIGITAL OUT OPTICAL R ANALOG L Español TV Italiano Conecte el televisor (para el sonido del televisor) 2 1 • Conecte las tomas de audio analógico de su televisor a las tomas de entrada TV/SAT de este sistema. Use un cable de sonido estéreo RCA.
HTP-700_VYXCN_Es.book 30 ページ 02 2009年9月17日 木曜日 午後3時3分 Conexión Conexión del televisor y de los componentes de reproducción Conexión mediante HDMI Si dispone de un componente equipado con HDMI o DVI (con HDCP) (reproductor de discos Bluray, etc.), podrá conectarlo a este sistema con un cable HDMI disponible en el mercado.
HTP-700_VYXCN_Es.book 31 ページ 2009年9月17日 木曜日 午後3時3分 Conexión 02 Esta ilustración muestra las conexiones al sistema de un televisor y de un reproductor DVD (u otro componente de reproducción) desprovistos de terminal HDMI. TV Seleccione una VIDEO IN R ANALOG L 2 1 VIDEO OUT AUDIO OUT Deutsch DIGITAL OUT COAXIAL OPTICAL Español Reproductor de DVD, etc.
HTP-700_VYXCN_Es.book 32 ページ 02 2009年9月17日 木曜日 午後3時3分 Conexión Conexión de una grabadora de HDD/DVD, una grabadora de vídeo y otras fuentes de vídeo Este sistema tiene entradas y salidas de audio/vídeo adecuadas para conectar grabadoras de vídeo analógicas o digitales, incluyendo grabadoras de vídeo y grabadoras de HDD/DVD.
HTP-700_VYXCN_Es.book 33 ページ 2009年9月17日 木曜日 午後3時3分 Conexión 02 Los receptores satélite y de cable y los sintonizadores de TV digitales terrestres son todos ejemplos de ‘equipos descodificadores’.
HTP-700_VYXCN_Es.book 34 ページ 02 2009年9月17日 木曜日 午後3時3分 Conexión Conexión de otros componentes de audio El número y tipo de conexiones depende del componente que vaya a conectar.1 Siga estos pasos para conectar un reproductor de CD-R, MD, DAT, grabadora de cintas o cualquier otro componente de audio. 1 2 1 1 COAXIAL OPTICAL DIGITAL OUT 2 R ANALOG L R ANALOG L AUDIO IN AUDIO OUT Seleccione una CD-R, MD, DAT, etc.
HTP-700_VYXCN_Es.book 35 ページ 2009年9月17日 木曜日 午後3時3分 Conexión 02 VIDEO INPUT iPod iPhone USB VIDEO L AUDIO R Español Podrá acceder a las conexiones de vídeo frontales a través del panel frontal empleando el botón VIDEO del mando a distancia. Son tomas de audio/vídeo estándar. Conéctelas del mismo modo que las conexiones del panel trasero. • Para más información sobre la reproducción con el iPod, consulte Reproducción de un iPod en la página 49.
HTP-700_VYXCN_Es.book 36 ページ 02 2009年9月17日 木曜日 午後3時3分 Conexión Conexión de la antena de FM Conecte la antena de FM como se muestra a continuación. Para mejorar la calidad de la recepción y el sonido, conecte antenas externas (consulte Conexión de antenas externas abajo). Emplee las salidas PRE OUT para conectar los altavoces traseros de sonido Surround Conecte las salidas PRE OUT del sistema y el amplificador adicional para añadir altavoces traseros de sonido Surround.
HTP-700_VYXCN_Es.book 37 ページ 2009年9月17日 木曜日 午後3時3分 Conexión No conecte el sistema hasta que no haya conectado todos los componentes de este sistema, incluidos los altavoces. 2 Enchufe el otro extremo a una toma de corriente. • Al manipular el cable de alimentación, sujételo por la parte de la clavija. No desconecte la clavija tirando del cable y nunca toque el cable de alimentación con las manos mojadas, ya que esto puede causar cortocircuitos o descargas eléctricas.
HTP-700_VYXCN_Es.book 38 ページ 03 2009年9月17日 木曜日 午後3時3分 Controles y visualizaciones Capítulo 3 Controles y visualizaciones Panel frontal 1 ST/MONO TUNE TUNE 2 3 FUNCTION 4 5 AUTO/DIRECT 6 STANDBY/ON VOLUME 7 8 VIDEO INPUT 9 USB 1 Visualizador del panel frontal Para obtener más información, consulte Pantalla en la página 39. 2 Botones de control del sintonizador ST/MONO Para cambiar entre el modo estéreo automático y el modo de recepción monofónica de emisiones (página 54).
HTP-700_VYXCN_Es.book 39 ページ 2009年9月17日 木曜日 午後3時3分 Controles y visualizaciones 03 2 1 3 4 5 6 7 8 Italiano Pantalla Español 10 1 PHASE Se ilumina cuando está activada la función de Control de fase (página 60). 2 AUTO Se ilumina cuando está activada la función de sonido Surround automática (consulte Reproducción automática en la página 57). 3 RDS Se ilumina durante la recepción de una emisión de radio (RDS) (página 56).
HTP-700_VYXCN_Es.book 40 ページ 03 2009年9月17日 2D Se ilumina cuando se detecta una señal de codificación Dolby Digital. 2D+ Se ilumina cuando se detecta una fuente con señales de audio de codificación Dolby Digital Plus. 2HD Se ilumina cuando se detecta una fuente con señal de audio de codificación Dolby TrueHD. EX Se ilumina cuando se detecta una fuente con señales de audio de codificación Dolby Digital EX.
HTP-700_VYXCN_Es.book 41 ページ 2009年9月17日 木曜日 午後3時3分 Controles y visualizaciones 03 SYSTEM SOURCE 1 3 SYSTEM 4 TV CONTROL 5 INPUT CH VOL DIMMER SIGNAL SEL 7 BD MENU 8 9 10 12 ENTER 11 Deutsch 6 4 Para poner el mando a distancia en el modo de control del sistema (se utiliza para seleccionar los comandos blancos que aparecen encima de los botones numéricos (S.RETRIEVER, etc.)).
HTP-700_VYXCN_Es.book 42 ページ 03 2009年9月17日 BD MENU Para visualizar el menú de discos Blu-ray. 9 Botones del modo de audición AUTO/DIRECT Para cambiar entre el modo de sonido Surround automático (Reproducción automática en la página 57) y la reproducción directa de secuencias Stream. El modo de reproducción directa de secuencias Stream omite los controles de tono, ofreciendo una reproducción extremadamente fiel de la fuente (página 59). STEREO/A.L.C.
HTP-700_VYXCN_Es.book 43 ページ 2009年9月17日 木曜日 午後3時3分 Controles y visualizaciones BASS –/+ Utilice éste para ajustar Bass1 TRE –/+ Utilice éste para ajustar Treble1 Para acceder a este botón, primero se debe pulsar TV: DTV/TV Cambia entre los modos de entrada de DTV y TV analógica en televisores de pantalla plana Pioneer. 14 MUTE Silencia/activa el sonido.
HTP-700_VYXCN_Es.book 44 ページ 03 2009年9月17日 木曜日 午後3時3分 Controles y visualizaciones Inserción de las pilas en el mando a distancia Utilización del mando a distancia 30° 30° 7m Precaución El uso incorrecto de las pilas puede ser peligroso y producir fugas y explosiones. Siga estos consejos: • No mezcle pilas nuevas y viejas. • No utilice juntas pilas de tipos diferentes – aunque puedan parecer iguales, las pilas distintas pueden tener tensiones diferentes.
HTP-700_VYXCN_Es.book 45 ページ 2009年9月17日 木曜日 午後3時3分 Primeros pasos 04 Italiano Capítulo 4 Primeros pasos Si tiene un trípode, utilícelo para situar el micrófono de modo tal que quede a nivel del oído en la posición de audición normal. En caso contrario, sitúe el micrófono a nivel del oído utilizando una mesa o silla.
HTP-700_VYXCN_Es.book 46 ページ 04 2009年9月17日 木曜日 午後3時3分 Primeros pasos 4 Seleccione ‘Auto MCACC’ en el menú System Setup y pulse luego ENTER.1 • Para poder efectuar unos ajustes correctos de los altavoces, no ajuste el volumen mientras se emiten los tonos de prueba. System Setup 7 Confirme la configuración de los altavoces. La configuración que se muestra en la pantalla debe corresponder a los altavoces que esté utilizando. 1.Auto MCACC 2.
HTP-700_VYXCN_Es.book 47 ページ 2009年9月17日 木曜日 午後3時3分 Primeros pasos 04 (acondicionador de aire, nevera, ventilador, etc.) que pudiesen estar afectando el ambiente y, si hace falta, apáguelos. Si aparecen instrucciones en la pantalla del panel frontal, asegúrese de seguirlas. Italiano • Algunos televisores más antiguos pueden interferir en el funcionamiento del micrófono. Si le parece que éste es el caso, apague el televisor mientras lleva cabo la configuración automática de MCACC.
HTP-700_VYXCN_Es.book 48 ページ 04 2009年9月17日 木曜日 午後3時3分 Primeros pasos 4 Inicie la reproducción del componente seleccionado en el paso 1. 5 Seleccione el modo de audición. Emplee los botones del modo de audición. 6 Pulse MASTER VOLUME +/– para ajustar el volumen. Selección de la señal de entrada En este sistema pueden cambiarse las señales de entrada de las distintas entradas como se describe a continuación.1 SYSTEM TV CONTROL INPUT CH DIMMER SIGNAL SEL • DIGITAL – Selecciona la entrada digital.
HTP-700_VYXCN_Es.book 49 ページ 2009年9月17日 木曜日 午後3時3分 Reproducción de iPod/USB 05 Italiano Capítulo 5 Reproducción de iPod/USB Este sistema cuenta con un terminal iPod exclusivo que le permitirá controlar la reproducción del contenido de audio de su iPod usando los controles de este sistema.1 2 Presione el botón iPod USB para cambiar el sistema al modo de iPod/USB. Mientras el sistema verifica la conexión y recupera los datos del iPod, en la pantalla del panel frontal aparecerá Loading.
HTP-700_VYXCN_Es.book 50 ページ 05 2009年9月17日 木曜日 午後3時3分 Reproducción de iPod/USB 2 Utilice los botones / para examinar la categoría seleccionada (p. ej., álbumes). • Utilice / para desplazarse al nivel anterior/posterior. 3 Siga buscando hasta que encuentre lo que quiere reproducir. A continuación, pulse para iniciar la reproducción.
HTP-700_VYXCN_Es.book 51 ページ 2009年9月17日 木曜日 午後3時3分 Reproducción de iPod/USB Función TOP MENU Pulse este botón para volver a la pantalla del menú iPod Top. RETURN Pulse para volver al nivel anterior. Acerca del iPod Para ver fotos o vídeo en su iPod, como no se puede controlar el vídeo usando este sistema, tendrá que usar los controles principales de su iPod.1 • Para reproducir fotos y vídeo del iPod, deberá conectar la toma de vídeo compuesto MONITOR OUT y el televisor.
HTP-700_VYXCN_Es.book 52 ページ 05 2009年9月17日 木曜日 午後3時3分 Reproducción de iPod/USB 3 Conecte su dispositivo USB.1 Consulte Conexión de un dispositivo USB en la página 35. Loading aparece en la pantalla (OSD) así este sistema empieza a reconocer el dispositivo USB conectado. Después del reconocimiento aparece una pantalla de reproducción en la pantalla (OSD) y la reproducción empieza automáticamente.2 Botón Función Inicia la reproducción normal. Interrumpe/reanuda la reproducción.
HTP-700_VYXCN_Es.book 53 ページ 2009年9月17日 木曜日 午後3時3分 Reproducción de iPod/USB Si se enciende un mensaje USB Error en la pantalla, intente seguir los puntos de abajo. • Apague el sistema y vuelva a encenderlo. • Seleccione otra fuente de entrada (como BD) y luego vuelva a iPod USB. Para más información sobre los mensajes de error, vea la Mensajes de USB en la página 83. Si esto no soluciona el problema, lo más probable es que su dispositivo USB sea incompatible.
HTP-700_VYXCN_Es.book 54 ページ 06 2009年9月17日 木曜日 午後3時3分 Uso del sintonizador Capítulo 6 Uso del sintonizador Mejora del sonido FM estéreo Audición de la radio El siguiente procedimiento describe cómo sintonizar emisiones de FM utilizando las funciones de sintonización automática (búsqueda) y sintonización manual (por pasos). Una vez que haya sintonizado una emisora, puede memorizar la frecuencia para recuperarla más tarde—para más detalles, consulte Presintonización de emisoras abajo.
HTP-700_VYXCN_Es.book 55 ページ 2009年9月17日 木曜日 午後3時3分 Uso del sintonizador Audición de emisoras presintonizadas Nombre de las emisoras presintonizadas Para facilitar su identificación, puede asignar nombres a las estaciones presintonizadas. 1 Elija la estación presintonizada a la que desea asignar un nombre. Para obtener información sobre cómo hacerlo, consulte la sección Audición de emisoras presintonizadas anterior. 2 Pulse dos veces TUNER EDIT.
HTP-700_VYXCN_Es.book 56 ページ 06 2009年9月17日 木曜日 午後3時3分 Uso del sintonizador TUNER EDIT MASTER VOLUME TOOLS AUDIO PARAMETER MENU SYSTEM INPUT SELECT SOURCE TOP MENU ENTER SYSTEM TV CONTROL • Modo de audición HOME MENU SETUP INPUT RETURN ST/MONO iPod CTRL CH PTY SEARCH BASS TRE VOL HDD DVD VCR DISPLAY BD MENU Búsqueda de programas RDS Puede buscar cualquiera de los tipos de programa que aparecen arriba.
HTP-700_VYXCN_Es.book 57 ページ 2009年9月17日 木曜日 午後3時3分 Audición con el sistema 07 Audición con el sistema Importante Reproducción automática Selección del modo de audición Existen varios modos de audición disponibles para disfrutar de diversos efectos de sonido y para la corrección del campo de sonido según prefiera. El mejor modo de audición puede variar según el modelo.
HTP-700_VYXCN_Es.book 58 ページ 07 2009年9月17日 木曜日 午後3時3分 Audición con el sistema • Mientras escucha una fuente, pulse STANDARD. Si la fuente es Dolby Digital, DTS, o Dolby Surround codificado, el formato de decodificación apropiado será seleccionado automáticamente y se visualizará en la pantalla. Con fuentes de dos canales, puede seleccionar entre: • DOLBY PLII MOVIE – Sonido de 5.1 canales, especialmente apropiado para películas 1 • DOLBY PLII MUSIC – Sonido de 5.
HTP-700_VYXCN_Es.book 59 ページ 2009年9月17日 木曜日 午後3時3分 Audición con el sistema • F.S.S.ADVANCE – Se usa para proporcionar un efecto de sonido Surround dirigido al punto donde converge la proyección del sonido de los altavoces delanteros derecho e izquierdo. Italiano En el modo estéreo de control del nivel Auto (A.L.C.), esta unidad ecualiza los niveles de sonido de reproducción si cada nivel de sonido varía con la fuente de la música grabada en un reproductor de audio portátil. 07 La posición F.S.S.
HTP-700_VYXCN_Es.book 60 ページ 07 2009年9月17日 木曜日 午後3時3分 Audición con el sistema Empleo de Sound Retriever (recuperador de sonido) Mejor sonido con el Control de fase Cuando se eliminan los datos de audio durante el proceso de compresión, a menudo la calidad de sonido sufre una imagen de sonido desigual.
HTP-700_VYXCN_Es.book 61 ページ 2009年9月17日 木曜日 午後3時3分 Audición con el sistema Altavoz frontal C O N T R O L ? SYSTEM TV CONTROL INPUT S.
HTP-700_VYXCN_Es.book 62 ページ 07 2009年9月17日 木曜日 午後3時3分 Audición con el sistema Modo de sonido Surround Con fuentes de dos canales, puede seleccionar entre: • DOLBY PLIIx MOVIE – Sonido de 7.1 canales, especialmente apropiado para películas • DOLBY PLIIx MUSIC – Sonido de 7.1 canales, especialmente apropiado para música1 • DOLBY PLIIx GAME – Sonido de 7.1 canales, especialmente apropiado para videojuegos • NEO:6 CINEMA – Sonido de 6.
HTP-700_VYXCN_Es.book 63 ページ 2009年9月17日 木曜日 午後3時3分 Audición con el sistema 07 descodificación de matriz para generar la componente trasera de sonido Surround desde la componente de sonido Surround. • SB OFF – Se desactiva el proceso de descodificación de matriz para generar la componente trasera de sonido Surround desde la componente de sonido Surround. Ajuste de la función de mezcla Up Mix En un sistema de sonido Surround de 7.
HTP-700_VYXCN_Es.book 64 ページ 07 2009年9月17日 木曜日 午後3時3分 Audición con el sistema Ajuste de las opciones de audio Existen varios ajustes de sonido adicionales que puede realizar a través del menú AUDIO PARAMETER. Si no se indica otra cosa, los valores predeterminados aparecen en negrita. Importante • Tenga en cuenta que si un ajuste no aparece en el menú AUDIO PARAMETER, significa que no está disponible debido a la fuente actual, a los ajustes y al estado del sistema.
HTP-700_VYXCN_Es.book 65 ページ 2009年9月17日 木曜日 午後3時3分 Audición con el sistema 07 Función Opción(es) S.RTVb (Recuperador de sonido) Cuando se han extraído datos de audio durante el proceso de compresión WMA/MP3c, la calidad del sonido resulta frecuentemente en una imagen del sonido con falta de uniformidad.
HTP-700_VYXCN_Es.book 66 ページ 07 2009年9月17日 木曜日 午後3時3分 Audición con el sistema Ajuste Función Opción(es) A.DLY (Retardo automático) Esta función corrige automáticamente el retardo de audio a vídeo entre componentes conectados con un cable HDMI. El nivel de retardo de audio se ajusta dependiendo del estado operacional de la pantalla conectada con un cable HDMI. El tiempo de retardo de vídeo se ajusta automáticamente según el tiempo OFF ON de retardo de audio.
HTP-700_VYXCN_Es.book 67 ページ 2009年9月17日 木曜日 午後3時3分 El menú System Setup 08 Italiano Capítulo 8 El menú System Setup TUNER EDIT MASTER VOLUME TOOLS AUDIO PARAMETER MENU SYSTEM INPUT SELECT SOURCE TOP MENU ENTER SYSTEM TV CONTROL HOME MENU SETUP INPUT iPod CTRL CH PTY SEARCH RETURN ST/MONO 1 Encienda el sistema y el televisor. Utilice el botón SYSTEM para encender el sistema y el televisor. 2 Pulse en el mando a distancia y, a continuación, pulse el botón SETUP.
HTP-700_VYXCN_Es.book 68 ページ 08 2009年9月17日 木曜日 午後3時3分 El menú System Setup • Center – Seleccione SMALL si ha conectado un altavoz central. Si no ha conectado un altavoz central, seleccione NO (el canal central es enviado a otros altavoces). 2 Seleccione la opción que desea ajustar. Si es primera vez que lo hace, le recomendamos ajustar las opciones en orden: • Speaker Setting – Para especificar el número de altavoces conectados (véase a continuación).
HTP-700_VYXCN_Es.book 69 ページ 2009年9月17日 木曜日 午後3時3分 El menú System Setup 2b.Channel Level Test Tone [ Manual ] Caution Loud test tones will be output. Return 4 Ajuste el nivel de cada canal utilizando /. Si seleccionó la opción Manual, utilice / para cambiar de altavoz. La opción Auto emite los tonos de prueba en el orden que se indica en la pantalla: 2b.Channel Level Front L Center Front R Surround R Surr. Back R Surr.
HTP-700_VYXCN_Es.book 70 ページ 09 2009年9月17日 木曜日 午後3時3分 Control de otros componentes del sistema Capítulo 9 Control de otros componentes del sistema Uso del mando a distancia para controlar otros componentes La mayoría de los componentes puede asignarse a uno de los botones MULTI CONTROL utilizando el código de preajuste del fabricante del componente almacenado en el mando a distancia.
HTP-700_VYXCN_Es.
HTP-700_VYXCN_Es.book 72 ページ 09 2009年9月17日 木曜日 午後3時3分 Control de otros componentes del sistema Botón(es) Función Botón +10 Utilícelo para agregar puntos decimales al seleccionar DTV canales de TV. Componentes ENTER Utilícelo para introducir un canal. TV por cable/TV por satélite/ TV/DTV MENU Presiónelo para que se visualice el menú DTV. DTV Para seleccionar la pantalla de menú.
HTP-700_VYXCN_Es.book 73 ページ 2009年9月17日 木曜日 午後3時3分 Control de otros componentes del sistema 09 Función Se detiene la reproducción (en algunos modelos, cuando Reproductor de discos BD/ se pulsa cuando el disco ya está parado se abre la bandeja DVD, DVR, Videograbadora del disco). Úselos para introducir un número de título, capítulo o pista. Videograbadora Reproductor de discos BD/ DVD, DVR Seleccione pistas superiores a 10.
HTP-700_VYXCN_Es.book 74 ページ 09 2009年9月17日 木曜日 午後3時3分 Control de otros componentes del sistema Lista de códigos preajustados No tendrá problemas para controlar un componente si encuentra su marca en esta lista, pero tenga presente que hay veces que los códigos de los fabricantes de la lista no funcionan para el modelo que usted está utilizando. También hay casos en que sólo pueden controlarse ciertas funciones después de haber asignado el código preajustado adecuado.
HTP-700_VYXCN_Es.
HTP-700_VYXCN_Es.
HTP-700_VYXCN_Es.
HTP-700_VYXCN_Es.
HTP-700_VYXCN_Es.book 79 ページ 2009年9月17日 木曜日 午後3時3分 Información adicional Información adicional Italiano Solución de problemas Español Capítulo 10 10 • Si la unidad no funciona con normalidad debido a factores externos tales como la electricidad estática, desenchufe la unidad de la red y vuelva a enchufarla para restablecer las condiciones normales de funcionamiento. Problema Deutsch Algunas operaciones incorrectas se suelen confundir con problemas o fallos de funcionamiento.
HTP-700_VYXCN_Es.book 80 ページ 10 2009年9月17日 木曜日 午後3時3分 Información adicional Problema Solución • Asegúrese de que la distancia de todos los altavoces es correcta Parece que la función PHASE CONTROL no tiene (consulte Distancia de los altavoces en la página 69). ningún efecto audible. Hay demasiado ruido en las • Conecte la antena (página 36) y ajuste la posición para obtener la mejor emisiones. recepción. • Ponga todos los cables sueltos apartados de los terminales y cables de la antena.
HTP-700_VYXCN_Es.book 81 ページ 2009年9月17日 木曜日 午後3時3分 Información adicional • Cambie las pilas (consulte página 44). • Utilícelo a una distancia de 7 m, 30° del sensor de control remoto (consulte página 44). • Retire cualquier obstáculo o úselo desde otra posición. • Evite exponer el sensor del panel frontal de la unidad a la luz directa del sol. La pantalla se oscurece o se apaga. • Pulse DIMMER en el mando a distancia repetidamente para seleccionar los ajustes predeterminados.
HTP-700_VYXCN_Es.book 82 ページ 10 2009年9月17日 木曜日 午後3時3分 Información adicional Información importante relacionada con la conexión HDMI Hay casos en los que no se pueden pasar las señales HDMI por este sistema (depende del componente dotado con HDMI que haya conectado; consulte al fabricante para obtener información sobre la compatibilidad con HDMI).
HTP-700_VYXCN_Es.book 83 ページ 2009年9月17日 木曜日 午後3時3分 Información adicional 10 Síntoma Causa Acción iPod/USB Error 1 Hay un problema con la ruta de la señal Apague el sistema y vuelva a conectar el desde el iPod al sistema. iPod al sistema. Si esto no funciona, (I/U ERR1) pruebe a reiniciar el iPod. Actualice el software que esté utilizando con el iPod (utilice el software de actualización de iPod más reciente, posterior a la actualización 2004-10-20).
HTP-700_VYXCN_Es.book 84 ページ 10 2009年9月17日 Altavoz de subgraves receptor SX-SWR1 • Sección Audio Salida de potencia nominal Frontal, Central, Sonido Surround . . . . . . . . . . 100 W por canal (1 kHz, 4 Ω, 10%) Altavoz de subgraves . . . . . . . . . . . . . . . . . . 100 W (100 Hz, 4 Ω, 10%) • Sección de sintonizador de FM Intervalo de frecuencia . . . .87,5 MHz a 108 MHz Entrada de antena . . . . . . . . . 75 Ω sin equilibrio • Accesorios Mando a distancia . . . . . . . . . . . . . . . . . . .
HTP-700_VYXCN_Es.book 85 ページ 2009年9月17日 木曜日 午後3時3分 Información adicional • Altavoces frontales/surround Altavoz central Caja . . . . . . . . . . . . . . Caja cerrada tipo estantería (con protección magnética) Sistema. . . . . . . . . . . . . . .Sistema 6,6 cm de 1 vía Altavoces . . . . . . . . . . . . . . . .Tipo cono de 6,6 cm Impedancia . . . . . . . . . . . . . . . . . . . . . . . . . . . .8 Ω Banda de frecuencias . . . . . . . . . 82 Hz a 20 kHz Potencia máxima de entrada . . . . . . . . . . . .
HTP-700_VYXCN_De.book 2 ページ 2009年9月17日 木曜日 午後3時20分 WICHTIG CAUTION RISK OF ELECTRIC SHOCK DO NOT OPEN Das Blitzsymbol in einem Dreieck weist den Benutzer darauf hin, dass eine Berührungsgefahr mit nicht isolierten Teilen im Geräteinneren, die eine gefährliche Spannung führen, besteht. Die Spannung kann so hoch sein, dass sie die Gefahr eines elektrischen Schlages birgt. ACHTUNG: UM SICH NICHT DER GEFAHR EINES ELEKTRISCHEN SCHLAGES AUSZUSETZEN, DÜRFEN SIE NICHT DEN DECKEL (ODER DIE RÜCKSEITE) ENTFERNEN.
HTP-700_VYXCN_De.book 3 ページ 2009年9月17日 木曜日 午後3時20分 Informationen für Anwender zur Sammlung und Entsorgung von Altgeräten und gebrauchten Batterien Symbol für Geräte Diese Symbole auf den Produkten, der Verpackung und/oder Begleitdokumenten bedeuten, dass gebrauchte elektrische und elektronische Produkte und Batterien nicht über den Haushaltsmüll entsorgt werden dürfen.
HTP-700_VYXCN_De.book 4 ページ 2009年9月17日 木曜日 午後3時20分 1 Kurzleitfaden (HTP-700) Überprüfen des mitgelieferten Zubehörs Bitte vergewissern Sie sich nach dem Auspacken, dass die nachstehend aufgeführten Zubehörartikel vollzählig im Verpackungskarton vorhanden sind.
HTP-700_VYXCN_De.
HTP-700_VYXCN_De.book 6 ページ 2009年9月17日 木曜日 午後3時20分 1 Kurzleitfaden (HTP-600) Überprüfen des mitgelieferten Zubehörs Bitte vergewissern Sie sich nach dem Auspacken, dass die nachstehend aufgeführten Zubehörartikel vollzählig im Verpackungskarton vorhanden sind.
HTP-700_VYXCN_De.
HTP-700_VYXCN_De.book 8 ページ 2009年9月17日 木曜日 午後3時20分 1 Kurzleitfaden (HTP-FS500) Überprüfen des mitgelieferten Zubehörs Bitte vergewissern Sie sich nach dem Auspacken, dass die nachstehend aufgeführten Zubehörartikel vollzählig im Verpackungskarton vorhanden sind.
HTP-700_VYXCN_De.
HTP-700_VYXCN_De.book 10 ページ 2009年9月17日 木曜日 午後3時20分 2 Für optimalen Hörgenuss (MCACC) SYSTEM TV CONTROL System Setup INPUT CH 1.Auto MCACC 2.Manual SP Setup Return ENTER 1.Auto MCACC Now Analyzing Environment Check Ambient Noise Speaker YES/NO ENTER Return (HTP-700) (HTP-700) ? 48 -50 VIDEO1 Einschalten 1.Auto MCACC 10:Next SYSTEM 10 De SOURCE Einschalten System Setup Check! Front Center Surr Surr. Back Subwoofer 1.Auto MCACC 2.
HTP-700_VYXCN_De.
HTP-700_VYXCN_De.book 12 ページ 2009年9月17日 木曜日 午後3時20分 Wir danken Ihnen für das Vertrauen, das Sie Pioneer mit dem Kauf dieses Produkts ausgesprochen haben. Bitte lesen Sie diese Bedienungsanleitung vor der Inbetriebnahme aufmerksam durch, damit Sie wissen, wie Sie Ihr neues Gerät richtig bedienen. Bewahren Sie die Anleitung anschließend für spätere Bezugnahme griffbereit auf. Inhaltsverzeichnis Kurzleitfaden (HTP-700) ..................4 Kurzleitfaden (HTP-600) ..................
HTP-700_VYXCN_De.book 13 ページ 2009年9月17日 03 Bedienelemente und Anzeigen 40 41 43 46 47 午後3時20分 Funktionen bei Anschluss von hinteren Surround-Lautsprechern . . . . . . . . . . . . . . 66 Surround Sound-Modi. . . . . . . . . . . . . . . 67 Verwendung der hinteren SurroundKanal-Verarbeitung . . . . . . . . . . . . . . . . . 67 Einstellen der Up Mix-Funktion . . . . . . . . 68 Einstellen der Audio-Optionen . . . . . . . . . . 69 08 Das System Setup-Menü Automatische Surround Sound-Einrichtung (MCACC) . .
HTP-700_VYXCN_De.book 14 ページ 01 2009年9月17日 木曜日 午後3時20分 Aufstellung der Lautsprecher (HTP-700) Kapitel 1-1 Aufstellung der Lautsprecher (HTP-700) Sicherheitsmaßnahmen bei der Aufstellung Legen Sie die Lautsprecher beim Zusammenbau flach auf eine Seite, um Unfälle und Verletzungen zu vermeiden. Bitte sorgen Sie dafür, dass die Lautsprecher auf einer stabilen Unterlage zusammengebaut, aufgebaut und platziert werden.
HTP-700_VYXCN_De.book 15 ページ 2009年9月17日 木曜日 午後3時20分 Aufstellung der Lautsprecher (HTP-700) Achtung • Ziehen Sie die Schrauben nicht zu stark an. • Wenn die Schrauben zu stark angezogen werden, können die Gewinde der Schrauben und/oder der Muttern beschädigt werden. Verwenden Sie einen mittelgroßen Schraubendreher für den Zusammenbau.
HTP-700_VYXCN_De.book 16 ページ 01 2009年9月17日 木曜日 午後3時20分 Aufstellung der Lautsprecher (HTP-700) Schließen Sie das andere Ende jedes Lautsprecherkabels an die entsprechend farbcodierten Lautsprecherklemmen an der Rückwand des Receiver-Subwoofers an. farbcodierte Klemme (+) farbcodiertes Kabel • Falls sich die Kabel aus den Klemmen lösen und miteinander in Berührung kommen, wird der Verstärker einer übermäßigen Belastung ausgesetzt.
HTP-700_VYXCN_De.book 17 ページ 2009年9月17日 木曜日 午後3時20分 Aufstellung der Lautsprecher (HTP-700) Befestigungssc hraube (nicht mitgeliefert) 5 mm 10 mm Vor der Montage • Bitte bedenken Sie das hohe Gewicht der Lautsprecher; es kann dazu führen, dass sich die Schrauben lockern, oder das Tragvermögen der Wand reicht für das Gewicht eines Lautsprechers nicht aus, so dass er herunterfällt. Vergewissern Sie sich daher, dass die für die Montage vorgesehene Wand stabil genug ist, um die Lautsprecher zu tragen.
HTP-700_VYXCN_De.book 18 ページ 01 2009年9月17日 • Die Frontlautsprecher, Mittellautsprecher und Surround-Lautsprecher dieser Anlage sind magnetisch abgeschirmt. Je nach Aufstellungsort kann es jedoch vorkommen, dass Farbverzerrungen im Fernsehbild auftreten, falls ein Lautsprecher in unmittelbarer Nähe des Bildschirms aufgestellt ist. Schalten Sie in einem solchen Fall das Fernsehgerät aus, warten Sie 15 Minuten bis 30 Minuten lang, und schalten Sie es dann wieder ein.
HTP-700_VYXCN_De.book 19 ページ 2009年9月17日 木曜日 午後3時20分 Aufstellung der Lautsprecher (HTP-600) 01 Kapitel 1-2 Wenn die Lautsprecher in einem Turmaufbau übereinander angeordnet werden sollen, müssen die mitgelieferten Halterungen verwendet werden, um die Boxen aneinander zu sichern (Seite 20). Aufstellung der Heimkinoanlage Dies ist eine standardisierte Lautsprecheraufstellung für mehrkanalige Surround-Wiedergabe, mit der ein optimaler 5.1-kanaliger Heimkino-Sound erzielt wird.
HTP-700_VYXCN_De.book 20 ページ 01 2009年9月17日 木曜日 午後3時20分 Aufstellung der Lautsprecher (HTP-600) 2 (Bei Aufstellung der Mittellautsprecher rechts und links) Stellen Sie die Lautsprecher übereinander auf, und sichern Sie sie mit der Halterung aneinander. An der Rückwand jedes Lautsprechers befindet sich als Identifikationshilfe eine Farbplakette auf dem Modellaufkleber. Stellen Sie die Lautsprecher unter Bezugnahme auf diese Farbplaketten richtig auf.
HTP-700_VYXCN_De.book 21 ページ 2009年9月17日 木曜日 午後3時20分 Aufstellung der Lautsprecher (HTP-600) farbcodierte Klemme (+) farbcodiertes Kabel • An den Lautsprecherklemmen dieses Gerätes liegt eine POTENTIELL GEFÄHRLICHE Spannung an. Achten Sie zur Vermeidung von elektrischem Schlag unbedingt darauf, vor dem Anschließen oder Abtrennen der Lautsprecherkabel den Netzstecker von der Netzsteckdose zu trennen, bevor Sie irgendwelche nicht isolierten Teile berühren.
HTP-700_VYXCN_De.book 22 ページ 01 2009年9月17日 • Die Frontlautsprecher, Mittellautsprecher und Surround-Lautsprecher dieser Anlage sind magnetisch abgeschirmt. Je nach Aufstellungsort kann es jedoch vorkommen, dass Farbverzerrungen im Fernsehbild auftreten, falls ein Lautsprecher in unmittelbarer Nähe des Bildschirms aufgestellt ist. In einem solchen Fall schalten Sie das Fernsehgerät aus, warten Sie 15 Minuten bis 30 Minuten lang, und schalten Sie es dann wieder ein.
HTP-700_VYXCN_De.book 23 ページ 2009年9月17日 木曜日 午後3時20分 Aufstellung der Lautsprecher (HTP-FS500) 01 Kapitel 1-3 1 Befestigen Sie die rutschfesten Untersetzer an der Unterseite des ReceiverSubwoofers. Verwenden Sie den mitgelieferten Klebstoff zur Befestigung von vier Untersetzern an der Unterseite des Subwoofers. Rutschfeste Untersetzer Aufstellung der Heimkinoanlage Deutsch Legen Sie die Lautsprecher beim Zusammenbau flach auf eine Seite, um Unfälle und Verletzungen zu vermeiden.
HTP-700_VYXCN_De.book 24 ページ 01 2009年9月17日 木曜日 午後3時20分 Aufstellung der Lautsprecher (HTP-FS500) • Wenn die Schrauben zu stark angezogen werden, können die Gewinde der Schrauben und/oder der Muttern beschädigt werden. Verwenden Sie einen mittelgroßen Schraubendreher für den Zusammenbau. • Verwenden Sie keine Akku-Schrauber oder übergroßen Schraubendreher, da die Schrauben damit zu stark angezogen werden könnten.
HTP-700_VYXCN_De.book 25 ページ 2009年9月17日 木曜日 午後3時20分 Aufstellung der Lautsprecher (HTP-FS500) • Falls sich die Kabel aus den Klemmen lösen und miteinander in Berührung kommen, wird der Verstärker einer übermäßigen Belastung ausgesetzt. Dies kann dazu führen, dass der Verstärker den Betrieb einstellt oder sogar beschädigt wird. • An den Lautsprecherklemmen dieses Gerätes liegt eine POTENTIELL GEFÄHRLICHE Spannung an.
HTP-700_VYXCN_De.book 26 ページ 01 2009年9月17日 木曜日 午後3時20分 Aufstellung der Lautsprecher (HTP-FS500) Wandmontage der Frontlautsprecher Die Frontlautsprecher sind jeweils mit einem Montageloch versehen, das zur Montage des Lautsprechers an einer Wand verwendet werden kann. Vor der Montage • Bitte bedenken Sie das hohe Gewicht der Lautsprecher; es kann dazu führen, dass sich die Schrauben lockern, oder das Tragvermögen der Wand reicht für das Gewicht eines Lautsprechers nicht aus, so dass er herunterfällt.
HTP-700_VYXCN_De.book 27 ページ 2009年9月17日 木曜日 午後3時20分 Aufstellung der Lautsprecher (HTP-FS500) Zusätzliche Hinweise zur Aufstellung der Lautsprecher Vorsichtshinweise: • Da der Subwoofer nicht magnetisch abgeschirmt ist, sollte er nicht in unmittelbarer Nähe eines Fernsehgerätes oder Monitors aufgestellt werden. Magnetische Datenträger (z. B. Disketten, Tonbänder oder Videokassetten) sollten nicht in der Nähe des Subwoofers aufbewahrt werden.
HTP-700_VYXCN_De.book 28 ページ 02 2009年9月17日 木曜日 午後3時20分 Anschlüsse Kapitel 2 Anschlüsse Rückwand 1 2 1 2 1 3 5 4 7 6 9 8 1 Koaxiale/optische DigitalaudioEingangsbuchsen (3) Diese Eingangsbuchsen dienen zum Anschließen von digitalen Audioquellen wie eines DVD-Players/Recorders, digitalen Satellitenempfängers, CD-Players usw.
HTP-700_VYXCN_De.book 29 ページ 2009年9月17日 木曜日 午後3時20分 Anschlüsse Herstellen der Kabelanschlüsse 02 (max. Anzahl der Kanaleingänge) PCM-Signale mit einer Abtastfrequenz von 192 kHz.1 Dieser Receiver ist nicht mit einem Videokonverter bestückt. Wenn Sie daher ein HDMI-Kabel für den Anschluss an das Eingabegerät verwenden, müssen Sie ebenfalls ein HDMI-Kabel der gleichen Ausführung für den Anschluss des Fernsehgerätes verwenden.
HTP-700_VYXCN_De.book 30 ページ 02 2009年9月17日 木曜日 午後3時20分 Anschlüsse HDMI, das HDMI-Logo und High-Definition Multimedia Interface sind Warenzeichen oder eingetragene Warenzeichen von HDMI Licensing, LLC. Wichtig • Im Vergleich zu herkömmlichen Formaten der digitalen Übertragung von Audiosignalen (optisch und koaxial), ist beim HDMI-Format eine längere Zeit zur Erkennung der digitalen AudiosignalÜbertragung erforderlich.
HTP-700_VYXCN_De.book 31 ページ 2009年9月17日 木曜日 午後3時20分 Anschlüsse 02 Anschließen Ihres Fernsehgerätes (zur Wiedergabe des Fernsehtons) Einen Anschluss auswählen AUDIO OUT DIGITAL OUT OPTICAL R ANALOG L Español Fernsehgerät Italiano Dieser Anschluss ermöglicht eine Tonwiedergabe vom eingebauten Tuner des Fernsehgerätes über die Lautsprecher dieser Anlage. Deutsch 1 2 1 • Verbinden Sie die analogen AudioAusgangsbuchsen Ihres Fernsehgerätes mit den Eingangsbuchsen TV/SAT dieser Anlage.
HTP-700_VYXCN_De.book 32 ページ 02 2009年9月17日 木曜日 午後3時20分 Anschlüsse Anschließen des Fernsehgerätes und der Wiedergabekomponenten Anschluss an die HDMI-Schnittstelle Wenn Sie eine mit einer HDMI- oder DVI-Schnittstelle (mit HDCP) ausgestattete Komponente (Blu-ray Disc-Player usw.) besitzen, können Sie diese über ein handelsübliches HDMI-Kabel an diese Anlage anschließen.
HTP-700_VYXCN_De.book 33 ページ 2009年9月17日 木曜日 午後3時20分 Anschlüsse 02 Anschließen von Komponenten ohne HDMI-Schnittstelle Das nachstehende Diagramm zeigt, wie Sie ein Fernsehgerät und einen DVD-Player (oder eine andere Wiedergabekomponente) ohne HDMI-Schnittstelle an diese Anlage anschließen können. Italiano DVD-Player usw.
HTP-700_VYXCN_De.book 34 ページ 02 2009年9月17日 木曜日 午後3時20分 Anschlüsse Anschließen eines HDD/DVD-Recorders, Videokassettenrecorders und anderer Videoquellen Diese Anlage ist mit Audio/Video-Eingängen und -Ausgängen ausgestattet, die den Anschluss von sowohl analogen als auch digitalen Videorecordern gestatten, einschließlich von herkömmlichen Videokassettenrecordern und HDD/DVD-Recordern.
HTP-700_VYXCN_De.book 35 ページ 2009年9月17日 木曜日 午後3時20分 Anschlüsse 02 Anschließen eines Satellitenempfängers oder einer digitalen SetTop-Box 1 Italiano Bei Satelliten- und Kabelempfängern sowie terrestrischen digitalen Fernsehtunern handelt es sich um gängige Beispiele sogenannter „Set-Top-Boxen“.
HTP-700_VYXCN_De.book 36 ページ 02 2009年9月17日 木曜日 午後3時20分 Anschlüsse Anschließen sonstiger Audiokomponenten Anzahl und Art der Anschlüsse hängen vom Typ der jeweils anzuschließenden Komponente ab.1 Gehen Sie wie nachstehend beschrieben vor, um einen CD-R-Recorder, MD-Recorder, DATRecorder, ein Kassettendeck oder eine andere Audiokomponente anzuschließen.
HTP-700_VYXCN_De.book 37 ページ 2009年9月17日 木曜日 午後3時20分 Anschlüsse 02 • Informationen zur iPod-Wiedergabe finden Sie unter Wiedergabe eines iPod auf Seite 52. VIDEO INPUT iPod iPhone VIDEO INPUT USB iPod iPhone USB VIDEO Deutsch • Entfernen Sie die Abdeckung, um Zugang zu den Buchsen an der Frontplatte zu erhalten. • Bitte schlagen Sie beim Herstellen dieses Anschlusses auch in der Bedienungsanleitung Ihres iPod nach.
HTP-700_VYXCN_De.book 38 ページ 02 2009年9月17日 木曜日 午後3時20分 Anschlüsse • Informationen zur Wiedergabe der Dateien eines USB-Gerätes finden Sie unter Wiedergabe von einem USB-Gerät auf Seite 55. Anschließen einer Außenantenne Um den UKW-Empfang zu verbessern, schließen Sie eine UKW-Außenantenne an die Buchse FM UNBAL 75 Ω an.
HTP-700_VYXCN_De.book 39 ページ 2009年9月17日 木曜日 午後3時20分 Anschlüsse 1 02 2 Schließen Sie den Netzstecker am anderen Ende des Netzkabels an eine Netzsteckdose an. 2 AUDIO IN Verstärker für hintere Surround-Kanäle • Der an den Vorverstärkerausgang dieser Anlage angeschlossene zusätzliche Verstärker kann auch zum Treiben eines einzigen hinteren Surround-Lautsprechers verwendet werden. In einem solchen Fall schließen Sie den Verstärker lediglich an die linke PRE OUT-Buchse (L (Single)) an.
HTP-700_VYXCN_De.book 40 ページ 03 2009年9月17日 木曜日 午後3時20分 Bedienelemente und Anzeigen Kapitel 3 Bedienelemente und Anzeigen Frontplatte 1 ST/MONO TUNE TUNE 2 3 FUNCTION 4 5 AUTO/DIRECT 6 STANDBY/ON VOLUME 7 8 VIDEO INPUT 9 USB 1 Anzeigen an der Frontplatte Einzelheiten hierzu finden Sie unter Display auf Seite 41. 2 Tuner-Betriebstasten ST/MONO Diese Taste dient zum Umschalten zwischen dem automatischen Stereo- und dem Mono-Empfangsmodus (Seite 58).
HTP-700_VYXCN_De.book 41 ページ 2009年9月17日 木曜日 午後3時20分 Bedienelemente und Anzeigen 03 Display 2 1 3 4 5 6 7 8 Italiano 10 2 AUTO Diese Anzeige leuchtet bei aktivierter Auto Surround-Funktion (Automatische Wiedergabe auf Seite 62). 3 RDS Diese Anzeige beim Empfang einer RDSSendung (Seite 60). 4 ST Diese Anzeige leuchtet beim Empfang einer UKW-Stereosendung im automatischen Stereo-Empfangsmodus. 5 TUNE Diese Anzeige leuchtet, wenn ein Sender einwandfrei abgestimmt ist.
HTP-700_VYXCN_De.book 42 ページ 03 2009年9月17日 2D Diese Anzeige leuchtet, wenn ein mit Dolby Digital codiertes Signal erfasst worden ist. 2D+ Diese Anzeige leuchtet, wenn eine Signalquelle mit Dolby Digital Pluscodierten Audiosignalen erfasst worden ist. 2HD Diese Anzeige leuchtet, wenn eine Signalquelle mit Dolby TrueHD-codierten Audiosignalen erfasst worden ist. EX Diese Anzeige leuchtet, wenn eine Signalquelle mit Dolby Digital EX-codierten Audiosignalen erfasst worden ist.
HTP-700_VYXCN_De.book 43 ページ 2009年9月17日 木曜日 午後3時20分 Bedienelemente und Anzeigen 03 Fernbedienung SOURCE 1 3 2 SYSTEM 4 3 SOURCE Durch Drücken dieser Taste können die an die Anlage angeschlossenen Komponenten einoder ausgeschaltet werden (Einzelheiten hierzu finden Sie auf Seite 78). Italiano SYSTEM TV CONTROL 5 INPUT 6 VOL DIMMER SIGNAL SEL BD MENU 8 9 10 12 ENTER 11 MUTE 13 DISPLAY 14 Diese Taste dient zum Ein- und Ausschalten des Fernsehgerätes.
HTP-700_VYXCN_De.book 44 ページ 03 2009年9月17日 Drücken Sie zunächst BD, um Zugriff zu erhalten auf: 9 Drücken Sie zunächst erhalten auf: , um Zugriff zu AUDIO PARAMETER Diese Taste dient zum Zugriff auf die Audio-Optionen (Seite 65). BD MENU Diese Taste dient zum Anzeigen des DiscMenüs von Blu-ray-Discs. SETUP Drücken Sie diese Taste, um auf das System Setup-Menü zuzugreifen (Seite 72).
HTP-700_VYXCN_De.book 45 ページ 2009年9月17日 木曜日 午後3時20分 Bedienelemente und Anzeigen Drücken Sie zunächst iPod USB, um Zugriff zu erhalten auf: 12 MASTER VOLUME +/– Diese Tasten dienen zur Einstellung der gewünschten Wiedergabelautstärke. 13 Tasten für Komponentensteuerung Die Haupttasten (, usw.) dienen zur Steuerung der jeweils mit den Eingangsquellen-Tasten gewählten Komponente.
HTP-700_VYXCN_De.book 46 ページ 03 2009年9月17日 木曜日 午後3時20分 Bedienelemente und Anzeigen CH SELECT Betätigen Sie diese Taste zur Wahl eines Kanals, und betätigen Sie dann +/– zur Einstellung des Kanalpegels (Seite 74). Einlegen der Batterien in die Fernbedienung CH SELECT +/– Diese Tasten dienen zur Einstellung des Kanalpegels. SB CH Diese Taste dient zur Wahl des Surround Back Channel-Modus (Seite 67). PHASE Betätigen Sie diese Taste, um die Phase Control-Funktion ein- und auszuschalten (Seite 65).
HTP-700_VYXCN_De.book 47 ページ 2009年9月17日 Bedienelemente und Anzeigen 木曜日 午後3時20分 03 Gebrauch der Fernbedienung 30° Italiano 30° 7m Español • Sorgen Sie dafür, dass der Übertragungsweg zwischen dem Geber der Fernbedienung und dem Fernbedienungssignal-Sensor an der Frontplatte der Anlage nicht durch Hindernisse blockiert wird.
HTP-700_VYXCN_De.book 48 ページ 04 2009年9月17日 木曜日 午後3時20分 Die ersten Schritte Kapitel 4 Die ersten Schritte Automatische Surround SoundEinrichtung (MCACC) Die akustische Mehrkanal-Kalibrierung MCACC (Multichannel Acoustic Calibration) misst die akustischen Eigenschaften Ihres Hörbereichs unter Berücksichtigung der Raumgeräusche, der Größe und des Abstands der Lautsprecher von der Hörposition und testet die Kanalverzögerung und den Kanalpegel.
HTP-700_VYXCN_De.book 49 ページ 2009年9月17日 木曜日 午後3時20分 Die ersten Schritte • Sie können jederzeit SETUP drücken, um das System Setup-Menü zu verlassen.1 1.Auto MCACC Now Analyzing Environment Check Ambient Noise Speaker YES/NO Return System Setup 1.Auto MCACC 2.Manual SP Setup 5 Folgen Sie den Anweisungen, die auf dem Bildschirm erscheinen. • Vergewissern Sie sich, dass das Mikrofon angeschlossen ist. • Weiter unten finden Sie Hinweise zu Hintergrundgeräuschen und anderen möglichen Störungen.
HTP-700_VYXCN_De.book 50 ページ 04 2009年9月17日 木曜日 午後3時20分 Die ersten Schritte Falls eine Fehlermeldung (ERR) in der rechten Spalte erscheint, liegt möglicherweise ein Problem beim Anschluss des betreffenden Lautsprechers vor. Wenn sich dieses Problem durch Wahl von RETRY nicht beseitigen lässt, schalten Sie die Anlage aus, und überprüfen Sie die Lautsprecheranschlüsse. 8 Vergewissern Sie sich, dass „OK“ markiert ist, und drücken Sie dann ENTER.
HTP-700_VYXCN_De.book 51 ページ 2009年9月17日 木曜日 午後3時20分 Die ersten Schritte 04 1 Schalten Sie die Wiedergabekomponente ein. 1 Drücken Sie Fernbedienung. 2 Drücken Sie SYSTEM, um diese Anlage einzuschalten. 2 Betätigen Sie SIGNAL SEL zur Wahl des Eingangssignals entsprechend der jeweiligen Quellenkomponente. Wenn DIGITAL (C1/O1/O2) oder HDMI (H) gewählt wird, ohne dass jedoch ein Anschluss am gewählten Audioeingang hergestellt ist, wird A (analog) automatisch eingestellt.
HTP-700_VYXCN_De.book 52 ページ 05 2009年9月17日 木曜日 午後3時20分 iPod/USB-Wiedergabe Kapitel 5 iPod/USB-Wiedergabe Wiedergabe eines iPod Diese Anlage verfügt über eine iPodSpezialbuchse, die eine Steuerung der Wiedergabe des Audio-Inhalts Ihres iPod über die Bedienelemente dieser Anlage gestattet.1 1 Schalten Sie die Anlage und das Fernsehgerät ein. Siehe Anschließen eines iPod/iPhone auf Seite 37. 2 Drücken Sie die iPod USB-Taste, um die Anlage auf den iPod/USB-Eingang umzuschalten.
HTP-700_VYXCN_De.book 53 ページ 2009年9月17日 木曜日 午後3時20分 iPod/USB-Wiedergabe Playlists Songs Artists Albums Songs Playlists Songs Songs Podcasts Genres Artists Albums Songs Composers Albums Songs Audiobooks Shuffle Songs Tipp • Sie können alle Titel in einer bestimmten Kategorie wiedergeben, indem Sie den Eintrag All ganz oben in jeder Kategorieliste markieren. Beispielsweise können Sie alle Titel eines bestimmten Interpreten wiedergeben.
HTP-700_VYXCN_De.book 54 ページ 05 2009年9月17日 木曜日 午後3時20分 iPod/USB-Wiedergabe Taste Funktion / Betätigen Sie diese Tasten während des Durchsuchens, um zur vorigen bzw. nächsten Ebene zu springen. / Betätigen Sie diese Tasten während der Audiobook-Wiedergabe, um die Wiedergabegeschwindigkeit zu ändern: Schneller Normal Langsamer. TOP MENU Drücken Sie diese Taste, um zum iPod Top-Menü zurückzukehren. RETURN Drücken Sie diese Taste, um auf die vorige Ebene zurückzukehren.
HTP-700_VYXCN_De.book 55 ページ 2009年9月17日 木曜日 午後3時20分 iPod/USB-Wiedergabe Wiedergabe von einem USBGerät Die Meldung Loading erscheint auf dem Bildschirm, sobald die Anlage das angeschlossene USB-Gerät erkannt hat. Nach der Erkennung erscheint ein Wiedergabefenster auf dem Bildschirm, und die Wiedergabe startet automatisch.3 1 Schalten Sie die Anlage und das Fernsehgerät ein.
HTP-700_VYXCN_De.book 56 ページ 05 2009年9月17日 Die nachstehende Tabelle zeigt die grundlegenden Steuerfunktionen der Fernbedienung zur USB-Wiedergabe. Drücken Sie iPod USB, um die Fernbedienung auf den iPod USB-Steuerungsmodus umzuschalten. Wichtig Falls eine USB Error-Meldung im Display erscheint, beseitigen Sie die Störung anhand der folgenden Abhilfemaßnahmen: • Schalten Sie die Anlage einmal aus und wieder ein. • Schließen Sie das USB-Gerät bei ausgeschalteter Anlage erneut an.
HTP-700_VYXCN_De.book 57 ページ 2009年9月17日 木曜日 午後3時20分 iPod/USB-Wiedergabe • MP3/WMA/MPEG-4 AAC-Wiedergabe mit VBR (Variable Bit Rate): Kompatibel1 • DRM-Schutz (Digital Rights Management): Kompatibel (DRM-geschützte Audiodateien können nicht mit dieser Anlage wiedergegeben werden). Hinweise zum Format MPEG-4 AAC Advanced Audio Coding (AAC) bildet den Kern der Norm MPEG-4 AAC, die MPEG-2 AAC umfasst und damit die Grundlage der MPEG-4Audiokomprimierungs-Technologie darstellt.
HTP-700_VYXCN_De.book 58 ページ 06 2009年9月17日 木曜日 午後3時20分 Verwendung des Tuners Kapitel 6 Verwendung des Tuners Empfang von Rundfunksendungen In diesem Abschnitt wird beschrieben, wie Sie UKW-Sender anhand der automatischen (Sendersuchlauf) und der manuellen (schrittweise) Abstimmfunktionen abstimmen können. Nachdem Sie einen Sender abgestimmt haben, können Sie dessen Empfangsfrequenz für späteren Abruf einspeichern — Einzelheiten hierzu finden Sie unter Einspeichern von Festsendern unten.
HTP-700_VYXCN_De.book 59 ページ 2009年9月17日 木曜日 午後3時20分 Verwendung des Tuners 4 Drücken Sie ENTER. Nach Drücken von ENTER hört die Anzeige der Speicherplatznummer auf zu blinken, und die Empfangsfrequenz des abgestimmten Senders wird gespeichert. Abrufen von Festsendern Um von dieser Funktion Gebrauch machen zu können, müssen Sie zunächst Festsender eingespeichert haben. Falls Sie dies noch nicht getan haben, schlagen Sie bitte unter Einspeichern von Festsendern auf Seite 58 nach.
HTP-700_VYXCN_De.book 60 ページ 06 2009年9月17日 木曜日 午後3時20分 Verwendung des Tuners Sendungen der folgenden Programmtypen können gesucht werden:1 NEWS – Nachrichten AFFAIRS – Aktuelles INFO – Allgemeine Informationen SPORT – Sport EDUCATE – Bildung DRAMA – Hörspiele usw. CULTURE – Nationale oder regionale Kultur, Theater usw. SCIENCE – Naturwissenschaft und Technik VARIED – Sendungen in Gesprächsform, wie QuizShows oder Interviews.
HTP-700_VYXCN_De.book 61 ページ 2009年9月17日 木曜日 午後3時20分 Verwendung des Tuners 06 Anzeigen von RDS-Informationen • Hörmodus • Gesamtlautstärke • Program Service Name (PS) – Name (Kürzel) des Senders Deutsch • Radio Text (RT) – Textmeldungen, die vom Sender ausgestrahlt werden Bei einem Programm mit Höreranrufen kann z. B. die Telefonnummer des Senders als RT ausgestrahlt werden. Español • Betätigen Sie DISPLAY, um die verschiedenen RDS-Informationen anzuzeigen.
HTP-700_VYXCN_De.book 62 ページ 07 2009年9月17日 木曜日 午後3時20分 Wiedergabe mit Ihrer Anlage Kapitel 7 Wiedergabe mit Ihrer Anlage Wichtig • In Abhängigkeit von der jeweils gewählten Eingangsquelle, den vorgenommenen Einstellungen und dem aktuellen Betriebszustand der Anlage kann es vorkommen, dass die Hörmodi und andere der in diesem Abschnitt beschriebenen Funktionen nicht zur Verfügung stehen. Automatische Wiedergabe Bei der Auto Surround-Funktion handelt es sich um die einfachste und direkteste Höroption.
HTP-700_VYXCN_De.book 63 ページ 2009年9月17日 木曜日 午後3時20分 Wiedergabe mit Ihrer Anlage Die folgenden Modi bieten eine grundlegende Surround Sound-Wiedergabe von Stereo- und Mehrkanal-Signalquellen. • DOLBY PLII MUSIC1 – Dieser Modus liefert einen bis zu 5.1-kanaligen Klang, der besonders gut für Musikquellen geeignet ist. • DOLBY PLII GAME – Dieser Modus liefert einen bis zu 5.1-kanaligen Klang, der besonders gut für Videospiele geeignet ist. • NEO:6 CINEMA – Dieser Modus liefert einen bis zu 5.
HTP-700_VYXCN_De.book 64 ページ 07 2009年9月17日 木曜日 午後3時20分 Wiedergabe mit Ihrer Anlage Stereo-Wiedergabe Nach Wahl von STEREO wird die Signalquelle ausschließlich über den linken und rechten Frontlautsprecher (und über den Subwoofer, sofern die entsprechenden Lautsprechereinstellungen vorgenommen wurden) wiedergegeben. Mehrkanalige Signalquellen im Format Dolby Digital oder DTS werden auf (2-kanaligen) Stereoton heruntergemischt. Im Stereomodus mit automatischer Pegelregelung (A.L.C.
HTP-700_VYXCN_De.book 65 ページ 2009年9月17日 木曜日 午後3時20分 Wiedergabe mit Ihrer Anlage Verwendung des Sound Retriever Wenn Audiodaten bei der Komprimierung entfernt werden, wird die Klangqualität oft durch ein schlecht ausgewogenes Klangbild beeinträchtigt.
HTP-700_VYXCN_De.book 66 ページ 07 2009年9月17日 木曜日 午後3時20分 Wiedergabe mit Ihrer Anlage und damit zu Phasenverzerrung, bei der die tiefen Tonfrequenzen durch Interferenzen zwischen den Kanälen verzerrt oder gedämpft werden. Bei aktivierter Phase Control-Funktion kann diese Anlage satte Bässe ohne jegliche Einbuße der Original-Klangqualität reproduzieren (siehe Abbildung).
HTP-700_VYXCN_De.book 67 ページ 2009年9月17日 木曜日 午後3時20分 Wiedergabe mit Ihrer Anlage Surround Sound-Modi Bei 2-kanaligen Signalquellen haben Sie die Auswahl zwischen: • NEO:6 CINEMA – Dieser Modus liefert einen bis zu 6.1-kanaligen Klang, der besonders gut für die Tonspuren von Kinofilmen geeignet ist. • NEO:6 MUSIC – Dieser Modus liefert einen bis zu 6.1-kanaligen Klang, der besonders gut für Musikquellen geeignet ist.2 • DOLBY PRO LOGIC – Dieser Modus liefert einen 4.
HTP-700_VYXCN_De.book 68 ページ 07 2009年9月17日 木曜日 午後3時20分 Wiedergabe mit Ihrer Anlage • Bei einer 7.1-kanaligen Surround SoundAnlage werden Audiosignale von den hinteren Surround-Lautsprechern ausgegeben, die einer Matrix-Decodierung anhand der hinteren Surround-KanalVerarbeitung unter gleichzeitigem Einsatz der Up Mix-Funktion unterzogen wurden. SYSTEM TV CONTROL INPUT S.
HTP-700_VYXCN_De.book 69 ページ 2009年9月17日 木曜日 午後3時20分 Wiedergabe mit Ihrer Anlage Einstellen der Audio-Optionen TOOLS MASTER VOLUME MENU SYSTEM INPUT SELECT SOURCE ENTER SYSTEM TV CONTROL INPUT HOME MENU SETUP iPod CTRL PTY SEARCH 3 Betätigen Sie / zur Wahl der gewünschten Einstellung. Die verschiedenen Einstellungen, die für jeden Parameter zur Verfügung stehen, sind in der nachstehenden Tabelle aufgeführt.
HTP-700_VYXCN_De.book 70 ページ 07 2009年9月17日 木曜日 午後3時20分 Wiedergabe mit Ihrer Anlage Parameter DUAL MONO d Funktion Einstellung(en) Diese Einstellung legt fest, wie die beiden mit Dolby Digital-Tonspuren codierten monauralen Kanäle wiedergegeben werden. CH1 – Nur der Ton von Kanal 1 wird wiedergegeben. CH2 – Nur der Ton von Kanal 2 wird wiedergegeben. CH1 CH2 – Der Ton beider Kanäle wird über die Frontlautsprecher wiedergegeben.
HTP-700_VYXCN_De.book 71 ページ 2009年9月17日 木曜日 午後3時20分 Wiedergabe mit Ihrer Anlage Parameter Funktion 07 Einstellung(en) Die folgenden Parameter werden vom Modell HTP-FS500 nicht unterstützt. DIMEN.g (Dimension) Dieser Parameter dient zur Einstellung der VornHinten-Balance des Surround Sound, so dass der Klangschwerpunkt weiter hinten (bei negativen Einstellwerten) oder weiter vorn (bei positiven Einstellwerten) liegt. –3 bis +3 Standardeinstellung: 0 PNRM.
HTP-700_VYXCN_De.book 72 ページ 08 2009年9月17日 木曜日 午後3時20分 Das System Setup-Menü Kapitel 8 Das System Setup-Menü Verwendung des System SetupMenüs In diesem Kapitel wird erläutert, wie Sie detaillierte Einstellungen zur Einrichtung Ihrer Anlage vornehmen können, und wie Sie individuelle Lautsprechereinstellungen wunschgemäß feinjustieren können. 3 Wählen Sie den Menüeintrag, dessen Einstellung geändert werden soll. System Setup 1.Auto MCACC 2.
HTP-700_VYXCN_De.book 73 ページ 2009年9月17日 木曜日 午後3時20分 Das System Setup-Menü 1 Wählen Sie „Manual SP Setup“, und drücken Sie dann ENTER. System Setup 2.Manual SP Setup 2a.Speaker Setting 2.Manual SP Setup a.Speaker Setting b.Channel Level c.Speaker Distance Return 1 Markieren Sie „Speaker Setting“ im Manual SP Setup-Menü. Return • Channel Level – Dieser Eintrag dient zur Einstellung der Gesamtbalance Ihrer Lautsprecheranlage (siehe unten).
HTP-700_VYXCN_De.book 74 ページ 08 2009年9月17日 木曜日 午後3時20分 Das System Setup-Menü 3 Drücken Sie nach Abschluss der Einstellungen RETURN. Das Manual SP Setup-Menü kehrt auf den Bildschirm zurück. Kanalpegel Die Kanalpegel-Einstellungen ermöglichen es Ihnen, die Gesamtbalance Ihrer Lautsprecheranlage wunschgemäß zu justieren, um den optimalen Klang von Ihrer Heimkinoanlage zu erhalten. 4 Betätigen Sie /, um den Pegel jedes Lautsprecherkanals wunschgemäß einzustellen.
HTP-700_VYXCN_De.book 75 ページ 2009年9月17日 Das System Setup-Menü 木曜日 午後3時20分 08 Lautsprecherabstand Um eine gute Klangtiefe und Kanaltrennung von Ihrer Lautsprecheranlage zu erhalten, müssen Sie den Abstand jedes Lautsprechers von der Hörposition vorgeben. Die Anlage kann dann die geeignete Verzögerung hinzufügen, die zur Erzielung eines wirkungsvollen Surround Sound-Effekts erforderlich ist. Italiano 1 Markieren Sie „Speaker Distance“ im Manual SP Setup-Menü. Español 2c.Speaker Distance 2.
HTP-700_VYXCN_De.book 76 ページ 09 2009年9月17日 木曜日 午後3時20分 Steuerung der übrigen Anlagekomponenten Kapitel 9 Steuerung der übrigen Anlagekomponenten Einstellen der Fernbedienung auf Steuerung anderer Komponenten Unter Verwendung der HerstellerVoreinstellungscodes, die in der Fernbedienung dieser Anlage abgespeichert sind, können Sie die meisten Komponenten einer der MULTI CONTROL-Tasten zuweisen.
HTP-700_VYXCN_De.book 77 ページ 2009年9月17日 木曜日 午後3時20分 Steuerung der übrigen Anlagekomponenten • Halten Sie die -Taste gedrückt, und halten Sie gleichzeitig die Taste „0“ mindestens 3 Sekunden lang gedrückt. 09 Standard-Vorgabecodes MULTI CONTROL-Taste Vorgabecode 2126 TV 0120 DVR 2121 VIDEO 1120 • Die TV CONTROL-Tasten der Fernbedienung sind ausschließlich zur Steuerung des Fernsehgerätes bestimmt, das der TV-Taste zugewiesen wurde.
HTP-700_VYXCN_De.book 78 ページ 09 2009年9月17日 木曜日 午後3時20分 Steuerung der übrigen Anlagekomponenten Taste(n) Funktion Komponenten Zifferntasten Verwenden Sie diese Tasten zur direkten Wahl eines Fernsehkanals. Kabel-Fernsehgerät/ Satelliten-Fernsehgerät/ Fernsehgerät/DTV +10-Taste Diese Taste dient zum Hinzufügen der Zehnerstelle bei DTV der Eingabe der Nummer eines Fernsehkanals. ENTER Diese Taste dient zur Eingabe der gewählten Kanalnummer.
HTP-700_VYXCN_De.book 79 ページ 2009年9月17日 木曜日 午後3時20分 Steuerung der übrigen Anlagekomponenten Komponenten Diese Taste dient zum Starten der Wiedergabe. BD/DVD-Player, DigitalVideorecorder, Videokassettenrecorder Halten Sie diese Taste gedrückt, um einen Suchlauf vorwärts auszuführen. BD/DVD-Player, DigitalVideorecorder, Videokassettenrecorder Halten Sie diese Taste gedrückt, um einen Suchlauf rückwärts auszuführen.
HTP-700_VYXCN_De.book 80 ページ 09 2009年9月17日 木曜日 午後3時20分 Steuerung der übrigen Anlagekomponenten Voreinstellungscode-Liste Wenn der Hersteller Ihrer Komponente in dieser Liste aufgeführt ist, sollte es keinerlei Probleme bei der Steuerung der betreffenden Komponente über die Fernbedienung dieser Anlage geben. Bitte beachten Sie jedoch, dass die in dieser Liste aufgeführten Herstellercodes in bestimmten Fällen nicht auf das jeweilige Modell der angeschlossenen Komponente zutreffen.
HTP-700_VYXCN_De.
HTP-700_VYXCN_De.
HTP-700_VYXCN_De.
HTP-700_VYXCN_De.
HTP-700_VYXCN_De.book 85 ページ 2009年9月17日 木曜日 午後3時20分 Zusätzliche Informationen 10 Kapitel 10 Zusätzliche Informationen Störung Abhilfemaßnahme Deutsch • Wenn die Anlage aufgrund externer Auswirkungen wie statischer Elektrizität nicht richtig funktioniert, trennen Sie den Netzstecker einmal von der Netzsteckdose, und schließen Sie ihn dann erneut an, um den normalen Betriebszustand der Anlage wiederherzustellen.
HTP-700_VYXCN_De.book 86 ページ 10 2009年9月17日 木曜日 午後3時20分 Zusätzliche Informationen Störung Abhilfemaßnahme Bei Verwendung der PHASE CONTROL-Funktion macht sich kein hörbarer Effekt bemerkbar. Der Rundfunkempfang ist stark verrauscht. • Prüfen Sie nach, dass der richtige Abstand für alle Lautsprecher eingestellt wurde (siehe Lautsprecherabstand auf Seite 75). Rundfunksender werden nicht automatisch abgestimmt. Bei Wiedergabe mit einem Kassettendeck macht sich Rauschen bemerkbar.
HTP-700_VYXCN_De.book 87 ページ 2009年9月17日 木曜日 午後3時20分 Zusätzliche Informationen • Bitte schlagen Sie unter Automatische Surround Sound-Einrichtung (MCACC) auf Seite 48 nach, und führen Sie die automatische Lautsprechereinrichtung erneut mit Hilfe der MCACC-Funktion aus (dabei wird eine Verzögerung der Tonausgabe vom Subwoofer automatisch korrigiert). HDMI Störung Deutsch Das Display ist zu dunkel oder ganz ausgeschaltet. • Wechseln Sie die Batterien der Fernbedienung aus (siehe Seite 46).
HTP-700_VYXCN_De.book 88 ページ 10 2009年9月17日 木曜日 午後3時20分 Zusätzliche Informationen Störung Abhilfemaßnahme • Wenn Sie separate Audioanschlüsse hergestellt haben, prüfen Sie nach, Es erfolgt keine Tonausgabe, oder der Ton dass Sie die analogen/digitale(n) Buchse(n) dem der jeweiligen Komponente setzt plötzlich aus. entsprechenden HDMI-Eingang zugewiesen haben. • Überprüfen Sie Audio-Ausgabeeinstellungen an der SignalquellenKomponente.
HTP-700_VYXCN_De.book 89 ページ 2009年9月17日 木曜日 午後3時20分 Zusätzliche Informationen 10 iPod- Fehlermeldungen Störung Ursache Abhilfemaßnahme iPod/USB Error 1 Auf dem Signalweg vom iPod zu dieser Anlage liegt eine Störung vor. (I/U ERR1) Schalten Sie die Anlage aus, und schließen Sie den iPod dann erneut an die Anlage an. Falls sich die Störung auf diese Weise nicht beheben lässt, führen Sie probeweise eine Rückstellung Ihres iPod aus.
HTP-700_VYXCN_De.book 90 ページ 10 2009年9月17日 Receiver-Subwoofer SX-SWR1 • Audiodaten Nennausgangsleistung Front-, Mitten-, Surround-Kanal . . . . . . . . . . . . . . . . . . . . . . . . . 100 W pro Kanal (1 kHz, Gesamtklirrfaktor 10 %, an 4 Ω) Subwoofer . . . . . . . . . . . . . . . . . . . . . . . . . 100 W (100 Hz, Gesamtklirrfaktor 10 %, an 4 Ω) • UKW-Tunerteil Frequenzbereich . . . . . . . . 87,5 MHz bis 108 MHz Antenneneingang . . . . . . . .
HTP-700_VYXCN_De.book 91 ページ 2009年9月17日 木曜日 午後3時20分 Zusätzliche Informationen Lautsprechersystem S-SWR600 • Front-/Surround-Lautsprecher Mittellautsprecher • Mitgeliefertes Zubehör Lautsprecherkabel . . . . . . . . . . . . . . . . . . . . . . . . .5 Schrauben . . . . . . . . . . . . . . . . . . . . . . . . . . . . . . .8 Kleine rutschfeste Untersetzer (für Lautsprecher) . . . . . . . . . . . . . . . . . . . . . . . .18 Halterungen . . . . . . . . . . . . . . . . . . . . . . . . . . . . . .
HTP-700_VYXCN_De.book 92 ページ 2009年9月17日 木曜日 午後3時20分 http://www.pioneer.it http://www.pioneer.es http://www.pioneer.de http://www.pioneer.eu Published by Pioneer Corporation. Copyright © 2009 Pioneer Corporation. All rights reserved. PIONEER CORPORATION 4-1, Meguro 1-Chome, Meguro-ku, Tokyo 153-8654, Japan PIONEER ELECTRONICS (USA) INC. P.O. BOX 1540, Long Beach, California 90801-1540, U.S.A. TEL: (800) 421-1404 PIONEER ELECTRONICS OF CANADA, INC.