cover & anki.fm 1 ページ 2007年2月13日 火曜日 午後4時58分 HTZ-370DV DVD/CD Receiver Récepteur-lecteur DVD/CD XV-DV370 Speaker System Enceintes acoustiques S-DV363 Register your product at: http://www.pioneerelectronics.com (US) http://www.pioneerelectronics.ca (Canada) • Protect your new investment The details of your purchase will be on file for reference in the event of an insurance claim such as loss or theft.
XV-DV-370.book 2 ページ 2007年2月2日 金曜日 午後8時9分 Thank you for buying this Pioneer product. Please read through these operating instructions so that you will know how to operate your model properly. After you have finished reading the instructions, put them in a safe place for future reference .
XV-DV-370.book 3 ページ 2007年2月2日 READ INSTRUCTIONS — All the safety and operating instructions should be read before the product is operated. RETAIN INSTRUCTIONS — The safety and operating instructions should be retained for future reference. HEED WARNINGS — All warnings on the product and in the operating instructions should be adhered to. FOLLOW INSTRUCTIONS — All operating and use instructions should be followed. CLEANING — The product should be cleaned only with a polishing cloth or a soft dry cloth.
XV-DV-370.book 4 ページ 2007年2月2日 金曜日 午後8時9分 We Want You Listening For A Lifetime Selecting fine audio equipment such as the unit you’ve just purchased is only the start of your musical enjoyment. Now it’s time to consider how you can maximize the fun and excitement your equipment offers. This manufacturer and the Electronic Industries Association’s Consumer Electronics Group want you to get the most out of your equipment by playing it at a safe level.
XV-DV-370.book 5 ページ 2007年2月2日 金曜日 午後8時9分 Contents 02 Getting started Home theater sound setup . . . . . . . . . . . . . . 11 Setting the channel levels. . . . . . . . . . . . . . 11 Using the on-screen displays. . . . . . . . . . . . . 11 Playing discs . . . . . . . . . . . . . . . . . . . . . . . . . 12 Basic playback controls . . . . . . . . . . . . . . . 12 Resume and Last Memory . . . . . . . . . . . . . 13 DVD-Video disc menus . . . . . . . . . . . . . . . . 13 Video CD/Super VCD PBC menus. . . .
XV-DV-370.book 6 ページ 2007年2月2日 金曜日 06 Audio Settings and Video Adjust menus 09 Additional information Audio Settings menu . . . . . . . . . . . . . . . . . . 26 Audio DRC . . . . . . . . . . . . . . . . . . . . . . . . . 26 Video Adjust menu . . . . . . . . . . . . . . . . . . . . 26 07 Initial Settings menu Using the Initial Settings menu. . . . . . . . . . . Video Output settings . . . . . . . . . . . . . . . . . . Language settings . . . . . . . . . . . . . . . . . . . . Display settings . . . . .
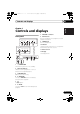
XV-DV-370.book 7 ページ 2007年2月2日 金曜日 午後8時9分 Controls and displays 01 Controls and displays 7 OPEN/CLOSE 8 USB interface Connect a USB device for playback (see USB playback on page 24). DVD/CD 4 USB 5 VOLUME 6 7 10 Indicator Lights blue when the power is on (except when the dimmer/sleep timer is active). STANDBY/ON PLAY LIST 1 PLAY LIST 2 9 PHONES jack Connect headphones.
XV-DV-370.book 01 8 ページ 2007年2月2日 金曜日 午後8時9分 Controls and displays SHIFT+AUDIO Selects audio channel/language (page 22). Remote control SHIFT+SUBTITLE Displays/changes the subtitles (page 22). 1 2 STANDBY /ON DVD/CD TUNER (FM/AM) USB LINE 2 3 AUDIO SUBTITLE 11 SHIFT+ANGLE Changes camera angle during DVD multiangle scene playback (page 23). 12 SHIFT+ZOOM Changes the screen zoom level (page 22).
XV-DV-370.book 9 ページ 2007年2月2日 金曜日 Controls and displays 9 TV CONTROL buttons These control Pioneer plasma televisions. 11 OPEN/CLOSE Opens/closes the disc tray. 14 MENU Press to display a DVD disc or USB menu, or the Navigator (page 13 and 25). 16 LINE OUT Cycle whether or not to output a downmixed signal from the LINE OUT terminal (page 32). Español 15 RETURN Returns to a previous menu screen. Nederlands 13 EXTRA PWR Switches on the Extra Power mode (page 15).
XV-DV-370.book 01 10 ページ 2007年2月2日 金曜日 午後8時9分 Controls and displays Display 1 2 3 4 PRGSVE SOUND DTS F.SURR. REC MODE RPT -1 kHz PGM MHz RDM 2D 2PL 15 14 13 12 11 1 DTS Lights during playback of a DTS source (page 15). 2 PRGSVE Lights when progressive scan video output is selected (page 33). 3 SOUND Lights when the SFC Modes or the tone controls (treble, bass or bass boost) are active (page 16). 4 F.SURR. Lights when the Extra Power mode is selected (page 15).
XV-DV-370.book 11 ページ 2007年2月2日 金曜日 午後8時9分 Getting started 02 English Chapter 2 Getting started Place your speakers as shown below for optimal surround sound (see the Speaker Setup Guide for more placement tips). Front left Center Front right Subwoofer 2 Use the VOLUME +/– button to adjust the volume to an appropriate level. 3 Use / to adjust the speaker levels in turn. You should hear the test tone at the same volume from each speaker when seated in the main listening position.
XV-DV-370.book 02 12 ページ 2007年2月2日 金曜日 午後8時9分 Getting started Button What it does RETURN Returns to the main menu without saving changes Tip • The button guide at the bottom of every OSD screen shows you which buttons you’ll need to use for that screen. • If a disc contains a mixture of DivX video and other media file types (MP3, for example), first select whether to play the DivX video files (DivX) or the other media file types (MP3/WMA/JPEG/MPEG-4 AAC) from the on-screen display.
XV-DV-370.book 13 ページ 2007年2月2日 金曜日 午後8時9分 Getting started Many DVD-Video discs contain menus from which you can select what you want to watch. Button What it does TOP MENU Displays the ‘top menu’ of a DVD MENU Displays a DVD disc menu—this varies with the disc and may be the same as the ‘top menu’. Moves the cursor around the screen. ENTER Selects the current menu option. RETURN Returns to the previously displayed menu screen. Numbers Highlights a numbered menu option (some discs only).
XV-DV-370.book 02 14 ページ 2007年2月2日 金曜日 午後8時9分 Getting started Improving poor FM reception If you’re listening to an FM station in stereo but the reception is weak, you can improve the sound quality by switching to mono. 1 Tune to an FM radio station then press SETUP. 2 Use / to choose FM MODE then press ENTER. Listening to other sources You can connect auxiliary sources (TV, satellite receiver, etc.) to this unit for playback through the speaker system.
XV-DV-370.book 15 ページ 2007年2月2日 金曜日 午後8時9分 Listening to your system 03 Listening to your system The Auto listening mode is the simplest way to listen to any source as it was mastered: the output from the speakers mirrors the channels in the source material. Listening in surround sound Extra Power mode allows you to enjoy richer, fuller sound from stereo (2.1ch) sources.3 Extra Power mode is available when listening to DVD/CD or USB sources. • Press EXTRA PWR to select MODE ON or MODE OFF.
XV-DV-370.book 03 16 ページ 2007年2月2日 金曜日 午後8時9分 Listening to your system Listening in stereo Adjusting the bass and treble You can listen to any source — stereo or multichannel — in stereo. When playing a multichannel source, all channels are downmixed to the front left/right speakers and the subwoofer. Use the bass and treble controls to adjust the overall tone. • Press SURROUND repeatedly until STEREO shows in the display. 1 Press SOUND. 2 Use / to select BASS or TREBLE then press ENTER.
playing audio_video discs.fm 17 ページ 2007年2月13日 火曜日 午前11時36分 Disc playback features 04 Disc playback features • Some DVDs restrict the use of some functions (random or repeat, for example) in some or all parts of the disc. This is not a malfunction. You can fast-scan discs forward or backward at various different speeds.1 • To resume playback, press (play).2 Playing in slow motion You can play DVDs, Video CD/Super VCDs and DivX video at four different forward slow motion speeds.
XV-DV-370.book 04 18 ページ 2007年2月2日 金曜日 Disc playback features While the slideshow is running: Button What it does Pauses the slideshow (or audio); press again to restart. Jumps to the previous picture (or audio file with audio playback). Jumps to the next picture (or audio file with audio playback). /// Pauses the slideshow and rotates/flips the displayed picture (Press (play) to restart slideshow). SHIFT+ZOOM Pauses the slideshow and zooms the picture.
XV-DV-370.book 19 ページ 2007年2月2日 金曜日 午後8時9分 Disc playback features 04 Tip 1 Press HOME MENU and select ‘Disc Navigator’ from the on-screen menu. 0kbps Folder1 Folder2 Folder3 2 Use /// and ENTER to navigate. Use / to move up and down the folder/file list. Use to return to the parent folder.1 • When a JPEG file is highlighted, a thumbnail image is displayed on the right.
XV-DV-370.book 04 20 ページ 2007年2月2日 金曜日 午後8時9分 Disc playback features 2 Tip • To add files without the on-screen display, simply press PLAY LIST 1, 2 or 3 during normal playback of the file you want (except when a JPEG slideshow is playing at the same time as audio). Listening to playlists • With playback stopped, press PLAY LIST 1, 2 or 3. During playback, PGM lights in the front panel display. If no playlist has been programmed, NO LIST shows in the display.
XV-DV-370.book 21 ページ 2007年2月2日 金曜日 午後8時9分 Disc playback features 2 • For CDs and Video CD/Super VCDs, select On or Off to switch random play on or off. • Use the following controls during random play: Selects a new track/title/chapter at random. Returns to the beginning of the current track/title/chapter; further presses select another random track/title/chapter. • Random play remains in effect until you select Random Off from the random play menu options.
XV-DV-370.book 04 22 ページ 2007年2月2日 金曜日 午後8時9分 Disc playback features Searching a disc You can search DVD discs by title or chapter number, or by time; CDs and Video CD/Super VCDs by track number or time; DivX video discs by time. 1 Press HOME MENU and select ‘Play Mode’. 2 Select ‘Search Mode’. The search options that appear depend on the kind of disc loaded. 3 Select a search mode. • The disc must be playing in order to use time search.
XV-DV-370.book 23 ページ 2007年2月2日 金曜日 Disc playback features Some DVD discs feature scenes shot from two or more angles—check the disc box for details. • During playback (or when paused), press SHIFT+ANGLE to switch angle. Various track, chapter and title information can be displayed on-screen during playback. Italiano • To show/switch/hide the information displayed, press DISPLAY repeatedly. Limited disc information also appears in the front panel display.
XV-DV-370.book 05 24 ページ 2007年2月2日 金曜日 午後8時9分 USB playback Chapter 5 USB playback Important Using the USB interface It is possible to listen to two-channel audio1 and watch JPEG files using the USB interface on the front of this unit. Connect a USB mass storage device2 as shown below. 1 With the player switched on, press USB. Make sure your TV is on and set to the correct video input. 2 Connect your USB device. The USB terminal is located on the front panel.
XV-DV-370.book 25 ページ 2007年2月2日 金曜日 午後8時9分 USB playback You can fast-scan forward or backward at various different speeds. • To resume playback, press (play).1 What it does MENU Displays the Navigator screen (see below). Browsing files with the Navigator Use the Navigator to find WMA, MP3, MPEG-4 AAC and JPEG files or folders by name.3 1 Press to start a slideshow from the first folder/picture.2 The pictures in each folder are displayed in order.
XV-DV-370.book 06 26 ページ 2007年2月2日 金曜日 午後8時9分 Audio Settings and Video Adjust menus Chapter 6 Audio Settings and Video Adjust menus Audio Settings menu 1 Press HOME MENU and select ‘Video Adjust’ from the on-screen display. The Audio Settings menu offers features for adjusting the way discs sound. 1 Press HOME MENU and select ‘Audio Settings’ from the on-screen display. Audio Settings 2 Select and change settings using // / and ENTER. Video Adjust 2 Make settings using /// and ENTER.
XV-DV-370.book 27 ページ 2007年2月2日 金曜日 午後8時9分 Initial Settings menu 07 English Chapter 7 Initial Settings menu 1 Press DVD/CD. 2 With playback stopped, press HOME MENU and select ‘Initial Settings’. The Initial Settings menu provides audio and video output settings, parental lock settings, and display settings, among others. Initial Settings 3 Use /// and ENTER to select the setting and option you want to set. All the settings and options are explained on the following pages.
XV-DV-370.book 07 28 ページ 2007年2月2日 金曜日 午後8時9分 Initial Settings menu Setting Option What it means Component Out Interlace Set if your TV is not compatible with progressive scan video. (See also Connecting using the component video output on page 33). Progressive Set if your TV is compatible with progressive scan video (see your TV’s instruction manual for details). Press ENTER once more to confirm (or RETURN to cancel).
XV-DV-370.book 29 ページ 2007年2月2日 金曜日 午後8時9分 Initial Settings menu 07 English Display settings Option What it means OSD Language English On-screen displays of the player are in English. Languages as displayed On-screen displays are shown in the language selected. On A camera icon is displayed on-screen during multi-angle scenes on a DVD disc. Off No multi-angle indication is shown. Angle Indicator Français Options settings Setting Option Parental Lock – See Parental Lock below.
XV-DV-370.book 07 30 ページ 2007年2月2日 金曜日 午後8時9分 Initial Settings menu Setting/changing the Parental Lock 1 Select ‘Level Change’. 2 Use number buttons to enter your password, then press ENTER. 3 • If you load a disc that contains DivX VOD content not authorized for your player, the message Authorization Error is displayed and the content will not play. Select a new level and press ENTER. • Press repeatedly to lock more levels (more discs will require the password); press to unlock levels.
XV-DV-370.book 31 ページ 2007年2月2日 金曜日 午後8時9分 Initial Settings menu • Default setting: 10.0ft. To get the best surround sound from your system, you should set up the speakers equal distances from your listening position. 6 Press to go back to the speaker list if you want to modify another speaker, or press ENTER to exit the Speaker Distance screen. 2 Select ‘Speakers’, then ‘Speaker Distance’. Deutsch 1 Press HOME MENU and select ‘Initial Settings’. • The subwoofer (SW) can be set from –7 ft.
XV-DV-370.book 08 32 ページ 2007年2月2日 金曜日 午後8時9分 Other connections Chapter 8 Other connections Tape deck, etc. Connecting external antennas For an external AM antenna, use 5 m (15 ft.) to 6 m (18 ft.) of vinyl-insulated wire and set up either indoors or outdoors. Leave the loop antenna connected. Use only the included AM loop antenna. To audio output COMPONENT VIDEO Outdoor antenna VIDEO CR/ PR L CONTRO OUT Y R R VIDEO OUT 5 m to 6 m (15 ft. to 18 ft.
XV-DV-370.book 33 ページ 2007年2月2日 金曜日 午後8時9分 Other connections 08 If your TV has an S-video input, you can use this instead of the standard video output for a better quality picture.
XV-DV-370.book 08 34 ページ 2007年2月2日 金曜日 午後8時9分 Other connections See About HDMI below for more about the HDMI connection. • Use an HDMI cable to connect the HDMI OUT interconnect on this player to an HDMI interconnect on a HDMI-compatible monitor. Resetting the HDMI connection If you get an error message (the display shows HDMI ERR) or if the screen goes blank (for example, after changing the resolution), check the troubleshooting guide on page 43.
XV-DV-370.book 35 ページ 2007年2月2日 金曜日 Other connections Italiano • Using a cable with mono mini-plugs on either side (sold separately), connect the CONTROL IN jack on another Pioneer component to the CONTROL OUT jack on this unit. This will allow you to control the other component by pointing its remote at this unit. Français If you choose to use this feature, you must make sure that you also have at least one set of analog audio jacks connected to another component for grounding purposes.
XV-DV-370.book 09 36 ページ 2007年2月2日 金曜日 午後8時9分 Additional information Chapter 9 Additional information Disc/content format playback compatibility This player is compatible with a wide range of disc types (media) and formats. Playable discs will generally feature one of the following logos on the disc and/or disc packaging. Note however that some disc types, such as recordable CD and DVD, may be in an unplayable format. See the Disc compatibility table below for more information.
XV-DV-370.book 37 ページ 2007年2月2日 金曜日 午後8時9分 Additional information Compatible formats • Official DivX® Certified product. • Plays all versions of DivX® video (including DivX®6) with standard playback of DivX® media files.1 About DVD+R/DVD+RW compatibility Only DVD+R/DVD+RW discs recorded in ‘Video Mode (DVD Video Mode)’ which have been finalized, can be played back. However, some editing made during the recording may not be played back accurately.
XV-DV-370.
XV-DV-370.book 39 ページ 2007年2月2日 金曜日 午後8時9分 Additional information DVD Video regions • Place directly on top of an amplifier, or other component in your stereo system that becomes hot in use. • Use near a television or monitor as you may experience interference — especially if the television uses an indoor antenna.
XV-DV-370.book 09 40 ページ 2007年2月2日 金曜日 午後8時9分 Additional information Screen sizes and disc formats Switching off the demo DVD-Video discs come in different screen aspects, ranging from TV programs, which are generally 4:3, to CinemaScope widescreen movies1, with an aspect ratio of up to about 7:3. Follow the steps below to switch the automatic demo feature off (this starts when you plug in for the first time): Televisions also come in different aspect ratios; ‘standard’ 4:3 and widescreen 16:9.
XV-DV-370.book 41 ページ 2007年2月2日 金曜日 午後8時9分 Additional information • If the system does not operate normally due to external effects such as static electricity disconnect the plug from the outlet and insert again to return to normal operating conditions. Deutsch Incorrect operations are often mistaken for trouble and malfunctions. If you think that there is something wrong with this component, check the points below. Sometimes the trouble may lie in another component.
XV-DV-370.book 09 42 ページ 2007年2月2日 金曜日 午後8時9分 Additional information DVD/CD/Video CD player Problem Remedy The disc is ejected automatically after loading. • Clean the disc and align the disc properly in the disc guide. • If the region number on a DVD-video disc does not match the number on the player, the disc cannot be used (see DVD Video regions on page 39). In this instance, one of the following messages appears on screen: Incompatible disc region number/Can’t play disc.
XV-DV-370.book 43 ページ 2007年2月2日 金曜日 午後8時9分 Additional information • The files on the disc must be named with the correct file extension: .mp3 for MP3 files; .wma for WMA files; .m4a for MPEG-4 AAC files; .jpg for JPEG files (upper or lower-case is OK). See Disc compatibility table on page 36. Can’t play WMA or MPEG-4 AAC files. • The files were recorded using DRM (digital rights management). This is not a malfunction.
Additional_information.fm 09 44 ページ 2007年2月15日 木曜日 午前10時40分 Additional information Problem Remedy No HDMI video output • Make sure that you’ve selected this player as the HDMI input in the settings for the component you’re using (refer to the component’s instruction manual). • Check that the HDMI cable is connected properly and isn’t damaged.
XV-DV-370.book 45 ページ 2007年2月2日 金曜日 Additional information Use the front panel controls to reset all system settings to the factory default. Deutsch • With the system on, press STANDBY/ ON while holding down USB. The next time you switch on, all the system settings should be reset. 09 English Resetting the system 午後8時9分 Setting the Key Lock 2 Use / to select LOCK ON or LOCK OFF then press ENTER.
XV-DV-370.
XV-DV-370.book 47 ページ 2007年2月2日 金曜日 午後8時9分 Additional information Amplifier section Disc section FM tuner section Frequency range . . . . . . . . 87.5 MHz to 108 MHz Antenna . . . . . . . . . . . . . . . . . . 75 Ω, unbalanced • AM tuner section Frequency range: With 9 kHz step . . . . . . . . 531 kHz to 1602 kHz With 10 kHz step . . . . . . . 530 kHz to 1700 kHz Antenna . . . . . . . . . . . . . . . . . . . . . Loop antenna • Miscellaneous Power requirements . . . . . . . . . . . . . . . . .
XV-DV-370.book 09 48 ページ 2007年2月2日 金曜日 Additional information Dimensions . . . . .221 mm (W) x 401.5 mm (H) x 390 mm (D) (8 11/16 in.(W) x 15 13/16 in.(H) x 15 3/8 in.(D) ) Weight . . . . . . . . . . . . . . . . . . 5.5 kg / 12 lbs. 2 oz. Manufactured under license from Dolby Laboratories.“Dolby”, “Pro Logic” and the double-D symbol are trademarks of Dolby Laboratories. • “DTS” and “DTS Digital Surround” are registered trademarks of DTS, Inc. Accessories Speaker cables . . . . . . . . . . . . . .
XV-DV-370.
XV-DV-370.book Page 2 Friday, February 16, 2007 6:19 PM Nous vous remercions d’avoir acheté ce produit Pioneer. Veuillez lire attentivement ces instructions d’utilisation afin d’apprendre à manipuler votre modèle correctement. Lorsque vous avez terminé, rangez ces instructions en lieu sûr afin de pouvoir vous y référer à l’avenir.
XV-DV-370.book Page 3 Friday, February 16, 2007 6:19 PM Sommaire 02 Pour commencer Installation du son Home Cinema . . . . . . . . . . 9 Réglage des niveaux de voie . . . . . . . . . . . . . 9 Utilisation de l’affichage sur l’écran . . . . . . . 10 Lecture d’un disque. . . . . . . . . . . . . . . . . . . . 10 Commandes de base pour la lecture . . . . . 10 Reprise de la lecture et mémoire de la dernière image . . . . . . . . . . . . . . . . . . . . . . 11 Menus des DVD-Vidéo . . . . . . . . . . . . . . .
XV-DV-370.book Page 4 Friday, February 16, 2007 06 Menus Audio Settings et Video Adjust 09 Informations complémentaires Menu Audio Settings . . . . . . . . . . . . . . . . . . 24 Audio DRC . . . . . . . . . . . . . . . . . . . . . . . . . 24 Menu Video Adjust . . . . . . . . . . . . . . . . . . . . 24 Compatibilité de lecture des disques et du format du contenu . . . . . . . . . . . . . . . . . . . . 34 Tableau de compatibilité des disques . . . . .
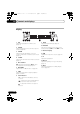
XV-DV-370.book Page 5 Friday, February 16, 2007 6:19 PM Chapitre 1 Commandes et écrans Panneau avant 3 DVD/CD 4 USB 5 VOLUME 6 7 PLAY LIST 1 1 PLAY LIST 2 PLAY LIST 3 2 8 11 Deutsch 10 Français STANDBY/ON Français OPEN/CLOSE 7 Touches VOLUME +/– 8 Interface USB Permet de connecter et d’utiliser un appareil USB comme source de lecture (voir Lecture USB page 22). 9 Prise PHONES Permet de brancher un casque ou des écouteurs.
XV-DV-370.book Page 6 Friday, February 16, 2007 6:19 PM SHIFT+SUBTITLE Affiche/modifie les sous-titres (page 20). Télécommande 1 2 STANDBY /ON DVD/CD TUNER (FM/AM) USB LINE 2 3 AUDIO SUBTITLE SHIFT+ANGLE Modifie l’angle de la caméra pendant la lecture d’une scène DVD filmée sous plusieurs angles (page 21).
XV-DV-370.book Page 7 Friday, February 16, 2007 6:19 PM 8 Commandes de lecture Reportez-vous aux sections Commandes de base pour la lecture page 10, Fonctions de lecture de disque page 15 et Lecture USB page 22 pour une explication sur ces commandes. Français Français Deutsch 9 Touches TV CONTROL Ces touches permettent de commander les écrans plasma Pioneer. 10 SHIFT Appuyez sur cette touche pour accéder aux commandes allumées en vert.
XV-DV-370.book Page 8 Friday, February 16, 2007 6:19 PM Écran 1 2 3 4 5 PRGSVE SOUND DTS F.SURR. REC MODE RPT -1 kHz PGM MHz RDM 2D 2PL 15 14 13 12 11 1 DTS S’allume pendant la lecture d’une source DTS (page 13). 2 PRGSVE S’allume lorsque la sortie vidéo à balayage progressif est sélectionnée (page 31). 3 SOUND S’allume lorsque les modes SFC ou les commandes de tonalité (aigus, graves ou augmentation des graves) sont actives (page 14). 4 F.SURR.
XV-DV-370.book Page 9 Friday, February 16, 2007 6:19 PM Chapitre 2 Pour commencer Installation du son Home Cinema Enceinte centrale Enceinte avant droite Position d’écoute Enceinte d’ambiance gauche Enceinte d’ambiance droite Une fois les enceintes installées, effectuez les opérations décrites dans Réglage des niveaux de voie ci-après, puis reportez-vous à la section Réglage du paramètre Speakers (enceintes) page 27 pour terminer l’installation de votre système de son d’ambiance.
XV-DV-370.book Page 10 Friday, February 16, 2007 Note • Le guide de touches situé en bas de chaque écran OSD indique les touches à utiliser pour cet écran. Lecture d’un disque Cette section traite des commandes de base pour la lecture de DVD, CD, Vidéo CD/Super VCD, vidéo DivX et de disques WMA/MP3/ MPEG-4 AAC. D’autres fonctions sont détaillées dans le chapitre 4. 1 Si le lecteur n’est pas encore allumé, mettez-le sous tension.
XV-DV-370.book Page 11 Friday, February 16, 2007 Reprise de la lecture et mémoire de la dernière image Vous pouvez commander la lecture d’un Vidéo CD PBC ou d’un Super VCD PBC sans parcourir le menu PBC, en appuyant simplement sur la touche numérotée correspondant au numéro de la plage qui vous intéresse au lieu de la touche (lecture). Touches Leur rôle RETURN Cette touche affiche le menu PBC. Cette touche affiche la page de menu précédente (si elle existe).
XV-DV-370.book Page 12 Friday, February 16, 2007 Amélioration d’une réception FM de mauvaise qualité Si vous écoutez une station FM en stéréo et si la réception est de mauvaise qualité, vous pouvez améliorer la qualité sonore en passant en mono. 1 Réglez une station de radio FM, puis appuyez sur SETUP. 2 Utilisez / pour sélectionner FM MODE, puis appuyez sur ENTER. 3 Utilisez / pour sélectionner FM MONO, puis appuyez sur ENTER.
XV-DV-370.book Page 13 Friday, February 16, 2007 6:19 PM Chapitre 3 Écoute de votre système Le mode Extra Power vous permet de bénéficier d’un son plus riche et plus complet à partir des sources stéréo (2.1 voies).3 Le mode Extra Power est disponible lors de l’écoute des sources DVD/CD ou USB. • Appuyez sur EXTRA PWR pour sélectionner MODE ON ou MODE OFF.4 Après avoir sélectionné MODE ON, le voyant F.SURR. s’allume sur l’écran du panneau avant.
XV-DV-370.book Page 14 Friday, February 16, 2007 Écoute en stéréo Réglage de la tonalité Vous pouvez écouter n’importe quelle source (stéréo ou multivoies) en stéréo. Lors de la lecture d’une source multivoies, toutes les voies sont réduites aux enceintes avant gauche et droite et au caisson de graves. • Appuyez à plusieurs reprises sur SURROUND jusqu’à ce que STEREO s’affiche sur l’écran. Les commandes de tonalité permettent de régler les signaux sonores de manière générale.
XV-DV-370.book Page 15 Friday, February 16, 2007 6:19 PM Chapitre 4 Fonctions de lecture de disque Important Lecture au ralenti Vous disposez de quatre vitesses de ralenti vers l’avant pour lire les DVD, les Vidéo CD, les Super VCD et les vidéo DivX. Vous pouvez également lire les DVD au ralenti en marche arrière. Deutsch Vous pouvez examiner rapidement des disques en avant ou en arrière à différentes vitesses.1 • Pendant la lecture, appuyez sur ou pour lancer l’examen du disque.
XV-DV-370.book Page 16 Friday, February 16, 2007 Pendant la lecture du diaporama : Touches Leur rôle Interrompt le diaporama (ou la lecture audio) ; appuyez de nouveau pour reprendre la lecture. Saute à l’image précédente (ou au fichier audio, selon le type de fichier). Saute à l’image suivante (ou au fichier audio, selon le type de fichier). /// Ces touches interrompent le diaporama et font pivoter/ retournent l’image affichée (Appuyez sur (lecture) pour reprendre le diaporama).
XV-DV-370.book Page 17 Friday, February 16, 2007 Parcourir les fichiers WMA, MP3, MPEG-4 AAC, vidéo DivX et JPEG avec Disc Navigator 00:00/ 00:00 0kbps Folder2 Folder3 Folder4 00:00/ 00:00 0kbps Folder2 File1 File2 File3 File4 File5 3 Pour lire la plage mise en valeur ou un fichier vidéo DivX, ou encore afficher le fichier JPEG mis en valeur, appuyez sur ENTER.
XV-DV-370.book Page 18 Friday, February 16, 2007 Note • Pour ajouter des fichiers sans utiliser l’affichage sur l’écran, appuyez simplement sur PLAY LIST 1, 2 ou 3 pendant la lecture normale du fichier souhaité (sauf lorsqu’un diaporama JPEG s’affiche en même temps que la lecture audio). Écoute des listes de lecture • La lecture étant arrêtée, appuyez sur PLAY LIST 1, 2 ou 3. Pendant la lecture, PGM s’allume sur l’écran du panneau avant.
XV-DV-370.book Page 19 Friday, February 16, 2007 Note • Utilisez les touches suivantes pour la lecture au hasard : Sélectionne, au hasard, une nouvelle plage, un nouveau titre ou un nouveau chapitre. Retourne au début de la plage, du titre ou du chapitre actuel. Permet de sélectionner aléatoirement une autre plage, un autre titre ou un autre chapitre si vous réappuyez.
XV-DV-370.book Page 20 Friday, February 16, 2007 Recherche sur un disque Vous pouvez effectuer une recherche sur un DVD par numéro de titre ou de chapitre ou par indication d’une durée. Pour les CD, Vidéo CD et Super VCD, la recherche peut se faire par numéro de plage ou par indication d’une durée. Pour un disque vidéo DivX, la recherche peut se faire par indication d’une durée. 1 Appuyez sur la touche HOME MENU et sélectionnez ‘Play Mode’. 2 Sélectionnez ‘Search Mode’.
XV-DV-370.book Page 21 Friday, February 16, 2007 6:19 PM Choix de l’angle de prise de vues Deutsch Vous pouvez afficher sur l’écran diverses informations sur les plages, les chapitres et les titres pendant la lecture. • Pour afficher, masquer ou choisir les informations, appuyez à plusieurs reprises sur DISPLAY. Des informations limitées sur le disque apparaissent également sur l’écran du panneau avant. Appuyez sur DISPLAY pour modifier les informations affichées.
XV-DV-370.book Page 22 Friday, February 16, 2007 6:19 PM Chapitre 5 Lecture USB Important Utilisation de l’interface USB L’interface USB située à l’avant de cet appareil permet d’écouter un contenu audio stéréo1 et de visualiser des fichiers JPEG. Pour cela, connectez un périphérique de stockage de masse USB2, comme indiqué ci-dessous. 1 L’appareil étant en marche, appuyez sur la touche USB. Vérifiez que le téléviseur est en marche et que l’entrée vidéo appropriée est sélectionnée.
XV-DV-370.book Page 23 Friday, February 16, 2007 Exploration rapide des fichiers Deutsch Appuyez sur pour lancer un diaporama à partir du premier dossier ou de la première image.2 Les images de chaque dossier sont affichées dans l’ordre. • Si l’appareil contient des fichiers WMA/ MP3/MPEG-4 AAC, la reproduction du diaporama et des fichiers audio se répète. Pendant la reproduction audio, vous pouvez toujours utiliser les fonctions sauter (/), balayage (/) et pause ().
XV-DV-370.book Page 24 Friday, February 16, 2007 6:19 PM Chapitre 6 Menus Audio Settings et Video Adjust Menu Audio Settings Menu Video Adjust Le menu Audio Settings propose des fonctions de réglage des caractéristiques audio des disques. 1 Appuyez sur HOME MENU, puis sélectionnez ‘Audio Settings’ sur l’écran. L’écran Video Adjust permet d’ajuster les réglages qui affectent la présentation des images. 1 Appuyez sur HOME MENU et sélectionnez ‘Video Adjust’ sur l’écran.
XV-DV-370.book Page 25 Friday, February 16, 2007 6:19 PM Chapitre 7 Menu Initial Settings Initial Settings 3 Utilisez les touches /// et la touche ENTER pour sélectionner une option et sa valeur. Les options et réglages possibles sont traités dans les pages suivantes.1 Réglage Option Ce qu’elle signifie TV Screen (Reportez-vous également à la section Tailles de l’écran et formats de disque page 38.) 4:3 (Letter Box) À choisir si le téléviseur est de type 4/3.
XV-DV-370.book Page 26 Réglage Friday, February 16, 2007 Option 6:19 PM Ce qu’elle signifie Full range RGB HDMI Color (Reportez-vous à Connexion au moyen de l’interface HDMI RGB page 31.) * Les valeurs par défaut dépendent de l’appareil Component connecté. Si les couleurs affichées sont pâles, cette option permet d’obtenir des couleurs plus vives et des noirs plus profonds (option par défaut pour les appareils DVI compatibles HDMI).
XV-DV-370.book Page 27 Friday, February 16, 2007 6:19 PM Réglage du paramètre Display (affichage) Option Ce qu’elle signifie OSD Language English Les informations sont affichées sur l’écran en anglais. Langues affichées Les informations sont affichées sur l’écran dans la langue sélectionnée. On Une icône représentant une caméra est affichée sur l’écran lorsque la scène du DVD a été filmée sous plusieurs angles. Off L’icône n’est pas affichée si la scène a été filmée sous plusieurs angles.
XV-DV-370.book Page 28 Friday, February 16, 2007 Sélection et modification du niveau de restriction parentale 1 Sélectionnez ‘Level Change’. 2 Utilisez les touches numérotées pour taper votre mot de passe, puis appuyez sur ENTER. 3 Sélectionnez un nouveau niveau, puis appuyez sur ENTER.
XV-DV-370.book Page 29 Friday, February 16, 2007 Speaker Distance • Réglage par défaut : 10.0ft Pour une restitution optimale des sonorités d’ambiance de votre système, vous devez tenir compte de la distance entre les enceintes et votre position d’écoute. 6:19 PM 6 Appuyez sur pour revenir à la liste des enceintes afin de modifier la valeur d’une autre enceinte ou appuyez sur ENTER pour quitter l’écran Speaker Distance. 2 Sélectionnez ‘Speakers’, puis ‘Speaker Distance’.
XV-DV-370.book Page 30 Friday, February 16, 2007 6:19 PM Chapitre 8 Autres connexions Connexion d’antennes extérieures Connexion d’appareils audio auxiliaires Pour une antenne AM extérieure, utilisez un câble avec protection vinyle de 5 m à 6 m et installez-la à l’intérieur ou à l’extérieur. Ne débranchez pas l’antenne cadre. Utilisez uniquement l’antenne cadre AM fournie. Les entrées stéréo analogiques vous permettent de connecter un appareil externe (platine cassette, lecteur MD, etc.
XV-DV-370.book Page 31 Friday, February 16, 2007 Connexion de la sortie S-vidéo • Utilisez un câble vidéo composante pour connecter COMPONENT VIDEO OUT à un jeu d’entrées composantes de votre téléviseur.
XV-DV-370.book Page 32 Friday, February 16, 2007 Reportez-vous à la section À propos de HDMI ci-après pour plus d’informations sur l’interface HDMI. • Utilisez uniquement un câble HDMI pour relier la prise HDMI OUT de cet appareil à la prise HDMI d’un moniteur compatible HDMI.
XV-DV-370.book Page 33 Friday, February 16, 2007 6:19 PM À propos des connexions de commande de sortie Français Français Deutsch De nombreux appareils Pioneer prennent en charge les connexions SR CONTROL, qui permettent d’utiliser la télécommande de tout appareil connecté en la dirigeant vers le capteur d’un seul appareil. Lorsque vous utilisez une télécommande, le signal de commande défile le long de la chaîne jusqu’au composant adéquat.
XV-DV-370.book Page 34 Friday, February 16, 2007 6:19 PM Chapitre 9 Informations complémentaires Compatibilité de lecture des disques et du format du contenu Ce lecteur est compatible avec une vaste gamme de disques (supports) et de formats. Les disques que cet appareil peut lire et/ou leur coffret présentent en général l’un des logos suivants. Sachez toutefois que le format de certains types de disques, tels que les CD et DVD enregistrables, peut être illisible.
XV-DV-370.book Support Page 35 Friday, February 16, 2007 Formats compatibles À propos de la compatibilité des disques DVD+R/DVD+RW Seuls les disques DVD+R/DVD+RW enregistrés en ‘mode vidéo (mode vidéo DVD)’ et ayant été finalisés peuvent être lus sur cet appareil. En outre, certaines modifications effectuées durant l’enregistrement peuvent ne pas être lues correctement. Compatibilité des vidéos DivX • • • Produit officiel certifié DivX®.
XV-DV-370.book Page 36 Friday, February 16, 2007 Groupe 3 : Bulgarian (bg), Byelorussian (be), Macedonian (mk), Russian (ru), Serbian (sr), Ukrainian (uk) Groupe 4 : Hebrew (iw), Yiddish (ji) Groupe 5 : Turkish (tr) DivX, la certification DivX et les logos associés sont des marques de DivX, Inc. et sont utilisés sous licence.
XV-DV-370.book Page 37 Friday, February 16, 2007 6:19 PM Régions DVD Vidéo Nous souhaitons que vous puissiez utiliser ce système pendant de nombreuses années. Par conséquent, tenez compte des consignes suivantes pour le choix de l’emplacement : Ce que vous devez faire… • Utiliser l’appareil dans une pièce bien aérée. • Placer l’appareil sur une surface horizontale stable, telle qu’une table, une étagère ou un rack stéréo.
XV-DV-370.book Page 38 Friday, February 16, 2007 Tailles de l’écran et formats de disque Les images des DVD-Vidéo existent en différents formats, du format TV 4/3 usuel au format CinemaScope1, qui peut atteindre 7/3. Les téléviseurs existent également en différents formats, du 4/3 ‘standard’ à l’écran large 16/9.2 En mode 4:3 (Letter Box), les disques pour écran large sont lus avec une bande noire horizontale en haut et en bas de l’écran.
XV-DV-370.book Page 39 Friday, February 16, 2007 6:19 PM Guide de dépannage • Si le système ne fonctionne pas normalement en raison d’interférences externes comme l’électricité statique, débranchez la fiche de la prise secteur, puis rebranchez-la pour restaurer les conditions de fonctionnement normales. Action corrective Impossible de mettre le système sous tension ou celui-ci s’éteint brusquement (il se peut qu’un message d’erreur s’affiche au démarrage).
XV-DV-370.book Page 40 Friday, February 16, 2007 6:19 PM Lecteur DVD/CD/Vidéo CD Anomalie Action corrective Le disque est éjecté • Nettoyez le disque et alignez-le correctement dans l’alvéole correspondante. automatiquement après • Si le code de région figurant sur le DVD-vidéo ne correspond pas à celui du lecteur, son chargement. vous ne pouvez pas utiliser le disque (reportez-vous à la section Régions DVD Vidéo page 37).
XV-DV-370.book Page 41 Friday, February 16, 2007 6:19 PM Action corrective Le disque DVD-ROM n’est pas reconnu. • Assurez-vous que le DVD-ROM a bien été enregistré au format UDF Bridge. Reportez-vous à la section Tableau de compatibilité des disques page 34 pour plus d’informations au sujet de la compatibilité. Les fichiers ne s’affichent pas dans Disc Navigator/ Photo Browser. • Les fichiers sur le disque doivent posséder l’extension correcte : .mp3 pour les fichiers MP3 ; .
XV-DV-370.book Page 42 Friday, February 16, 2007 6:19 PM Anomalie Action corrective Pas de sortie vidéo HDMI. • Vérifiez que vous avez sélectionné ce lecteur comme entrée HDMI lors du réglage des options concernant l’appareil externe utilisé (reportez-vous au manuel d’utilisation de l’appareil). • Vérifiez que le câble HDMI est raccordé correctement et qu’il n’est pas endommagé.
XV-DV-370.book Page 43 Friday, February 16, 2007 6:19 PM Réinitialisation du système Deutsch Vous pouvez verrouiller les touches du panneau avant en activant la fonction Key Lock. 1 Lorsque le système est en veille, appuyez sur SETUP et utilisez / pour sélectionner KEYLOCK, puis appuyez sur ENTER. Cette mention s’affiche sur l’écran du panneau avant. 2 Utilisez les touches / pour sélectionner LOCK ON (verrouiller) ou LOCK OFF (déverrouiller), puis appuyez sur ENTER.
XV-DV-370.
XV-DV-370.book Page 45 Friday, February 16, 2007 Caractéristiques techniques Section amplificateur Section disque Caractéristiques audio numériques . . . . . . . . . . . . . . . . . . . . . . . DVD : 96 kHz, 24 bits Type . . . Système DVD, système Vidéo CD/Super VCD et système CD audio numérique Réponse en fréquence . . . . .4 Hz à 44 kHz (échantillonnage de 96 kHz)/ 4 Hz à 22 kHz (échantillonnage de 48 kHz) Pleurage et scintillement . . . . . . . . . . . . . . . . . . .
XV-DV-370.book • Page 46 Friday, February 16, 2007 Accessoires Câbles d’enceinte . . . . . . . . . . . . . . . . . . . . . . . . 6 Supports . . . . . . . . . . . . . . . . . . . . . . . . . . . . . . . 2 Vis (pour supports) . . . . . . . . . . . . . . . . . . . . . . . 4 Coussinets antidérapants (petits) . . . . . . . . . . 16 Coussinets antidérapants (grands). . . . . . . . . . 4 Remarque • Les spécifications et la présentation peuvent être modifiées sans préavis suite à des améliorations.
XV-DV-370.book Page 48 Friday, February 16, 2007 6:19 PM Should this product require service in the U.S.A. and you wish to locate the nearest Pioneer Authorized Independent Service Company, or if you wish to purchase replacement parts, operating instructions, service manuals, or accessories, please call the number shown below. 800–421–1404 Please do not ship your product to Pioneer without first calling the Customer Support Division at the above listed number for assistance.