IDK-01.
IDK-01.book 2 ページ 2006年5月17日 水曜日 午後1時55分 IMPORTANT CAUTION RISK OF ELECTRIC SHOCK DO NOT OPEN The lightning flash with arrowhead symbol, within an equilateral triangle, is intended to alert the user to the presence of uninsulated "dangerous voltage" within the product's enclosure that may be of sufficient magnitude to constitute a risk of electric shock to persons. CAUTION: TO PREVENT THE RISK OF ELECTRIC SHOCK, DO NOT REMOVE COVER (OR BACK). NO USER-SERVICEABLE PARTS INSIDE.
IDK-01.book 3 ページ 2006年5月17日 水曜日 午後1時55分 Thank you for buying this Pioneer product. Please read through these operating instructions so that you will know how to operate your model properly. After you have finished reading the instructions, put them in a safe place for future reference. English Contents Connecting the system to your AV receiver or TV . . . . . . . . . . . . . . . . . . . . . . . . . . 8 02 Controls and displays 05 Additional information Top and front panel . . . . . . . . . . . . .
IDK-01.book 4 ページ 2006年5月17日 01 水曜日 午後1時55分 Before you start Chapter 1 Before you start Checking what’s in the box Inserting the battery Please check that you've received the following supplied accessories: Reseat the lithium battery (CR2025) in the remote control as shown right. When you notice a decrease in the operating range, replace the battery in the same manner.
IDK-01.book 5 ページ 2006年5月17日 水曜日 午後1時55分 Before you start Range of the remote control unit The remote control has a range of about 7 meters. It may not work properly if: • There are obstacles between the remote control and this unit’s remote sensor. • When disposing of used batteries, please comply with governmental regulations or environmental public instruction’s rules that apply in your country/area. • Direct sunlight or fluorescent light is shining onto the remote sensor.
IDK-01.book 6 ページ 2006年5月17日 01 水曜日 Before you start Attaching the iPod type adapter For your iPod to sit properly in the dock connector port, you will have to match the iPod type adapter with your model of iPod. Each iPod type adapter has a model marking as shown below.
IDK-01.book 7 ページ 2006年5月17日 水曜日 午後1時55分 Controls and displays 02 English Chapter 2 Controls and displays Rear panel OUTPUT IN 1 2 3 4 4 AUDIO L 5 1 CONTROL IN terminal Connect this to a Pioneer AV receiver (or similar component) CONTROL OUT terminal using the supplied SR cable. This allows you to use the receiver's remote to control this unit. Check your Pioneer receiver's operating instructions for more on this.
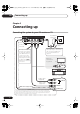
IDK-01_02_connect_up.fm 8 ページ 2006年5月19日 03 金曜日 午後6時42分 Connecting up Chapter 3 Connecting up Connecting the system to your AV receiver or TV OUTPUT IN CONTROL S - VIDEO VIDEO DC IN 12 V R AUDIO AC adapter (supplied) L AC power outlet Control Dock for iPod • Plug in the AC adapter only after completing all connections. • Do not use any adapter with this unit other than the one supplied. • A video connection is necessary if you want to see iPod video playback or the OSD of this unit.
IDK-01.book 9 ページ 2006年5月17日 水曜日 午後1時55分 Getting started 04 English Chapter 4 Getting started Once you have connected everything, you’re ready to starting watching videos and listening to music. Follow the steps below for an introduction to your iPod dock. The following table shows the basic playback controls for your iPod: Button OSD On/Off Returns to the previous menu. Selects menu items/levels. Enter Starts/pauses playback. Press to skip to the previous/next song.
IDK-01.book 10 ページ 2006年5月17日 04 水曜日 午後1時55分 Getting started Important • This system is compatible with an iPod mini, iPod Photo, iPod nano and iPod Video portable device (third generation and above), however, compatibility may vary depending on the software version of your iPod. The following software versions have been tested: Model Software version iPod Video 1.0 or higher iPod nano 1.0 or higher • Make sure the iPod dock is connected to a video component, then press ‘OSD On/Off’.
IDK-01_05_add_info.fm 11 ページ 2006年5月18日 木曜日 午後12時25分 Additional information 05 Additional information Remedy • Make sure your iPod is working properly. • Make sure the iPod is seated correctly in the iPod connector dock. • Make sure you have properly connected the AV outputs from the dock to your external components. Also check that the correct input is selected on your receiver and/or monitor. • If you have connected the S-video output, nothing is output from the standard (composite) video output.
IDK-01.book Page 2 Wednesday, May 17, 2006 11:10 AM IMPORTANT ATTENTION DANGER D´ELECTROCUTION NE PAS OUVRIR Ce symbole de l’éclair, placé dans un triangle équilatéral, a pour but d’attirer l’attention de l’utilisateur sur la présence, à l’intérieur du coffret de l’appareil, de “tensions dangereuses” non isolées d’une grandeur suffisante pour représenter un risque d’électrocution pour les êtres humains.
IDK-01.book Page 3 Wednesday, May 17, 2006 11:10 AM Nous vous remercions de votre achat d'un produit Pioneer. Veuillez lire ce mode d'emploi pour savoir comment utiliser correctement votre modèle. Après sa lecture, placez ce mode d'emploi dans un endroit accessible pour pouvoir le consulter. 01 Avant de commencer Vue supérieure et avant. . . . . . . . . . . . . . . . . . 7 Vue arrière. . . . . . . . . . . . . . . . . . . . . . . . . . . . 7 04 Pour commencer Fonctions de lecture iPod . . . . . . . . . .
IDK-01.
IDK-01.book Page 5 Wednesday, May 17, 2006 11:10 AM Avant de commencer Deutsch 30 Français La portée de la télécommande est d'environ 7 mètres. Elle peut ne pas fonctionner correctement si : • Il y a des obstacles entre la télécommande et le capteur de cet appareil. • La lumière du soleil ou une lumière fluorescente rayonne sur le capteur. • Ce système est placé près d'un dispositif émettant des rayons infrarouges. • Cette unité est utilisée en même temps qu'une autre télécommande à infrarouge.
IDK-01.book Page 6 Wednesday, May 17, 2006 11:10 AM 01 Avant de commencer Fixation de l'adaptateur de type d'iPod Pour que votre iPod soit placé correctement dans le port connecteur du dock, vous devez sélectionner l'adaptateur correspondant à votre iPod. Chaque adaptateur de type d'iPod a une indication de modèle comme ci-dessous.
IDK-01.book Page 7 Wednesday, May 17, 2006 11:10 AM Contrôles et affichages 02 English Chapitre 2 Contrôles et affichages Vue supérieure et avant Vue arrière CONTROL 2 3 4 3 Témoin d'alimentation S'allume quand votre iPod est branché sur le port connecteur du dock. 4 Capteur de télécommande Voir Portée de la télécommande sur la page 5 pour plus d'information à ce sujet.
IDK-01.book Page 8 Wednesday, May 17, 2006 11:10 AM 03 Connexion Chapitre 3 Connexion Connexion du système avec votre récepteur AV ou téléviseur OUTPUT IN CONTROL S - VIDEO VIDEO DC IN 12 V R AUDIO Adaptateur secteur (fourni) L Prise d'alimentation secteur Dock de contrôle pour iPod • Ne branchez l'adaptateur secteur qu'après avoir effectué toutes les connexions. • N'utilisez pas d'autre adaptateur que celui fourni avec cet appareil.
IDK-01.book Page 9 Wednesday, May 17, 2006 11:10 AM Pour commencer 04 Pour commencer Fonctions de lecture iPod Bouton OSD On/Off Pour activer et désactiver l'affichage sur écran de cette unité (ceci apparaît sur le composant vidéo connecté). Pour revenir au menu précédent. Menu Enter Pour sélectionner les élément/niveaux de menu. Appuyez et maintenez pendant la lecture pour lancer le balayage. Playlist Playlist Shuffle Appuyez plusieurs fois pour commuter entre les options de lecture aléatoire.
IDK-01.book Page 10 Wednesday, May 17, 2006 11:10 AM 04 Pour commencer Important • Ce système est compatible avec les lecteurs iPod, iPod mini et iPod photo (troisième génération et plus), mais la compatibilité peut varier selon la version de logiciel de votre iPod. Ce récepteur ne prend pas en charge les versions de logiciel antérieures à la mise à jour iPod 2004-10-20. Veuillez vérifier que vous utilisez le logiciel le plus récent.
IDK-01.book Page 11 Wednesday, May 17, 2006 11:10 AM Informations supplémentaires 05 Informations supplémentaires English Chapitre 5 Dépannage L'utilisation semble impossible après la connexion du câble SR de cet appareil à un composant externe. • Pour l'utilisation, vous devez diriger la télécommande fournie avec cet appareil vers le capteur du récepteur ou de l'amplificateur connecté. • Veillez à bien utiliser le câble SR fourni avec ce système.
IDK-01.book Page 2 Wednesday, May 17, 2006 11:11 AM WICHTIG CAUTION RISK OF ELECTRIC SHOCK DO NOT OPEN Das Blitzsymbol in einem Dreieck weist den Benutzer darauf hin, dass eine Berührungsgefahr mit nicht isolierten Teilen im Geräteinneren, die eine gefährliche Spannung führen, besteht. Die Spannung kann so hoch sein, dass sie die Gefahr eines elektrischen Schlages birgt. ACHTUNG: UM SICH NICHT DER GEFAHR EINES ELEKTRISCHEN SCHLAGES AUSZUSETZEN, DÜRFEN SIE NICHT DEN DECKEL (ODER DIE RÜCKSEITE) ENTFERNEN.
IDK-01.book Page 3 Wednesday, May 17, 2006 11:11 AM Lesen Sie bitte diese Bedienungsanleitung sorgfältig durch, damit Sie in der Lage sind, dieses Modell ordnungsgemäß zu bedienen. Bewahren Sie diese Bedienungsanleitung zur künftigen Einsichtnahme an einem sicheren Ort auf, nachdem Sie sie gelesen haben. 01 Vor dem Start Ober- und Vorderseite . . . . . . . . . . . . . . . . . . . 7 Rückseite . . . . . . . . . . . . . . . . . . . . . . . . . . . . 7 04 Start Wiedergabefunktionen des iPod . . . . . . . .
IDK-01.
IDK-01.book Page 5 Wednesday, May 17, 2006 11:11 AM Vor dem Start Français Deutsch Die Fernbedienung weist eine Reichweite von ca. 7 Metern auf. Unter folgenden Umständen könnte sie nicht ordnungsgemäß funktionieren: • Es befinden sich Hindernisse zwischen der Fernbedienung und dem Fernbedienungssensor. • Es fällt direktes Sonnenlicht oder fluoreszierendes Licht auf den Fernbedienungssensor. • Dieses System befindet sich in der Nähe eines Geräts, das Infrarotstrahlen aussendet.
IDK-01.book Page 6 Wednesday, May 17, 2006 11:11 AM 01 Vor dem Start Montage des iPod-Adapters Damit Ihr iPod genau in den Dock-Anschluss passt, muss der zu Ihrem iPod-Modell passende iPod-Adapter gewählt werden. Jeder iPod-Adapter weist eine im Folgenden dargestellte Modellbezeichnung auf.
IDK-01.book Page 7 Wednesday, May 17, 2006 11:11 AM Bedienelemente und Anzeigen 02 Bedienelemente und Anzeigen Ober- und Vorderseite Rückseite CONTROL 3 4 3 Stromanzeige Leuchtet, wenn Ihr iPod mit dem DockAnschluss verbunden ist. 4 Fernbedienungssensor Weitere Einzelheiten siehe Reichweite der Fernbedienung auf Seite 5. L 5 1 CONTROL IN-Ausgang Schließen Sie diesen mit dem beiliegenden SR Kabel an die CONTROL OUT-Buchse Ihres Audio-/Video-Receivers von Pioneer (oder eines ähnlichen Geräts) an.
IDK-01.book Page 8 Wednesday, May 17, 2006 11:11 AM 03 Vornahme der Anschlüsse Kapitel 3 Vornahme der Anschlüsse Anschluss des Systems an Ihren Audio-/Video-Receiver oder Fernseher OUTPUT IN CONTROL S - VIDEO VIDEO DC IN 12 V R AUDIO Netzteil (mitgeliefert) L Netzsteckdose iPod Control Dock • Stecken Sie das Netzteil erst nach Vornahme aller Anschlüsse in die Netzsteckdose.
IDK-01.book Page 9 Wednesday, May 17, 2006 11:11 AM Start 04 Start Wiedergabefunktionen des iPod Playlist Shuffle Playlist Repeat Ein-/Ausschalten des OnScreenDisplays dieses Geräts (dieses erscheint auf dem angeschlossenen Videogerät). Rückkehr zum vorherigen Menü. Menu Wahl der Menüpunkte/-ebenen. Enter Start/Pausierung der Wiedergabe. Zum Durchlauf während der Wiedergabe gedrückt halten. Zum vorherigen/nächsten Titel gehen.
IDK-01.book Page 10 Wednesday, May 17, 2006 11:11 AM 04 Start Zur Beachtung • Dieses System ist kompatibel zu einem tragbaren iPod, iPod Mini und iPod Photo (der dritten Generation und höher). Der Grad der Kompatibilität hängt jedoch von der Version der Software Ihres iPod ab. Dieser Receiver unterstützt keine der iPodAktualisierung vom 20.10.2004 vorhergehenden Softwareversionen. Achten Sie bitte darauf, die neueste Software zu verwenden. Weitere Einzelheiten siehe die Homepage der Apple Computer Inc.
IDK-01.book Page 11 Wednesday, May 17, 2006 11:11 AM Ergänzende Informationen 05 Ergänzende Informationen English Kapitel 5 Fehlerbehebung • Sie müssen zum Betrieb die diesem Gerät beiliegende Fernbedienung auf den Fernbedienungssensor des angeschlossenen Receivers oder Verstärkers halten. • Verwenden Sie unbedingt das diesem System beiliegende SR Kabel. Technische Daten • Stromversorgung und Sonstiges • Zubehör Fernbedienung. . . . . . . . . . . . . . . . . . . . . . . . . .
IDK-01.book Page 2 Wednesday, May 17, 2006 11:12 AM IMPORTANTE CAUTION RISK OF ELECTRIC SHOCK DO NOT OPEN Il simbolo del lampo con terminale a forma di freccia situato all’interno di un triangolo equilatero serve ad avvisare l’utilizzatore della presenza di una “tensione pericolosa” non isolata nella struttura del prodotto che potrebbe essere di un’intensità tale da provocare scosse elettriche all’utilizzatore.
IDK-01.book Page 3 Wednesday, May 17, 2006 11:12 AM La ringraziamo per aver acquistato questo prodotto Pioneer. Si prega di leggere tutte le istruzioni per l’uso al fine di apprendere come utilizzare correttamente questo modello. Una volta lette le istruzioni, conservare il manuale in un luogo sicuro per l’eventuale consultazione in futuro. 02 Comandi e display Pannello superiore ed anteriore . . . . . . . . . . . 7 Pannello posteriore . . . . . . . . . . . . . . . . . . . . .
IDK-01.
IDK-01.book Page 5 Wednesday, May 17, 2006 11:12 AM Prima di iniziare Français Deutsch Il telecomando dispone di un raggio di azione di circa 7 metri. Potrebbe non funzionare correttamente se: • Vi sono ostacoli tra il telecomando e il sensore remoto di questo apparecchio. • La luce diretta del sole o una luce fluorescente si riflette sul sensore remoto. • L’apparecchio è collocato in prossimità di un dispositivo che emette raggi infrarossi.
IDK-01.book Page 6 Wednesday, May 17, 2006 11:12 AM 01 Prima di iniziare Collegamento dell’adattatore per iPod Per sistemare correttamente l’iPod nella porta del connettore, è necessario far corrispondere l’adattatore per iPod al proprio modello di iPod. Ciascun adattatore per iPod dispone di una etichetta relativa al modello, come indicato di seguito. • È inoltre possibile collegare un adattatore per iPod da una base dock originale iPod.
IDK-01.book Page 7 Wednesday, May 17, 2006 11:12 AM Comandi e display 02 English Capitolo 2 Comandi e display Pannello superiore ed anteriore Pannello posteriore CONTROL 2 3 4 3 Spia di alimentazione Si accende quando si collega l’iPod alla porta del connettore dock. 4 Sensore remoto Per ulteriori informazioni, consultare Raggio di azione del telecomando a pagina 5.
IDK-01.book Page 8 Wednesday, May 17, 2006 11:12 AM 03 Collegamenti Capitolo 3 Collegamenti Collegamento dell’apparecchio al ricevitore AV o al televisore OUTPUT IN CONTROL S - VIDEO VIDEO Adattatore CA (in dotazione) DC IN 12 V R AUDIO L Presa alimentazione CA Dock di controllo per iPod • Inserire l’adattatore CA solo dopo aver eseguito tutti i collegamenti. • Con questo apparecchio non usare nessun adattatore che non sia quello in dotazione.
IDK-01.book Page 9 Wednesday, May 17, 2006 11:12 AM Predisposizione all’avvio 04 Predisposizione all’avvio Dopo aver effettuato i collegamenti, è possibile iniziare a guardare video ed ascoltare musica. Osservare le operazioni di seguito per un’introduzione alla base dock dell’iPod. La seguente tabella mostra i comandi basici di riproduzione dell’iPod: Tasto OSD On/Off Consente di tornare al menu precedente. Enter Consente di selezionare le voci/i livelli del menu.
IDK-01.book Page 10 Wednesday, May 17, 2006 11:12 AM 04 Predisposizione all’avvio Importante • Il presente apparecchio è compatibile con dispositivi portatiti iPod, iPod mini ed iPod Photo (terza generazione e superiore). Tuttavia, tale compatibilità potrebbe variare in base alla versione software dell’iPod. Il presente ricevitore non supporta versioni software precedenti a iPod Updater 2004-10-20. Assicurarsi di utilizzare il software più aggiornato.
IDK-01.book Page 11 Wednesday, May 17, 2006 11:12 AM Ulteriori informazioni 05 Ulteriori informazioni English Capitolo 5 Risoluzione dei problemi • Per effettuare l’operazione, è necessario puntare il telecomando in dotazione all’apparecchio verso il sensore remoto del ricevitore o amplificatore collegato. • Assicurarsi di utilizzare il cavo SR in dotazione all’apparecchio. Specifiche tecniche • Alimentazione e varie • Accessori Telecomando . . . . . . . . . . . . . . . . . . . . . . . . . . .
IDK-01.book Page 2 Wednesday, May 17, 2006 11:10 AM BELANGRIJK CAUTION RISK OF ELECTRIC SHOCK DO NOT OPEN De lichtflash met pijlpuntsymbool in een gelijkzijdige driehoek is bedoeld om de aandacht van de gebruikers te trekken op een niet geïsoleerde “gevaarlijke spanning” in het toestel, welke voldoende kan zijn om bij aanraking een elektrische shock te veroorzaken. WAARSCHUWING: OM HET GEVAAR VOOR EEN ELEKTRISCHE SHOCK TE VOORKOMEN, DEKSEL (OF RUG) NIET VERWIJDEREN.
IDK-01.book Page 3 Wednesday, May 17, 2006 11:10 AM Bedankt voor het aanschaffen van dit Pioneer-product. Lees deze gebruiksinstructies door om u ervan te verzekeren dat u in staat bent om uw model op de juiste wijze te bedienen. Bewaar de gebruiksaanwijzing goed als referentiemateriaal na deze te hebben doorgelezen. 01 Voor u begint Boven- en voorpaneel . . . . . . . . . . . . . . . . . . . 7 Achterpaneel. . . . . . . . . . . . . . . . . . . . . . . . . . 7 04 Beginnen iPod-weergavefuncties. . . . . .
IDK-01.
IDK-01.book Page 5 Wednesday, May 17, 2006 11:10 AM Voor u begint Bereik van de afstandsbediening Français Deutsch De afstandsbediening heeft een bereik van ongeveer 7 meter. Het functioneert mogelijk niet goed indien: • Er obstakels zijn geplaatst tussen de afstandsbediening en de afstandsbedieningssensor van het apparaat. • Direct zonlicht of TL-licht op de afstandsbedieningssensor schijnt. • Het systeem zich bevindt in de buurt van een apparaat dat infraroodstraling aan het genereren is.
IDK-01.book Page 6 Wednesday, May 17, 2006 11:10 AM 01 Voor u begint De iPod type-adapter plaatsen Om uw iPod op de juiste wijze in het dock te plaatsen, dient u de iPod type-adapter te selecteren die overeenkomt met het model van uw iPod. Iedere iPod type-adapter is voorzien van een modelmarkering zoals hieronder wordt aangeduid. • Gebruik in het geval van vijfde generatie iPod-modellen de iPod type-adapter die u heeft ontvangen bij uw iPod.
IDK-01.book Page 7 Wednesday, May 17, 2006 11:10 AM Bedieningselementen en displays 02 English Hoofdstuk 2 Bedieningselementen en displays Achterpaneel OUTPUT IN 1 2 4 4 AUDIO L 5 1 CONTROL IN-aansluiting Sluit dit aan op de CONTROL OUT-aansluiting van een Pioneer AV-receiver (of vergelijkbaar component) met behulp van de meegeleverde SR-kabel. Dit stelt u in staat om het apparaat te bedienen met de afstandsbediening van de receiver.
IDK-01.book Page 8 Wednesday, May 17, 2006 11:10 AM 03 Aansluiten Hoofdstuk 3 Aansluiten Het apparaat op uw AV-receiver of TV aansluiten OUTPUT IN CONTROL S - VIDEO VIDEO DC IN 12 V R AUDIO Netstroomadapter (meegeleverd) L Stopcontact Control Dock voor iPod • Verbind de netstroomadapter pas na alle aansluitingen tot stand te hebben gebracht. • Gebruik enkel de meegeleverde adapter met dit apparaat.
IDK-01.book Page 9 Wednesday, May 17, 2006 11:10 AM Beginnen 04 Beginnen Basishandelingen met de afstandsbediening Zodra u alles heeft aangesloten, bent u klaar om video’s te bekijken en naar muziek luisteren. Volg de onderstaande stappen voor een introductie van uw iPod-dock. De volgende tabel bevat informatie over de basishandelingen die via de afstandsbediening van uw iPod kunnen worden uitgevoerd: Keert terug naar het vorige menu. Menu Selecteert menuitems/-niveaus.
IDK-01.book Page 10 Wednesday, May 17, 2006 11:10 AM 04 Beginnen Belangrijk • Dit systeem is compatibel met de draagbare iPod, iPod mini en iPod Photo apparatuur (derde generatie en daarboven), maar de compatibiliteit kan desondanks variëren, afhankelijk van de softwareversie van uw iPod. Deze receiver ondersteunt geen softwareversies voor iPod-update 2004-10-20. Verzeker u ervan dat u de meest actuele software gebruikt. Raadpleeg voor meer informatie de Apple Computer Inc. homepage.
IDK-01.book Page 11 Wednesday, May 17, 2006 11:10 AM Aanvullende informatie 05 Aanvullende informatie English Hoofdstuk 5 Problemen verhelpen • Voor de bediening ervan dient u de afstandsbediening die u bij uw apparaat heeft ontvangen te richten op de afstandsbedieningssensor van de aangesloten receiver of versterker. • Verzeker u ervan dat u de SR-kabel gebruikt die u heeft ontvangen bij dit systeem. Specificaties • Stroomvoorziening en overige • Accessoires Afstandsbediening . . . . . . . . .
IDK-01.book Page 2 Wednesday, May 17, 2006 11:13 AM IMPORTANTE CAUTION RISK OF ELECTRIC SHOCK DO NOT OPEN La luz intermitente con el símbolo de punta de flecha dentro un triángulo equilátero. Está convenido para avisar el usuario de la presencia de “voltaje peligrosa” no aislada dentro el producto que podría constituir un peligro de choque eléctrico para las personas.
IDK-01.book Page 3 Wednesday, May 17, 2006 11:13 AM Gracias por la adquisición de este producto Pioneer. Lea completamente este manual de instrucciones para aprender a operar correctamente el aparato. Después de haber terminado la lectura de las instrucciones, guarde el manual en un lugar seguro para poderlo consultar en el futuro. 01 Antes de comenzar Panel superior y frontal . . . . . . . . . . . . . . . . . . 7 Panel posterior . . . . . . . . . . . . . . . . . . . . . . . .
IDK-01.book Page 4 Wednesday, May 17, 2006 11:13 AM 01 Antes de comenzar Capítulo 1 Antes de comenzar Comprobar los contenidos de la caja Le rogamos que compruebe que ha recibido los siguientes accesorios: • • • • • • • • • • Mando a distancia Batería de litio (CR2025) Instalación de las pilas Reinstale la pila de litio (CR2025) en el mando a distancia como se indica a la derecha. Cuando observe una disminución de la distancia de funcionamiento, recambie la pila del mismo modo.
IDK-01.book Page 5 Wednesday, May 17, 2006 11:13 AM Antes de comenzar El mando a distancia tiene una distancia de funcionamiento de unos 7 metros. Tal vez no funcione si: Français Deutsch • Hay obstáculos entre él y el sensor remoto de esta unidad. • Brilla directamente luz solar o fluorescente sobre el sensor remoto. • Este sistema se coloca cerca de un dispositivo que emite rayos infrarrojos. • Este mando funciona simultáneamente junto con otro que también use rayos infrarrojos.
IDK-01.book Page 6 Wednesday, May 17, 2006 11:13 AM 01 Antes de comenzar Acoplar el adaptador tipo iPod Para que su iPod pueda acoplarse adecuadamente en el puerto conector de la base dock, deberá hacer coincidir el adaptador para iPod con su modelo iPod. Cada adaptador para iPod tiene una marca de modelo como puede apreciar a continuación. Marca de modelo iPod • También puede conectar un adaptador para iPod desde un dock base para iPod original.
IDK-01.book Page 7 Wednesday, May 17, 2006 11:13 AM Controles y pantallas 02 English Capítulo 2 Controles y pantallas Panel superior y frontal Panel posterior CONTROL 2 3 4 3 Indicador de encendido Se enciende cuando su iPod se conecta al puerto de conexión de la base dock. 4 Sensor remoto Consulte Distancia de funcionamiento del mando a distancia en la página 5 si necesita más información.
IDK-01.book Page 8 Wednesday, May 17, 2006 11:13 AM 03 Conexiones Capítulo 3 Conexiones Conectar el sistema a su receptor AV o televisor OUTPUT IN CONTROL S - VIDEO VIDEO Adaptador CA (suministrado) DC IN 12 V R AUDIO L Base dock de control para iPod • Es necesaria una conexión de vídeo si desea ver vídeo usando el iPod o los OSD de esta unidad. • Conecte un cable de S-vídeo para una mayor calidad en la reproducción de vídeo (no se reproducirá vídeo al terminal VIDEO si realiza esta conexión).
IDK-01.book Page 9 Wednesday, May 17, 2006 11:13 AM Para empezar 04 Para empezar Una vez haya conectado todo, podrá ver vídeos y escuchar música. Siga los pasos siguientes a modo de introducción a su dock base del iPod. La tabla siguiente muestra los controles de reproducción básicos de su iPod: Botón OSD On/Off Vuelve al menú anterior. Enter Selecciona elementos/niveles del menú. Inicia/pausa la reproducción. Mantenga presionado durante la reproducción para iniciar la búsqueda.
IDK-01.book Page 10 Wednesday, May 17, 2006 11:13 AM 04 Para empezar Importante • Este sistema es compatible con un dispositivo portátil iPod, iPod mini y iPod Photo (tercera generación y versiones superiores). No obstante, la compatibilidad puede variar dependiendo de la versión de software que use su iPod. Este receptor no es compatible con las versiones de anteriores a la actualización 2004-10-20 del iPod. Cerciórese de que está usando el software más reciente.
IDK-01.book Page 11 Wednesday, May 17, 2006 11:13 AM Información adicional 05 Información adicional English Capítulo 5 Resolución de problemas • Para hacer funcionar el aparato, debe apuntar con el mando a distancia suministrado con esta unidad al sensor remoto del receptor o amplificador conectado. • Cerciórese de usar el cable SR suministrado con este sistema. Especificaciones • Alimentación y miscelánea • Accesorios Mando a distancia . . . . . . . . . . . . . . . . . . . . . . .
IDK-01_05_add_info.fm 12 ページ 2006年5月17日 水曜日 午後2時9分 PIONEER CORPORATION 4-1, Meguro 1-Chome, Meguro-ku, Tokyo 153-8654, Japan PIONEER ELECTRONICS (USA) INC. P.O. BOX 1540, Long Beach, California 90810-1540, U.S.A. TEL: (800) 421-1404 PIONEER ELECTRONICS OF CANADA, INC. 300 Allstate Parkway, Markham, Ontario L3R OP2, Canada TEL: 1-877-283-5901 PIONEER EUROPE NV Haven 1087, Keetberglaan 1, B-9120 Melsele, Belgium TEL: 03/570.05.11 PIONEER ELECTRONICS ASIACENTRE PTE. LTD.