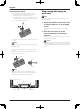
English Thank you for buying this Pioneer product. Please read through these operating instructions before using your speaker system so you will know how to make the most of its performance. After you have finished reading the instructions, put them away in a safe place for future reference. CHECKING THE ACCESSORIES • Speaker Cables × 2 CAUTION About compatibility This product is designed exclusively for use with the flat screen TV.
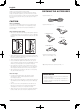
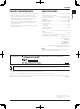
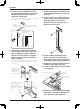
English English INSTALLATION ON THE FLAT SCREEN TV Flat screen TV with the speaker installed Speaker mounting screw (M5 × 10 mm) Speaker bracket (for TOP-Right) Speaker mounting screw (M5 × 10 mm) Speaker bracket (for TOP-Left) Speaker mounting screw (M5 × 10 mm) Speaker mounting screw (M5 × 10 mm) Speaker Speaker Speaker mounting screw (M5 × 10 mm) Speaker bracket (for BOTTOM-Right) Speaker mounting screw (M5 × 10 mm) Cable clamp* Speaker mounting screw (M5 × 10 mm) Speaker cable Speaker brac
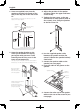
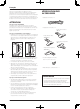
English 2. Screw an supplied screw into the speaker mounting hole (lower of the two) at the top, rear of the flat screen TV. Do not tighten it all the way yet. Leave it loose, with about 5 mm left to tighten. Speaker Mounting Hole 4. Adjust the position of the speaker and then tighten the upper and lower screws firmly. 5. Tighten the two screws, at the top and bottom for each speaker (total of four screws), thus fixing the speakers to the flat screen TV.
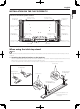
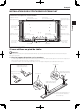
English Connecting the speaker cables to the speaker. Black Gray Red Gray Black Gray Red Black Red English Black Connecting the speaker cables to the rear of flat screen TV. Connect the cables correctly with respect to the polarity of the flat screen TV speaker terminals, that is, cable (Gray) to terminals (Red) and cable (Black) to terminals (Black).
English 10. Bundling the cables. Follow the steps below to attach a cable clamp. 1 ) Thread the clamp band through the holder and bundle the cable(s) in the cable clamp. 2 ) Push and hold the levers then insert the hook into an appropriate hole on the rear of the flat screen TV. 3 ) Pull up the clamp band to lock. When using the hung on wall unit: NOTE: First lay the flat screen TV on top of a soft sheet etc., then attach the speakers. 1.
CABINET MAINTENANCE SPECIFICATIONS • Use a polishing cloth or dry cloth to wipe off dust and dirt. • When the cabinet is very dirty, wipe with a soft cloth moistened with water-diluted cleanser; then wipe again with a dry cloth. Do not use furniture wax or cleaners. They may damage the surface of the cabinet. • Never use thinner, benzine, insecticide sprays and other chemicals on or near the cabinets, since these will corrode the surfaces.
Français Merci pour votre achat de cet appareil Pioneer. Veuillez lire attentivement la totalite de ce mode d’emploi avant d’utiliser vos enceintes acoustiques de façon à pouvoir en tirer le meilleur profit. Après lecture complète du livret d’instructions de fonctionnement, le ranger dans un endroit sûr afin de pouvoir vous y reporter facilement en cas de besoin lors de l’utilisation des l’enceintes acoustiques.
Français INSTALLATION SUR LE TÉLÉVISEUR À ÉCRAN PLAT Téléviseur à écran plat avec enceinte installée Vis de montage de l’enceinte (M5 x 10 mm) Support de l’enceinte (angle supérieur gauche) Vis de montage de l’enceinte (M5 x 10 mm) Vis de montage de l’enceinte (M5 x 10 mm) Enceinte Support de l’enceinte (angle inférieur droit) Français Vis de montage de l’enceinte (M5 x 10 mm) Support de l’enceinte (angle supérieur droit) Enceinte Vis de montage de l’enceinte (M5 x 10 mm) Vis de montage de l’enc
Français 2. Vissez une vis fournie dans le trou de montage de l’enceinte (le plus bas des deux) situé en haut au dos du téléviseur à écran plat. Ne la serrez pas complètement tout de suite. Laissez du jeu, arrêtez-vous à environ 5 mm de la fin. Trou de montage de l’enceinte Angle supérieur arrière du téléviseur à écran plat 4. Ajustez la position de l’enceinte puis serrez complètement les vis du haut et du bas. 5.
Français Branchement des câbles d’enceinte sur l’enceinte. Noir Gris Gris Noir Gris Rouge Noir Rouge Français Noir Brancher les câbles d’enceinte à l’arrière du téléviseur à écran plat. Rouge Branchez les câbles correctement en respectant la polarité des bornes d’enceintes, c’est à dire le câble (gris) sur les bornes (rouge) et le câble (noir) sur les bornes (noir).
Français 10. Relier les câbles. Suivez les étapes suivantes pour poser un serre-câbles. 1 ) Passez la languette du collier dans le support et placez le ou les câbles dans le serre-câbles. 2 ) Poussez et retenez les leviers puis insérez le crochet dans un trou adapté au dos du téléviseur à écran plat. 3 ) Tirez la languette du collier pour bloquer les câbles.
ENTRETIEN DU COFFRET SPECIFICATIONS • Utiliser un chiffon à polir ou un chiffon sec pour essuyer la poussière et éliminer les salissures. • Si le coffret est très sale, le frotter avec un chiffon doux imbibé de liquide à nettoyer dilué d’eau. Ensuite, essuyer à nouveau avec un chiffon sec. Ne pas utiliser de cire à meuble ou de produits de nettoyage corrosifs. Ils risqueraient d’endommager la surface du coffret.
Deutsch Wir danken Ihnen dafür, dass Sie sich für ein Produkt von Pioneer entschieden haben. Bitte lesen Sie vor der Verwendung Ihrer Lautsprecheranlage diese Anleitung aufmerksam durch, um die Vorzüge des Systems optimal ausnützen zu können. Nachdem Sie die Bedienungsanleitung durchgelesen haben, bewahren Sie sie sorgfältig auf, um sich im Bedarfsfall jederzeit darauf beziehen zu können.
Deutsch INSTALLATION AM FLACHBILDFERNSEHER Flachbildfernseher mit dem installierten Lautsprecher Lautsprecher-Montageschraube (M5 x 10 mm) Lautsprecher-Montageschraube (M5 x 10 mm) LautsprecherMontageschraube (M5 x 10 mm) LautsprecherMontageschraube (M5 x 10 mm) Lautsprecher LautsprecherHalterung (für unten rechts) LautsprecherHalterung (für oben links) Lautsprecher LautsprecherMontageschraube (M5 x 10 mm) LautsprecherMontageschraube (M5 x 10 mm) Kabelhalterung* LautsprecherMontageschraube (M5 x 1
Deutsch 2. Schrauben Sie eine mitgelieferte Schraube in das MontageSchraubloch (das untere der zwei Schraublöcher) oben an der Rückseite des Flachbildfernsehers. Ziehen Sie die Schraube noch nicht fest, sondern lassen Sie noch etwa 5 mm Zwischenraum. LautsprecherMontageschraubloch Oben, Rückseite des Flachbildfernsehers 4. Richten Sie die Position des Lautsprechers aus und ziehen Sie dann die obere und die untere Schraube fest. 5.
Deutsch Anschließen der Lautsprecherkabel am Lautsprecher. Schwarz Grau Schwarz Anschließen der Lautsprecher-kabel an die Rückseite des Flachbildfernsehers. Grau Schwarz Grau Rot Rot Schwarz Rot Schließen Sie die Kabel hinsichtlich ihrer Polarität richtig an die Lautsprecher-Anschlussklemmen an, das heißt, das -Kabel (Grau) an die -Anschlussklemmen (Rot) und das -Kabel (Schwarz) an die -Anschlussklemmen (Schwarz).
Deutsch 10. Bündelung der Kabel. Verfahren Sie wie nachfolgend beschrieben, um eine Kabelhalterung anzubringen. 1) Ziehen Sie das Halterungsband durch die Halterung und fixieren/bündeln Sie das/die Kabel in der Kabelhalterung. 2) Drücken Sie den Hebel, halten Sie ihn gedrückt und führen Sie dann den Haken in eine geeignete Öffnung an der Rückseite des Flachbildfernsehers ein. 3) Ziehen Sie das Halterungsband fest.
PFLEGE DES GEHÄUSES TECHNISCHE DATEN • Zum Abwischen von Staub und Verschmutzung kann ein Poliertuch oder ein trockener Lappen verwendet werden. • Wenn das Gehäuse stark verschmutzt ist, kann es mit einem weichen, mit verdünntem Haushaltsreiniger angefeuchteten Lappen gesäubert und dann mit einem trockenen Lappen abgewischt werden. Keine Möbelpolitur oder Reinigungsmittel verwenden, da diese Mittel die Oberfläche des Gehäuses beschädigen können.
Italiano Grazie per avere acquistato questo prodotto Pioneer. Leggere attentamente queste istruzioni per l’uso prima di utilizzare il sistema di altoparlanti per avvalersi al massimo delle sue prestazioni. Conservare poi il manuale in un luogo sicuro per ogni eventuale futura necessità. CONTROLLO DEGLI ACCESSORI • Cavi dell’altoparlante × 2 ATTENZIONE Problemi di compatibilità Questo prodotto è concepito esclusivamente per l’uso con una TV Flat-Screen Pioneer.
Italiano INSTALLAZIONE DELLA TV FLAT-SCREEN TV Flat-Screen con l’altoparlante installato Supporto dell’altoparlante (per parte superiore destra) Vite di montaggio per l’altoparlante (M5 x 10 mm) Vite di montaggio per l’altoparlante (M5 x 10 mm) Vite di montaggio per l’altoparlante (M5 x 10 mm) Vite di montaggio per l’altoparlante (M5 x 10 mm) Altoparlante Vite di montaggio per l’altoparlante (M5 x 10 mm) Altoparlante Vite di montaggio per l’altoparlante (M5 x 10 mm) Morsetto del cavo* Vite di mont
Italiano 2. Stringete una delle viti in dotazione nel foro di montaggio dell’altoparlante (il più basso dei due) nella parte superiore del retro della TV Flat-Screen. Non stringete fino in fondo. Lasciate le viti allentate, con ancora 5 mm circa da stringere. Foro per il montaggio dell’altoparlante 4. Regolate la posizione dell’altoparlante, quindi stringete bene la vite superiore e inferiore. 5.
Italiano Collegamento dei cavi dell’altoparlante all’altoparlante. Nero Grigio Nero Rosso Collegate i cavi dell’altoparlante al retro della TV Flat-Screen. Grigio Nero Grigio Rosso Nero Rosso Collegate i cavi correttamente rispettando la polarità dei terminali degli altoparlanti della TV Flat-Screen, vale a dire, cavo (grigio) con terminali (rosso) e cavo (nero) con terminali (nero).
Italiano 10. Legare i cavi. Seguite i passaggi qui sotto per attaccare un morsetto del cavo. 1) Infilate la banda del morsetto nella staffa di supporto e legate il/i cavo(i) nel morsetto. 2) Spingete e tenete ferme le leve, quindi inserite il gancio nell’apposito foro sul retro della TV FlatScreen. 3) Tirate verso l’alto la banda del morsetto per chiuderlo.
Italiano • Per togliere sporco e polvere utilizzare un panno per lucidare o un normale panno asciutto. • Se la cassa esterna è molto sporca, pulirla con un panno morbido bagnato con acqua e detergente, quindi passare di nuovo un panno asciutto. Non utilizzare cera per mobili o detersivi. Potrebbero danneggiare la superficie della cassa esterna. • Non usare mai diluenti, benzina, insetticidi spray e altri prodotti chimici sulla cassa esterna o nelle vicinanze. Questi prodotti sono corrosivi.
Nederlands Dank u voor de aanschaf van dit Pioneer product. Lees alvorens het luidsprekersysteem in gebruik te nemen eerst deze gebruiksaanwijzing door zodat u volledig op de hoogte bent van de bediening en werking. Bewaar de gebruiksaanwijzing op een veilige plaats voor het geval u later nog het een en ander wilt nalezen. CONTROLEREN VAN DE ONDERDELEN • Luidsprekersnoeren × 2 LET OP Over de compatibiliteit Dit product is uitsluitend ontworpen voor gebruik met een Pioneer Flat Screen TV.
Nederlands INSTALLATIE OP DE FLAT SCREEN TV Flat Screen TV met geïnstalleerde luidspreker Montageschroef luidspreker (M5 x 10 mm) Luidsprekerbeugel (voor rechtsboven) Montageschroef luidspreker (M5 x 10 mm) Luidsprekerbeugel (voor linksboven) Montageschroef luidspreker (M5 x 10 mm) Montageschroef luidspreker (M5 x 10 mm) Luidspreker Luidspreker Montageschroef luidspreker (M5 x 10 mm) Luidsprekerbeugel (voor rechtsonder) Montageschroef luidspreker (M5 x 10 mm) Kabelklem* Montageschroef luidspreker
Nederlands 2. Draai een meegeleverde schroef in het montagegat van de luidspreker (de laagste van de twee) aan de bovenachterzijde van de Flat Screen TV. Draai hem nog niet helemaal aan. Laat het nog half aangedraaid zodat er nog ongeveer 5 mm moet worden aangedraaid. Montagegat luidspreker 4. Stel de positie van de luidspreker bij en draai vervolgens de bovenste en onderste schroeven stevig aan. 5.
Nederlands Sluit de luidsprekersnoeren aan op de luidspreker. Grijs Zwart Zwart Sluit de luidsprekersnoeren op de achterzijde van Flat Screen TV aan. Grijs Zwart Grijs Rood Zwart Rood Rood Sluit de snoeren op de juiste polariteit van de luidsprekereindklemmen aan, d.w.z. snoer (grijs) op de eindklemmen (rood) en het snoer (zwart) op de eindklemmen (zwart).
Nederlands 10. Het samenvoegen van de snoeren. Volg onderstaande stappen om een kabelklem aan te brengen. 1) Steek het klembandje door de houder en voeg het snoer/de snoeren samen in de kabelklem. 2) Houd de hendeltjes ingedrukt en leid het haakje door het juiste gat aan de achterzijde van de Flat Screen TV. 3) Trek aan het klembandje om het vast te zetten. Indien de eenheid voor wandbevestiging wordt gebruikt: N.B.
Nederlands • Veeg stof en vuil met een poetsdoek of droge, schone doek van de behuizing. • Bevochtig een zachte doek in een oplossing van water en een neutraal reinigingsmiddel en wring de doek goed uit voor het verwijderen van hardnekkige vlekken. Veeg na met een droge doek. Gebruik geen meubelwas of andere reinigingsmiddelen daar deze de behuizing aan kunnen tasten.
Español Muchas gracias por comprar este producto Pioneer. Lea atentamente estas instrucciones de funcionamiento antes de usar su sistema de altavoces, de modo que sepa cómo obtener el máximo rendimiento. Después de haber finalizado la lectura del manual de instrucciones, guárdelo en un lugar seguro para futuras consultas.
Español INSTALACIÓN EN EL TELEVISOR DE PANTALLA PLANA Televisor de pantalla plana con el altavoz instalado Soporte para el altavoz (para parte superior derecha) Perno de fijación del altavoz (M5 x 10 mm) Perno de fijación del altavoz (M5 x 10 mm) Soporte para el altavoz (para parte superio izquierda) Perno de fijación del altavoz (M5 x 10 mm) Perno de fijación del altavoz (M5 x 10 mm) Altavoz Altavoz Soporte para el altavoz (para parte inferior derecha) Perno de fijación del altavoz (M5 x 10 mm) P
Español 2. Atornille uno de los pernos suministrados en el agujero de montaje del altavoz (el más bajo de los dos) situado en la parte superior de la cara posterior del monitor de pantalla plana. No lo apriete al máximo todavía. Déjelo algo flojo, de modo que queden unos 5 mm para atornillar. 4. Ajuste la posición del altavoz y a continuación asegure firmemente los pernos superior e inferior. 5. Apriete los dos pernos, en la parte superior e inferior de cada altavoz (un total de cuatro pernos).
Español Cómo conectar los cables de altavoz a la parte posterior del televisor de pantalla plana. Cómo conectar los cables de altavoz al altavoz. Negro Gris Gris Negro Gris Rojo Negro Rojo Rojo Negro Conecte los cables correctamente con respecto a la polaridad de los terminales de altavoz; es decir, el cable (gris) al terminal (rojo) y el cable (negro) al terminal (negro).
Español 10. Cómo reunir y enrollar los cables sobre sí mismos. Para colocar una abrazadera para cables, siga los pasos que se indican a continuación. 1) Deslice un extremo de la abrazadera por el soporte de la misma y reúna los cables de modo que éstos queden sujetos por la abrazadera. 2) Presione las palancas de la abrazadera y, sin soltarlas, introduzca el gancho en el orificio que encontrará en la parte posterior del televisor de pantalla plana. 3) Tire del extremo de la abrazadera para cerrarla.
Español • Para quitar la suciedad y el polvo utilice un paño abrillantador o un paño seco. • Si la caja del altavoz está muy sucia, límpiela con un paño humedecido con algún producto limpiador diluido con agua. Después, seque la superficie con un paño seco. No utilice ceras ni productos limpiadores para muebles, ya que dañarían la superficie de la caja del altavoz.
中文 感謝惠購先鋒產品。 在使用該揚聲器系統之前,請通讀操作手冊,以獲知 如何使本揚聲器系統發揮最佳性能。閱讀完畢後,請 將其妥善保管以備日後參考。 檢查配件 • 揚聲器連接線 x 2 注意 關於兼容性 本產品專門設計適用於先鋒平面電視。有關相容性的 詳情,請就近諮詢先鋒授權經銷商或服務中心。 關於安裝與固定 • 請勿以握住揚聲器或揚聲器固定裝置來移動平面電 視,否則可能會導致人身傷害或固定裝置損壞。若 要移動平面電視,請以握住電視頂部及其把手的方 式搬動。 • 揚聲器固定裝置 × 4 ѢαР!(TOP R) ѢίР!(BOTTOM R) ѿαР!(TOP L) ѿίР!(BOTTOM L) • 安裝揚聲器時,請勿使用附送螺絲以外的螺絲,否 則揚聲器可能會從本機脫開,甚至於掉落。 • 安裝揚聲器時,請將螺絲擰緊。 • 揚聲器固定螺絲 (M5 x 10 mm:黑色 ) × 16 • 當揚聲器受到外部的影響時,請充分注意揚聲器的 處理,以免損壞護網和音箱。 • 在揚聲器附近放置 CRT 電腦屏幕或 CRT 監視器可 能會導致干擾或色彩失真。如果出現這種情況,請 使監視器遠離揚聲器。 •
中文 平面電視配備 ϑԋ၇ඵᖑᏣޠ҂८Ⴌຝ ඵᖑᏣۢڿᖴ (M5 x 10 mm) ඵᖑᏣۢڿ၇ဋ ȞѢαРȟ ඵᖑᏣۢڿᖴ (M5 x 10 mm) ඵᖑᏣۢڿ၇ဋ ȞѿαРȟ ඵᖑᏣۢڿᖴ (M5 x 10 mm) ඵᖑᏣۢڿᖴ (M5 x 10 mm) ඵᖑᏣ ඵᖑᏣۢڿ၇ဋ ȞѢίРȟ ඵᖑᏣ ඵᖑᏣۢڿᖴ (M5 x 10 mm) ඵᖑᏣۢڿᖴ (M5 x 10 mm) ಝጤԛ* ඵᖑᏣۢڿᖴ (M5 x 10 mm) ඵᖑᏣഀ௦ጤ ඵᖑᏣۢڿ၇ဋ ȞѿίР!ȟ ඵᖑᏣۢڿᖴ (M5 x 10 mm) ಝጤԛ* *: ҂८Ⴌຝପӈ 使用桌上支架時: 備註: 安裝揚聲器前,請先安裝平面電視 KRP-TS01 系列桌上支架(或其他先鋒平面電視支架)。 1.
中文 2. 在平面電視的背面上方,將隨附的一顆 螺絲鎖入揚聲器的固定螺絲孔內(請鎖 入兩個螺絲孔其中較偏下方者)。 請勿鎖緊。 留下約 5 mm 的空間,稍後再鎖緊。 ඵᖑᏣۢڿᖴЍ 4. 調整揚聲器位置,然後鎖緊上下螺絲。 5. 鎖緊各揚聲器上下方的兩顆螺絲(共四 顆),如此便可將揚聲器固定到平面電視 上。 ҂८Ⴌຝन८ദഌ ҂८Ⴌຝദഌ 5 mm Ⴒङ 5 mm ޫޠȄ 3. 將揚聲器固定裝置的槽縫較寬的一端套 入剛鎖上的螺絲,並往下移動使其卡至 定位;且暫時鎖入下方螺絲。 將揚聲器固定裝置(上方)槽縫較寬的一端套入 螺絲後,將揚聲器往下移動使其卡至定位。 6. 將隨附的揚聲器連接線,從下方穿過揚 聲器及平面電視中間(位於揚聲器固定 裝置下方)。 7. 將揚聲器連接線接上揚聲器(請參閱次 頁)。 8. 將連接線塞入揚聲器溝槽中。 ඵᖑᏣഀ௦ጤ ᖂၷቷޠΚᆓ एႇᖴࡤȂ܂ί ಌඵᖑᏣȄ ඵᖑᏣᆓφ ༭Τྜྷ пᓎߤޠᖴȂඵᖑᏣڿ ۢ၇ဋІ҂८ႬຝȞ՞ܼۼ ഌȟ๗ӬٯኸਣᚈαȄ 9.
中文 ױඵᖑᏣഀ௦ጤ௦αඵᖑᏣȄ ༄Ք ༄Ք ඵᖑᏣഀ௦ጤ௦Վ҂८ ႬຝࡤޠРȄ ԹՔ कՔ ፝ҔጃӵྲٸඵᖑᏣᆓφٿܓ྄ޠ௦αഀ௦ ጤȂ!ഀ௦ጤȞԹՔȟᔗ௦!ژ!ᆓφ ȞकՔȟȂ!ഀ௦ጤȞ༄Քȟᔗ௦!ژᆓ φȞ༄ՔȟȄ ԹՔ ༄Ք कՔ ༄Ք ԹՔ कՔ ፝Ҕጃྲٸ҂८ႬຝඵᖑᏣᆓφܓ྄ޠ௦α ഀ௦ጤȂ! پԄ! ഀ௦ጤȞԹՔȟᔗ௦!ژ ᆓφȞकՔȟȇ ഀ௦ጤȞ༄Քȟᔗ௦ !ژᆓφȞ༄ՔȟȄ ඵᖑᏣᆓφ ඵᖑᏣᆓφ ඵᖑᏣᆓφ ඵᖑᏣഀ௦ጤ 備註: • 拉動拉柄,插入連接線。 • 當您鬆開拉柄時,拉柄會自動夾 住揚聲器連接線。 注意 • 在變更配線或擺設方法前,請務必關閉連線的裝置, 並從插座上拔除電源線。 • 若因引線外露致使 與 連接線短路,將可能造 成平面電視的嚴重負載,導致操作中斷或故障。 • 揚聲器連接線若未依正確極性插入平面電視左、右 端子時,將可能導致立體聲音訊強度不足,造成重 低音品質不佳,或音效不穩。 • 綑紮連接線時,請勿用力拉扯。 中文 • 如果您將揚聲器連接
中文 10. 綑紮連接線。 使用壁掛裝置時: 請透過下列步驟安裝紮線扣。 1) 將壓條穿過固定座,並綑紮於扎線扣的連接線。 2) 扣上扎線扣,然後將扎線扣裝至平面電視背面 的正確洞孔中。 3) 拉緊壓條以固定。 1 備註: 請先把平面電視放在軟墊之類的物品上,再進行安裝揚聲器。 1. 將揚聲器安裝到平面電視上(請參閱第 39 到 42 頁步驟 1 到 10)。 將其他連接線及電源線接至平面電視。 2.
中文 機殼維護 規格 • 使用拋光布或乾布來擦拭灰塵和污垢。 機殼................................低音反射型 所用揚聲器(兩路系統): 低音喇叭(用於低音)....... 4.8 cm x 13 cm 圓型 高音喇叭(用於高音)........... 2.5 cm 半球頂型 阻抗...................................... 6 Ω 頻率範圍..................... 55 Hz 到 30 000 Hz 靈敏度(1 m, 1 W)........................ 80 dB 容許輸入功率: 最大輸入功率............................ 18 W 額定輸入功率 ............................ 6 W 交叉頻率 ................................ 3 kHz 外形尺寸 ..... 105( 寬 ) mm x 876( 高 ) mm x 64( 深 ) mm 重量: 揚聲器(一個)......................... 1.
Pyccкий Спасибо за покупку продукта Pioneer. Пожалуйста прочтите данные инструкции по эксплуатации перед использованием вашей акустической системы, так чтобы использовать ее самым оптимальным образом. После того как вы прочли инструкции, положите их в надежное место для дальнейших справок. ПРОВЕРКА АКСЕССУАРОВ • Кабели громкоговорителей × 2 ВНИМАНИЕ Информация о совместимости Этот продукт сконструирован исключительно для использования с телевизором с Плоским Экраном Pioneer.
Pyccкий УСТАНОВКА НА ТЕЛЕВИЗОРЕ С ПЛОСКИМ ЭКРАНОМ Телевизор с Плоским Экраном с установленным громкоговорителем Держатель громкоговорителя (Для верхнего правого) Винты для установки громкоговорителей (M5 × 10 мм) Винты для установки громкоговорителей (M5 × 10 мм) Держатель громкоговорителя (Для верхнего левого) Винты для установки громкоговорителей (M5 × 10 мм) Винты для установки громкоговорителей (M5 × 10 мм) Громкоговоритель Держатель громкоговорителя (Для нижнего правого) Винты для установки гро
Pyccкий 2. Завинтите имеющийся в комплекте винт в установочное отверстие громкоговорителя (нижнее из двух) сверху, на задней части телевизора с Плоским Экраном. Пока не слишком крепко затягивайте его. Оставьте его незатянутым, приблизительно на 5 мм для затяжки. Отверстие для установки громкоговорителя 4. Настройте положение громкоговорителя и затем плотно завинтите верхние и нижние винты. 5.
Pyccкий Соединение кабелей громкоговорителя с громкоговорителем. Соединение кабелей громкоговорителей с задней частью телевизора с Плоским Экраном. Черный Серый Серый Черный Красный Красный Правильно соедините кабели, соблюдая полярность терминалов громкоговорителей, то есть кабель (Серый) к терминалам (Красный) и кабель (Черный) к терминалам (Черный).
Pyccкий 10. Связывание кабелей. Для крепления кабельного зажима выполните нижеследующие действия. 1) Проденьте ленту зажима через держатель и свяжите кабель(и) в кабельном зажиме. 2) Протолкните и удерживайте рычажки, затем вставьте крючок в соответствующее отверстие на задней части телевизора с Плоским Экраном. 3) Вытяните ленту зажима вверх для защелкивания. 1 2 При использовании настенного устройства: ВНИМАНИЕ: Сначала поставьте телевизор с Плоским Экраном на мягкую поверхность и т.д.
Pyccкий УХОД ЗА КОРПУСОМ СПЕЦИФИКАЦИИ • Используйте ткань для полировки или сухую ткань для стирания пыли и грязи. • Когда корпус очень грязный, протрите его мягкой тканью, смоченной водорастворимым очистителем, затем вновь протрите сухой тканью. Не используйте полироль для мебели или очистители. Они могут повредить поверхность корпуса. • Никогда не используйте растворители, бензин, спреи и другие химикаты на поверхности или вблизи корпусов, так как они повредят поверхность.