Operating Instructions Audio Multi-channel Receiver Subwoofer SX-LX70SW Satellite Speaker SSP-LX70ST Blu-ray Disc Player SBDP-LX08 Accessory Box AS-LX71 Blu-ray Disc Home Cinema System Downloaded from www.Manualslib.
Thank you for buying this Pioneer product. Please read through these operating instructions so you will know how to operate your model properly. After you have finished reading the instructions, put them away in a safe place for future reference.
If the AC plug of this unit does not match the AC outlet you want to use, the plug must be removed and appropriate one fitted. Replacement and mounting of an AC plug on the power supply cord of this unit should be performed only by qualified service personnel. If connected to an AC outlet, the cut-off plug can cause severe electrical shock. Make sure it is properly disposed of after removal.
Information for users on collection and disposal of old equipment and used batteries Symbol for equipment These symbols on the products, packaging, and/or accompanying documents mean that used electrical and electronic products and batteries should not be mixed with general household waste. For proper treatment, recovery and recycling of old products and used batteries, please take them to applicable collection points in accordance with your national legislation.
Contents Section One 05 Listening to your system What’s in the box . . . . . . . . . . . . . . . . . . . . . . . . . . . . . . . . . . . . . . . . . 7 Effective Sound (for optimum sound). . . . . . . . . . . . . . . . . . . . . . . . . . . . . . . . . . . . . .30 Auto listening mode . . . . . . . . . . . . . . . . . . . . . . . . . . . . . . . . . . . . . .30 Listening in surround sound . . . . . . . . . . . . . . . . . . . . . . . . . . . . . . .30 Dolby Pro Logic II Music settings . . . . . . . . . .
09 HDMI Control Making the HDMI Control connections . . . . . . . . . . . . . . . . . . . . . . 45 Setting the HDMI options . . . . . . . . . . . . . . . . . . . . . . . . . . . . . . . . . 46 Setting the HDMI Control mode . . . . . . . . . . . . . . . . . . . . . . . . . . 46 Before using synchronization . . . . . . . . . . . . . . . . . . . . . . . . . . . . . . 46 Synchronized amp mode . . . . . . . . . . . . . . . . . . . . . . . . . . . . . . . . . 47 Synchronized amp mode operations. . . . . . . . . .
What’s in the box Please confirm that the following items are all supplied.
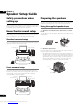
01 Chapter 1 Speaker Setup Guide Safety precautions when setting up When assembling the speakers, lay them down flat on their side to avoid accidents or injury. Make sure to use a stable surface when assembling, setting up, and placing the speakers. Home theater sound setup Depending on the size and characteristics of your room, you can place your speakers in one of two ways using this system.
When not using the supplied speaker bases Attach the non-skid pads to the base of each of the front/ center and surround speakers (as shown). Use the adhesive side of the pads to attach them to the base of each speaker. Additional notes on speaker placement 01 • Install the main front left and right speakers at an equal distance from the TV. • When using the Standard surround setup, install the surround speakers slightly above ear level for optimum effect.
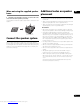
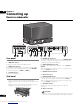
02 Chapter 2 Connecting up Receiver subwoofer OUT IN 3 HDMI IN 2 IN 1 SYST EM Rear panel Side panel HDMI OUT IN 3 IN 2 IN 1 ANTENNA L AM LOOP OUT 1 OUT 2 CONTROL IN 1 R R IN 2 R OPTICAL DIGITAL FRONT L CENTER L FRONT R L SURROUND SUBWOOFER AC IN ANALOG AUDIO IN SYSTEM 1 2 3 4 5 6 Rear panel 1 HDMI OUT terminal Connect to a television that has an HDMI terminal. 2 HDMI IN terminals (x3) Use high-quality audio/video connection with compatible HDMI devices.
Display unit 02 1 SYSTEM connector Connect to the receiver subwoofer. DISPLAY UNIT SYSTEM F.AUDIO 1 2 iPod 2 F.AUDIO input To listen to audio from an external component, connect with a stereo mini-plug cable. Once connected, the input automatically changes to Front Audio In. MCACC SETUP MIC 3 3 iPod input terminal Use to connect your Apple iPod as an audio source. 4 When you connect an iPod, the input automatically changes to iPod.
02 Basic connections Receiver subwoofer Display unit HDMI OUT IN 3 IN 2 IN 1 DISPLAY UNIT SYSTEM F.
1 Connect the display unit to the receiver subwoofer. Plug the display cable into the connector on the rear of the display unit, then plug the other end of the display cable into SYSTEM connector on the receiver subwoofer. 4 Connect each speaker. • Each speaker cable has a color-coded connector at one end and two wires at the other end. 02 Color-coded wire (Connect to speaker) Caution • Do not attempt to attach the display unit to the wall. 2 Assemble the AM loop antenna. a b c a.
02 FRONT SURROUND SURROUND BACK CENTER L L R VIDEO OUT AC IN Y R AUDIO OUT ( 2 ch ) VIDEO AUDIO OUT ( 7.1 ch ) SUB WOOFER PB HDMI OUT PR OPTICAL COMPONENT S-VIDEO VIDEO CONTROL DIGITAL IN OUT Blu-ray disc player 5 Receiver subwoofer Rear panel Side panel HDMI OUT IN 3 IN 2 IN 1 OUT 1 OUT 2 CONTROL IN 1 IN 2 OPTICAL DIGITAL SYSTEM 6 To HDMI input 7 From digital audio output (optical) TV - 5 Connect the Blu-ray disc player to the receiver subwoofer. a.
02 Note • When digital connections are used, it may be necessary to adjust the digital audio output settings on the TV. For details, consult the operating instructions for your TV. • About the different types of Blu-ray disc players: – Use the AUDIO OUT (2 ch) and AUDIO OUT (7.1 ch) terminals to connect a separately sold receiver and listen to 2-channel or 7.1-channel sound, respectively. – Use the VIDEO OUT terminals to connect to a TV not equipped with an HDMI terminal. 8 Connect the power cord.
03 Chapter 3 Controls and displays Display unit 1 2 3 Top buttons 4 5 6 7 1 STANDBY/ON Press to switch the receiver subwoofer on/into standby. 5 Front panel display See below for details. 2 INPUT SELECTOR (page 42) Press repeatedly to select one of the external audio inputs (HDMI 1 to HDMI 3, Digital 1, Digital 2, Analog, iPod or Front Audio In). 6 7 HDMI indicator (Red) Lights when this receiver subwoofer is connected to HDMI (HDCP) compatible component.
8 Digital format indicators 10 Tuner indicators 2 DIGITAL Lights during playback of a Dolby Digital source (page 30). Lights when a broadcast is being received. DTS Lights during playback of a DTS source (page 30). Lights when a stereo FM broadcast is being received in auto stereo mode. DTS 96/24 Lights during playback of a DTS 96/24 decoding (page 30). Lights when FM mono reception is selected. DSDPCM Lights during DSD (Direct Stream Digital) to PCM conversion with SACDs.
03 Remote control • For more information on using the remote control, see Operating the remote control on page 27. Operating the receiver subwoofer This section explains how to operate the remote control for the receiver subwoofer. Note that the controls change when you have chosen the input function for separate connected devices, such as an Blu-ray disc player. ON SYSTEM 1 4 OFF 2 TV INPUT HDMI 1 HDMI 2 HDMI 3 BD DVR DVD TV INPUT SELECT FM/AM 15 3 16 ADV.
9 SETUP Use to access the menu system for surround sound setup, tuner settings and so on (page 34, 37, 40, 48). Operating the built-in FM/AM tuner 10 RETURN Use to cancel settings. FM/AM 5 11 TV VOL +/– Use to adjust the volume of the TV. 12 SYSTEM VOL +/– Use to adjust the volume of the receiver subwoofer. 13 MUTE Mutes the sound or restores the sound if it has been muted (adjusting the volume also restores the sound).
03 Operating the supplied Blu-ray disc player 10 Playback controls BD 2/2 BD 1/2 9 16 1 2 3 4 5 6 Press to stop playback. 7 8 9 Press to pause playback. Press again to restart playback. 10 11 13 PAGE / PLAY MODE MENU 14 2nd 2nd AUDIO VIDEO CLEAR 17 12 HMG 15 19 0 18 VIDEO ADJ 20 ENTER 21 RESOLUTION FL VIDEO DIMMER SEL OPEN/ CLOSE 1 2 LIGHT , Press to start reverse/forward scanning (page 68).
Operating Pioneer Flat Screen TV and TVs First, refer to Setting up the remote to control your TV on page 49 for information about setting up your TV’s presets. Note that certain buttons may not work with some TVs. TELETEXT-related buttons can only be used with Pioneer Flat Screen TVs. 03 6 HOME MENU Displays the HOME MENU screen. 7 RETURN Restores the previous menu screen. 8 Color (RED/GREEN/YELLOW/BLUE) buttons Controls a BD player for HDMI Control functions only.
03 27 EXIT Press to exit the channel information 25 Teletext mode: Stops updating Teletext pages. Press again to release the hold mode. 28 Teletext mode: Selects a page. 26 Teletext mode: Switches Teletext images. (full/upper half/lower half) 29 Sets the sound multiplex mode. Operating a Pioneer HDD/DVD recorder 1 HDMI 1 HDMI 2 HDMI 3 BD DVR DVD TV INPUT SELECT FM/AM DVR 2/3 DVR 1/3 DVR 3/3 12 13 14 HDD/ DVD JUKE BOX P.
11 INFO While watching D.TV, press to display information banner. 21 TIMER ON/OFF This button cannot be used for an HDD/DVD recorder. LCD touch screen 22 Number buttons Use the number buttons for track/chapter/title selection; channel selection, and so on. 12 HDD/DVD Press to select the hard disk (HDD) or DVD for recording and playback. 13 JUKEBOX Press to display the Jukebox screen of an HDD/DVD recorder, from where you can copy music to the HDD for playback. 14 P.
03 Operating a Pioneer DVD player 1 HDMI 1 HDMI 2 HDMI 3 BD DVR DVD TV INPUT SELECT FM/AM LCD touch screen 9 10 (SUBTITLE) Press to select a subtitle display. DVD 2/2 DVD 1/2 12 9 1 2 3 4 5 6 7 8 9 CLEAR 0 ENTER PAGE / 11 13 ZOOM PLAY MODE (ANGLE) Press to change the camera angle during DVD-Video movie multi-angle scene playback. 10 Playback controls Press to start or resume playback.
Putting the batteries in the remote control 1 Open the battery compartment cover on the back of the remote control. 2 Insert four AA/LR6 alkaline batteries into the battery compartment following the indications (,) inside the compartment. Using the remote control 03 Please keep in mind the following when using the remote control: • Make sure that there are no obstacles between the remote and the remote sensor on the unit.
04 Chapter 4 Before you start Switching on Using the Auto MCACC setup for optimal surround sound When the remote control’s SYSTEM ON button is pressed, the power of both the receiver subwoofer and Blu-ray disc player turns on.
3 If the receiver subwoofer is off, press SYSTEM ON to turn the power on. ON SYSTEM OFF TV INPUT HDMI 1 HDMI 2 HDMI 3 BD DVR DVD TV 4 Press SYSTEM CONTROL to set the remote control to receiver control mode. SYSTEM GUIDE INFO TV MUTE VOL VOL 04 This manual is split into two parts, one covering using the receiver subwoofer, the other using the Blu-ray disc player. Below are some common operations and where to find them explained in this manual.
04 Operating the Blu-ray disc player Press BD (HDMI 1) to display the BD screen. The BD screen is shown on the remote control’s LCD screen, and the remote is switched to Blu-ray disc player control mode. ON SYSTEM OFF Using the LCD touch screen Depending on the type of connected component you are operating (such as a Blu-ray disc player), there may be multiple pages of information for the LCD touch screen.
6 Press (play) (LCD page 1) to start playback. To pause, press (pause) during playback. Listening to the radio 04 To stop, press (stop) during playback. 1 BD 1/2 Switches on the system. ON 2 INPUT HDMI 1 HDMI 2 HDMI 3 BD DVR DVD HDMI 1 HDMI 2 HDMI 3 BD DVR DVD TV INPUT SELECT FM/AM FM/AM SYSTEM SYSTEM INFO 1 SURR TV MUTE VOL VOL ADV. SURR 2 F.S.
05 Chapter 5 Listening to your system The Effective sound mode can be turned off (activating Direct mode) by doing the following: Important • Press SYSTEM CONTROL to set the remote control to receiver control mode in order to operate the receiver subwoofer (make sure that the LCD displays the SYSTEM screen, as shown below). SYSTEM GUIDE Press DIRECT to switch to Direct Sound.
• Neo:6 Music – 6.1 channel sound, especially suited to music sources; see Center image setting below. • Stereo – See Listening in stereo on page 32. With multichannel sources, you can select (according to format): • Auto – Auto listening mode (see page 30). • StandardDecode – Listening in Dolby Digital or DTS surround decoding. Plays back multichannel sources like Dolby Digital, DTS, and multichannel PCM with the most standard decoder.
05 Genre Sync Mode Note • You cannot use this function for the following audio streams: – Dolby TrueHD: over 88.2 kHz – DTS-HD: over 88.
Listening with MCACC Effect Adjusting the bass and treble Listen to sound using the corrected acoustic field settings obtained by MCACC. Use the bass and treble controls to adjust the overall tone. 1 1 05 Press SOUND to open the sound menu. Press SOUND to open the sound menu. LINE LINE TEST SOUND MCACC TONE TEST SOUND MCACC TONE SLEEP SLEEP EXIT EXIT 2 Select ‘MCACC Effect’. Use / to select, then press ENTER. 3 Select ‘MCACC On’ or ‘MCACC Off’. Use / to select, then press ENTER to confirm.
06 Chapter 6 Listening to the radio Improving poor FM reception Important • To listen to the radio, press the FM/AM button to set the remote control to FM/AM control mode. The LCD screen on the remote control changes to the FM/AM screen. If you’re listening to an FM station in stereo but the reception is weak, you can improve the sound quality by switching to mono. 1 HDMI 1 HDMI 2 HDMI 3 BD DVR DVD TV INPUT SELECT FM/AM Press SETUP after tuning to an FM radio station.
Changing the noise cut mode If you find that the AM sound quality is bad even after trying the above, you may be able to improve it using a different noise cut mode. Just choose the one that sounds best. 1 Press SETUP after tuning to an AM radio station. HOME MENU RETURN SETUP Using RDS 06 Radio Data System (RDS) is a system used by most FM radio stations to provide listeners with various kinds of information — the name of the station and the kind of show they’re broadcasting, for example.
06 Note • If any noise is picked up while displaying the RT scroll, some characters may be displayed incorrectly. • If you see No Radio Text Data in the RT display, it means no RT data is sent from the broadcast station. The display will automatically switch to the PS data display (if no PS data, the frequency is displayed). • In the PTY display, No Data or No Type may be shown. In this case, the PS display is shown after a few seconds.
Chapter 7 07 Surround sound settings 2 Select ‘Sound Setup’. Use / to select, then press ENTER. Important • Press SYSTEM CONTROL to set the remote control to receiver control mode in order to operate the receiver subwoofer (make sure that the LCD displays the SYSTEM screen, as shown below). SYSTEM GUIDE TOP MENU TOOLS MENU DISC NAVIGATOR HOME MENU INFO RETURN SETUP TV VOL VOL MUTE SYSTEM CONTROL 4 Use / to select a channel, or use / to adjust the level of that channel. SYSTEM SURR ADV.
07 4 Use / to select a speaker, or use / to adjust the distance. Each speaker can be adjusted from 0.1 m to 9.0 m. 5 Press ENTER when you’re finished. • If you use the Auto MCACC feature again, it will overwrite the settings you have made here. Dual mono setting Specifies how dual mono encoded Dolby Digital soundtracks should be played. You can also use this setting to switch the audio channel on DVD-RW discs recorded with bilingual audio.
LFE Attenuate 07 Some Dolby Digital and DTS audio sources include ultra-low bass tones. Set the LFE attenuator as necessary to prevent the ultra-low bass tones from distorting the sound from the speakers. The LFE is not limited when set to 0dB, which is the recommended value. When set to -5dB, -10dB, -15dB or -20dB, the LFE is limited by the respective degree. When Off is selected, no sound is output from the LFE channel. 1 Press SETUP. 2 Select ‘Sound Setup’. Use / to select, then press ENTER.
08 Chapter 8 Other connections Important • When making or changing connections on the side panel of this unit, be sure to switch power off and disconnect the power cord from the wall socket. After completing all connections, connect the power cord to the wall socket. • Press SYSTEM CONTROL to set the remote control to receiver control mode in order to operate the receiver subwoofer (make sure that the LCD displays the SYSTEM screen, as shown below).
Connecting auxiliary components You can connect both analog and digital external audio sources to this system. Digital audio sources include digital satellite receivers, CD recorders, etc. Connecting an analog audio component 08 You can use the ANALOG AUDIO IN jacks to connect an analog audio component, such as a tape player. Receiver subwoofer We recommend using an HDMI cable to connect sources that have HDMI terminals. For more information see Connecting using HDMI on page 43.
08 Connecting external antennas Connecting an iPod You can use the iPod jack on the display unit to playback music from an iPod. All operations can be carried out via the iPod. Use the supplied iPod cable to connect an iPod to this unit. • When you connect an iPod, this unit’s input automatically switches to iPod. For an external AM antenna, use 5 to 6 meters of vinyl-insulated wire and set up either indoors or outdoors. Leave the loop antenna connected.
Connecting using HDMI • Set the HDMI Mode in HDMI mode setting below to Through Mode if you want to hear HDMI audio output from your TV or Flat Screen TV (no sound will be heard from this receiver). If you have an HDMI or DVI (with HDCP) equipped component, you can connect it to this receiver using a commercially available HDMI cable. • If the video signal does not appear on your TV or Flat Screen TV, try adjusting the resolution settings on your component or display.
08 Setting the Auto Delay This feature automatically corrects the audio-to-video delay between components connected with an HDMI cable. The audio delay time is set depending on the operational status of the display connected with an HDMI cable. The audio delay time is automatically adjusted according to the video delay time. 1 Press SETUP. HOME MENU RETURN SETUP 2 Select ‘HDMI Setup’. Use / to select, then press ENTER. 3 Select ‘Auto Delay’. Use / to select, then press ENTER. 4 Select ‘A.
Chapter 9 09 HDMI Control Important • The KURO LINK function name used on the web and in catalogues is referred to as HDMI Control in the operating instructions and on the product. • Press SYSTEM CONTROL to set the remote control to receiver control mode in order to operate the receiver subwoofer (make sure that the LCD displays the SYSTEM screen, as shown below).
09 • Connect the Flat Screen TV directly to this unit. Interrupting a direct connection with other amps or an AV converter (such as an HDMI switch) can cause operational errors. Setting the HDMI options You must adjust the settings of this unit as well as HDMI Controlcompatible connected components in order to make use of the HDMI Control function. For more information see the operating instructions for each component.
Synchronized amp mode 09 Synchronized amp mode begins once you carry out an operation for the Flat Screen TV. For more information, see the operating instructions of your Flat Screen TV. Synchronized amp mode operations By connecting a component to this unit with an HDMI cable you can use synchronized amp mode, which allows you to synchronize the following operations: • Displays on the Flat Screen TV when you mute or adjust the volume of this unit.
10 Chapter 10 Additional information Setting the sleep timer Important • Press SYSTEM CONTROL to set the remote control to receiver control mode in order to operate the receiver subwoofer (make sure that the LCD displays the SYSTEM screen, as shown below). SYSTEM GUIDE The sleep timer switches off the receiver subwoofer after a specified time so you can fall asleep without worrying about it. Press SLEEP to select an option.
Setting up the remote to control TV Preset code list your TV Please note that there are cases where only certain functions may You can use the supplied remote to control your TV. To be able to use this feature you first have to program the remote with a maker code from the table on the following page. 1 Set the input to TV. ON SYSTEM OFF TV 2 INPUT HDMI 1 HDMI 2 HDMI 3 BD DVR DVD TV INPUT SELECT FM/AM Press and hold the TV button and press SETUP.
10 Resetting the system Surround sound formats Use this procedure to reset all system settings to the factory default. Below is a brief description of the main surround sound formats you’ll find on DVDs, satellite, cable and terrestrial broadcasts, and video cassettes. 1 Press STANDBY/ON to switch the system on. 2 Press and hold INPUT SELECTOR then press STANDBY/ON on the display unit. The next time you switch on, all the system settings should be reset.
Mbps on Blu-ray Disc, and it outputs Dolby Digital bitstreams for playback on existing Dolby Digital systems. Dolby Digital Plus can accurately reproduce the sound originally intended by directors and producers. It also features multi-channel sound with discrete channel output, interactive mixing and streaming capability in advanced systems. Supported by High-Definition Media Interface (HDMI), a single-cable digital connection is possible for high-definition audio and video.
10 Troubleshooting Incorrect operations are often mistaken for trouble and malfunctions. If you think that there is something wrong with this component, check the points below. Sometimes the trouble may lie in another component. Investigate the other components and electrical appliances being used. If the trouble cannot be rectified even after exercising the checks listed below, ask your nearest Pioneer authorized service center or your dealer to carry out repair work.
Tuner 10 Problem Remedy Considerable noise in radio broadcasts. • Connect the AM antenna (refer to Connecting up on page 10) and adjust the direction and position for best reception. You may also connect an additional internal or external AM antenna (refer to Connecting external antennas on page 42). • Fully extend the FM wire antenna, position for best reception, and secure to a wall. You may also connect an outdoor FM antenna (see Connecting external antennas on page 42).
10 Message Description HDMI C.ERR 1** Check if the HDMI cable is properly connected. If the cable is properly connected, this unit may be damaged. In such an event, please contact a Pioneer-authorized service center or your nearest dealer. Noisy! Background noise is too high to complete MCACC setup successfully. Error MIC! An error occurred during MCACC setup because the microphone is not connected or is not connected properly.
Satellite Speaker 10 (Front/center speakers x2, Surround speakers x2) Model SSP-LX70ST Front/center speakers Enclosure Closed-box bookshelf type (magnetically shielded) System 5.2 cm 1-way system Speakers Nominal impedance 5.2 cm cone type x3 Front channel 8Ω Center channel 8Ω Frequency range Maximum input power 200 Hz to 20 kHz Front channel 50 W Center channel 50 W Surround speakers Dimensions 122.5 mm (W) x 89.5 mm (H) x 104 mm (D) Weight 0.
Section Two Blu-ray Disc Player SBDP-LX08 Downloaded from www.Manualslib.
Contents Section Two 01 Before you start Types of discs/files that can be played. . . . . . . . . . . . . . . . . . . . . . . 58 Playable discs . . . . . . . . . . . . . . . . . . . . . . . . . . . . . . . . . . . . . . . . . 58 Playable files . . . . . . . . . . . . . . . . . . . . . . . . . . . . . . . . . . . . . . . . . . 60 02 Getting Started Making settings using the Setup Navigator menu . . . . . . . . . . . . . 62 Using the TOOLS menu. . . . . . . . . . . . . . . . . . . . . . . . . . . . . . . .
01 Chapter 1 Before you start Types of discs/files that can be played Playable discs Discs with the logo marks below indicated on the disc label, package or jacket can be played.
Discs that cannot be played 01 • HD DVDs • DVD Audio discs • DVD-RAM discs • Non-finalized DVD-R/DVD-RW/DVD+R/DVD+RW discs in the DVD-Video format and AVCHD format • Non-finalized Dual Layer DVD-R discs in the DVD VR format • SACDs • Video CDs Playing BDs • SVCDs “Blu-ray Disc” and Manufactured under license under U.S. Patent #: 5,451,942; 5,956,674; 5,974,380; 5,978,762; 6,487,535 & other U.S. and worldwide patents issued & pending.
01 • Dual Layer DVDs can be played. However, non-finalized Dual Layer DVD-R discs recorded in the VR format cannot be played (finalize them before playing them on this player). • HD DVD, DVD Audio and DVD-RAM discs cannot be played. About region numbers Playable files Movie and music files recorded on DVDs and CDs can be played. Caution Blu-ray Disc Player and BD-ROM or DVD-Video discs are assigned region numbers according to the region in which they are sold.
Supported music file formats • Windows Media™ Audio 9 (WMA9) Bit rate: Up to 192 kbps Sampling frequencies: 22.05 kHz, 32 kHz, 44.1 kHz and 48 kHz 01 Windows Media is either a registered trademark or trademark of Microsoft Corporation in the United States and/or other countries. This product includes technology owned by Microsoft Corporation and cannot be used or distributed without a license from Microsoft Licensing, Inc.
02 Chapter 2 Getting Started Setup Navigator BD PLAYER Please select the on-screen display language. Important • Press BD (HDMI 1) to set the remote control to BD control mode in order to operate the Blu-ray disc player. HDMI 1 HDMI 2 HDMI 3 BD DVR DVD TV INPUT SELECT FM/AM Audio, subtitle and BDMV/DVD-Video menu language will also be set. BD 1/2 • The BD settings are listed on two separate pages. To cycle between pages, use the PAGE button.
7 Select the aspect ratio of your TV. Use / to select, then press ENTER. Caution • When HDMI is selected for Video, no video signals are output from the COMPONENT VIDEO, S-VIDEO or VIDEO output terminals. 02 Setup Navigator BD PLAYER Select the screen aspect ratio to match your TV. • When Component Video or S-Video/Video is selected for Video, no video signals are output from the HDMI OUT terminal.
02 10 Finish the Setup Navigator menu. Use / to select Finish, then press ENTER. 2 Select and set the item. Use / to select, then press ENTER. TOP MENU Setup Navigator BD PLAYER Setup is complete! DISC NAVIGATOR HOME MENU TOOLS MENU RETURN SETUP Go Back Finish Note The setup menu comes back in 30 seconds. • Items that cannot be changed are displayed in gray. The items that can be selected depend on the player’s status. To redo the settings from the start, select Go Back.
Erasing the additional data from BD-ROMs Switching the video output terminal When a BD-ROM is played, additional data may be stored in the player’s memory (local storage). Use the procedure below to switch the video output terminal. Switch between the digital output (HDMI output) and the analog output (Component Video output, S-Video output or Video output). If the message indicating low memory (local storage) appears, erase the BDMV data.
02 The output video resolution can be switched by selecting Output Video Resolution from the TOOLS menu. The output video resolution depends on the video output terminal. See the table below. The table below shows the output video resolution for the different terminals when the frame/field frequency of the playback source is 50 Hz on the upper line, the resolutions when the source's frame/ field frequency is 60 Hz on the lower line.
Chapter 3 03 Playback 3 Important Press (play) to play the disc. BD 1/2 • Press BD (HDMI 1) to set the remote control to BD control mode in order to operate the Blu-ray disc player. HDMI 1 HDMI 2 HDMI 3 BD DVR DVD TV INPUT SELECT FM/AM To pause, press (pause) during playback. BD 1/2 To stop, press (stop) during playback. • The BD settings are listed on two separate pages. To cycle between pages, use the PAGE button.
03 Forward and reverse scanning BD DVD AVCHD CD Skipping content Movie files Music files BD DVD AVCHD CD During playback, press or (LCD page 1). Movie files Music files Press or (LCD page 1). BD 1/2 BD 1/2 • When is pressed, the disc skips ahead to the beginning of the next title/chapter/track/file. • The scanning speed switches each time the button is pressed. The speed steps depend on the disc or file (the speed is displayed on the TV screen).
Step forward and step reverse BD DVD AVCHD CD • Angle mark is displayed for scenes at which multiple angles are recorded. Movie files Music files 03 Note • For some discs, the angle can also be switched on the menu screen. While playback is paused, press / or /. • Angle mark is not displayed if Angle/Secondary Indicator is set to Off (page 84).
03 Switching the audio streams/channels Switching the secondary video For discs or files on which multiple audio streams/channels are recorded, audio streams/channels can be switched during playback. Also use this procedure to switch the secondary audio for BD-ROMs on which secondary audio is recorded. Use the procedure below to switch the secondary video (Picture-inPicture) recorded on the BD-ROM.
Using the Play Mode functions 03 Note • To play from 45 minutes, input 0, 0, 4, 5, 0 and 0, then press ENTER. Playing from a specific time (Time Search) 1 During playback, press PLAY MODE (LCD page 2) to display the Play Mode screen. BD 2/2 • To play from 1 hour 20 minutes, input 0, 1, 2, 0, 0 and 0, then press ENTER. • Press CLEAR to clear the values you have input. 4 Starting playback from the specified time. Use / to select Search, then press ENTER.
03 3 Input the number. Use the number buttons (0 to 9) or / to input the number. Use / to move the cursor. BD 2/2 1 2 3 4 5 6 7 8 9 CLEAR 0 ENTER Playing a specific section within a title or track repeatedly (A-B Repeat) Use this procedure to play a specific section within a title or track repeatedly. TOP MENU TOOLS MENU DISC NAVIGATOR HOME MENU 1 During playback, press PLAY MODE to display the Play Mode screen.
Playing repeatedly (Repeat Play) Playing in random order (Random Play) Use this procedure to play the currently playing disc, title, chapter, track or file repeatedly. Use this procedure to play the tracks or files in random order. 1 During playback, press PLAY MODE to display the Play Mode screen. 03 1 During playback, press PLAY MODE to display the Play Mode screen.
03 About Play Mode types The functions that can be used differ according to the type of disc and file. In some cases, some of the functions cannot be used. Check the usable functions on the table below. Disc/file type Play Mode type Repeat play Random Search play 1. 2. 3. 4. 5. 6.
Playing from the Home Media Gallery 3 Select the title or track to be played. Use / to select, then press ENTER. BD-R BDAV My Favorite TV Program 1 Morning serial drama 2 News at noon 3 Evening movie 4 Midnight variety show 5 Playback protection 6 World heritage 7 Drama: Blank time 8 Music and us 10 items Title Total : 0 h 54 m 30 s Recording Date : 11/11/2008 Original The Home Media Gallery lets you display a list of the titles, tracks or files recorded on the disc.
03 3 Select Movies. Use / to select Movies, then press ENTER. Note • It may take a few seconds before playback starts. This is normal. DVD-RW • It may not be possible to play some files properly. • The number of views may be restricted (page 60). Movies Music Playing music files 1 Press HMG to display the Home Media Gallery. View available movies. BD 1/2 4 Select Folders or All Movies. Use / to select, then press ENTER. • Folders – The files in the selected folder are displayed.
4 Select Folders or All Songs. Use / to select, then press ENTER. • Folders – The files in the selected folder are displayed. Playing in the desired order (HMG Playlist) 03 • All Songs – All the recorded files are displayed. The discs that can add tracks and files to the HMG (Home Media Gallery) Playlist are as shown below.
03 4 Press TOOLS to display the TOOLS menu. DISPLAY LIGHT 2 Select HMG Playlist. Use / to select, then press ENTER. PAGE TOP MENU Home Media Gallery BD PLAYER TOOLS MENU DISC NAVIGATOR CD-ROM HMG Playlist 5 Select Add to HMG Playlist. Use / to select, then press ENTER. Folders CD-ROM/Music Music001.mp3 Music002.mp3 Music003.mp3 Music004.mp3 Music005.mp3 Music006.mp3 BD PLAYER TOOLS Music007.mp3Play from Beginning Music008.
Chapter 4 04 Adjusting audio and video Important • Press BD (HDMI 1) to set the remote control to BD control mode in order to operate the Blu-ray disc player. HDMI 1 HDMI 2 HDMI 3 BD DVR DVD TV INPUT SELECT FM/AM • Professional – With this setting, video signal processing is restrained. Select this when connected to a professional monitor. • Memory1 to 3 – Picture quality settings with adjusted parameters can be stored in the memory.
04 3 Adjust the setting. Use / to switch between Off, Low, Medium, High and Auto. Note • Prog.Motion and Pure Cinema have the effect only for pictures recorded in the interlaced scan format (576i/480i or 1080i signals). TOP MENU TOOLS MENU DISC NAVIGATOR • Prog.Motion is disabled when Pure Cinema is set to On. • Black Setup have the effect only for pictures output from the VIDEO and S-VIDEO output terminals, and for NTSC signals output.
Chapter 5 05 Advanced settings 3 Select the item and change the setting. Use /// to select, then press ENTER. Important • Press BD (HDMI 1) to set the remote control to BD control mode in order to operate the Blu-ray disc player. TOP MENU DISC NAVIGATOR HDMI 1 HDMI 2 HDMI 3 BD DVR DVD TV INPUT SELECT FM/AM HOME MENU TOOLS MENU RETURN SETUP BD 1/2 Closing the Initial Setup screen Press HOME MENU. • The BD settings are listed on two separate pages.
05 Note • Items that cannot be changed are indicated in gray. The items that can be selected depend on the player’s status. • In Options, the factory default settings are indicated in bold. Video Out Setting Options Explanation TV Aspect Ratio 16:9 (Widescreen) Select this when connected to a wide (16:9) TV. 4:3 Video Out DVD 16:9 Video Out NTSC on PAL TV 4:3 (Standard) Select this when connected to a conventional TV. Full 4:3 pictures are displayed over the entire screen.
HDMI Setting Options Explanation HDMI High-Speed Transmission On Select this when connected with a High Speed HDMI™ cable (page 91). Off Select this when connected with a Standard HDMI™ cable (page 91). 05 The player’s setting screen is closed if the output video resolution is switched by changing the HDMI High-Speed Transmission setting. When HDMI High-Speed Transmission is set to On, use the supplied HDMI cable.
05 Options Setting Options Output Terminal Priority Select the terminals for outputting video and audio signals with priority. For details, see Changing the terminals for outputting video and audio signals (Output Terminal Priority) on page 89. On Screen Display On Select this to display the operation indicators (Play, Stop, etc.) on the TV screen. Off Select this if you do not want to display the operation indicators (Play, Stop, etc.) on the TV screen.
Closing the speaker settings screen Changing the speaker setup Press ENTER. Set whether or not to use the speakers which are connected to the AV receiver or amplifier, as well as the size of the speakers. This setting is only valid for analog audio outputs. Note • Normally there is no need to perform this setting on this system. • Select Initial Setup from the HOME MENU, then press ENTER. 1 Select and set Speakers. Use / to select, then press ENTER.
05 • Auto – Switch the speaker to be adjusted automatically. • Manual – Switch the speaker to be adjusted manually. 3 Input the password. Use the number buttons (0 to 9) (LCD page 2) or / to input the number, then press ENTER to set. Use / to move the cursor. Caution • Test tones are output. Lower the volume of the device connected to the player. • The volume of the test tones output from the subwoofer may seem lower than the tones output from the other channels. 4 Adjust the output level.
Changing the Age Restriction for watching BD-ROMs 4 Change the age. Use the number buttons (0 to 9) (LCD page 2) or / to input the number, then press ENTER to set. 05 Use / to move the cursor. For BD-ROMs containing scenes of violence, for example, watching can be restricted by setting an age restriction for the BD-ROMs. BD DVD AVCHD CD Movie files Music files Video Out Audio Out Speakers HDMI Language Parental Lock Options Setup Navigator 1 Select and set Parental Lock.
05 3 Input the password. Use the number buttons (0 to 9) (LCD page 2) or / to input the number, then press ENTER to set. Use / to move the cursor. BD DVD AVCHD CD BD 2/2 1 2 3 4 5 6 7 CLEAR 8 0 TOP MENU DISC NAVIGATOR 9 ENTER Changing the Country/Area code HOME MENU TOOLS MENU RETURN Movie files Music files Note • Refer to Country/Area Code Table on page 100. 1 Select and set Parental Lock. Use / to select, then press ENTER.
4 Change the country/area code. Use / to change, then press ENTER to set. When an analog output is selected for the video output terminal, Component Video or S-Video/Video can be selected for Video. Initial Setup BD PLAYER Video Out Audio Out Speakers HDMI Language Parental Lock Options Setup Navigator TOP MENU Country Code Code HOME MENU RETURN SETUP Number Initial Setup BD PLAYER Video Out Audio Out Speakers HDMI Language Parental Lock Options Setup Navigator Use / to select Number.
05 About the audio output settings The audio signals that are output differ according to the audio format recorded on the disc and the player’s settings. Check on the table below. AUDIO OUT terminal Audio format 2ch2 BD-ROM Dolby Digital 5.1-channel audio Converted to 2-channel audio Linear PCM Dolby Digital MPEG-2 AAC Converted to 2-channel audio 5.1-channel audio MPEG Dolby Digital DTS Digital Surround Converted to 2-channel audio 5.
Chapter 6 06 Other player connections Connecting a TV Be sure to turn off the power and unplug the power cord from the power outlet whenever making or changing connections. Note • Make the settings in the Setup Navigator menu according to the type of cable connected (page 62). Connecting using the HDMI cable The audio and video signals can be transferred to HDMI-compatible devices as digital signals with no loss of sound or video quality.
06 • No audio signals are output. Connect using an audio cable (included), etc. • This player is designed for connection with HDMI-compatible devices. When connected to a DVI device, it may not operate properly depending on the DVI device. About HDMI Control function • When the player is connected to a Pioneer Flat Screen TV or this receiver subwoofer, supporting the HDMI Control function, it can be operated from the Flat Screen TV or this receiver subwoofer.
Connecting to a TV with no HDMI input 06 TV To component video input terminals To audio input terminals Component cable or three video cables (commercially available) can also be used for connection. An S-Video cable (commercially available) can also be used for connection.
06 Connecting the other audio component Player’s rear panel FRONT SURROUND SURROUND BACK CENTER L L R VIDEO OUT AC IN Y R AUDIO OUT ( 2 ch ) VIDEO AUDIO OUT ( 7.1 ch ) SUB WOOFER HDMI OUT PB PR OPTICAL CONTROL DIGITAL IN OUT Connect to the other audio component in order to enjoy the surround sound of Dolby TrueHD, Dolby Digital Plus, Dolby Digital, DTS-HD Master Audio, DTS-HD High Resolution Audio or DTS Digital Surround.
Chapter 7 07 Additional information Troubleshooting Incorrect operation is often mistaken for trouble or malfunction. If you think that there is something wrong with this component, check the points below. Sometimes the trouble may lie in another component. Inspect the other components and electrical appliances being used. If the trouble cannot be rectified even after checking the points below, ask your nearest Pioneer authorized service center or your dealer to carry out repair work.
07 Problem Check Remedy Picture is stretched. Aspect ratio cannot be switched. Is the TV’s aspect ratio properly set? Read the TV’s operating instructions and set the TV’s aspect ratio properly. Is 4:3 Video Out properly set? • Set 4:3 Video Out properly (page 82).
Problem Check Digital audio signals are not output from the DIGITAL OUT (OPTICAL) terminals (analog audio signals are output). Is Audio Out set to audio formats supported by the connected • Read the operating instructions of the connected AV receiver AV receiver or amplifier? or amplifier and check the supported audio formats. • Set Audio Out properly (page 82). Noise can be heard when outputting DTS Digital Surround signals.
07 When connected using an HDMI cable Problem Check Remedy HDMI indicator does not light. Is the input of the connected HDMI device properly set? Read the HDMI device’s operating instructions and set the input properly. Is a DVI device connected? Read the DVI device’s operating instructions and check whether it is compatible with HDCP. Is the HDMI indicator lit? • If the HDMI indicator is not lit, read the HDMI device’s operating instructions and switch to the proper input.
Others 07 Problem Check Remedy The power turns off automatically. Is Auto Power Off set to On? If Auto Power Off is set to On, the power turns off automatically if no operation is performed for over 30 minutes (page 84). Is HDMI Control set to On? The player’s power may turn off together with the power of the connected TV. If you do not want the player’s power to turn off when the TV’s power is turned off, set HDMI Control to Off (page 83). The power turns on automatically.
07 Language Code Table and Country/Area Code Table Language Code Table Language name (language code), input code Japanese (ja/jpn), 1001 Dzongkha (dz/dzo), 0426 English (en/eng), 0514 Esperanto (eo/epo), 0515 French (fr/fra), 0618 Estonian (et/est), 0520 German (de/deu), 0405 Basque (eu/eus), 0521 Italian (it/ita), 0920 Persian (fa/fas), 0601 Spanish (es/spa), 0519 Finnish (fi/fin), 0609 Chinese (zh/zho), 2608 Fijian (fj/fij), 0610 Dutch (nl/nld), 1412 Faroese (fo/fao), 0615 Portuguese (pt/por), 1620 Frisi
Specifications 07 Model SBDP-LX08 Type Blu-ray Disc PLAYER Rated voltage AC 220 V to 240 V Rated frequency 50 Hz/60 Hz Power consumption 36 W Power consumption (standby) 0.5 W Weight 6.5 kg External dimensions (including projecting parts) 420 mm (W) x 80 mm (H) x 356 mm (D) Tolerable operating temperature +5 °C to +35 °C Tolerable operating humidity 5 % to 85 % (no condensation) Output terminals Video 1 set, RCA jack (1.0 Vp-p (75 Ω)) S-Video 1 set, S-Video jack: Y (luminance): 1.
07 Cautions on use Moving the player If you need to move this unit, first remove the disc if there’s one loaded, and close the disc tray. Next, press STANDBY/ON to switch the power to standby, checking that the POWER OFF indication on the front panel display goes off. Wait at least 10 seconds. Lastly, disconnect the power cord. Never lift or move the unit during playback — discs rotate at a high speed and may be damaged.
Handling discs Glossary 07 Do not use damaged (cracked or warped) discs. Do not scratch the disc’s signal surface or let it get dirty. Aspect ratio Do not load more than one disc into the player at a time. The ratio of a TV screen’s width to its height. Conventional TVs have an aspect ratio of 4:3, while high definition (HD) and widescreen TVs have an aspect ratio of 16:9. Do not glue paper or put stickers onto the disc, or use a pencil, ballpoint pen or other sharp-tipped writing instrument.
07 Deep Color This is one of the capabilities of HDMI™. The players supporting Deep Color can transmit a video signal with a color bit depth of greater than 8 bits per color component. Subtle color gradations can be reproduced when connected to a TV that supports Deep Color. DivX DivX is a media technology developed by DivX, Inc. DivX media files include moving picture data. Dolby Digital Dolby Digital is an audio format to record the sound in up to 5.
Region number A number assigned to Blu-ray Disc Players, BD-ROM and DVDVideo discs according to the region in which they are sold. A disc can be played if the region numbers indicated on the disc include the number set for the player or if “ALL” is indicated. 07 S-Video output An output terminal for transmitting separate luminance (Y) and color (C) signals over a single cord. It offers clearer pictures than the composite video output.
07 Licenses The licenses for the software used on this player are shown below.
Introduction The FreeType Project is distributed in several archive packages; some of them may contain, in addition to the FreeType font engine, various tools and contributions which rely on, or relate to, the FreeType Project. This license applies to all files found in such packages, and which do not fall under their own explicit license. The license affects thus the FreeType font engine, the test programs, documentation and makefiles, at the very least.
07 libpng versions 0.89, June 1996, through 0.96, May 1997, are Copyright © 1996, 1997 Andreas Dilger Distributed according to the same disclaimer and license as libpng0.88, with the following individuals added to the list of Contributing Authors: John Bowler Kevin Bracey Sam Bushell Magnus Holmgren Greg Roelofs Tom Tanner libpng versions 0.5, May 1995, through 0.88, January 1996, are Copyright © 1995, 1996 Guy Eric Schalnat, Group 42, Inc.
In order to support file conversion and viewing software, we have included considerable functionality beyond the bare JPEG coding/decoding capability; for example, the color quantization modules are not strictly part of JPEG decoding, but they are essential for output to colormapped file formats or colormapped displays. These extra functions can be compiled out of the library if not required for a particular application.
07 The TIFF 6.0 file format specification can be obtained by FTP from ftp://ftp.sgi.com/graphics/tiff/TIFF6.ps.gz. The JPEG incorporation scheme found in the TIFF 6.0 spec of 3-June-92 has a number of serious problems. IJG does not recommend use of the TIFF 6.0 design (TIFF Compression tag 6). Instead, we recommend the JPEG design proposed by TIFF Technical Note #2 (Compression tag 7). Copies of this Note can be obtained from ftp.sgi.com or from ftp://ftp.uu.net/graphics/jpeg/.
The precise terms and conditions for copying, distribution and modification follow. TERMS AND CONDITIONS FOR COPYING, DISTRIBUTION AND MODIFICATION 0. This License applies to any program or other work which contains a notice placed by the copyright holder saying it may be distributed under the terms of this General Public License.
07 11. BECAUSE THE PROGRAM IS LICENSED FREE OF CHARGE, THERE IS NO WARRANTY FOR THE PROGRAM, TO THE EXTENT PERMITTED BY APPLICABLE LAW. EXCEPT WHEN OTHERWISE STATED IN WRITING THE COPYRIGHT HOLDERS AND/OR OTHER PARTIES PROVIDE THE PROGRAM "AS IS" WITHOUT WARRANTY OF ANY KIND, EITHER EXPRESSED OR IMPLIED, INCLUDING, BUT NOT LIMITED TO, THE IMPLIED WARRANTIES OF MERCHANTABILITY AND FITNESS FOR A PARTICULAR PURPOSE. THE ENTIRE RISK AS TO THE QUALITY AND PERFORMANCE OF THE PROGRAM IS WITH YOU.
In other cases, permission to use a particular library in non-free programs enables a greater number of people to use a large body of free software. For example, permission to use the GNU C Library in non-free programs enables many more people to use the whole GNU operating system, as well as its variant, the GNU Linux operating system.
07 114 En d) If distribution of the work is made by offering access to copy from a designated place, offer equivalent access to copy the above specified materials from the same place. e) Verify that the user has already received a copy of these materials or that you have already sent this user a copy. For an executable, the required form of the "work that uses the Library" must include any data and utility programs needed for reproducing the executable from it.
[Notice on GNU General Public License] This product include the software licensed for use under the terms of a GNU General Public License. A copy of the corresponding source code can be obtained by being charged the fee for distribution. To obtain a copy, contact your local Pioneer Customer Support Center. See the GNU website (http://www.gnu.org) for details of the GNU General Public License. 07 115 En Downloaded from www.Manualslib.
Discover the benefits of registering your product online at http://www.pioneer.co.uk (or http://www.pioneer.eu) PIONEER CORPORATION 4-1, Meguro 1-Chome, Meguro-ku, Tokyo 153-8654, Japan PIONEER ELECTRONICS (USA) INC. P.O. BOX 1540, Long Beach, California 90801-1540, U.S.A. TEL: (800) 421-1404 PIONEER ELECTRONICS OF CANADA, INC. 300 Allstate Parkway, Markham, Ontario L3R 0P2, Canada TEL: 1-877-283-5901, 905-479-4411 PIONEER EUROPE NV Haven 1087, Keetberglaan 1, B-9120 Melsele, Belgium TEL: 03/570.05.