MINIDISC RECORDER ENREGISTREUR DE MINIDISC MINIDISC-RECORDER LETTORE DI MINIDISC MJ-L77 Operating Instructions Mode d’emploi Bedienungsanleitung Istruzioni per l’uso
IMPORTANT 1 CAUTION RISK OF ELECTRIC SHOCK DO NOT OPEN The lightning flash with arrowhead symbol, within an equilateral triangle, is intended to alert the user to the presence of uninsulated "dangerous voltage" within the product's enclosure that may be of sufficient magnitude to constitute a risk of electric shock to persons. CAUTION: TO PREVENT THE RISK OF ELECTRIC SHOCK, DO NOT REMOVE COVER (OR BACK). NO USERSERVICEABLE PARTS INSIDE. REFER SERVICING TO QUALIFIED SERVICE PERSONNEL.
1 Before You Start Opening the Box ................................................................ 4 About Minidiscs ................................................................. 5 1 Informations préliminaires Ouverture du carton d’emballage ..................................... 4 A propos des minidisques .................................................. 5 2 Connecting up Connecting to the Rest of the System.............................. 11 2 Raccordement Raccordement à la chaîne ..............
Opening the Box Thank you for buying this Pioneer product. Before starting to set up your new minidisc recorder, please check that you’ve received the following supplied accessories in the box: • Optical digital cord • Power cord • Warranty card • This instruction manual Ouverture du carton d’emballage Merci pour l’achat de ce produit Pioneer.
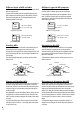
About Minidiscs A propos des minidisques Minidisc, or MD as it’s usually called, is an extremely flexible and convenient format on which you can both playback and record high-quality digital audio. Because it’s a disc, MD has many of the advantages of compact disc—you can jump directly to any track on the disc, program the playing order, instantly skip over tracks you don’t Minidisc mark—all want to play or back to tracks you MDs carry this logo want to play again, and so on.
Different kinds of MD available Différents types de MD proposés All MDs carry the MD logo shown above. Do not use any disc which does not have this mark. There are both recordable and non-recordable (playback-only) MDs. Commercially available music on MD generally comes on discs which are playback only. The diagrams below show the differences between the two types. Tous les MD portent cette marque: N’utilisez jamais un disque qui ne porte pas cette marque.
English Once you’ve recorded a disc, it’s a good idea to protect it against accidental erasure by sliding the tab on the side of the disc to the open position. If you want to erase or re-record the disc, simply slide the tab back to the closed position before loading the disc into the recorder. Use a screwdriver, pen or fingernail to open or shut the eraseprotect tab Analog and digital recording Whatever you record onto an MD is stored on the disc as digital data (in other words, numbers).
Copying restrictions Limitations de la reproduction You may run into problems making digital copies of some sources, even when the sampling rate is compatible. Some DVD discs disable the DVD player’s digital output to prevent illegal digital copying (you can still record via the analog outputs though). Another restriction on digital copying comes from something called SCMS, which stands for Serial Copy Management System.
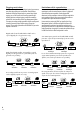
English When you load any kind of minidisc into the recorder, the first thing it does is read a section of the disc called the Table of Contents, or TOC. Just as the contents page of a book tells the reader what each chapter is about and where to find it in the book, the TOC tells the recorder where the tracks are on the disc, the name and length of each track, the name of the disc, and so on. In the couple of seconds it takes to read all this, the recorder’s display shows the message MD TOC READ.
A propos du Sommaire Lorsque vous chargez un minidisque dans l’enregistreur, il lit tout d’abord la section du disque intitulée le Sommaire ou le TOC. Tout comme le sommaire d’un livre décrit les chapitres en indiquant les emplacements, le TOC indique à l’enregistreur où se trouvent les plages, le nom et la longueur de chaque plage, le nom du disque etc. Au cours de ces quelques secondes de reconnaissance, l’afficheur présente le message ‘MD TOC READ’ (Lecture en cours du TOC).
Raccordement à la chaîne Français Connecting to the Rest of the System English 2 Connecting Up CD receiver Ampli-tuner CD MD recorder Enregistreur MD Tape deck Platine à cassette Ribbon cable Câble ruban Optical cable Câble optique Ribbon cable Câble ruban Important: Before making or changing any rear panel connections, make sure that all the components are switched off and unplugged from the power supply.
Note: Power must be connected to the CD receiver whenever you use the MD recorder—the MJ–L77 will not work independently of the rest of the system. Remarque: L’ampli-tuner CD doit être raccordé à une prise d’alimentation secteur lorsque vous utilisez l’enregistreur MD — le MJ-L77 ne fonctionne pas sans la chaîne. Ribbon cords Câble ruban IMPORTANT: Never connect or disconnect the system ribbon cords while the power plug is connected to the wall outlet. Doing so may damage the unit.
1 Fente d’insertion du MD 2 Témoin d’alimentation – S’allume lorsque l’appareil est en service. 3 Touche 6 – Pour la lecture de MD ou la pause de la lecture (appuyez une nouvelle fois pour poursuivre la lecture). Dans le mode d’enregistrement, pour commencer ou arrêter l’enregistrement. 4 Touche 0 – Pour éjecter le MD. 5 Témoin de lecture – S’allume lorsqu’un MD est en cours de lecture ; clignote pendant la pause. 6 Afficheur de caractères 7 Fonction MD – S’allume dans le mode d’enregistreur MD.
Playing an MD Lecture d’un MD You should now have your MD recorder connected up to the rest of the system, and plugged into the power outlet. This chapter takes you through the basics of using the MD recorder—playing discs and making a recording from the CD receiver. When following the steps below, use either a playback-only disc, or a recordable MD that already has some tracks recorded on it. Votre enregistreur est maintenant raccordé à la chaîne et branché sur une prise secteur.
If a track has been named, the name appears in the display while the track is playing 4 To pause playback, press the MD button. To resume playback, press again. You can also use the MD recorder’s front panel controls: Press ^ once to pause playback; press again to resume. 5 To fast-reverse or fast-forward, press and hold $ or › . You should hear snippets of sound to give you some idea of where you are in the track. Release the button to resume normal playback.
Changing the Display Changement d’affichage You can choose to display various kinds of information during playback, recording and stop modes. Switch between them by pressing the DISPLAY button. Vous pouvez choisir d’afficher différents types d’informations pendant la lecture, l’enregistrement et l’arrêt. Changez d’affichage en appuyant sur la touche DISPLAY.
ALL REMAIN - affichage du temps restant sur le disque CLOCK - displays the current time and date CLOCK - affichage de l’heure et de la date actuelles CALENDAR - displays the current date CALENDAR - affichage de la date actuelle DIMMER - adjusts the display brightness (see page 63 of XC–L77 manual) DIMMER - réglage de la luminosité de l’afficheur (voir page 63 du manuel du XC-L77) When recording an MD Pendant l’enregistrement d’un MD TRACK NAME - displays the name of the current track, if one has
Recording levels Niveaux d’enregistrement Whether you're recording through the digital or the analog inputs, there's no need to set the recording level. In the case of analog, the level is adjusted automatically. With digital, the data that makes up the sound is simply copied to the disc unaltered. Also, when recording, the volume, tone and balance controls have no effect on the recording. This means that you can record something with the volume turned all the way down, if you want.
Display showing that you’ve loaded a blank disc L’afficheur indique que le disque inséré est vide 2 Press CD to switch to the CD player. 3 Load the CD you want to record. Press & to make sure the disc is stopped. 2 Appuyez sur CD pour mettre le lecteur CD en service. 3 Insérez le CD que vous voulez enregistrer. Appuyez sur & pour vous assurer que le disque est arrêté.
Automatically Recording a Tape Enregistrement automatique d’une cassette Use this feature if you want to transfer material from tape to MD. Recording starts and stops automatically with the tape, and you can set the tape to auto-reverse so that you can copy both sides of the tape all in one go. Utilisez cette fonction si vous voulez enregistrer une cassette sur un MD. L’enregistrement commence et s’arrête automatiquement en même temps que la cassette.
Display shows tape direction set to ‘forward’, auto-reverse off and Dolby NR on 5 Press MD REC. The recorder goes into record-pause mode, waiting for you to start the tape. Si vous voulez enregistrer toute la cassette, réglez le mode d’inversion sur p; si vous voulez enregistrer une seule face, réglez-le sur “. Si la cassette a été enregistrée avec le réducteur de bruit Dolby, vous devrez mettre la fonction Dolby en service pour obtenir de meilleurs résultats.
Using the Menu System Access to many of the less commonly used functions of the XC– L77 is via a menu system. Each component (CD player, tuner, tape deck, auxiliary, and this MD recorder) has it's own set of menu options, but access to all of them is from the MENU button. Pressing MENU displays the first menu option for the component you're currently using. You can display the next option by pressing ›, or the previous one by pressing $.
TRACK NAME - Attribution d’un nom de plage qui apparaîtra lors de la lecture de la plage (page 37) UNDO - Annulation de la dernière opération de montage (page 45) Programming the Track Order Programmation de l’ordre des plages This mode lets you program a sequence (a playlist) of up to 24 tracks to play. The order can be anything you choose. Tracks can appear more than once in the playlist, or can be left out entirely. The playlist applies only to the MD in the player at the time.
4 Repeat steps 2 and 3 to continue adding tracks to the playlist. 4 Répétez les étapes 2 et 3 pour continuer d’ajouter des plages à la liste de lecture. If you make a mistake, press CANCEL to delete the last (most recent) track programmed. (Delete multiple tracks by pressing CANCEL repeatedly.) En cas d’erreur, appuyez sur CANCEL pour supprimer la dernière plage (la plus récente) programmée. (Pour supprimer plusieurs plages appuyez de façon répétée sur CANCEL).
$ REPEAT TRK? › - REPEAT ALL? REPEAT OFF Remember: switch between menu options using the $ and › buttons; select the option by pressing SET. After setting a repeat mode, the display shows RPT for repeat all, or R1 for repeat track 3 Start playback. In one track repeat mode, any track you choose will repeat. If you jump to another track (using track skip), then the new track will start repeating.
Playing Tracks at Random Lecture aléatoire de plages To have the MD recorder play the tracks on a disc in a different order each time you play the disc, use the random play function. Each track will play just once, but the order will be random. When all tracks have been played, the disc stops. Pour que l’enregistreur lise les plages d’un disque dans un autre ordre, utilisez la lecture aléatoire. Chaque plage sera lue une seule fois dans un ordre différent.
Although the MJ–L77 can make recording largely automatic, you can also manually control a number of settings if you prefer. For any kind of recording, including the synchro-recording modes covered on pages 18 and 20, you can: ❖ switch on or off the auto numbering feature ❖ switch the recording mode to stereo or long-play mono When recording from an external component, or the internal CD player, you can also specify whether the MJ–L77 should record from the analog or digital input.
3 Press SET to exit the menu. 3 Appuyez sur SET pour quitter le menu. The flag symbol in the display lights when Auto Mark is on. Le drapeau apparaît sur l’afficheur lorsque l’inscription automatique des numéros est en service. Display after auto mark has been switched off (auto mark indicator disappears) Affichage après la mise hors service de l’inscription automatique des numéros de plages (le témoin disparaît) Note: If you record from the tuner, Auto Mark automatically switches off.
2 Sélectionnez MONO LP ou STEREO SP à l’aide des touches $ et ›. Commutation en mono pour la lecture longue durée English 2 Switch to MONO LP or STEREO SP using the $ and › buttons. Switch to mono for long-play L’indicateur MONO LP s’allume dans l’afficheur lorsque MONO LP est sélectionné. The MONO LP indicator in the display lights when MONO LP is selected. L’indicateur MONO LP s’allume dans le mode longue durée Français 3 Appuyez sur SET pour quitter le menu. 3 Press SET to exit the menu.
2 Switch to ANALOG (or AUTO) using the $ and › buttons. 2 Sélectionnez ANALOG (ou AUTO) à l’aide des touches $ et ›. 3 Press SET to exit the menu. 3 Appuyez sur SET pour quitter le menu. The DIGITAL indicator in the display lights when AUTO is selected. L’indicateur DIGITAL s’allume sur l’afficheur lorsque AUTO est sélectionné.
For example, to record from the auxiliary input, press the AUX button (if the display shows AUX (Digital), press AUX again). Par exemple, pour enregistrer depuis l’entrée auxiliaire, appuyez sur la touche AUX (si l’afficheur indique AUX (numérique), appuyez une nouvelle fois sur AUX). Recording will be from the analog auxiliary inputs L’enregistrement s’effectuera depuis les entrées analogiques auxiliaires. 3 Prepare the source for recording. Switch on the component and load the source material, etc.
Recording an External Digital Source Enregistrement d’une source numérique externe Recording an external digital source— a DAT or MD player, or digital satellite receiver, for example—via the optical digital input of the MJ–L77 follows much the same procedure as recording from an analog source.
L’enregistreur MD se met en pause d’enregistrement. The MD record indicator flashes in record-pause mode. During recording it remains lit Le témoin d’enregistrement de MD clignote pendant la pause d’enregistrement. Il reste allumé pendant l’enregistrement. 5 Press the MD button to start recording. Alternatively, press ^ on the MD recorder’s front panel. 6 Playback the source (if necessary). 7 During recording: 5 Appuyez sur la touche MD pour commencer l’enregistrement.
MD REC SET AUX/CD-R SOUND DISPLAY SET STANDBY/ ON MD TAPE REC TIMER/ & CHARACTER CANCEL $ ! — › + ⁄ VOL MD 1 Find the place in the disc you want to record from and pause playback. The track that you stop on will be completely overwritten, as well as all the tracks following. 1 Recherchez le point à partir duquel vous voulez enregistrer et mettez l’enregistreur en pause de lecture. La plage sur laquelle vous vous arrêtez sera complètement écrasée (supprimée) ainsi que les plages suivantes.
The MD system allows for very flexible editing of discs. Using the editing features described on the following pages you can easily: create names for discs and for individual tracks; combine two tracks into one long one, or divide a track into two short ones; move single tracks, or reorder a whole disc; erase tracks or erase the whole disc. Not all of these functions are available in any mode: the table below shows what editing functions you have access to in each MD mode.
1 Make sure the disc is stopped . To be able to name the disc, the disc must be stopped with the disc information showing in the display. 2 Press MENU and select DISC NAME. Remember: switch between menu options using the $ and › buttons; select the option by pressing SET. 1 Assurez-vous que le disque est arrêté. Pour pouvoir titrer un disque, le disque doit être arrêté et les informations concernant le disque affichées. 2 Appuyez sur MENU et sélectionnez DISC NAME.
L’afficheur indique le nom du disque complet Display showing the completed disc name Tip Conseil If you make a mistake, you can go back and correct the last character by pressing DISPLAY. To abort completely and start again, press CANCEL. En cas d’erreur, vous pouvez revenir en arrière et corriger le dernier caractère en appuyant sur DISPLAY. Pour abandonner complètement et recommencer, appuyez sur CANCEL.
3 Enter a name for the track. 3 Inscrivez le nom de la plage. The input method is exactly the same as for naming discs above. La méthode est la même que pour le titrage de disque. 4 Lorsque le nom du disque est complet, appuyez sur MENU pour quitter le menu. 4 When you've finished naming the disc, press MENU to exit. Remarque Note Il n’y a pas de fonction d’effacement ni d’insertion. En cas d’erreur, vous devrez effacer tout le nom en appuyant sur CANCEL et recommencer depuis l’étape 2.
Rappel: Utilisez les touches $ et › pour sélectionner une option du menu et validez l’option en appuyant sur SET. 4 Confirm that you want to divide the track. 4 Confirmez la division de la plage. Press SET to divide the track, or CANCEL to cancel the edit. The display shows COMPLETE once the edit has been made. Appuyez sur SET pour diviser la plage ou sur CANCEL pour annuler le montage. L’afficheur indique COMPLETE lorsque le montage est terminé.
1 During playback of the later track of the two, press the MD button. The recorder pauses playback. (You can also use the ^ button on the front panel to do this.) Combine only works with two consecutive tracks, so if you wanted to combine tracks 3 and 4, pause during playback of track 4. Note: If you want to combine two tracks which are not consecutive, you'll have to first move them next to each other—see below for how to do this. Display shows track 4 selected.
AUX/CD-R SOUND DISPLAY SET STANDBY/ ON MD TAPE REC TIMER/ & CHARACTER CANCEL 4 1 Select the track you want to move. The disc can be stopped (with the track information shown in the display), or in play-pause mode. $ ! — › + ⁄ VOL ¢ 1 Sélectionnez la plage que vous voulez déplacer. English SET Français MENU Le disque peut être arrêté (avec affichage des informations concernant la plage) ou en pause de lecture.
Reordering Tracks on a Disc Changement de l’ordre des plages d’un disque The track reorder feature takes the play order you've programmed for the disc using the program play feature (see page 23), and reorders the tracks on the disc accordingly. If you want to change the position of more than a couple of tracks on the disc, it's probably quicker to do it this way than use the move track function described on the previous page.
Erasing unwanted tracks on a disc frees up disc space for further recording. When you erase a track, all the tracks following it are automatically renumbered. Erasing the whole disc erases not only all the tracks on the disc, but also the disc name (if you've entered one). MENU L’effacement des plages inutiles d’un disque libère de l’espace pour de nouveaux enregistrements. Lorsque vous effacez une plage, toutes les plages suivantes sont automatiquement renumérotées.
Erasing individual tracks Effacement de plages particulières 1 Press MD while playing the track you want to erase to pause the disc. 1 Appuyez sur MD pendant la lecture de la plage que vous voulez effacer pour mettre le disque en pause. Alternatively, press ^ on the front panel. Vous pouvez aussi appuyer sur ^ du panneau avant. Display shows track 4 selected 2 Press MENU and select ERASE. Remember: switch between menu options using the $ and › buttons; select the option by pressing SET.
Although the MJ–L77 always lets you abort an edit before completing it, there will probably still be times when you complete an edit operation only to find that it wasn't what you had intended. As long as you haven't switched the power off, updated the UTOC by ejecting the disc, or recorded anything else on the disc, you can still undo the last edit operation. The only exceptions to this are the undo operation itself (i.e., you can’t redo an edit), and track/disc naming while in record mode.
Understanding Error Messages Message NO DISC DISC ER * ?DISC DISC FULL BLANK DISC Playback MD PROTECTED TOC FULL Can't REC TEMP OVER Can't EDIT NAME FULL DEFECT MECHA ER* Can't COPY Description • MD is not loaded. • The MD data cannot be read. • The disc is damaged. • The MD does not contain the TOC or the data is corrupted. • The data is corrupted or the MD is out of standard. • The MD has no space available for recording.
DISC ER * ?DISC DISC FULL BLANK DISC Playback MD PROTECTED TOC FULL Can't REC TEMP OVER Can't EDIT NAME FULL DEFECT MECHA ER* Can't COPY Description • Pas de MD dans l’enregistreur. • Le MD ne peut pas être lu. • Le disque est endommagé. • Le MD ne contient pas de table des matières ou les données sont vérolées. • Les données sont vérolées ou le MD est hors standard. • Le MD ne contient plus d’espace libre pour l’enregistrement. • Le MD ne contient aucune information enregistrée (nom de disque compris).
Troubleshooting It’s often easy to mistake incorrect operation for trouble and malfunction of the unit. If you think there is something wrong with the component, check the points below first. If the problems persists, contact your nearest Pioneer-authoriorized service center and have them check over the unit. Symptom Possible Causes Remedy No sound. • The power cord is unplugged. • Connection cords aren’t connected properly. Can’t record. • The MD is protected against accidental erasure.
Une mauvaise opération est souvent confondue avec panne et défaut de fonctionnement de l’appareil. Si quelque chose ne semble pas fonctionner, vérifiez tout d’abord les points ci-dessous. Si les problèmes persistent, veuillez contacter votre centre technique Pioneer le plus proche pour faire vérifier l’appareil. Causes Possibles • Le cordon d’alimentation est débranché. • Les cordons de connexion ne sont pas correctement branchés. • Le MD est protégé contre tout effacement Impossible d’enregistrer.
VORSICHT Dieses Gerät enthält eine Laserdiode mit einer höheren Klasse als 1. Um einen stets sicheren Betrieb zu gewährleisten, weder irgendwelche Abdeckungen entfernen, noch versuchen, sich zum Geräteinneren Zugang zu verschaffen. Alle Wartungsarbeiten sollten qualifiziertem Kundendienstpersonal überlassen werden. Wir danken lhnen für den Kauf dieses Pioneer-Produkts. Lesen Sie sich bitte diese Bedienungsanleitung durch. Dann wissen Sie, wie Sie lhr Gerät richtig bedienen.
1 Vor der Inbetriebnahme Überprüfung des Lieferumfangs auf Vollständigkeit ........ 4 Umgang mit MDs .............................................................. 5 1 Preparativi Apertura della scatola ........................................................ 4 Cenni sui minidisc ............................................................ 5 2 Anschluß des Geräts Anschluß an das übrige System ...................................... 11 2 Collegamenti Collegamento al resto del sistema ..................
Überprüfung des Lieferumfangs auf Vollständigkeit Vielen Dank für das Vertrauen in Pioneer-Produkte, das Sie mit dem Kauf dieses MD-Recorders erwiesen haben. Vor der Inbetriebnahme Ihres neuen MD-Recorders vergewissern Sie sich bitte, daß die folgenden Zubehörteile im Versandkarton mitgeliefert worden sind: • Optisches Kabel • Netzkabel • Garantiekarte • Diese Bedienungsanleitung Apertura della scatola Grazie per avere acquistato questo prodotto Pioneer.
Umgang mit MDs Eine Minidisc, die oft auch einfach MD genannt wird, ist ein äußerst flexibles Medium, um digitale Signale sowohl wiederzugeben als auch aufzunehmen. Da es sich hier um eine Disc handelt, hat eine MD viele jener Vorteile, die eine Compact Disc auszeichnen — Sie können direkt einen beliebigen Titel auf der Minidisc-Zeichen-auf Disc ansteuern, die Reihenfolge der jeder MD vorhanden Titel programmieren, sofort unerwünschte Titel überspringen bzw.
Verschiedene Typen von MDs Diversi tipi di MiniDisc disponibili Alle MDs haben dieses Kennzeichen: Verwenden Sie keine MD ohne dieses Kennzeichen. Es gibt sowohl bespielbare als auch vorbespielte (nur zur Wiedergabe) Minidiscs. Die im Handel erhältlichen Musik-MDs eignen sich ausnahmslos nur zur Wiedergabe und können nicht bespielt werden. Die folgenden Diagramme stellen die Unterschiede zwischen diesen beiden MD-Typen dar.
Nachdem Sie eine MD aufgenommen haben, ist es empfehlenswert, diese vor einem versehentlichen Löschen zu schützen. Dazu schieben Sie den Überschreibschutz an der Seite der MD in die offene Position. Wenn Sie eine Disc löschen oder neu bespielen wollen, schieben Sie den Überschreibschutz ganz einfach wieder in die geschlossene Position, bevor Sie die Disc in den Recorder einlegen. Öffnen oder Schließen Sie den Schreibschutz mit Schraubendreher, Kugelschreiber oder dem Fingernagel.
Kopierbeschränkungen Restrizioni sulla copìa Bei der digitalen Aufnahme einiger Tonquellen entstehen trotz kompatibler Abtastfrequenz eventuell Probleme. Einige DVD Discs deaktivieren den digitalen Ausgang des DVD-Players, um illegales digitales Kopieren zu verhindern (Sie können jedoch über die Analogausgänge aufnehmen). Eine weitere Einschränkung für digitale Aufnahmen stammt vom sogenannten SCMS, Serial Copy Management System.
○ ○ ○ ○ ○ ○ ○ ○ ○ ○ ○ ○ ○ ○ ○ ○ ○ ○ ○ ○ ○ ○ ○ ○ ○ ○ ○ ○ ○ ○ ○ ○ ○ ○ ○ ○ ○ ○ ○ ○ ○ ○ ○ ○ ○ ○ ○ ○ ○ ○ ○ ○ ○ ○ ○ ○ Einschränkungen des MD-Systems Die hochentwickelten Wiedergabe-, Editier- und Aufnahmefunktionen einer MD werden durch die Speicherart der Audiosignale auf der Disc und die oben beschriebenen TOC- und UTOC-Systeme ermöglicht. Manchmal begegnen Sie jedoch vielleicht ungewohnten Nebenerscheinungen, die durch die Funktionsweise von MDs entstehen.
Cenni sul TOC (indice del disco) Quando si inserisce un qualsiasi minidisc nel registratore, questo innanzitutto legge una sezione del disco detta TOC (Table of Contents = indice). Il TOC fornisce al registratore varie informazioni come la posizione delle piste sul disco, il nome e la durata di ciascuna pista, il nome del disco, ecc. Il display del registratore visualizza il messaggio MD TOC READ.
2 Connecting Up Anschluß an das übrige System Collegamento al resto del sistema CD-Receiver Lettore CD/ricevitore MD-Recorder Registratore di minidisc Bandkabel Cavo a nastro Optisches Kabel Cavo ottico Bandkabel Cavo a nastro Netzkabel des CD-Receivers Cavo di alimentazione del lettore CD/ricevitore Netzkabel des MD-Recorders Cavo di alimentazione del registratore di minidisc Wichtig: Vor dem Herstellen oder Lösen von Kabelverbindungen an der Rückseite sorgen Sie dafür, daß alle Komponenten ausgeschal
Hinweis: Da die Stromversorgung des MD-Recorders MJ-L77 unabhängig vom übrigen System ist, müssen stets er und der CD-Receiver ans Netz angeschlossen werden. Nota: Il lettore CD/ricevitore deve essere collegato alla fonte di alimentazione ogni volta che si usa il registratore di minidisc; lo MJ-L77 non funziona indipendentemente dal resto del sistema. Bandkabel Cavi a nastro WICHTIG: Keinesfalls die System-Bandkabel verbinden oder abtrennen, solange der Netzstecker in der Netzsteckdose steckt.
1 Fessura per l’inserimento di minidisc 2 Spia di alimentazione – Si illumina quando l’apparecchio è acceso. 3 Tasto di riproduzione/pausa (6) – Premerlo per riprodurre un minidisc, o per fare una pausa durante la riproduzione di un disco (premerlo di nuovo per far ricominciare la riproduzione). Nel modo di registrazione, usare questo tasto anche per avviare la registrazione o per fare una pausa durante la registrazione. 4 Tasto di espulsione disco (0) – Premerlo per estrarre il minidisc.
Abspielen von MDs Riproduzione di un minidisc Der MD-Recorder dürfte nun an das übrige System angeschlossen mit der Netzsteckdose verbunden sein. Im folgenden werden die Grundfunktionen des MD-Recorders behandelt — d.h. das Abspielen von MDs und das Überspielen vom CD-Receiver. Bei der Ausführung der nachstehenden Bedienschritte müssen Sie entweder eine reine Abspiel-Disc oder eine bespielbare MD mit einigen aufgezeichneten Titeln verwenden.
Bei benannten Titeln erscheint der Name auf dem Display während der Titelwiedergabe. 4 Zum Umschalten auf Wiedergabepause drücken Sie die MD-Taste. Durch erneutes Drücken der Taste wird die MD-Wiedergabe fortgesetzt. Sie können auch die Bedienteile an der Frontplatte des CDReceivers nutzen: Drücken Sie ^ einmal zum Umschalten auf Wiedergabepause und noch einmal zur Fortsetzung der Wiedergabe. 5 Zum Schnellrücklauf oder -vorlauf halten Sie $ oder › gedrückt.
Umschalten der Displayanzeige Cambiamento della visualizzazione Sie können während Wiedergabe, Aufnahme und den Stoppbetriebsarten verschiedene Informationen auf das Display bringen. Das Umschalten zwischen den verschiedenen Anzeigen erfolgt mit der DISPLAY-Taste. È possibile scegliere di visualizzare informazioni di vari tipi durante la riproduzione, la registrazione e nel modo di arresto. Passare dall’una all’altra di esse premendo il tasto DISPLAY.
ALL REMAIN - Anzeige der verbleibenden MD-Abspielzeit CLOCK - Anzeige von aktueller Uhrzeit und Datum TRACK REMAIN - Visualizza il tempo di riproduzione rimanente della pista attuale. ALL REMAIN - Visualizza il tempo di riproduzione rimanente del disco. CALENDAR - Anzeige des aktuellen Datums DIMMER - Einstellung der Helligkeit des Displays (Siehe Seite 63 in der Bedienungsanleitung von XC-L77.) CLOCK - Visualizza l’ora e la data attuali. CALENDAR - Visualizza la data attuale.
Aufnahmepegel Livelli di registrazione Sowohl bei digitaler als auch analoger Aufnahme ist eine Einstellung des Aufnahmepegels nicht erforderlich. Bei Analogaufnahme erfolgt die Pegeleinstellung automatisch und bei Digitalaufnahme werden die den Klang repräsentierenden Daten einfach unverändert auf die MD kopiert. Darüber hinaus haben auch die Regler für Lautstärke, Klang und Balance keinen Einfluß auf die Aufnahme, so daß Aufnahmen bei vollständig zurückgedrehter Lautstärke möglich sind.
Um herauszufinden, wieviel Aufnahmezeit noch auf der MD verblieben ist, können Sie die Displayanzeige entsprechend umschalten. Näheres hierzu finden Sie auf Seite 16. È possibile sapere quanto spazio vuoto rimane sul disco cambiando la visualizzazione a questo punto. Fare riferimento a pagina 16 per informazioni su questa operazione. Anzeige, daß eine unbespielte MD eingelegt ist. Il display indica che è stato inserito un disco vuoto. 2 Schalten Sie durch Drücken von CD auf den CD-Spieler um.
Automatisches Überspielen von Cassetten Registrazione automatica di un nastro Dieses Merkmal macht das Überspielen von Cassette auf MD denkbar einfach dank dem gleichzeitigen automatischen Starten und Stoppen von MD und Cassette. Das Cassettendeck läßt sich auf Autoreverse einstellen, so daß beide Seiten der Cassette in einem Durchgang überspielt werden können. Usare questa funzione se si desidera trasferire del materiale da un nastro su un minidisc.
Die Aufnahme erfolgt in “Vorwärtsrichtung”, AutoreverseBetriebsart ist deaktiviert und Dolby-Rauschunterdrückung eingeschaltet 5 Drücken Sie MD REC. Daraufhin schaltet der Recorder auf Aufnahmepause und wartet darauf, daß Sie das Cassettendeck starten. Die SYNCHRO-Anzeige leuchtet, und die rote MDAufnahmeanzeige blinkt. 6 Starten Sie durch Drücken von TAPE die Cassettenwiedergabe.
Nutzung des Menüsystems Uso del sistema di menu Der Zugriff auf die weniger häufig benötigten Funktionen des XC-L77 erfolgt über das Menüsystem. Die einzelnen Systemkomponenten (CD-Spieler, Tuner, Cassettendeck, externe Komponente und der vorliegende MD-Recorder) verfügen zwar jeweils über eigene Menüoptionen, aber alle werden über die MENUTaste aufgerufen. Beim Drücken von MENU erscheint die erste Menüoption für die aktuell aktivierte Komponente.
TRACK ERASE - Löschen eines Titels von der MD (Seite 43) TRACK ERASE - Per cancellare una pista dal disco (pagina 43) TRACK NAME - Benennung eines Titels mit einem Namen, der beim Einlegen der MD auf dem Display erscheint (Seite 37).
4 Zur Programmierung weiterer Titel wiederholen Sie die Schritte 2 und 3. 4 Ripetere i punti 2 e 3 per continuare ad aggiungere piste alla lista di riproduzione. Bei Eingabefehler drücken Sie CANCEL, um den letzten (direkt zuvor) programmierten Titel zu löschen. (Durch entsprechend häufiges Drücken von CANCEL lassen sich mehrere Titel löschen.) Se si commette un errore, premere CANCEL per cancellare l’ultima (la più recente) pista programmata. (Cancellare piste plurime premendo CANCEL ripetutamente.
$ REPEAT TRK? › - REPEAT ALL? REPEAT OFF 2 Selezionare un modo di ripetizione. Sono disponibili tre opzioni: $ REPEAT TRK? › - REPEAT ALL? REPEAT OFF Achtung: Schalten Sie zwischen den Menüoptionen mit $ und › um, und wählen Sie die Option durch Drücken von SET. Ricordare: Passare da un’opzione del menu ad un’altra usando i tasti $ e ›; selezionare un’opzione premendo SET.
Zufallswiedergabe von Titeln Riproduzione delle piste in ordine casuale Mit Hilfe der Zufallswiedergabefunktion können Sie die Titel auf einer MD beim Abspielen jedesmal in einer anderen Reihenfolge hören. Dabei werden die Titel jeweils einmal abgespielt, aber stets in einer zufälligen Abfolge. Sobald alle Titel wiedergegeben sind, stoppt die MD.
Der MJ-L77 kann zwar weitgehend automatisch Aufnahme machen, aber auf Wunsch können Sie auch eine Reihe von Einstellungen manuell vornehmen.
3 Verlassen Sie das Menü durch erneutes Drücken von SET. 3 Premere SET per uscire dal menu. Il simbolo della bandierina sul display si illumina quando la marcatura automatica è attivata. Daraufhin erscheint das Flagge-Symbol auf dem Display. Visualizzazione dopo che la marcatura automatica è stata disattivata (l’indicatore di marcatura automatica scompare) Displayanzeige nach dem Ausschalten der Numerierungsautomatik (die Flagge-Anzeige verschwindet vom Display).
2 Wählen Sie MONO LP oder STEREO SP mit den Tasten $ und ›. 2 Passare a MONO LP o a STEREO SP usando i tasti $ e ›. Passaggio a monoaurale per registrazioni prolungate Umschaltung auf Mono für Langspielbetrieb 3 Verlassen Sie das Menü durch erneutes Drücken von SET. 3 Premere SET per uscire dal menu. L’indicatore MONO LP sul display si illumina quando è selezionata la registrazione prolungata in monoaurale. Daraufhin erscheint die Anzeige MONO LP auf dem Display, wenn Langspielbetrieb gewählt ist.
2 Wählen Sie ANALOG (oder AUTO) mit den Tasten $ und ›. 2 Passare a ANALOG (o AUTO) usando i tasti $ e ›. 3 Verlassen Sie das Menü durch erneutes Drücken von SET. 3 Premere SET per uscire dal menu. L’indicatore DIGITAL sul display si illumina quando è selezionato AUTO. Daraufhin erscheint die Anzeige DIGITAL auf dem Display, wenn AUTO gewählt ist. L’indicatore DIGITAL scompare quando è selezionato l’ingresso analogico. Die DIGITAL-Anzeige verschwindet, wenn der Analogeingang gewählt ist.
2 Passare alla fonte da cui si desidera registrare. Zur Aufnahme über den AUX-Eingang beispielsweise drücken Sie die AUX-Taste (erscheint AUX (Digital) auf dem Display, so drücken Sie AUX erneut.) Per esempio, per registrare dagli ingressi ausiliari, premere il tasto AUX (se il display visualizza AUX (Digital), premere di nuovo AUX). Aufnahme über den analogen AUX-Eingang La registrazione avverrà tramite gli ingressi ausiliari analogici.
Überspielen von einer externen digitalen Signalquelle Registrazione di una fonte digitale esterna Il procedimento per la registrazione da una fonte digitale esterna, come per esempio una piastra DAT o un lettore di minidisc, o un ricevitore satellite digitale, tramite l’ingresso digitale ottico dello MJ-L77 è in gran parte simile al procedimento per la registrazione da una fonte analogica.
4 Premere MD REC. Daraufhin schaltet der MD-Recorder auf Aufnahmepause um. Il registratore di minidisc entra nel modo di pausa di registrazione. Die MD-Aufnahmeanzeige blinkt bei Aufnahmepause und leuchtet dauernd während der Aufnahme. L’indicatore di registrazione di minidisc lampeggia quando l’apparecchio è nel modo di pausa di registrazione. Durante la registrazione esso rimane stabilmente illuminato. Stattdessen können Sie auch ^ an der Frontplatte des MD-Recorders drücken.
MD REC SET AUX/CD-R SOUND DISPLAY SET STANDBY/ ON MD TAPE REC TIMER/ & CHARACTER CANCEL $ ! — › + ⁄ VOL MD 1 Suchen Sie die Stelle auf der MD, an der die Aufnahme einsetzen soll, und schalten Sie auf Wiedergabepause. Der Titel, bei dem Sie anhalten, und alle folgenden Titel werden vollständige überschrieben. 1 Localizzare il punto sul disco da cui si desidera registrare e porre l’apparecchio nello stato di pausa di riproduzione.
Das MD-System ermöglicht Ihnen äußerst flexible Möglichkeiten zum Editieren von MDs. Mit den im folgenden beschriebenen Editierfunktionen können Sie problemlos ganze MDs bzw. einzelne Titel benennen, zwei separate Titel zu einem einzigen Titel zusammenfassen oder einen Titel in zwei separate unterteilen, einzelne Titel verschieben oder den Inhalt einer ganzen MD umordnen sowie einzelne Titel oder die ganze MD löschen. Nicht alle diese Funktionen sind in allen Betriebsarten verfügbar.
MENU SET AUX/CD-R SOUND DISPLAY SET MD MD TAPE REC STANDBY/ ON DISPLAY 1 Vergewissern Sie sich, daß die MD gestoppt ist. Um MDs benennen zu können, muß der Recorder auf Betriebsstopp geschaltet sein und das Display die MDInformationen anzeigen. 2 Drücken Sie MENU, und wählen Sie DISC NAME. Achtung: Schalten Sie zwischen den Menüoptionen mit $ und › um, und wählen Sie die Option durch Drücken von SET. TIMER/ & CHARACTER CANCEL 4 $ ! — › + ⁄ VOL ¢ 1 Accertarsi che il disco sia fermo.
4 Nach vollständiger Eingabe des MDNamens schalten Sie durch Drücken von MENU aus dem Menü zurück. 4 Quando il nome del disco è come desiderato, premere MENU per uscire. Visualizzazione indicante il nome di disco completo Display mit dem vollständig eingegebenen Namen Nota Tip Benennen von Titeln Oltre che a poter assegnare un nome ad un disco, è anche possibile assegnare un nome a ciascuna pista del disco. Anche in questo caso i nomi possono essere di una lunghezza massima di 100 caratteri.
3 Geben Sie den Namen des Titels ein. 3 Introdurre un nome per la pista. Die Eingabe erfolgt genau so wie bei der Benennung von Mds. Il metodo di introduzione è identico a quello descritto precedentemente per l’introduzione del nome del disco. 4 Nach vollständiger Eingabe des Titelnamens schalten Sie durch Drücken von MENU aus dem Menü zurück. 4 Quando il nome della pista è come desiderato, premere MENU per uscire. Nota Hinweis Non è disponibile una funzione di cancellazione o di inserimento.
3 Drücken Sie MENU, und wählen Sie DIVIDE. 3 Premere MENU e selezionare DIVIDE. Ricordare: Passare da un’opzione del menu ad un’altra usando i tasti $ e ›; selezionare un’opzione premendo SET. Achtung: Schalten Sie zwischen den Menüoptionen mit $ und › um, und wählen Sie die Option durch Drücken von SET. 4 Confermare che si desidera dividere la pista. 4 Bestätigen Sie, daß der Titel unterteilt werden soll. Premere SET per dividere la pista, o CANCEL per annullare il montaggio.
1 Drücken Sie die MD-Taste während der Wiedergabe des hinteren Titels der beiden. 1 Durante la riproduzione della seconda delle due piste, premere il tasto MD. Daraufhin schaltet der Recorder auf Wiedergabepause. (Zu diesem Zweck können Sie auch Taste ^ an der Frontplatte drücken.) Kombinieren Sie ausschließlich direkt aufeinanderfolgende Titel. Bei der Kombination von Titel 3 und 4 schalten Sie auf Pause während der Wiedergabe von Titel 4.
SET SOUND DISPLAY SET MD TAPE REC TIMER/ & CHARACTER CANCEL 4 1 Wählen Sie den Titel, dessen Position Sie umstellen wollen. $ ! — › + ⁄ VOL ¢ 1 Selezionare la pista che si desidera spostare. Es spielt hierfür keine Rolle, ob sich die MD dabei im Stoppbetrieb (mit angezeigter Titelinformation) oder Pausebetrieb befindet. Il disco può essere fermo (con le informazioni sul disco visualizzate sul display), o nello stato di pausa di riproduzione. Das Display zeigt, das Titel 4 gewählt ist.
Umordnen von Titeln Cambiamento dell’ordine delle piste su un disco Die Umordnungsfunktion verwendet die Titelreihenfolge, die Sie für die Disc mit der programmierten Wiedergabefunktion eingegeben haben (siehe S. 23) und ordnet die Titel dementsprechend um. Wenn Sie die Position mehrerer Titel ändern möchten, ist diese Funktion empfehlenswerter als die auf der vorhergehenden Seite beschriebene Umstellungsfunktion.
Löschen von Titeln Cancellazione delle piste su un disco Das Löschen unerwünschter Titel auf einer MD schafft freie Kapazität für weitere Aufnahmen. Beim Löschen von Titeln werden alle nachfolgenden Titel automatisch umnumeriert. Beim Löschen der gesamten MD werden nicht nur alle Titel auf ihr annulliert, sondern auch der Name der MD (falls eingegeben).
Löschen einzelner Titel Cancellazione di singole piste 1 Drücken Sie MD während der Wiedergabe des zu löschenden Titels, um auf Wiedergabepause umzuschalten. 1 Premere MD durante la riproduzione della pista che si desidera cancellare per porre il disco nello stato di pausa. Stattdessen können Sie Taste ^ an der Frontplatte drücken. In alternativa, premere ^ sul pannello anteriore. Il display indica che è stata selezionata la pista 4. Das Display zeigt, daß Titel 4 gewählt ist.
Korrektur von Fehlern Annullamento di errori Der MJ-L77 bietet Ihnen zwar stets die Möglichkeit, den Editiervorgang abzubrechen, aber es kann durchaus vorkommen, daß das Resultat der erfolgten Editierung unbefriedigend ist. Sofern die Stromversorgung nicht ausgeschaltet, das UTOCVerzeichnis nicht durch Auswerfen der MD aktualisiert oder eine andere Aufnahme gemacht worden ist, können Sie stets den letzten Editiervorgang annulieren. Ausnahmen hiervon sind die Annullierfunktion selbst (d.h.
Fehlermeldungen und zugehörige Abhilfemaßnahmen Fehlermeldung Beschreibung NO DISC • Keine MD eingelegt. • MD-Daten nicht auslesbar. • MD beschädigt. DISC ER * • MD ohne TOC-Bereich oder mit fehlerhaften Daten. ?DISC • Fehlerhafte Daten oder vom Standard abweichende MD. DISC FULL • MD ohne freie Aufnahmekapazität. BLANK DISC • MD ohne aufgezeichnete Informationen (einschließlich MD-Name). Playback MD • Versuch zum Bespielen oder Editieren einer reinen AbspielMD. PROTECTED • MD mit aktiviertem Löschschutz.
Comprensione dei messaggi di errore ?DISC DISC FULL BLANK DISC Playback MD PROTECTED TOC FULL Can't REC TEMP OVER Can't EDIT NAME FULL • Il disco non ha spazio per la registrazione dei dati del numero di pista e dei caratteri (compresi i nomi di disco/ pista). • Non è possibile eseguire la registrazione a causa di urti o di danni al disco. • La temperatura è troppo alta. DEFECT MECHA ER* Can't COPY • Non è possibile eseguire il montaggio.
Fehlersuche Es passiert recht häufig, daß inkorrektes Bedienen für Fehlfunktionen oder Störungen des Geräts gehalten werden. Falls Sie glauben, daß Ihr Gerät nicht richtig funktioniert, sollten Sie zuerst die folgende Liste durchgehen, bevor Sie es zu Ihrem Pioneer-Servicecenter bringen. Symptom Mögliche Gründe Lösung Kein Ton. • Das Stromkabel wurde herausgezogen. • Verbinden Sie das Stromkabel mit dem Stromnetz. • Verbinden Sie die Kabel korrekt; siehe Anleitung auf S. 11 „Anschlüsse”.
Soluzione di Problemi Spesso è facile confondere operazioni errate con problemi di funzionamento dell’unità. Se l’apparecchio non dovesse funzionare nel modo descritto nel corso di questo manuale e si ritiene che il registratore presenti problemi di funzionamento, verificare le indicazioni descritte nella seguente guida. Qualora i problemi persistessero dopo le verifiche suggerite, rivolgersi a un centro di assistenza autorizzato Pioneer affinché controllino l’unità. Non viene emesso alcun suono.
POWER-CORD CAUTION Handle the power cord by the plug. Do not pull out the plug by tugging the cord and never touch the power cord when your hands are wet as this could cause a short circuit or electric shock. Do not place the unit, a piece of furniture, etc., on the power cord, or pinch the cord. Never make a knot in the cord or tie it with other cords. The power cords should be routed such that they are not likely to be stepped on. A damaged power cord can cause a fire or give you an electrical shock.
AVVERTIMENTO RIGUARDANTE IL FILO DI ALIMENTAZIONE Prendete sempre il filo di alimentazione per la spina. Non tiratelo mai agendo per il filo stesso e non toccate mai il filo con le mani bagnati, perchè questo potrebbe causare cortocircuiti o scosse elettriche. Non collocate l’unità, oppure dei mobili sopra il filo di alimentazione e controllate che lo stesso non sia premuto. Non annodate mai il filo di alimentazione nè collegatelo con altri fili.
Specifications Technische Daten Recording method ............................... Magnetic field modulation overwriting type Playback method ...................................... Non-contact optical type Sampling frequency ................................. 44.1 kHz, 32 kHz, 48 kHz Frequency response ................................................... 20 Hz - 20 kHz Signal-to-Noise ratio ................................................................ 98 dB Wow and flutter .................................