PD-D6-J_MY.book Page 1 D6 Friday, September 8, 2006 4:25 PM PD-D6-J Super Audio CD Player Lecteur Super Audio CD Super Audio CD-Spieler Super-Audio CD-speler Lettore CD Super Audio Reproductor de Super Audio CD Discover the benefits of registering your product online at www.pioneer.co.uk (www.pioneer-eur.com). Découvrez les nombreux avantages offerts en enregistrant votre produit en ligne maintenant sur www.pioneer.fr (ou www.pioneer-eur.com).
PD-D6-J_MY.book Page 2 Friday, September 8, 2006 4:25 PM Location: rear of the unit IMPORTANT CAUTION RISK OF ELECTRIC SHOCK DO NOT OPEN The lightning flash with arrowhead symbol, within an equilateral triangle, is intended to alert the user to the presence of uninsulated "dangerous voltage" within the product's enclosure that may be of sufficient magnitude to constitute a risk of electric shock to persons. CAUTION: TO PREVENT THE RISK OF ELECTRIC SHOCK, DO NOT REMOVE COVER (OR BACK).
PD-D6-J_MY.book Page 3 Friday, September 8, 2006 WARNING Before plugging in for the first time, read the following section carefully. The voltage of the available power supply differs according to country or region. Be sure that the power supply voltage of the area where this unit will be used meets the required voltage (e.g., 230 V D3-4-2-1-4_A_En or 120 V) written on the rear panel. 4:25 PM This product is for general household purposes.
PD-D6-J_MY.book Page 4 Friday, September 8, 2006 4:25 PM Thank you for buying this Pioneer product. Please read through these operating instructions so that you will know how to operate your model properly. After you have finished reading the instructions, put them in a safe place for future reference. Contents 01 Before you start 04 Getting started Features . . . . . . . . . . . . . . . . . . . . . . . . . . . 5 What’s in the box . . . . . . . . . . . . . . . . . . . .
PD-D6-J_MY.book Page 5 Friday, September 8, 2006 4:25 PM Before you start 01 English Chapter 1 Before you start Italiano • Legato Link Conversion Pro and Hi-Bit Pioneer's unique Legato Link Conversion system restores high-frequency dynamics lost in the digital recording process, to fully reproduce all the shading and detail of the original musical performance. This results in a minimum amount of phase shift across the entire hearable audio spectrum.
PD-D6-J_MY.book 01 Page 6 Friday, September 8, 2006 Before you start What’s in the box Please confirm that the following accessories are in the box when you open it. • Remote control • Lithium battery (CR2025) • RCA/phono stereo audio cable • SR control cable • Power cable • Operating instructions Inserting the battery Insert the lithium battery (CR2025) into the remote control as shown below. The battery supplied with this unit is stored in the battery casing (see step 3 below).
PD-D6-J_MY.book Page 7 Friday, September 8, 2006 4:25 PM Before you start 01 Compatible formats PC-created • Discs recorded using a PC may not disc be playable due to the setting of the software used to create the disc. In these instances, check the software manual or disc boxes for more on compatibility. • Discs recorded in packet write mode are not compatible. About WMA CD-RW Super Audio CD Disc compatibility table CD-R/RW • CD-Audio, ISO 9660 CD-ROM* * ISO 9660 Level 1 or 2 compliant.
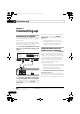
PD-D6-J_MY.book 02 Page 8 Friday, September 8, 2006 4:25 PM Connecting up Chapter 2 Connecting up Connecting to an amplifier You can connect this player to your amplifier or receiver using the analog outputs or one of the digital outputs. If you connect using one of the digital outputs, you should also connect the 2 channel analog outputs for compatibility with all discs. 1 Connect the analog LINE OUT jacks on this player to a set of analog audio inputs on your amplifier.
PD-D6-J_MY.book Page 9 Friday, September 8, 2006 Connecting up 02 CONTROL IN OUT CONTROL IN Français Pioneer component English 2 Connect the CONTROL OUT jack of that component to the CONTROL IN jack of another Pioneer component. Use a cable with a mono mini-plug on each end for the connection. Pioneer component 4:25 PM OUT Deutsch IN OUT This player Plugging in • Connect the AC power cord to the AC IN inlet on the rear panel of the player, then plug into a power outlet.
PD-D6-J_MY.
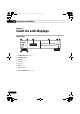
PD-D6-J_MY.book Page 11 Friday, September 8, 2006 4:25 PM Controls and displays 03 Keep in mind the following when using the remote control: 1 6 7 PURE AUDIO 8 2 4 2 3 CLEAR 4 5 6 ENTER 7 8 PROGRAM REPEAT 9 0 RANDOM TIME SACD SETUP LEGATO LINK SUPER AUDIO CD PLAYER 11 12 Display 1 3 4 TRACK 3 Number buttons (page 12) 4 PROGRAM (page 13) REPEAT (page 13) RANDOM (page 13) 7 8 1 TRACK – Lights when the track number is indicated.
PD-D6-J_MY.book 04 Page 12 Friday, September 8, 2006 4:25 PM Getting started Chapter 4 Getting started Switching on After making sure that everything is connected properly and that the player is plugged in, push the POWER button into the ON position to switch the player on. 3 Load a disc. Load a disc with the label side facing up, using the disc tray guide to align the disc. Once properly seated, press to close the disc tray. • Press on the remote to switch the unit into standby.
PD-D6-J_MY.book Page 13 Friday, September 8, 2006 4:25 PM Getting started What it does Skips to the next track. • Why can’t I hear SACD audio through the digital outputs? Other playback features What it does Selects a new track at random. Returns to the beginning of the current track. Creating a program list This feature lets you program the play order of tracks on a disc.2 1 While stopped, press PROGRAM. There are two repeat play options available during playback.
PD-D6-J_MY.book 05 Page 14 Friday, September 8, 2006 4:25 PM Other settings and features Chapter 5 Other settings and features Listening to Pure Audio Using Legato Link Pro This unit has been specially designed to provide you the truest possible reproduction of recorded audio. When the Pure Audio feature is selected, the front panel display is switched off and the digital outputs are disabled, leaving you with the pure sound source.
PD-D6-J_MY.book Page 15 Friday, September 8, 2006 4:25 PM Additional information 06 Additional information English Hints on installation Français Chapter 6 We want you to enjoy using this product for years to come, so please use the following guidelines when choosing a suitable location: • Use in a well-ventilated room. • Place on a solid, flat, level surface, such as a table, shelf or stereo rack. Hold discs by the edge or by the center hole and edge.
PD-D6-J_MY.book 06 Page 16 Friday, September 8, 2006 Additional information This player is designed to be used only with conventional, fully circular discs. Do not use shaped discs. Pioneer disclaims all liability arising in connection with the use of shaped discs. Cleaning discs Fingerprints and dust on discs can affect playback performance. Clean using a soft, dry cloth, wiping the disc lightly from the center to the outside edge as shown below.
PD-D6-J_MY.book Page 17 Friday, September 8, 2006 4:25 PM Additional information • The remote control is too far from the player, or the angle with the remote sensor is too wide: Use the remote within its operating range (page 11). • If you're trying to switch on using the remote control, make sure the front panel POWER button is switched on first. • The battery is exhausted: Replace the lithium battery (page 6). No audio, or audio is distorted.
PD-D6-J_MY.book 06 Page 18 Friday, September 8, 2006 Additional information Glossary Specifications Analog audio Direct representation of sound by an electrical signal. See also Digital audio. General Digital audio Indirect representation of sound using numbers. See also Sampling frequency and Analog audio. DRM 18 En 4:25 PM DRM (digital rights management) copy protection is a technology designed to prevent unauthorized copying by restricting playback, etc.
PD-D6-J_MY.book Page 19 Friday, September 8, 2006 Additional information Published by Pioneer Corporation. Copyright © 2006 Pioneer Corporation. All rights reserved. 06 English The specifications and design of this product are subject to change without notice, due to improvement.
PD-D6-J_Fr.book Page 2 Thursday, September 7, 2006 8:53 PM Emplacement : Panneau arrière IMPORTANT ATTENTION DANGER D´ELECTROCUTION NE PAS OUVRIR Ce symbole de l’éclair, placé dans un triangle équilatéral, a pour but d’attirer l’attention de l’utilisateur sur la présence, à l’intérieur du coffret de l’appareil, de “tensions dangereuses” non isolées d’une grandeur suffisante pour représenter un risque d’électrocution pour les êtres humains.
PD-D6-J_Fr.book Page 3 Thursday, September 7, 2006 AVERTISSEMENT Avant de brancher l’appareil pour la première, lisez attentivement la section suivante. La tension de l’alimentation électrique disponible varie selon le pays ou la région. Assurez-vous que la tension du secteur de la région où l’appareil sera utilisé correspond à la tension requise (par ex. 230 V ou 120 V), indiquée sur le panneau arrière. 8:53 PM Ce produit est destiné à une utilisation domestique générale.
PD-D6-J_Fr.book Page 4 Thursday, September 7, 2006 8:53 PM Nous vous remercions d’avoir acheté ce produit Pioneer. Veuillez lire attentivement ce mode d’emploi afin d’apprendre à manipuler votre modèle correctement. Lorsque vous avez terminé, rangez-le en lieu sûr afin de pouvoir vous y référer à l’avenir. Sommaire 01 Avant de commencer 05 Autres réglages et fonctions Caractéristiques . . . . . . . . . . . . . . . . . . . . .5 Contenu de l’emballage . . . . . . . . . . . . . . . .
PD-D6-J_Fr.book Page 5 Thursday, September 7, 2006 8:53 PM Avant de commencer 01 Avant de commencer Caractéristiques Français Deutsch Nederlands Italiano • Circuit d’alimentation à réaction rapide Le circuit d’alimentation supérieur de cet appareil permet une réaction largement améliorée grâce à l’utilisation de circuits ‘sans retour’ et de condensateurs parallèles à faible impédance généralement utilisés dans la surveillance audio professionnelle.
PD-D6-J_Fr.book 01 Page 6 Thursday, September 7, 2006 Avant de commencer Contenu de l’emballage Veuillez vous assurer que les accessoires suivants sont livrés avec l’appareil. • Télécommande • Pile au lithium (CR2025) • Câble audio stéréo RCA/phono • Câble de commande SR • Câble d’alimentation • Mode d’emploi • Carte de garantie Insertion de la pile Insérez la pile au lithium (CR2025) dans la télécommande comme illustré ci-dessous.
PD-D6-J_Fr.book Page 7 Thursday, September 7, 2006 8:53 PM Avant de commencer CD-RW Super Audio CD Tableau de compatibilité des disques CD-R/RW • CD-Audio, ISO 9660 CD-ROM* * Conforme à ISO 9660 Niveau 1 ou 2. Format physique des CD : Mode1, Mode2 XA Form1. Les systèmes de fichiers Romeo et Joliet sont compatibles.
PD-D6-J_Fr.book 02 Page 8 Thursday, September 7, 2006 8:53 PM Connexions Chapitre 2 Connexions Connexion à un amplificateur Vous pouvez relier ce lecteur à un amplificateur ou récepteur en utilisant les sorties analogiques ou l’une des sorties numériques. Si vous effectuez la connexion à l’aide d’une sortie numérique, vous devez également connecter les sorties analogiques à 2 voies pour assurer la compatibilité avec tous les disques.
PD-D6-J_Fr.book Page 9 Thursday, September 7, 2006 Connexions 02 Composant Pioneer OUT Français CONTROL IN English 2 Branchez la prise Prise CONTROL OUT de cet appareil à la prise Prise CONTROL IN d’un autre appareil Pioneer. Utilisez un câble avec une mini prise mono à chaque extrémité pour le branchement. Composant Pioneer 8:53 PM CONTROL IN OUT Deutsch IN OUT Ce lecteur Branchement Español Assurez-vous que tous les branchements sont effectués avant de relier l’appareil au secteur.
PD-D6-J_Fr.
PD-D6-J_Fr.book Page 11 Thursday, September 7, 2006 8:53 PM Commandes et écrans 03 DIMMER OPEN/CLOSE 1 6 8 2 4 2 3 CLEAR 4 5 6 ENTER 7 8 PROGRAM REPEAT SACD SETUP 9 0 RANDOM TIME LEGATO LINK SUPER AUDIO CD PLAYER 11 12 Écran 1 2 3 4 5 6 LEGATO ALL REPEAT SACD TOTAL RANDOM REMAIN PGM TRACK 8 1 TRACK – S’allume lorsque le numéro de plage est indiqué. 2 / – S’allume pendant la lecture/une pause. 3 Affichage du balayage – Affiche la vitesse de balayage.
PD-D6-J_Fr.book 04 Page 12 Thursday, September 7, 2006 8:53 PM Démarrage Chapitre 4 Démarrage Mise sous tension Après vous êtes assuré que toutes les connexions sont correctement établies et que le lecteur est branché, activez le bouton POWER en position ON pour mettre le lecteur sous tension. • Appuyez sur sur la télécommande pour mettre l’appareil en veille. POWER OFF ON Commandes de lecture de base Le tableau ci-dessous indique les commandes de base pour la lecture de disques.
PD-D6-J_Fr.book Page 13 Thursday, September 7, 2006 8:53 PM Démarrage Numéros Permettent d’entrer un numéro de plage. Appuyez sur la touche ENTER pour valider le choix. • Si le disque est arrêté, la lecture démarre à la plage sélectionnée. • Si le disque est en cours de lecture, celle-ci passe au début de la plage sélectionnée.
PD-D6-J_Fr.book 05 Page 14 Thursday, September 7, 2006 8:53 PM Autres réglages et fonctions Chapitre 5 Autres réglages et fonctions Écoute en mode Pure Audio Utilisation de Legato Link Pro Cet appareil a été spécialement conçu pour vous fournir la reproduction la plus fiable possible d’un signal audio enregistré. Lorsque le mode Pure Audio est sélectionné, l’écran du panneau avant s’éteint et les sorties numériques sont désactivées. Vous pouvez ainsi profiter de la source sonore pure.
PD-D6-J_Fr.book Page 15 Thursday, September 7, 2006 8:53 PM Informations complémentaires 06 Informations complémentaires Conseils d’installation Ce que vous devez faire… Tenez le disque par les bords ou par son centre et un bord. Lorsque vous n’utilisez pas le disque, replacezle dans son coffret et rangez ce dernier sur la tranche. Évitez d’exposer les disques à des environnements excessivement froids, humides ou chauds (y compris à la lumière directe du soleil).
PD-D6-J_Fr.book 06 Page 16 Thursday, September 7, 2006 Informations complémentaires Ce lecteur est exclusivement conçu pour l’utilisation de disques conventionnels parfaitement circulaires. N’utilisez aucun disque non circulaire. Pioneer exclut toute responsabilité liée à l’utilisation de disques non circulaires. Nettoyage des disques Les empreintes digitales et les poussières sur les disques peuvent dégrader les performances de lecture.
PD-D6-J_Fr.book Page 17 Thursday, September 7, 2006 8:53 PM Informations complémentaires • Assurez-vous que le disque est propre et qu’il n’est pas endommagé (page 15). • Vérifiez Compatibilité en lecture des disques et du format de gravure , page 7 pour confirmer que le disque est compatible avec ce lecteur. • Assurez-vous que le disque est en place la face portant l’étiquette orientée vers le haut et correctement aligné dans son alvéole.
PD-D6-J_Fr.book 06 Page 18 Thursday, September 7, 2006 Informations complémentaires Glossaire Caractéristiques techniques Audio analogique Représentation directe d’un son par un signal électrique. Reportez-vous également à Audio numérique. Audio numérique Représentation indirecte des sons au moyen de nombres. Reportez-vous également à Fréquence d’échantillonnage et Audio analogique.
PD-D6-J_Fr.book Page 19 Thursday, September 7, 2006 Informations complémentaires Publication de Pioneer Corporation. © 2006 Pioneer Corporation. Tous droits de reproduction et de traduction réservés. 06 English Les caractéristiques et la présentation peuvent être modifiées, sans avis préalable, dans un souci d’amélioration.
PD-D6-J_Ge.book Page 2 Thursday, September 7, 2006 9:07 PM Lage des Aufklebers : Rückwand des Gerätes WICHTIG CAUTION RISK OF ELECTRIC SHOCK DO NOT OPEN Das Blitzsymbol in einem Dreieck weist den Benutzer darauf hin, dass eine Berührungsgefahr mit nicht isolierten Teilen im Geräteinneren, die eine gefährliche Spannung führen, besteht. Die Spannung kann so hoch sein, dass sie die Gefahr eines elektrischen Schlages birgt.
PD-D6-J_Ge.book Page 3 Thursday, September 7, 2006 WARNUNG Vor dem erstmaligen Anschluss des Gerätes an das Stromnetz bitte den folgenden Hinweis sorgfältig beachten. Die Netzspannung ist je nach Land verschieden. Vor der Inbetriebnahme des Gerätes sicherstellen, dass die örtliche Netzspannung mit der auf dem Typenschild an der Rückwand des Gerätes angegebenen Nennspannung (z.B. 230 V oder 120 V) D3-4-2-1-4_A_Ge übereinstimmt.
PD-D6-J_Ge.book Page 4 Thursday, September 7, 2006 9:07 PM Vielen Dank, dass Sie sich für dieses Pioneer-Produkt entschieden haben. Bitte lesen Sie diese Bedienungsanleitung sorgfältig, damit Sie wissen, wie Sie Ihr Gerät ordnungsgemäß bedienen können. Bewahren Sie die Bedienungsanleitung anschließend an einem sicheren Ort auf, um später nachschlagen zu können. Inhalt 01 Bevor Sie beginnen Merkmale . . . . . . . . . . . . . . . . . . . . . . . . . .5 Lieferumfang . . . . . . . . . . . . . . . . . . . .
PD-D6-J_Ge.book Page 5 Thursday, September 7, 2006 9:07 PM Bevor Sie beginnen 01 English Kapitel 1 Bevor Sie beginnen Merkmale Français Deutsch Nederlands Italiano Español • Reaktionsschnelles Netzteil Das überragende Schaltungsdesign des Netzteils für dieses Gerät erzielt eine dramatisch verbesserte Leistung durch Anwendung von ‘No Feedback’-Schaltkreisen und parallel geschalteten Netzkondensatoren mit niedriger Impedanz, die zumeist in professionellen Audio-Monitor-Anlagen zum Einsatz kommen.
PD-D6-J_Ge.book 01 Page 6 Thursday, September 7, 2006 Bevor Sie beginnen Vorsicht Lieferumfang Überprüfen Sie zuerst, ob die folgenden Teile im Paket enthalten sind. • Fernbedienung • Lithiumbatterie (CR2025) • Cinch-Stereo-Audiokabel • SR-Steuerkabel • Netzkabel • Bedienungsanleitung • Garantiekarte Batterie einlegen Setzen Sie die Lithiumbatterie (CR2025) wie unten gezeigt in die Fernbedienung ein.
PD-D6-J_Ge.book Page 7 Thursday, September 7, 2006 9:07 PM Bevor Sie beginnen 01 CD-RW Hinweise zu WMA Super-Audio-CD Disc-Kompatibilitätstabelle • CD-Audio, ISO 9660 CD-ROM* * Kompatibel mit ISO 9660 Level 1 oder 2. Physikalisches CD-Format: Mode1, Mode2 XA Form1. Die Dateisysteme Romeo und Joliet sind beide mit diesem Player kompatibel.
PD-D6-J_Ge.book 02 Page 8 Thursday, September 7, 2006 9:07 PM Anschluss Kapitel 2 Anschluss Anschließen an einen Verstärker Sie können diesen Player wahlweise über die Analogausgänge oder einen der Digitalausgänge an Ihren Verstärker oder Receiver anschließen. Falls Sie die Verbindung über einen der Digitalanschlüsse herstellen, sollten Sie zusätzlich auch die 2-kanaligen Analogausgänge anschließen, damit die Anlage mit allen Discs kompatibel ist.
PD-D6-J_Ge.book Page 9 Thursday, September 7, 2006 Anschluss 02 CONTROL CONTROL IN OUT IN OUT 3 Führen Sie die Kette auf die gleiche Weise bis zur letzten Komponente weiter. Italiano Dieser Player Nederlands AC IN CONTROL Deutsch OUT Français Pioneer-Komponente Pioneer-Komponente English 2 Verbinden Sie den Anschluss Buchse CONTROL OUT dieser Komponente mit dem Anschluss Buchse CONTROL IN einer anderen Pioneer-Komponente.
PD-D6-J_Ge.
PD-D6-J_Ge.book Page 11 Thursday, September 7, 2006 9:07 PM Bedienelemente und Anzeigen DIMMER OPEN/CLOSE 1 6 8 2 2 3 CLEAR 4 5 6 ENTER 7 8 PROGRAM REPEAT SACD SETUP 9 0 RANDOM TIME LEGATO LINK SUPER AUDIO CD PLAYER 11 12 Display 1 2 3 4 5 6 LEGATO ALL REPEAT SACD TOTAL RANDOM REMAIN PGM TRACK 8 1 TRACK – Leuchtet, wenn die Tracknummer angezeigt wird. 2 / – Leuchtet während der Wiedergabe / in Pausenstellung. 3 Scan-Display – Zeigt die ScanGeschwindigkeit an.
PD-D6-J_Ge.book 04 Page 12 Thursday, September 7, 2006 9:07 PM Die ersten Schritte Kapitel 4 Die ersten Schritte richtig liegt, drücken Sie , um den Disc-Tray zu schließen. Einschalten Nachdem Sie sichergestellt haben, dass alles richtig verbunden und der Player angeschlossen ist, schalten Sie die Taste POWER in die Stellung ON, um den Player einzuschalten. • Drücken Sie auf der Fernbedienung, um das Gerät in Bereitschaft zu schalten. 4 Drücken Sie (Wiedergabe), um die Wiedergabe zu starten.
PD-D6-J_Ge.book Page 13 Thursday, September 7, 2006 9:07 PM Die ersten Schritte Funktion Taste Funktion Wählt zufällig einen neuen Track aus. Kehrt zurück zum Anfang des aktuellen Tracks. Deutsch Häufig gestellte Fragen • Warum wird über die Digitalausgänge kein SACD-Tonsignal ausgegeben? SACD-Ton wird nur über die Analogausgänge ausgegeben. Dies ist keine Funktionsstörung.
PD-D6-J_Ge.book 05 Page 14 Thursday, September 7, 2006 9:07 PM Weitere Einstellungen und Funktionen Kapitel 5 Weitere Einstellungen und Funktionen Hören mit Pure Audio Verwenden von Legato Link Pro Dieses Gerät wurde speziell im Hinblick auf die bestmögliche Reproduktion aufgenommener Audiosignale entwickelt.
PD-D6-J_Ge.book Page 15 Thursday, September 7, 2006 9:07 PM Zusätzliche Informationen 06 Zusätzliche Informationen Hinweise zur Aufstellung Das Gerät bitte... Das Gerät bitte nicht... Halten Sie Discs an den Kanten oder zwischen Mittelloch und Kante. Wenn Sie eine Disc nicht benutzen, legen Sie sie in die Hülle und lagern Sie diese hochkant. Setzen Sie Discs keinen extrem niedrigen oder hohen Temperaturen (auch keiner direkten Sonneneinstrahlung) und hoher Luftfeuchtigkeit aus.
PD-D6-J_Ge.book 06 Page 16 Thursday, September 7, 2006 Zusätzliche Informationen Dieser Player ist nur zur Wiedergabe von herkömmlichen, runden Discs ausgelegt. Verwenden Sie keine Discs mit Sonderformen. Pioneer lehnt jede Haftung für Schäden ab, die auf den Gebrauch nicht genormter Discs zurückzuführen sind. Reinigen von Discs Fingerabdrücke und Staub auf Discs können die Wiedergabe beeinträchtigen.
PD-D6-J_Ge.book Page 17 Thursday, September 7, 2006 9:07 PM Zusätzliche Informationen Häufig ist eine vermeintliche Störung durch einen Bedienungsfehler bedingt. Wenn das Gerät nicht richtig arbeitet, gehen Sie zunächst die unten stehenden Punkte durch. Manchmal wird eine Störung auch durch ein externes Gerät verursacht. Überprüfen Sie alle Geräte im Umfeld des Players. Wenn Sie die Störung nicht beheben können, wenden Sie sich an die nächste PioneerKundendienststelle oder an Ihren Händler.
PD-D6-J_Ge.book 06 Page 18 Thursday, September 7, 2006 Zusätzliche Informationen Glossar Analoges Audio Technische Daten Direkte Repräsentation des Schalls mittels eines elektrischen Signals. Siehe auch Digital Audio. Digital Audio Indirekte Repräsentation des Schalls unter Verwendung von Zahlendaten. Siehe auch Sampling-Frequenz und Analoges Audio. DRM DRM (Digital Rights Management) ist ein Kopierschutzverfahren, das entwickelt wurde, um illegales Kopieren durch Einschränken der Wiedergabe usw.
PD-D6-J_Ge.book Page 19 Thursday, September 7, 2006 Zusätzliche Informationen Veröffentlicht von Pioneer Corporation. Urheberrechtlich geschützt © 2006 Pioneer Corporation. Alle Rechte vorbehalten. 06 English Aus Gründen der Produktverbesserung behalten wir uns das Recht vor, die technischen Daten und das Design dieses Geräts ohne vorherige Ankündigung zu ändern.
PD-D6-J_Du.book Page 2 Thursday, September 7, 2006 9:15 PM Plaats: Achterkant van apparaat BELANGRIJK CAUTION RISK OF ELECTRIC SHOCK DO NOT OPEN De lichtflash met pijlpuntsymbool in een gelijkzijdige driehoek is bedoeld om de aandacht van de gebruikers te trekken op een niet geïsoleerde “gevaarlijke spanning” in het toestel, welke voldoende kan zijn om bij aanraking een elektrische shock te veroorzaken.
PD-D6-J_Du.book Page 3 Thursday, September 7, 2006 WAARSCHUWING Lees zorgvuldig de volgende informatie voordat u de stekker de eerste maal in het stopcontact steekt. De bedrijfsspanning van het apparaat verschilt afhankelijk van het land waar het apparaat wordt verkocht. Zorg dat de netspanning in het land waar het apparaat wordt gebruikt overeenkomt met de bedrijfsspanning (bijv. 230 V of 120 V) aangegeven D3-4-2-1-4_A_Du op de achterkant van het apparaat.
PD-D6-J_Du.book Page 4 Thursday, September 7, 2006 9:15 PM Dank u wel dat u dit Pioneer-product hebt gekocht. Lees alstublieft deze gebruiksaanwijzing goed door zodat u weet hoe u uw apparaat correct kunt gebruiken. Als u de gebruiksaanwijzing hebt gelezen, bergt u hem op een veilige plaats op voor later gebruik. Inhoud 01 Voordat u begint 04 Aan de slag Kenmerken . . . . . . . . . . . . . . . . . . . . . . . . .5 Inhoud van de doos . . . . . . . . . . . . . . . . . . .
PD-D6-J_Du.book Page 5 Thursday, September 7, 2006 9:15 PM Voordat u begint 01 English Hoofdstuk 1 Voordat u begint Kenmerken Français Deutsch Nederlands Italiano Español • 'Quick response'-voedingscircuit Het kwalitatief zeer hoogwaardige voedingscircuit dat in dit apparaat wordt toegepast maakt sterk verbeterde reactiesnelheden mogelijk door gebruik te maken van circuits ‘zonder feedback’ en parallelle hoofdcondensatoren met lage impedantie die kenmerkend zijn voor professionele audiobewaking.
PD-D6-J_Du.book 01 Page 6 Thursday, September 7, 2006 Voordat u begint Inhoud van de doos Controleer of de volgende accessoires in de doos zitten. • Afstandsbediening • Lithiumbatterij (CR2025) • RCA/phono stereo audiokabel • SR-besturingskabel • Netsnoer • Gebruiksaanwijzing • Garantiebewijs De batterij plaatsen Plaats de lithiumbatterij (CR2025) op de hieronder aangegeven wijze in de afstandsbediening.
PD-D6-J_Du.book Page 7 Thursday, September 7, 2006 9:15 PM Voordat u begint 01 CD-RW Info over WMA Nederlands CD-R • Schijven die zijn opgenomen met behulp van een pc zijn mogelijk niet afspeelbaar vanwege de instelling van de software die is gebruikt voor het maken van de schijf. Controleer in dergelijke gevallen de softwarehandleiding of de verpakking van de schijf voor nadere informatie over compatibiliteit. • Schijven die zijn opgenomen in de packet write-modus zijn niet compatibel.
PD-D6-J_Du.book 02 Page 8 Thursday, September 7, 2006 9:15 PM Aansluitingen Hoofdstuk 2 Aansluitingen Verbinding tot stand brengen met een versterker U kunt deze speler via de analoge uitgangen of via een van de digitale uitgangen verbinden met uw versterker of receiver. Als u de verbinding tot stand brengt via een van de digitale uitgangen, moet u ook de tweekanaals analoge uitgangen verbinden voor compatibiliteit met alle schijven.
PD-D6-J_Du.book Page 9 Thursday, September 7, 2006 Aansluitingen 02 CONTROL OUT CONTROL IN Deutsch IN OUT Nederlands AC IN CONTROL IN Français Pioneer-component English 2 Verbind de CONTROL OUT-aansluiting van die component met de CONTROL INaansluiting van een andere Pioneercomponent. Gebruik een kabel met een mono ministekker aan beide uiteinden om de verbinding tot stand te brengen.
PD-D6-J_Du.
PD-D6-J_Du.
PD-D6-J_Du.book 04 Page 12 Thursday, September 7, 2006 9:15 PM Aan de slag Hoofdstuk 4 Aan de slag dat is gebeurd, drukt u op om de schijflade te sluiten. Inschakelen Zet, nadat u hebt gecontroleerd of alle verbindingen correct zijn uitgevoerd en het netsnoer is aangesloten, de knop POWER in de stand ON om de speler in te schakelen. • Druk op op de afstandsbediening om het apparaat op standby te zetten. POWER OFF ON 4 Druk op (afspelen) om het afspelen te starten.
PD-D6-J_Du.book Page 13 Thursday, September 7, 2006 9:15 PM Aan de slag Functie Met de volgende functies kunt u de afspeelvolgorde aanpassen. Houd er rekening mee dat deze functies niet beschikbaar zijn voor gegevensschijven (met WMA/MP3bestanden). Willekeurige weergave gebruiken Gebruik de functie voor willekeurige weergave om tracks in willekeurige volgorde weer te geven. U kunt de optie voor willekeurige weergave instellen wanneer een schijf wordt afgespeeld of is stopgezet.
PD-D6-J_Du.book 05 Page 14 Thursday, September 7, 2006 9:15 PM Overige instellingen en functies Hoofdstuk 5 Overige instellingen en functies Luisteren naar Pure Audio Legato Link Pro gebruiken Dit apparaat is specifiek ontworpen om u een zo getrouw mogelijke weergave van opgenomen audio te bieden. Als de functie Pure Audio is geselecteerd, wordt het display op het voorpaneel uitgeschakeld en worden de digitale uitgangen gedeactiveerd, zodat u kunt genieten van de pure geluidsbron.
PD-D6-J_Du.book Page 15 Thursday, September 7, 2006 9:15 PM Extra informatie 06 English Hoofdstuk 6 Extra informatie Wij willen graag dat u jarenlang plezier zult hebben van dit apparaat. Let daarom op het volgende wanneer u een geschikte plaats voor het apparaat uitzoekt: Houd de schijf bij de rand vast, of bij het gaatje in het midden en de rand. Wanneer u een schijf niet gebruikt, doe deze dan terug in het doosje en zet dit rechtop.
PD-D6-J_Du.book 06 Page 16 Thursday, September 7, 2006 Extra informatie Deze speler is uitsluitend ontworpen voor gebruik met conventionele, geheel ronde schijven. Gebruik geen schijven met een afwijkende vorm. Pioneer kan niet aansprakelijk worden gesteld voor eventuele defecten als gevolg van het gebruik van schijven met een afwijkende vorm. De schijven reinigen Vingerafdrukken en vuil op de schijven kunnen de weergaveprestatie beïnvloeden.
PD-D6-J_Du.book Page 17 Thursday, September 7, 2006 9:15 PM Extra informatie 06 Storingen verhelpen English • De afstandsbediening is te ver van de speler verwijderd of de afstandsbediening wordt onder een te grote hoek naar de sensor voor de afstandsbediening gericht: Gebruik de afstandsbediening binnen het bedieningsbereik (pagina 11). • Als u probeert het apparaat in te schakelen via de afstandsbediening, controleert u eerst of de knop POWER op het voorpaneel is ingeschakeld.
PD-D6-J_Du.book 06 Page 18 Friday, September 8, 2006 Extra informatie Woordenlijst Analoge audio Directe weergave van geluid door een elektrisch signaal. Zie ook Digitale audio. Digitale audio Indirecte weergave van geluid door getallen. Zie ook Bemonsteringsfrequentie en Analoge audio. DRM De DRM (Digital Rights Management) kopieerbeveiliging is een technologie die ontwikkeld is om ongeoorloofd kopiëren te voorkomen door beperking van weergave enz.
PD-D6-J_Du.book Page 19 Thursday, September 7, 2006 Extra informatie Uitgegeven door Pioneer Corporation. Copyright © 2006 Pioneer Corporation. Alle rechten voorbehouden. 06 English De technische gegevens en het ontwerp van dit product kunnen vanwege voortgaande verbetering zonder voorafgaande kennisgeving worden gewijzigd.
PD-D6-J_It.book Page 2 Thursday, September 7, 2006 9:20 PM Posizione dell’etichetta : parte posteriore dell’apparecchio. IMPORTANTE CAUTION RISK OF ELECTRIC SHOCK DO NOT OPEN Il simbolo del lampo con terminale a forma di freccia situato all’interno di un triangolo equilatero serve ad avvisare l’utilizzatore della presenza di una “tensione pericolosa” non isolata nella struttura del prodotto che potrebbe essere di un’intensità tale da provocare scosse elettriche all’utilizzatore.
PD-D6-J_It.book Page 3 Thursday, September 7, 2006 ATTENZIONE Prima di collegare per la prima volta l’apparecchio alla sorgente di alimentazione leggere attentamente la sezione che segue. La tensione della sorgente di elettricità differisce da Paese a Paese e da regione a regione. Verificare che la tensione di rete della zona in cui si intende utilizzare l’apparecchio sia quella corretta, come indicato sul pannello posteriore dell’apparecchio D3-4-2-1-4_A_It stesso (ad es.: 230 V o 120 V).
PD-D6-J_It.book Page 4 Thursday, September 7, 2006 9:20 PM Grazie per avere acquistato questo prodotto Pioneer. Si prega di leggere queste istruzioni d’uso per adoperare il proprio modello in modo corretto. Dopo avere letto le istruzioni, porle in un luogo sicuro per poterle consultare in futuro. Indice 01 Prima di iniziare Caratteristiche . . . . . . . . . . . . . . . . . . . . . . .5 Contenuto della confezione . . . . . . . . . . . . .
PD-D6-J_It.book Page 5 Thursday, September 7, 2006 9:20 PM Prima di iniziare 01 English Capitolo 1 Prima di iniziare Caratteristiche Français Deutsch Nederlands Italiano Español • Circuito di alimentazione a risposta rapida Il circuito di alimentazione adottato dalla presente unità ottiene una risposta notevolmente migliore grazie all’impiego della circuiteria ‘no feedback’ e dei condensatori principali paralleli a bassa impedenza normalmente utilizzati per il monitoraggio audio professionale.
PD-D6-J_It.book 01 Page 6 Thursday, September 7, 2006 Prima di iniziare Contenuto della confezione Verificare che i seguenti accessori siano inclusi nella confezione. • Telecomando • Batteria al litio (CR2025) • Cavo audio stereo RCA/fono • Cavo di comando SR • Cavo di alimentazione • Istruzioni per l’uso • Documento di garanzia Inserimento della batteria Inserire la batteria al litio (CR2025) nel telecomando, come indicato qui sotto.
PD-D6-J_It.book Page 7 Thursday, September 7, 2006 9:20 PM Prima di iniziare 01 CD-RW Il formato WMA Super Audio CD Tabella compatibilità dischi • CD-Audio, CD-ROM ISO 9660* * Conforme agli standard ISO 9660 Level 1 o 2. Formato fisico del CD: Mode1, Mode2 XA Form1. I file system Romeo e Joliet sono entrambe compatibili.
PD-D6-J_It.book 02 Page 8 Thursday, September 7, 2006 9:20 PM Collegamento Capitolo 2 Collegamento Collegamento ad un amplificatore È possibile collegare questo lettore ad un amplificatore o ad un ricevitore usando le uscite analogiche o una delle uscite digitali. Se si effettua la connessione usando una delle uscite digitali, è necessario anche collegare le uscite analogiche a 2 canali per la compatibilità con tutti i dischi.
PD-D6-J_It.book Page 9 Thursday, September 7, 2006 Collegamento 02 CONTROL OUT CONTROL IN Français Componente Pioneer Componente Pioneer English 2 Collegare presa CONTROL OUT del componente a presa CONTROL IN di un altro componente Pioneer. Usare una cavo con spinotto mono su ciascuna estremità per il collegamento. IN 9:20 PM OUT Deutsch IN OUT Questo lettore Inserimento della spina Español Accertarsi di completare tutti i collegamenti prima di collegarsi ad una presa AC.
PD-D6-J_It.
PD-D6-J_It.book Page 11 Thursday, September 7, 2006 9:20 PM Controlli e display 03 DIMMER OPEN/CLOSE 1 6 8 2 4 2 3 CLEAR 4 5 6 ENTER 7 8 PROGRAM REPEAT SACD SETUP 9 0 RANDOM TIME LEGATO LINK 11 12 SUPER AUDIO CD PLAYER Display 1 2 3 4 5 6 LEGATO ALL REPEAT SACD TOTAL RANDOM REMAIN PGM TRACK 8 1 TRACK – Si accende quando è indicato il numero del brano. 2 / – Acceso in fase di riproduzione/ pausa. 3 Display scansione – Mostra la velocità di scansione.
PD-D6-J_It.book 04 Page 12 Thursday, September 7, 2006 9:20 PM Come iniziare Capitolo 4 Come iniziare collocato, premere per chiudere il cassetto disco. Accensione Dopo aver verificato che tutti i cavi siano collegati correttamente e che il lettore sia collegato ad una presa di corrente, premere il pulsante POWER nella posizione ON per accendere il lettore. • Premere sul telecomando per attivare il lettore in standby. 4 Premere (riproduzione) per avviare la riproduzione.
PD-D6-J_It.book Page 13 Thursday, September 7, 2006 9:20 PM Come iniziare Numbers Utilizzati per immettere un numero di traccia. Per scegliere, premere ENTER. • Se il disco viene fermato, la riproduzione parte dalla traccia selezionata. • Se il disco è in riproduzione, questa passa all’inizio della traccia selezionata.
PD-D6-J_It.book 05 Page 14 Thursday, September 7, 2006 9:20 PM Altre impostazioni e caratteristiche Capitolo 5 Altre impostazioni e caratteristiche Ascolto di Pure Audio Uso di Legato Link Pro Questa unità è stata progettata appositamente per fornire la riproduzione più fedele possibile di audio registrato. Quando è selezionata la caratteristica Pure Audio, il display del pannello anteriore è spento e le uscite digitali sono disabilitate, lasciando soltanto la sorgente sonora pura.
PD-D6-J_It.book Page 15 Thursday, September 7, 2006 9:20 PM Informazioni aggiuntive 06 Informazioni aggiuntive Suggerimenti per l’installazione Sì... Prendere il disco per le estremità o tra un bordo e il foro centrale. Quando non si utilizza un disco, riporlo nella custodia e posizionare quest’ultima in verticale. Evitare di lasciare i dischi in un ambiente eccessivamente freddo, umido o caldo (inclusi quelli sotto la luce diretta del sole). Non incollare carta o adesivi ai dischi.
PD-D6-J_It.book 06 Page 16 Thursday, September 7, 2006 Informazioni aggiuntive Quest’unità può essere utilizzata solo con dischi convenzionali circolari. Non usare dischi di forma diversa. Pioneer non si ritiene responsabile per danni causati dall’uso di un disco di forma non standard. Pulizia dei dischi Le impronte e la polvere su dischi possono influenzare la qualità della riproduzione. Pulire i dischi con un panno soffice ed asciutto passandolo dal centro verso i bordi come visto in figura.
PD-D6-J_It.book Page 17 Thursday, September 7, 2006 9:20 PM Informazioni aggiuntive • Il telecomando è troppo lontano dal lettore, o l’angolo del sensore col telecomando è eccessivo: Usare il telecomando nel suo campo di azione (pagina 11). • Se si tenta di accendere il lettore usando il telecomando, verificare prima che sul pannello anteriore sia acceso il pulsante POWER. • La batteria è scarica: Sostituire la batteria al litio (pagina 6). Audio mancante o distorto.
PD-D6-J_It.book 06 Page 18 Thursday, September 7, 2006 Informazioni aggiuntive Glossario Specifiche Audio analogico Rappresentazione diretta di suoni con un segnale elettrico. Vedere anche Audio digitale. Audio digitale Rappresentazione indiretta di suoni attraverso numeri. Vedere anche Frequenza di campionamento e Audio analogico.
PD-D6-J_It.book Page 19 Thursday, September 7, 2006 Informazioni aggiuntive Pubblicato da Pioneer Corporation. Copyright © 2006 Pioneer Corporation. Tutti i diritti riservati. 06 English Le specifiche e il disegno di questo prodotto sono soggetti a modifiche senza preavviso dovute a miglioramenti.
PD-D6-J_Sp.book Page 2 Thursday, September 7, 2006 9:25 PM Ubicación : Parte posterior del aparato IMPORTANTE CAUTION RISK OF ELECTRIC SHOCK DO NOT OPEN La luz intermitente con el símbolo de punta de flecha dentro un triángulo equilátero. Está convenido para avisar el usuario de la presencia de “voltaje peligrosa” no aislada dentro el producto que podría constituir un peligro de choque eléctrico para las personas.
PD-D6-J_Sp.book Page 3 Thursday, September 7, 2006 ADVERTENCIA Antes de enchufar el aparato a la corriente, lea la sección siguiente con mucha atención. La tensión de la red eléctrica es distinta según el país o región. Asegúrese de que la tensión de la alimentación de la localidad donde se proponga utilizar este aparato corresponda a la tensión necesaria (es decir, 230 V ó 120 V) indicada en el D3-4-2-1-4_A_Sp panel posterior.
PD-D6-J_Sp.book Page 4 Thursday, September 7, 2006 9:25 PM Gracias por comprar un producto Pioneer. Le sugerimos que lea atentamente este manual de instrucciones con el fin de que aprenda el funcionamiento de su equipo de manera correcta. Después de leer las instrucciones, guárdelas en un lugar seguro para futuras referencias. Contenido 01 Antes de comenzar 04 Operaciones a realizar Funciones . . . . . . . . . . . . . . . . . . . . . . . . . .5 Contenido de la caja . . . . . . . . . . . . . . . . . .
PD-D6-J_Sp.
PD-D6-J_Sp.book 01 Page 6 Thursday, September 7, 2006 Antes de comenzar Contenido de la caja Confirme que estos accesorios se encuentran en la caja una vez abierta. • Control remoto • Pila de litio (CR2025) • Cable de audio estéreo fonográfico/RCA • Cable de control de SR • Cable de alimentación • Manual de instrucciones • Tarjeta de garantía Introducción de la pila Introduzca la pila de litio (CR2025) en el control remoto como se muestra a continuación.
PD-D6-J_Sp.
PD-D6-J_Sp.book 02 Page 8 Thursday, September 7, 2006 9:25 PM Conexión Capítulo 2 Conexión Conexión a un amplificador Puede conectar este reproductor a su amplificador o receptor mediante las salidas analógicas o una de las salidas digitales. Si lo conecta mediante una de las salidas digitales, debe conectar también las salidas analógicas de 2 canales para disfrutar de la compatibilidad con todos los discos.
PD-D6-J_Sp.book Page 9 Thursday, September 7, 2006 Conexión 02 CONTROL OUT CONTROL IN Français Componente Pioneer Componente Pioneer English 2 Conecte el Conector CONTROL OUT de ese componente al Conector CONTROL IN del otro componente Pioneer. Utilice un cable con una mini-conexión mono en cada extremo para la conexión. IN 9:25 PM OUT Deutsch IN OUT Este reproductor Conexión Español Asegúrese de que realiza todas las conexiones antes de conectar a una toma de CA.
PD-D6-J_Sp.
PD-D6-J_Sp.book Page 11 Thursday, September 7, 2006 9:25 PM Controles y visualizadores DIMMER OPEN/CLOSE 1 6 8 2 2 3 CLEAR 4 5 6 ENTER 7 8 PROGRAM REPEAT SACD SETUP 9 0 RANDOM TIME LEGATO LINK 11 12 SUPER AUDIO CD PLAYER Visualizador 1 2 3 4 5 6 LEGATO ALL REPEAT SACD TOTAL RANDOM REMAIN PGM TRACK 8 1 TRACK – Se ilumina cuando se indica el número de pista. 2 / – Se ilumina durante la reproducción / en modo de pausa.
PD-D6-J_Sp.book 04 Page 12 Thursday, September 7, 2006 9:25 PM Operaciones a realizar Capítulo 4 Operaciones a realizar colocado correctamente, pulse para cerrar la bandeja de discos. Encendido Después de comprobar que se ha conectado todo correctamente y que el reproductor está enchufado, pulse el botón POWER situándolo en la posición ON para encender el reproductor. • Pulse en el control remoto para cambiar la unidad al modo de espera.
PD-D6-J_Sp.book Page 13 Thursday, September 7, 2006 9:25 PM Operaciones a realizar Números Se usan para introducir un número de pista. Pulse ENTER para seleccionar. • Si el disco está parado, la reproducción empieza desde la pista seleccionada. • Si se reproduce el disco, la reproducción salta al principio de la pista seleccionada. (no disponibles con discos de datos en formato MP3/WMA) Las siguientes funciones permiten personalizar el orden de reproducción.
PD-D6-J_Sp.book 05 Page 14 Thursday, September 7, 2006 9:25 PM Otros ajustes y funciones Capítulo 5 Otros ajustes y funciones Escucha en Pure Audio Uso de Legato Link Pro Esta unidad ha sido especialmente diseñada para proporcionarle la reproducción más auténtica posible de audio grabado. Cuando se selecciona la función Pure Audio, el visualizador del panel frontal se apaga y las salidas digitales se deshabilitan, dejándole con la fuente de sonido puro.
PD-D6-J_Sp.book Page 15 Thursday, September 7, 2006 9:25 PM Información adicional 06 Información adicional Sugerencias de instalación Recomendamos que… Sujete el disco por los lados o por el agujero central y el extremo. Cuando no use un disco, introdúzcalo en su funda y guárdelo en posición vertical. Evite dejar los discos en ambientes demasiado fríos, húmedos o calientes (y bajo la luz solar directa). No pegue papeles ni pegatinas en los discos.
PD-D6-J_Sp.book 06 Page 16 Thursday, September 7, 2006 Información adicional Este reproductor ha sido diseñado para usar sólo discos convencionales, discos completamente circulares. No utilice discos de otras formas. Pioneer renuncia a cualquier responsabilidad relacionada con el uso de discos con otras formas. Limpieza de los discos Las huellas dactilares y el polvo de los discos pueden alterar la reproducción.
PD-D6-J_Sp.book Page 17 Thursday, September 7, 2006 9:25 PM Información adicional Remedio El disco no se reproduce o sale expulsado automáticamente después de cargarlo. • Asegúrese de que el disco no tiene suciedad o polvo y que no está dañado (página 15). • Compruebe Compatibilidad de reproducción de los distintos formatos de disco / contenido en la página 7 para confirmar que el disco es compatible con este reproductor.
PD-D6-J_Sp.book 06 Page 18 Thursday, September 7, 2006 Información adicional Glosario Audio analógico Especificaciones Representación directa del sonido mediante una señal eléctrica. Véase también Audio digital. Audio digital Representación indirecta del sonido usando números. Véase también Frecuencia de muestreo y Audio analógico.
PD-D6-J_Sp.book Page 19 Thursday, September 7, 2006 Información adicional Publicado por Pioneer Corporation. Copyright © 2006 Pioneer Corporation. Todos los derechos reservados. 06 English Las especificaciones y diseño de este producto están sujetos a cambios sin previo aviso, debido a mejoras en los mismos.
PD-D6-J_MY.book Page 20 Friday, September 8, 2006 4:25 PM Published by Pioneer Corporation. Copyright © 2006 Pioneer Corporation. All rights reserved. Publication de Pioneer Corporation. © 2006 Pioneer Corporation. Tous droits de reproduction et de traduction réservés. PIONEER CORPORATION 4-1, Meguro 1-Chome, Meguro-ku, Tokyo 153-8654, Japan PIONEER ELECTRONICS (USA) INC. P.O. BOX 1540, Long Beach, California 90810-1540, U.S.A. TEL: (800) 421-1404 PIONEER ELECTRONICS OF CANADA, INC.