Operating Instructions | Mode d’emploi | Bedienungsanleitung PDPPLASMA TELEVISION TÉLÉVISEUR PLASMA PLASMA-FERNSEHER PDP- 508 428 XD XD
Replacement and mounting of an AC plug on the power supply cord of this unit should be performed only by qualified service personnel. IMPORTANT: THE MOULDED PLUG This appliance is supplied with a moulded three pin mains plug for your safety and convenience. A 13 amp fuse is fitted in this plug. Should the fuse need to be replaced, please ensure that the replacement fuse has a rating of 13 amps and that it is approved by ASTA or BSI to BS1362.
WARNING This equipment is not waterproof. To prevent a fire or shock hazard, do not place any container filed with liquid near this equipment (such as a vase or flower pot) or expose it to dripping, splashing, rain or moisture. D3-4-2-1-3_A_En The following symbols are found on labels attached to the product. They alert the operators and service personnel of this equipment to any potentially dangerous conditions.
Contents Thank you for buying this Pioneer product. Please read through these operating instructions so you will know how to operate your model properly. After you have finished reading the instructions, put them away in a safe place for future reference. In some countries or regions, the shape of the power plug and power outlet may sometimes differ from that shown in the explanatory drawings. However the method of connecting and operating the unit are the same.
Contents English 10 Using the Electronic Programme Guide (EPG)(for DTV only) . . . . . . . . . . . . . . . . . . 45 EPG display format. . . . . . . . . . . . . . . . . . . . . . . . . . . . Using the EPG. . . . . . . . . . . . . . . . . . . . . . . . . . . . . . . . Presetting TV programmes using the EPG . . . . . . . . Using other useful EPG functions . . . . . . . . . . . . . . . 45 46 46 49 11 Useful adjustment settings . . . . . . . . . 50 Switching the vertical drive mode (AV source only) . . . . .
01 Important user information Chapter 1 Important user information In order to obtain maximum enjoyment from this Pioneer PDP508XD/PDP-428XD plasma television, please first read this information carefully. With the Pioneer PDP-508XD/PDP-428XD, you can be assured of a high quality plasma television with long-life and high reliability.
Important user information • Pioneer bears no responsibility for any damage arising from incorrect use of the product by you or other people, malfunctions when in use, other product related problems, and use of the product except in cases where the company must be liable. Plasma television protection function When still images (such as photos and computer images) stay on the screen for an extended period of time, the screen will be slightly dimmed.
01 Important user information Caution Panel sticking and after-image lag Displaying the same images such as still images for a long time may cause after-image lagging. This may occur in the following two cases. After-image lagging due to remaining electrical load When image patterns with very high peak luminance are displayed for more than one minute, after-image lagging may occur due to the remaining electric load.
Safety precautions 02 English Chapter 2 Safety precautions Electricity is used to perform many useful functions, but it can also cause personal injuries and property damage if improperly handled. This product has been engineered and manufactured with the highest priority on safety. However, improper use can result in electric shock and/or fire. In order to prevent potential danger, please observe the following instructions when installing, operating and cleaning the product.
02 Safety precautions Installation precautions Caution Observe the following precautions when installing with any items such as the optional stand. When using the optional stand, brackets, or equivalent items • Ask your dealer to perform the installation. • Be sure to use the supplied bolts. • For details, see the instruction manual that comes with the optional stand (or equivalent items). When using other items • Consult your dealer.
Supplied accessories 03 English Chapter 3 Supplied accessories Check that all of the following accessories are supplied in the box.
04 Part names Chapter 4 Part names Plasma television (Front) Side PDP-508XD PDP-428XD Side 11 7 8 12 9 13 10 14 15 ON STANDBY 2 3 TIMER ON 1 4 STANDBY TIMER 5 6 1 2 3 4 5 6 Viewed from the underside of the display Viewed from the front of the display The terminals on side panels are common to the PDP-508XD and PDP-428XD.
Part names 04 English Plasma television (Rear) PDP-508XD 10 11 12 13 14 PDP-428XD 15 3 2 1 11 12 13 14 15 10 16 17 18 19 4 5 6 7 8 9 * For exact terminal positions, refer to the terminal position sheet located near the terminal compartment. 16 17 18 The terminals from 1 to 9 are the same as the PDP-508XD.
04 Part names Remote control unit c: Switches the screen mode among 2-screen, picture-in- 6 picture, and single-screen. This section describes the functions of the buttons available when the TV mode has been selected by using the SELECT button. For the buttons controlling other equipment, see Controlling other equipment using the supplied remote control unit starting from page 68. 7 P+/P–: TV/External input mode: Selects a channel. w/x: Teletext mode: Selects a page.
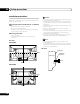
Preparation 05 English Chapter 5 Preparation Installing the plasma television Moving the plasma television When installing on a rack, etc., hold the plasma television as shown below. Because the plasma television is heavy, be sure to have someone help you when moving it. Over 50 cm (for PDP-508XD) Under speaker Over 10 cm Location • Avoid direct sunlight. Maintain adequate ventilation.
05 Preparation (for PDP-428XD) Preventing the plasma television from falling over After installing the stand, be sure to take special care to ensure that the plasma television will not fall over and is stabilized to both the wall and rack. Stabilizing on a table or rack Stabilize the plasma television as shown in the diagram using the plastic bands and screws supplied with the optional stand.
Preparation 05 English Basic connections Caution • A table or rack with adequate strength should always be used to support the plasma television. Failure to do so could result in personal injury and physical damage. • When installing the plasma television, please take the necessary safety measures to prevent it from falling or overturning in case of emergencies, such as earthquakes, or of accidents. • If you do not take these precautions, the plasma television could fall down and cause injury.
05 Preparation Routing cables Attaching the ferrite core When the speaker is installed under the plasma television panel (for PDP-508XD only): Attach the accessory ferrite core to the end of the power cord as shown in the accompanying illustration. Use the provided cable tie to prevent the ferrite core from slipping on the table. If you do not do this, the plasma television will not conform to mandatory CE standards.
Preparation Inserting batteries 1 Open the battery cover. Operating range of the remote control unit English Preparing the remote control unit 05 Operate the remote control unit while pointing it toward the remote control sensor located at the bottom right of the front panel of the plasma television. The distance from the remote control sensor must be within 7 m and the angle relative to the sensor must be within 30 degrees in the right, left, upward, or downward direction.
06 Watching TV Chapter 6 Watching TV Important • Before watching broadcast channels, the built-in TV tuner must be set up. See Setting up TV channels on page 26 for how to do this. Turning the power on • Press a on the plasma television when the POWER ON and STANDBY indicators are off. • The system is on. • The POWER ON indicator lights up blue. • Press a or 0 to 9 on the remote control unit or STANDBY/ON on the plasma television if the STANDBY indicator lights red.
Watching TV 06 Using 0 to 9 on the remote control unit Use the remote control or the control panel on the right-hand side of the plasma television to change channels. • Before operating with the remote control unit, make sure to select the TV mode using its SELECT button. See Controlling other equipment using the supplied remote control unit on page 68. • Select channels directly by pressing buttons 0 to 9. For example: Press 2 to select channel 2 (one-digit channel).
06 Watching TV Changing the volume and sound The table below shows the available audio channels by broadcast audio type. Use the remote control or the control panel on the right-hand side of the plasma television to adjust the volume.
Watching TV 06 • Before operating with the remote control unit, make sure to select the TV mode using its SELECT button. See Controlling other equipment using the supplied remote control unit on page 68. 1 Press c to select the display mode. Each time you press c, the display mode is switched among 2screen, picture-in-picture, and single-screen. English Using the multiscreen functions • In 2-screen or picture-in-picture mode, press to switch the position of the two screens shown.
06 Watching TV Note • The multiscreen function cannot display images from the same input source at the same time. If you make such an attempt, a warning message appears. • The multiscreen function cannot display images from combinations of two external input sources (INPUT 1 to INPUT 5, PC). It can display images from the following combinations of input sources.
The HOME MENU 07 English Chapter 7 The HOME MENU HOME MENU overview For PC source For AV source HOME MENU Item Picture AV Selection Contrast Brightness Colour Tint Sharpness Pro Adjust Reset Treble Bass Balance Reset Sound Effect Headphone Output Sub Volume Energy Save No Signal Off No Operation Off – Position Auto Size Side Mask HDMI Input HDMI Control Setting Blue LED Dimmer Orbiter Video Pattern Drive Mode Colour System Input Select Game Control Pref Room Light Sensor Auto Installation Analogue
08 Setting up Chapter 8 Setting up Setting up TV channels Note • You can start Auto Installation from the HOME MENU after moving to another country, for example. Perform the following steps before starting Auto Installation: Press HOME MENU, select “Setup” (/ then ENTER), then “Auto Installation” (/ then ENTER). The password entry screen appears. Enter your four-digit password using buttons 0 to 9. • If no channel is found, check the antenna connections, and then retry Auto Installation.
Setting up 13 Select “Store” (/). 14 Select “Yes”, “Yes (Listed)”, or “No” (/). Item Description Yes You can select the channel using P+/P– Setting Child Lock Child Lock inhibits selected TV channels from being tuned and watched. 1 Repeat steps 1 to 6 provided for Reducing video noise. After selecting a channel (using Programme Entry), perform the following steps: 2 3 Yes (Listed) No Select this option to register the channel as your favourite channel.
08 Setting up Labeling TV channels Sorting preset TV channels You can name TV channels that you have set up, using up to five characters. This may help you easily identify the channels during selections. Use the following procedure to change the sequence of the preset TV programmes. 1 Press HOME MENU. 2 Select “Setup” (/ then ENTER). 3 Select “Analogue TV Setup” (/ then ENTER). The password entry screen appears. Enter your four-digit password using 0 to 9. 4 Select “Label” (/ then ENTER).
Setting up 08 For AV source Item Description OPTIMUM Automatically adjusts the brightness of the image to the optimum level in accordance with the brightness level of the viewing area. This setting is shared by both the external inputs and TV input sources. STANDARD Well defined image in a normally lit room. This setting is shared by both the external inputs and TV input sources. DYNAMIC Sharp imaging with the maximum contrast. Note that this mode does not allow manual image quality adjustment.
08 Setting up Basic picture adjustments For AV source Adjust the picture to your preference for the chosen AV Selection option (except DYNAMIC). 1 Press HOME MENU. 2 Select “Picture” (/ then ENTER). 3 Select an item to be adjusted (/ then ENTER).
Setting up 08 Using Intelligent Mode The plasma television provides various advanced functions for optimizing the picture quality. For details on these functions, see the tables. 1 Repeat steps 1 to 3 provided for Using PureCinema. 2 Select “Intelligent Mode” (/ then ENTER). 3 Select the desired parameter (/ then ENTER). Using PureCinema Intelligent Mode 1 Press HOME MENU. 2 Select “Picture” (/ then ENTER). 3 Select “Pro Adjust” (/ then ENTER).
08 Setting up • You may rather want to perform fine adjustment. To do this, select “Manual” first and then press and hold ENTER for more than three seconds. The manual adjustment screen appears. Then go to step 7. ACL Performs such compensation that results in the optimum contrast characteristics for images Selections Off On Deactivates ACL Activates ACL 7 Select an item to be adjusted (/ then ENTER). 8 Select the desired level (/).
Setting up 08 Eliminating noise from images 1 Press HOME MENU. 1 2 Select “Picture” (/ then ENTER). 2 Select “Picture” (/ then ENTER). 3 Select “Pro Adjust” (/ then ENTER). 3 Select “Pro Adjust” (/ then ENTER). 4 Select “Colour Detail” (/ then ENTER). 4 Select “Noise Reduction” (/ then ENTER). 5 Select “Colour Management” (/ then ENTER). 6 Select an item to be adjusted (/ then ENTER). 5 Select an item to be adjusted (/ then ENTER).
08 Setting up Using the 3DYC and I-P Mode 1 Press HOME MENU. 2 Select “Picture” (/ then ENTER). 3 Select “Pro Adjust” (/ then ENTER). Comparing picture adjustments on the screen 4 Select “Others” (/ then ENTER). During picture adjustments, you can quickly refer to the image previously set in the same parameter, allowing you to easily compare and select the preferred image quality. 5 Select “3DYC” or “I-P Mode” (/ then ENTER). 1 6 Select the desired parameter (/ then ENTER).
Setting up 08 Sound Effect You can select from SRS FOCUS, SRS or SRS TruBass. You can adjust the sound quality to your preference with the following settings. Adjust the sound to your preference for the chosen AV Selection option. See AV Selection on page 29. 1 Press HOME MENU. 2 Select “Sound” (/ then ENTER). 3 Select “Sound Effect” (/ then ENTER). 1 Press HOME MENU. 4 Select “SRS FOCUS”, “SRS” or “SRS TruBass” (/). 2 Select “Sound” (/ then ENTER).
08 Setting up Listening to audio from the sub screen using headphones With headphones connected, you can listen to audio coming from the sub screen when in the 2-screen or picture-in-picture mode; audio coming from the main screen is output from the speakers. To use this function, follow the procedure below. 1 2 3 4 Power Control Power Control provides convenient functions for power saving. Energy Save You may use one of the three Energy Save modes to save power consumption. Press HOME MENU.
Setting up 08 Power Management (PC source only) The system will be automatically placed into the standby mode if no signal is received for 15 minutes. The system will be automatically placed into the standby mode when no signal is received from the personal computer. 1 Press HOME MENU. 1 Press HOME MENU. 2 Select “Power Control” (/ then ENTER). 2 Select “Power Control” (/ then ENTER). 3 Select “No Signal off” (/ then ENTER). 3 Select “Power Management” (/ then ENTER).
09 Enjoying DTV broadcasts Chapter 9 Enjoying DTV broadcasts Watching DTV programmes Digital TV (DTV) not only replaces the conventional analogue TV channels, but also provides more channels, clearer picture quality, and various types of useful information. It also provides various features, including subtitling and multiple audio tracks.
Enjoying DTV broadcasts 09 Replacing the existing channels When in the DTV mode, press [ to turn subtitles on and off. The following procedure discards the current DTV channel setups and searches for receivable channels to redo the channel setups. 1 Subtitles On 2 Note • When a programme is recorded with this function on, subtitles are also recorded. English Viewing subtitles Repeat steps 1 to 4 provided for Reselecting a country. Select “Replace Existing Channels” (/ then ENTER).
09 Enjoying DTV broadcasts Checking signal strength 2 You can check the signal strength and signal quality of each TV channel. 1 Press HOME MENU. 2 Select “Setup” (/ then ENTER). 3 Select “DTV Setup” (/ then ENTER). 4 3 With “OK” pressed, the system restores the factory defaults. Then Auto Installation is initiated automatically. Note • The password entry screen does not appear if you have disabled the password function. For details, see Using a password on page 55.
Enjoying DTV broadcasts 09 Note • “Auto Skip” function lets you skip “group” of services such as radio and text data. On the other hand, individual channel settings set to skip in “Channel Options” screen will not be affected by this setting. • You can select “DTV Setup” only when watching DTV channels. English 7 After the setting is complete, make sure to complete the following steps.
09 Enjoying DTV broadcasts Selecting a digital audio format Using Software Update Use the following procedure to switch between the PCM and Dolby digital audio format. This function downloads and updates the system’s software at the specified timing. 1 Press HOME MENU. 2 Select “Setup” (/ then ENTER). 3 Select “DTV Setup” (/ then ENTER). Using Auto Update 4 Select “User Preferences” (/ then ENTER). 5 Select “Digital Audio” (/). 6 Select “PCM” or “Dolby” (/).
Enjoying DTV broadcasts 09 Using MHEG application (UK only) You can set the time your plasma television performs Auto Update each day. To use this function, set “Auto Update” to “On” first. Some stations bring you programmes with the MHEG (Multimedia and Hypermedia Expert Group) application encoded, letting you experience DTV interactively. When provided, the MHEG application will start when you press any of the colour buttons or m. 1 Press HOME MENU. 2 Select “Setup” (/ then ENTER).
09 Enjoying DTV broadcasts Common Interface 2 Insert the specified CA module containing a smart card into the Common Interface slot as far as it will go. To receive scrambled DTV signals you will need a CA module and a smart card provided by the service provider. Although CA module types may vary depending on the manufacturer, each one of the CA modules supports a certain kind of encryption system. Your plasma television supports CA modules which are made to work with the DVB standard.
Using the Electronic Programme Guide (EPG)(for DTV only) Using the Electronic Programme Guide (EPG)(for DTV only) EPG display format The Electronic Programme Guide (EPG) shows the table of scheduled digital TV programmes and detailed information about individual programmes. It also allows you to easily select and tune to a desired programme. The EPG Screen consists of the Programme Information, Channel List, and General Programme List.
10 Using the Electronic Programme Guide (EPG)(for DTV only) • To quit the display of detailed information, press p again (or RETURN). Using the EPG Use the following procedure to check the schedule of digital TV programmes, view information about desired programmes, and/or select programmes. 001 ************ 13:40 - 14:05 ************* ************************** HOME MENU RETURN INFO PC 0 MENU INPUT 5 ENTER TV/DTV EXIT EPG More DVD TOP MENU / GUIDE P 1 2 Press EPG.
Using the Electronic Programme Guide (EPG)(for DTV only) • Recording may fail because of watching restrictions imposed by the CA module. Setting the timer manually English • Select a programme not yet started (then ENTER or GREEN): The programme can be set for recording/watching. 10 Using the menu, you can also preset digital TV programmes by specifying their scheduled date and time. 1 Press HOME MENU. 2 Select “Setup” (/ then ENTER). 3 Select “DTV Setup” (/ then ENTER).
10 Using the Electronic Programme Guide (EPG)(for DTV only) Note • Preset recording/watching begins immediately when presetting operations are performed within three minutes of the start of the programme. • Presettings made using the EPG are automatically shown in the scheduled table. • Recording may fail because of watching restrictions imposed by the CA module. Using the menu Use the following procedure to change or cancel programme presettings using the menu. 1 Press HOME MENU.
Using the Electronic Programme Guide (EPG)(for DTV only) Below are some useful functions that guide you through the EPG screen and save your time. EPG Search 1 Press YELLOW when the EPG screen (Programme List, Detailed information and Search Result) is displayed. 2 English Using other useful EPG functions 10 Select “Date” (/). EPG Jump 1 Press RED when the EPG screen (Programme List, Detailed information and Search Result) is displayed. 2 Date Sun.12.
11 Useful adjustment settings Chapter 11 Useful adjustment settings About “Option” menus The “Option” menu consists of two screens. To select the desired menu, press repeatedly / to switch between Screen 1 and Screen 2. The current screen number appears at the top right corner on the screen. Option 1/2 Position Auto Size Off Switching the vertical drive mode (AV source only) You can select the desired drive mode according to the programme you watch. 1 Press HOME MENU.
Useful adjustment settings Use Auto Setup to automatically adjust the positions and clock of images coming from a personal computer. 1 Press HOME MENU. 2 Select “Option” (/ then ENTER). Selecting an input signal type After connecting to the INPUT 1, INPUT 2, or INPUT 3 terminal, specify the type of video signals to be received from the connected equipment. For the type of the signals, see the operation manual that came with the connected equipment.
11 Useful adjustment settings Colour system setting Selecting a screen size manually If an image does not appear clearly, select another colour system (e.g., PAL, NTSC). Press f to switch among the screen size options selectable for the type of video signals currently received. Each time you press f, the selection is switched. The selectable screen sizes differ depending on the types of input signals. 1 Press HOME MENU. 2 Select “Option“ (/ then ENTER).
Useful adjustment settings PC source 4:3 CINEMA 5 Press HOME MENU to exit the menu. Note 4:3 FULL 14:9 English AV source 11 • Manually select an appropriate screen size if an image does not automatically switch to a correct screen format. • When the video signal contains no aspect ratio information, the function will not work even with “Natural” or “Wide-Zoom” selected.
11 Useful adjustment settings Changing the brightness at both sides of the screen (Side Mask) Note • This function is disabled when “OPTIMUM” is selected on the “AV Selection” menu. • This function is not available when PC signals are received. • As this function automatically optimizes image quality, the process in which image settings such as brightness and tint gradually change may be seen on the screen. This is not a malfunction.
Useful adjustment settings • The system is automatically placed into standby one hour after the Video Pattern screen has started. • While the Video Pattern screen is on, no buttons operate except a on the remote control unit, STANDBY/ON and a on the plasma television. • To cancel the Video Pattern screen, press a on the remote control unit, STANDBY/ON or a on the plasma television. • The Video Pattern timer has priority over the sleep timer.
11 Useful adjustment settings Resetting the password function 1 Press HOME MENU. 2 Select “Setup“ (/ then ENTER). 3 Select “Password“ (/ then ENTER). The password entry screen appears. Enter the current four-digit password using buttons 0 to 9. 4 Select “Reset“ (/ then ENTER). 5 Select “Yes“ (/ then ENTER). 6 Press HOME MENU to exit the menu. Note • The above procedure will reset the password to the factory default (1 2 3 4).
Using with other equipment 12 English Chapter 12 Using with other equipment You can connect many types of external equipment to your plasma television, like a decoder, VCR, DVD player, game console, personal computer and camcorder. To view images coming from external equipment, select the input source using the INPUT 1 to INPUT 5 buttons on the remote control (page 14) or INPUT on the plasma television.
12 Using with other equipment Connecting a VCR Note Use the INPUT 2 terminals when connecting a VCR and other audiovisual equipment. If your VCR supports TV-VCR advanced “AV link” systems, you can connect the VCR to the INPUT 2 or INPUT 3 terminal on the plasma television using the fully-wired 21-pin SCART cable. AV link advanced system • Download tuning information directly from TV to VCR (Preset download).
Using with other equipment Connecting a game console or camcorder English • When you complete the connections and setups, you can then enjoy timeshift playback with the DVD/HDD recorder (DVR). You can also select the 2-screen or picture-in-picture mode to watch images coming from the DTV input source and an external input source (INPUT 2 for the above connection example) to which the output of the recorder has been connected.
12 Using with other equipment Connecting a personal computer Use the PC terminals to connect a personal computer. Note • The PC input terminals are DDC2B-compatible.
Using with other equipment The INPUT 1, INPUT 3 and INPUT 4 terminals are HDMI terminals to which digital video and audio signals can be input. To use the HDMI terminal, activate the terminal and specify the types of video and audio signals to be received from the connected equipment. For the types of these signals, see the operation manual that came with the connected equipment.
12 Using with other equipment When using the INPUT 4 HDMI terminal: Item Description Video (default) Select this option except when a PC is connected PC Select this option when a PC is connected to the HDMI input terminal Rear view 4 Press HOME MENU to exit the menu. Caution • Make sure to select “PC” when a PC is connected to the HDMI input terminal.
Using with other equipment • If you select a parameter other than “Auto”, make such a setting that results in natural colour. • If no image appears, specify another digital video signal type. • For the digital video signal types to be specified, check the operation manual that came with the connected equipment.
12 Using with other equipment Using i/o link.A The plasma television incorporates three typical i/o link.A functions for smooth connections between plasma television and other audiovisual equipment. Rear view One Touch Play While the plasma television is in standby mode, it automatically turns on and plays back images from the audiovisual source (e.g. VCR, DVD).
Using with other equipment On this system, you can watch JPEG images that have been captured and stored in memory cards using a digital still camera. You can also connect your digital camera directly to the plasma television using a USB connector cable. Connecting a USB device Hold the USB device’s connector with its top side facing the front panel, and then insert it into the USB port on the side of the plasma television. • Insert the USB device’s connector as far as it goes.
12 Using with other equipment • Do not insert or remove the USB device immediately after the system is switched on or off. This may cause data inside the memory to be damaged. • Do not turn the digital camera off while the Home Gallery screen is displayed. Starting a thumbnail screen When a folder is selected on the initial Home Gallery screen, images in the folder are displayed in thumbnail format.
Using with other equipment Displays the previous image in the normal or full screen. P+: Displays the next image in the normal or full screen. RED: Displays the image using the full screen. To quit the full-screen display, press RETURN. 9 If you have selected “Auto” in step 8, press / to select “Interval(sec.)”, and then press / to select the desired display duration for individual images.
12 Using with other equipment Controlling other equipment using the supplied remote control unit Using the supplied remote control unit, you can control other equipment in connection: a set-top box (STB), DVD player, DVD/ HDD recorder (DVR), BD player or VCR. Before using this function, you need to preset the supplied remote control unit with the manufacture code of the equipment to be controlled.
Using with other equipment VCR 113 SHARP 512 HITACHI 1 114 SONY 1 513 HITACHI 2 115 SONY 2 514 HITACHI 3 116 SONY 3 515 JVC 1 117 THOMSON 516 JVC 2 118 TOSHIBA 517 JVC 3 119 YAMAHA 518 JVC 4 519 JVC 5 520 LOEWE 1 521 LOEWE 2 522 MATSUI 523 ORION 524 PANASONIC 1 525 PANASONIC 2 526 PHILIPS 1 527 PHILIPS 2 528 PHILIPS 3 529 SANYO 530 SAMSUNG 1 531 SAMSUNG 2 532 SAMSUNG 3 533 SAMSUNG 4 534 SHARP 535 SONY 1 536 SONY 2 537 SONY 3 538 SONY 4 53
12 Using with other equipment STB (set - top box) control buttons When in the STB mode, the buttons on the remote control unit function as below. 1 2 3 INPUT 1 1 2 3 4 5 6 7 8 9 INFO 0 PC 1 0 to 9 Function as the numeric buttons. 2 P+/P– Press to tune in a higher or lower channel. 3 RETURN When the broadcasting menu screen is in display, press to restore the immediately previous screen. 4 ENTER Press to activate the selected function.
Using with other equipment 12 English DVD/DVR control buttons When in the DVD/DVR mode, the buttons on the remote control unit function as below. 1 2 3 4 INPUT 1 1 2 3 4 5 6 7 8 9 1 0 to 9 Function as the numeric buttons. 2 P+/P– (DVD/HDD recorder (DVR) only) Press to change the channel of the tuner built in the DVD/ HDD recorder (DVR). 3 RETURN When the DVD menu is in display, press to restore the immediately previous screen. 4 ENTER Press to activate the selected function.
12 Using with other equipment VCR control buttons When in the VCR mode, the buttons on the remote control unit function as below. 1 2 3 INPUT 1 1 2 3 4 5 6 7 8 9 PC 0 INFO INPUT 5 TV/DTV 2 TV DVD/ SOURCE STB DVR VCR 5 HOME MENU RETURN MENU ENTER EXIT EPG 3 4 DVD TOP MENU / GUIDE HDMI CONTROL DISC NAVI En 0 to 9 Function as the numeric buttons. 2 P+/P– Press to select channels of the TV tuner on the VCR. 3 F (PAUSE/STILL) Sets pauses and still pictures.
Using the HDMI Control 13 English Chapter 13 Using the HDMI Control Using the HDMI Control functions You can operate such Pioneer devices as a recorder, player, AV system or HD AV Converter that support the HDMI Control functions using the remote control of the plasma television.
13 Using the HDMI Control On-screen control panel Making the HDMI Control connections For an AV system 1 HDMI Control 5 1 2 SURROUND+ 2 6 7 INPUT- 3 INPUT+ 3 4 SURROUND- 4 5 HDMI CONTROL Exit 6 7 Switches the surround mode in order Switches the input source in reverse order Switches the surround mode in reverse order Closes the screen to return to the HDMI Control menu Displays the model number of the connected device Void Switches the input source in order Press or on the
Using the HDMI Control 13 English Connecting a DVD recorder Rear view Rear view HDMI compliant cable (HDMI cable having the HDMI mark) DVD recorder Note • Maximum number of devices that can be connected and controlled using the remote control unit of the plasma television is as follows: recorder x 2, player x 2, AV system or HD AV Converter x 1. • When connecting an AV system or HD AV Converter, be sure to place and connect it between the plasma television and recorder or player.
13 Using the HDMI Control Setting the HDMI Control Note • The “Power Off Control” function is valid for the devices connected to any of HDMI terminals at the rear of the plasma television. Selecting the input terminal Select the HDMI terminal to which the external device is connected in order to use the HDMI Control functions. Selecting the Power-On Ready 1 Press HOME MENU. 2 Select “Option” (/ then ENTER). 3 Select “HDMI Control Setting” (/ then ENTER).
Using the HDMI Control 13 English Input selection for the HD AV Converter In the HD AV Converter mode, you can select the INPUT 1 to INPUT 5 on the HD AV Converter using “INPUT 1” to “INPUT 5” on the remote control unit or INPUT on the right side of the plasma television.
13 Using the HDMI Control Using the HDMI Control menus You can enjoy various functions with the connected Pioneer recorder, player or AV system that supports the HDMI Control functions by selecting and using the corresponding HDMI Control menus. 1 Press HOME MENU. 2 Select “HDMI Control” (/ then ENTER). The HDMI Control menu is displayed.
Using Teletext 14 English Chapter 14 Using Teletext Using the Teletext Functions What is Teletext? Teletext broadcasts pages of information and entertainment to specially equipped television sets. Your plasma television receives Teletext signals broadcast by TV networks, and decodes them into graphical format for viewing. News, weather and sports information, stock exchange prices and programme previews are among many services available.
14 Using Teletext k: Displaying TOP Over View To display hidden information such as an answer to a quiz, press k. Press k again to hide the information. When receiving TOP Teletext, you can read a TOP text overview. TOP Over View : BLOCK PAGES GROUP PAGES To stop updating Teletext pages, press Press . TV PROGRAMS COLOUR BAR WEATHER NEWS MOVIE LOCAL SPORTS BLOCK 1 BLOCK 2 BLOCK 3 again to release the hold mode. l: Displays an Index page for the CEEFAX/FLOF format.
Additional information Additional information English Chapter 15 15 Troubleshooting Problem Possible solution GENERAL • No power. • The system cannot be switched on. • • • • • Power is suddenly turned off. • The system’s internal temperature has increased. Remove any objects blocking vent or clean. (See page 15.) • Check the power control setting. (See page 36.) • Check the sleep timer setting. (See page 55.) • System cannot be operated.
15 Additional information Problem Possible solution • Audio is output but no image is • Check if you have selected “Picture Off” for “Energy Save”. With this option selected, the screen presented. is deactivated: only sound is output. To restore the screen display, press any button other than i + /i – or e. (See page 36.) • Images are presented but no audio is output. Check if you have selected the minimum volume. (See page 22.) Check that no headphones are connected. Check that the sound is not muted.
Additional information 15 Possible solution • No sound. • Check if the connections are properly made between the plasma television and the device that supports the HDMI Control functions. (See page 74.) • Check if you have entered the settings properly for “HDMI Control Setting”. (See page 76.) • Check if you have an HDMI controlled AV system connected to one HDMI terminal and the recorder or player connected to another HDMI terminal on the plasma television.
15 Additional information Signal names for 15-pin mini D-sub connecter 84 En Pin No. Signal name Pin No.
Additional information 15 English SCART pin assignments Various audio and video devices may be connected via the SCART terminals.
15 Additional information Specifications Item 50” plasma television, model: PDP-508XD 42” plasma television, model: PDP-428XD Number of pixels 1365 x 768 pixels Audio amplifier 17 W + 17 W (1 kHz, 10 %, 6 Ω) Speakers 1024 x 768 pixels – Sound Effect SRS FOCUS/SRS/SRS TruBass Power Requirements 220 V to 240 V AC, 50 Hz/60 Hz, 364 W (0.4 W 220 V to 240 V AC, 50 Hz/60 Hz, 299 W (0.4 W Standby) Standby) Weight 34.5 kg (76.1 lbs.) Colour System Analogue PAL/SECAM/NTSC 3.58/NTSC 4.
Additional information 15 English Dimensions PDP-508XD Unit: mm 115 717 1224 PDP-428XD Unit: mm 115 679 1040 Trademarks • is a trademark of SRS Labs, Inc. • WOW technology is incorporated under license from SRS Labs, Inc. • This product includes FontAvenue® fonts licensed by NEC Corporation. FontAvenue is a registered trademark of NEC Corporation. • DDC is a registered trademark of Video Electronics Standards Association.
IMPORTANT ATTENTION DANGER D´ELECTROCUTION NE PAS OUVRIR Ce symbole de l’éclair, placé dans un triangle équilatéral, a pour but d’attirer l’attention de l’utilisateur sur la présence, à l’intérieur du coffret de l’appareil, de “tensions dangereuses” non isolées d’une grandeur suffisante pour représenter un risque d’électrocution pour les êtres humains. ATTENTION: POUR ÉVITER TOUT RISQUE D’ÉLECTROCUTION, NE PAS ENLEVER LE COUVERCLE (NI LE PANNEAU ARRIÈRE).
Les symboles suivants figurent sur les étiquettes apposées sur l’appareil. Ils appellent l’attention des utilisateurs et du personnel d’entretien sur des dangers potentiels. AVERTISSEMENT Ce symbole signale une pratique dangereuse ou contraire à la sécurité qui peut entraîner une blessure ou des dégâts matériels. DANGER Ce symbole signale une pratique dangereuse ou contraire à la sécurité qui peut entraîner une blessure grave, voire la mort.
Table des matières Nous vous remercions d’avoir acquis cet appareil Pioneer. Veuillez lire attentivement ce mode d’emploi pour être en mesure d’utiliser l’appareil convenablement. La lecture de ce mode d’emploi terminée, conservez-le dans un endroit sûr pour référence. Dans certains pays ou régions, la forme de la prise secteur et celle de la fiche du cordon d’alimentation peuvent différer des illustrations de ce document. Toutefois, la manière de brancher le cordon et d’utiliser l’appareil est la même.
Table des matières Français 10 Utilisation du guide électronique de programme (EPG) (pour DTV uniquement) . . . . . . . . . . . . . . . . . . . . . 45 Format d’affichage EPG . . . . . . . . . . . . . . . . . . . . . . . . Utilisation du guide électronique de programme (EPG) . . . . . . . . . . . . . . . . . . . . . . . . . . . . . . . . . . . . . Préréglage des émissions de télévision avec EPG . . . . Utilisation d’autres fonctions EPG pratiques. . . . . . . 45 46 46 49 11 Réglages utiles . . . . . . .
01 Informations importantes pour l’utilisateur Chapitre 1 Informations importantes pour l’utilisateur Veuillez lire attentivement ces informations de manière à profiter au mieux du téléviseur plasma Pioneer PDP-508XD/PDP-428XD. Avec le Pioneer PDP-508XD/PDP-428XD, vous disposez d’un téléviseur plasma de qualité qui assurera un service fiable et de longue durée.
Informations importantes pour l’utilisateur Attention • Pioneer ne saurait être tenue responsable des dommages survenant à la suite d’un usage incorrect de l’appareil, par vous-même ou d’autres personnes, des anomalies de fonctionnement, des perturbations que l’appareil peut causer à d’autres équipements à moins que sa responsabilité soit clairement engagée.
01 Informations importantes pour l’utilisateur Pour utiliser cet appareil pendant longtemps La fonction d’économie d’énergie contribue à maintenir l’efficacité de l’écran pendant longtemps. Le réglage de la fonction d’économie d’énergie sur “Mode 1” est recommandé pour maintenir l’efficacité de l’écran pendant longtemps. Attention Rémanence d’image sur le panneau L’affichage de la même image pendant une longue période peut provoquer une rémanence de cette image.
Précautions de sécurité 02 Chapitre 2 Précautions de sécurité 10. Ventilation - Les évents et autres ouvertures de la carrosserie sont destinés à la ventilation. Ne les couvrez pas, ne les obstruez pas car une réduction de la ventilation peut entraîner une augmentation de la température interne de l’appareil et par voie de conséquence une diminution de sa durée de vie.
02 Précautions de sécurité Précautions d’installation Attention Observez les précautions suivantes si vous effectuez une installation mettant en œuvre des accessoires tels que le support optionnel. Si vous utilisez le support, les équerres ou les accessoires optionnels • Demandez au revendeur d’effectuer l’installation. • Servez-vous des boulons fournis.
Accessoires fournis 03 Chapitre 3 Accessoires fournis Vérifiez que tous les accessoires suivants sont fournis dans le carton. Carte de garantie Français Télécommande Mode d’emploi x 2 Piles de taille AA x 2 (pour boîtier de télécommande) Noyau de ferrite Câble d’alimentation Seul le câble d’alimentation correspondant à votre pays ou région est fourni.
04 Nomenclature Chapitre 4 Nomenclature Téléviseur plasma (Avant) Côté PDP-508XD PDP-428XD Côté 11 7 8 12 9 13 10 14 15 ON STANDBY 2 3 TIMER ON 1 4 STANDBY TIMER 5 6 2 3 4 5 1 Vue de dessous de l’écran Vue de face de l’écran Les prises se trouvant sur les côtés sont les mêmes sur les PDP-508XD et PDP-428XD.
Nomenclature 04 Téléviseur plasma (Dos) PDP-508XD PDP-428XD Français 10 11 12 13 14 15 3 2 1 11 12 13 14 15 10 16 17 18 19 4 5 6 7 8 9 * Pour les emplacements exacts des prises, voir la feuille se trouvant près du compartiment à prises. 16 17 18 Les prises 1 à 9 sont les mêmes que pour le PDP-508XD.
04 Nomenclature Boîtier de télécommande 7 Cette section décrit les fonctions des touches disponibles quand le mode télévision (TV) a été sélectionné à l’aide de la touche SELECT. Pour les touches de commande d’autres appareils, voir Commande d’un autre appareil avec le boîtier de télécommande fourni à partir de la page 68.
Préparation 05 Chapitre 5 Préparation Installation du téléviseur plasma Déplacement du téléviseur plasma Plus de 50 cm Français Lors de l’installation sur une étagère, etc., tenez le téléviseur plasma comme montré ci-dessous. Le poids du téléviseur plasma étant élevé, faites-vous aider si vous devez le déplacer. (pour PDP-508XD) Enceinte inférieure Plus de 10 cm Emplacement • Évitez que l’écran ne soit exposé à la lumière directe du soleil. Veillez à ce qu’il soit convenablement ventilé.
05 Préparation (pour PDP-428XD) Pour empêcher le téléviseur plasma de se renverser Après avoir installé le support, veillez à prendre toutes les précautions nécessaires pour empêcher le téléviseur plasma de se renverser et bien le fixer au mur et à l’étagère. Fixation sur une table ou une étagère Avec les colliers en plastique et les vis fournis avec le support optionnel, fixez le téléviseur plasma comme montré sur l’illustration.
Préparation 05 Connexions de base Attention Connexion de l’antenne Pour bénéficier d’une image de meilleure qualité, utilisez une antenne extérieure. Voici de brèves explications sur la connexion d’un câble coaxial. Attention • Quand le réglage “Alimentation antenne” est en service, connectez directement l’antenne à la prise d’entrée ANT située au dos du téléviseur plasma. La connexion de tout appareil entre l’antenne et le téléviseur plasma peut provoquer l’endommagement de l’appareil.
05 Préparation Cheminement des câbles Fixation du noyau de ferrite Quand des enceintes sont installés sous l’écran du téléviseur plasma (pour PDP-508XD seulement): Fixez le noyau de ferrite à l’extrémité du cordon d’alimentation comme montré sur l’illustration. Utilisez le collier pour câble fourni pour empêcher le noyau de ferrite de glisser sur le cordon. Si vous ne le faites pas, le téléviseur plasma ne sera pas conforme aux normes CE obligatoires.
Préparation Préparation du boîtier de télécommande Mise en place des piles 1 Ouvrez le couvercle du logement des piles. 05 Portée du boîtier de télécommande Agissez sur le boîtier de télécommande en le dirigeant vers le capteur qui est placé à la partie inférieure droite de la face du téléviseur plasma. La distance du boîtier au capteur doit être inférieure à 7 m et l’angle du faisceau avec le capteur doit être à 30 degrés, quelle que soit la position du boîtier dans l’espace.
06 Pour regarder la télévision Chapitre 6 Pour regarder la télévision Important • Avant de regarder les chaînes diffusées, le tuner de télévision intégré doit être réglé. Pour ce faire, voir Réglage des chaînes de télévision, page 26. Mise sous tension • Appuyez sur a du téléviseur plasma quand les témoins POWER ON et STANDBY sont éteints. • Le système est mis sous tension. • Le témoin POWER ON s’allume en bleu.
Pour regarder la télévision 06 Utilisation de 0 à 9 du boîtier de télécommande Utilisez la télécommande ou le panneau de commande du côté droit du téléviseur plasma pour changer les chaînes. • Avant toute utilisation du boîtier de télécommande, veillez à sélectionner le mode télévision (TV) avec sa touche SELECT. Voir Commande d’un autre appareil avec le boîtier de télécommande fourni à la page 68. • Sélectionnez les chaînes directement en appuyant sur les touches 0 à 9.
06 Pour regarder la télévision Modification du volume et du son Le tableau ci-dessous montre les canaux audio disponibles en fonction du type d’émission audio. Utilisez la télécommande ou le panneau de commande du côté droit du téléviseur plasma pour ajuster le volume.
Pour regarder la télévision Utilisation des fonctions d’affichage multiple 06 1 Appuyez sur c pour sélectionner le mode d’affichage. Chaque pression sur la touche c provoque la sélection d’un autre mode d’affichage, comme ceci: 2 images, image dans l’image, une seule image. • Avant toute utilisation du boîtier de télécommande, veillez à sélectionner le mode télévision (TV) avec sa touche SELECT. Voir Commande d’un autre appareil avec le boîtier de télécommande fourni à la page 68.
06 Pour regarder la télévision Remarque • La fonction multiécran ne permet pas de faire apparaître sur l’écran, en même temps, deux images provenant de la même source. Si vous essayez d’obtenir un tel affichage, un message d’avertissement apparaît. • La fonction multiécran ne peut pas afficher des images d’une combinaison de deux sources d’entrée externes (ENTRÉE 1 à ENTRÉE 5, PC). Elle peut afficher les images des combinaisons de sources d’entrée indiquées ci-dessous.
Menu principal (HOME MENU) 07 Chapitre 7 Menu principal (HOME MENU) Présentation du menu principal (HOME MENU) HOME MENU Élément Image Sélection AV Contraste Luminos. Couleur Teinte Netteté Réglage pro. Réinitial. Aigus Graves Balance Réinitial. Effet sonore Sortie casque Volume du Sub Économie d’énergie Pas de signal arrêt Pas d’opération arrêt – Position Taille auto Cache latéral Entrée HDMI Rég. cmde HDMI Lumin. DEL bleue Orbiteur Mire vidéo Sélection mode Système couleur Sélection entrée Préf.
08 Réglage Chapitre 8 Réglage Réglage des chaînes de télévision Remarque • Vous pouvez démarrer l’autoinstallation à partir de HOME MENU, par exemple après avoir choisi un autre pays. Réalisez les étapes suivantes avant de démarrer l’autoinstallation: Appuyez sur HOME MENU, sélectionnez “Installation” (/ puis ENTER), puis “Autoinstallation” (/ puis ENTER). La page de saisie du mot de passe s’affiche. Tapez le mot de passe à quatre chiffres en vous servant des touches 0 à 9.
Réglage 11 Sélectionnez “Système couleur” (/). 12 Sélectionnez un système couleur (/). Vous pouvez sélectionner parmi “Auto”, “PAL”, “SECAM” et “4.43NTSC”. 13 Sélectionnez “Mémoriser” (/). 14 Sélectionnez “Oui”, “Oui (Listé)” ou “Non” (/). Description Vous pouvez sélectionner la chaîne avec P+/P– Définition de Verrouillage enfants Verrouil. Enfants interdit l’accord sur les chaînes de télévision qui ont été spécifiquement marquées pour cela.
08 Réglage Désignation des chaînes de télévision Vous avez la possibilité d’attribuer un nom ne comportant pas plus de cinq caractères à chaque chaîne réglée. Ceci peut vous aider à faciliter l’identification des chaînes au cours de leur sélection. 1 Appuyez sur HOME MENU. 2 Sélectionnez “Installation” (/ puis ENTER). 3 Sélectionnez “Install. TV analogue” (/ puis ENTER). La page de saisie du mot de passe s’affiche. Tapez le mot de passe à quatre chiffres en vous servant des touches 0 à 9.
Réglage 08 Choix de la langue Pour source AV 1 Élément Description OPTIMUM Règle automatiquement la luminosité de l’image au niveau optimum en fonction de la luminosité ambiante. Ce réglage est commun aux sources d’entrée externe et d’entrée de télévision. STANDARD Image bien définie dans une pièce éclairée normalement. Ce réglage est commun aux sources d’entrée externe et d’entrée de télévision. Appuyez sur HOME MENU. 2 Sélectionnez “Installation” (/ puis ENTER).
08 Réglage Réglages de base de l’image Pour source AV Réglez l’image selon vos préférences et en fonction de l’option Sélection AV (sauf DYNAMIQUE) retenue. 1 Élément Touche Contraste Diminution du contraste Augmentation du contraste Luminos.
Réglage 08 Réglages avancés de l’image Utilisation de Mode intelligent Le téléviseur plasma est doté de diverses fonctions avancées permettant d’optimiser la qualité de limage. Pour les détails sur ces fonctions, consultez les tableaux. 1 Répétez les opérations 1 à 3 de Utilisation de PureCinema. 2 Sélectionnez “Mode intelligent” (/ puis ENTER). 3 Sélectionnez le paramètre souhaité (/ puis ENTER). Utilisation de PureCinema Appuyez sur HOME MENU.
08 Réglage • Vous pouvez également exécuter une réglage fin. Pour ce faire, sélectionnez d’abord “Manuel” puis tenez ENTER enfoncée pendant plus de trois secondes. L’écran de réglage manuel apparaît. Passez alors à l’opération 7. ACL Effectue une correction qui donne lieu à des caractéristiques de contraste optimales pour les images Sélections Arrêt Marche Désactive ACL 7 Sélectionnez un élément à régler (/ puis ENTER). 8 Sélectionnez le niveau souhaité (/).
Réglage 08 Utilisation de Gestion coul. Élimination du bruit des images 1 Appuyez sur HOME MENU. 1 Appuyez sur HOME MENU. 2 Sélectionnez “Image” (/ puis ENTER). 2 Sélectionnez “Image” (/ puis ENTER). Sélectionnez “Réglage pro.” (/ puis ENTER). 3 Sélectionnez “Réglage pro.” (/ puis ENTER). Sélectionnez “Infos couleur” (/ puis ENTER) 4 Sélectionnez “Réduction Bruit” (/ puis ENTER). 5 Sélectionnez “Gestion coul.” (/ puis ENTER).
08 Réglage Utilisation de 3DYC et de Mode I-P 1 Appuyez sur HOME MENU. Comparaison des réglages d’image sur l’écran 2 Sélectionnez “Image” (/ puis ENTER). 3 Sélectionnez “Réglage pro.” (/ puis ENTER). 4 Sélectionnez “Autres” (/ puis ENTER). Pendant les réglages d’image, vous pouvez vous référer rapidement à l’image précédemment réglée dans le même paramètre; ce qui vous permet de comparer facilement et de sélectionner la qualité d’image que vous préférez.
Réglage 08 Réglages du son Effet sonore Vous pouvez sélectionner SRS FOCUS, SRS ou SRS TruBass. 3 Sélectionnez “Effet sonore” (/ puis ENTER). 1 Appuyez sur HOME MENU. 4 Sélectionnez “SRS FOCUS”, “SRS” ou “SRS TruBass” (/). 5 Sélectionnez le paramètre souhaité (/). 2 Sélectionnez “Son” (/ puis ENTER). 3 Sélectionnez un élément à régler (/). 4 Sélectionnez le niveau souhaité (/). 1 Appuyez sur HOME MENU. 2 Sélectionnez “Son” (/ puis ENTER).
08 Réglage Écoute de la partie audio de l’écran secondaire avec un casque En branchant un casque, vous pouvez écouter la partie audio de l’écran secondaire en mode 2 écrans ou image dans l’image; la partie audio de l’écran principal est sortie par les enceintes. Pour utiliser cette fonction, procédez comme décrit ci-après. 1 Appuyez sur HOME MENU. 2 Sélectionnez “Son” (/ puis ENTER). 3 Sélectionnez “Sortie casque” (/). 4 Sélectionnez le paramètre souhaité (/).
Réglage 08 Mise hors service en l’absence de signal (source AV uniquement) Cette fonction place le système en veille si aucun signal n’est capté pendant 15 minutes. 1 Appuyez sur HOME MENU. Gestion alimentation (source PC uniquement) Le système est automatiquement placé en veille si aucun signal n’est reçu de l’ordinateur personnel. 1 Appuyez sur HOME MENU. 2 Sélectionnez “Commande alimentation” (/ puis ENTER). Sélectionnez “Commande alimentation” (/ puis ENTER).
09 Pour goûter aux joies des émissions DTV Chapitre 9 Pour goûter aux joies des émissions DTV Pour regarder des émissions DTV La télévision numérique (DTV) ne remplace pas seulement les chaînes de télévision analogiques conventionnelles, mais offre également davantage de chaînes, une qualité d’image plus claire et divers types d’informations utiles. Elle offre aussi diverses fonctions, comme le sous-titrage et les pistes audio multiples.
Pour goûter aux joies des émissions DTV 09 Affichage de sous-titres Remplacement des chaînes existantes En mode DTV, appuyez sur [ pour activer ou désactiver l’affichage des sous-titres. La procédure ci-après supprime les réglages courants de chaînes de télévision numérique et cherche des chaîne pour refaire les réglages. Sous-titre Actif Répétez les étapes 1 à 4 de la partie Nouvelle sélection d’un pays. 2 Sélectionnez “Remplacer les chaînes existantes” (/ puis ENTER).
09 Pour goûter aux joies des émissions DTV Vérification de la puissance du signal 1 Vous pouvez vérifier la force et la qualité du signal pour chaque chaîne de télévision. 2 1 Appuyez sur HOME MENU. 2 Sélectionnez “Installation” (/ puis ENTER). 3 Quand on confirme avec “OK”, le système rétablit les réglages par défaut. L’opération Autoinstallation est alors démarrée automatiquement. 3 Sélectionnez “Installation DTV” (/ puis ENTER). 4 Sélectionnez “Vérification du signal” (/ puis ENTER).
Pour goûter aux joies des émissions DTV 7 Après le réglage, veillez à effectuer les opérations ci-après. • Si vous avez enregistré une chaîne comme favorite, reportezvous à la partie Activation de la fonction Favoris et activez la fonction Favoris. • Si vous avez sélectionné une chaîne pour Blocage de la chaîne., reportez-vous à Utilisation d’un mot de passe à la page 55 et validez un mot de passe à quatre chiffres.
09 Pour goûter aux joies des émissions DTV Sélection d’un format audio numérique Utilisation de la mise à jour du logiciel Procédez comme ci-après pour faire la sélection parmi les formats audio numérique PCM et Dolby. Cette fonction télécharge et met à jour le logiciel du système à l’heure spécifiée. 1 Appuyez sur HOME MENU. 2 Sélectionnez “Installation” (/ puis ENTER). 3 Sélectionnez “Installation DTV” (/ puis ENTER). 4 Sélectionnez “Préférences” (/ puis ENTER).
Pour goûter aux joies des émissions DTV Réglage de l’heure de mise à jour Vous pouvez programmer l’heure à laquelle votre téléviseur plasma effectuera la mise à jour automatique chaque jour. Pour utiliser cette fonction, réglez dabord “Mise à jour auto” sur “Marche”. Appuyez sur HOME MENU. 2 Sélectionnez “Installation” (/ puis ENTER). 3 Sélectionnez “Installation DTV” (/ puis ENTER). 4 Sélectionnez “Mise à jour du logiciel” (/ puis ENTER).
09 Pour goûter aux joies des émissions DTV Interface commune 2 Insérez au maximum le module CA spécifié contenant une carte intelligente dans la fente d’interface commune. Pour recevoir des signaux DTV cryptés, vous aurez besoin d’un module CA et d’une carte intelligente fournie par le fournisseur de service. Bien que les types de module CA puissent varier selon le fabricant, chacun des modules CA prend en charge un certain type de système de cryptage.
Utilisation du guide électronique de programme (EPG) (pour DTV uniquement) 10 Chapitre 10 Utilisation du guide électronique de programme (EPG) (pour DTV uniquement) Information sur les émissions Le guide électronique de programme (EPG) affiche le tableau des émissions de télévision numérique prévues et des informations détaillées sur chaque émission. Il vous permet de sélectionner et d’accorder facilement sur une émission désirée.
10 Utilisation du guide électronique de programme (EPG) (pour DTV uniquement) Utilisation du guide électronique de programme (EPG) • Pour quitter l’affichage d’informations détaillées, appuyez de nouveau sur p (ou sur RETURN). 001 ************ 13:40 - 14:05 ************* ************************** Procédez comme suit pour vérifier le planning des émissions de télévision numérique, consulter les informations sur les émissions désirées et/ou sélectionner des émissions.
Utilisation du guide électronique de programme (EPG) (pour DTV uniquement) • Sélectionnez une émission qui n’a pas encore commencé (puis ENTER ou VERT): L’émission peut être réglée pour enregistrement/visionnement. 10 • L’enregistrement peut échouer en raison des restrictions de visionnement imposées par le module CA. Réglage manuel de la minuterie À l’aide du menu, vous pouvez également prérégler des émissions de télévision numérique en spécifiant la date et l’heure prévues. Dim.12.
10 Utilisation du guide électronique de programme (EPG) (pour DTV uniquement) Remarque • L’enregistrement/visionnement préréglé commence immédiatement lorsque les opérations de préréglage sont effectuées dans les trois minutes avant le début de l’émission. • Les préréglages effectués avec EPG sont automatiquement affichés dans le tableau du planning. • L’enregistrement peut échouer en raison des restrictions de visionnement imposées par le module CA.
Utilisation du guide électronique de programme (EPG) (pour DTV uniquement) Utilisation d’autres fonctions EPG pratiques Recherche EPG Vous trouverez ci-dessous certaines fonctions pratiques qui vous guideront à travers l’écran EPG et vous feront gagner du temps. 2 1 Appuyez sur JAUNE lorsque l’écran EPG (Liste d’émissions, informations détaillées et résultat de la recherche) est affiché. Sélectionnez “Date” (/). Date Saut EPG Dim.12.
11 Réglages utiles Chapitre 11 Réglages utiles Au sujet des menus “Options” Le menu “Options” est constitué de deux pages. Pour sélectionner le menu souhaité, appuyer sur / à plusieurs reprises pour changer entre page 1 et page 2. Le numéro de la page actuelle apparaît au coin supérieur droit de l’écran. Options 1/2 Sélection du mode de commande vertical (source AV uniquement) Vous pouvez sélectionner le mode souhaité suivant le programme que vous regardez. 1 Appuyez sur HOME MENU.
Réglages utiles Réglage automatique des positions de l’image et de l’horloge (source PC uniquement) Grâce à Autoinstallation vous pouvez régler automatiquement les positions et l’horloge des images provenant de l’ordinateur personnel. Appuyez sur HOME MENU. 2 Sélectionnez “Options” (/ puis ENTER). Sélection d’un type de signal d’entrée Après avoir raccordé les prises INPUT 1, INPUT 2 ou INPUT 3, indiquez le type de signal d’entrée qui sera fourni par l’appareil relié.
11 Réglages utiles Choix du système couleur Sélection manuelle d’un format d’écran Si les images ne sont pas nettes, sélectionnez un autre système couleur (par exemple, PAL, NTSC). Appuyez sur f pour passer d’un format d’écran disponible, compte tenu de la nature des signaux vidéo reçus, à l’autre. Chaque pression sur la touche f provoque la sélection d’un autre format. Les formats disponibles dépendent de la nature des signaux appliqués à l’entrée. 1 Appuyez sur HOME MENU.
Réglages utiles Source AV 11 Source PC 4:3 5 Appuyez sur HOME MENU pour quitter le menu. Remarque 4:3 PLEIN 14:9 PLEIN Détection de cache latéraux ZOOM CINÉMA 14:9 PLEIN LARGE Certaines émissions HD peuvent apparaître au format 4:3 avec des caches de chaque côté.
11 Réglages utiles Modification de la luminosité de chaque côté de l’écran (Cache latéral) Remarque • Cette fonction est désactivée quand “OPTIMUM” est sélectionné sur le menu “Sélection AV”. • Cette fonction est inopérante quand des signaux de PC sont reçus. • Comme cette fonction optimise automatiquement la qualité de l’image, le processus dans lequel les réglages d’image tels que la luminosité et la teinte changent progressivement peut être visible à l’écran.
Réglages utiles Remarque Saisie du mot de passe Vous devez saisir le mot de passe après la sélection d’une chaîne bloquée avec la fonction Verrouil. Enfants, et avant d’utiliser certaines fonctions du menu. • Tapez le mot de passe à quatre chiffres en vous servant des touches 0 à 9. Intro votre code svp. Remarque Minut. Extinction • Si vous échouez trois fois à saisir le mot de passe correct, “Code non valide.” apparaît et le menu se ferme.
11 Réglages utiles Réinitialisation de la fonction mot de passe 1 Appuyez sur HOME MENU. 2 Sélectionnez “Installation” (/ puis ENTER). 3 Sélectionnez “Mot de passe” (/ puis ENTER). La page de saisie du mot de passe s’affiche. Tapez le mot de passe actuel à quatre chiffres en vous servant des touches 0 à 9. 4 Sélectionnez “Réinitial.” (/ puis ENTER). 5 Sélectionnez “Oui” (/ puis ENTER). 6 Appuyez sur HOME MENU pour quitter le menu.
Utilisation avec un autre appareil 12 Chapitre 12 Utilisation avec un autre appareil Lecture de DVD Pour regarder les images provenant d’un lecteur de DVD, appuyez sur INPUT 2 du boîtier de télécommande ou sur INPUT du téléviseur plasma de manière à sélectionner “ENTRÉE 2”.
12 Utilisation avec un autre appareil Connexion d’un magnétoscope Utilisez la prise INPUT 2 pour connecter un magnétoscope ou un autre appareil audiovisuel. Si le magnétoscope prend en compte les systèmes “AV link” téléviseur-magnétoscope récents, vous pouvez le connecter à la prise INPUT 2 ou INPUT 3 du téléviseur plasma en utilisant pour cela un câble péritel à 21 broches, toutes câblées.
Utilisation avec un autre appareil • Une fois que les connexions et réglages ci-dessus sont faits, vous pouvez utiliser la lecture en différé avec le graveur de DVD/HDD (DVR). Vous pouvez aussi sélectionner le mode 2 écrans ou image dans l’image pour visualiser les images venant de la source d’entrée de télévision numérique et d’une source d’entrée externe (ENTRÉE 2 pour l’exemple de connexion ci-dessus) à laquelle la sortie du graveur a été raccordée.
12 Utilisation avec un autre appareil Connexion d’un ordinateur personnel Utilisez les prises PC pour la connexion d’un ordinateur personnel. Remarque • Les prises d’entrée PC sont compatibles DDC2B.
Utilisation avec un autre appareil Utilisation de l’entrée HDMI Signaux vidéo pris en charge 720 (1440) x 576i@50 Hz 720 x 576p@50 Hz 1280 x 720p@50 Hz 1920 x 1080i@50 Hz 720 (1440) x 480i@59,94 Hz/60 Hz 720 x 480p@59,94 Hz/60 Hz Deep Colour pris en charge Deep Colour signifie la profondeur de couleur, qui décrit le nombre de bits utilisés pour représenter la couleur de chaque pixel dans une image matricielle.
12 Utilisation avec un autre appareil Utilisation de la prise HDMI INPUT 4: Élément Description Vidéo (réglage par défaut) Excepté le cas où un PC est connecté, sélectionnez cette option PC Sélectionnez cette option quand un PC est connecté à la prise d’entrée HDMI Vue de dos 4 Appuyez sur HOME MENU pour quitter le menu. Attention • Veillez à sélectionner “PC” quand un PC est connecté à la prise d’entrée HDMI.
Utilisation avec un autre appareil Remarque Spécification du type de signaux audio Quand vous utilisez la prise HDMI INPUT 1 ou INPUT 3, sélectionnez la prise pour la source d’entrée souhaitée, puis procédez comme décrit ci-dessous pour spécifier le type de signaux audio. 1 Appuyez sur HOME MENU. 2 Sélectionnez “Options” (/ puis ENTER). 3 Sélectionnez “Entrée HDMI” (/ puis ENTER). 4 5 Sélectionnez “Audio” (/ puis ENTER). Sélectionnez le type de signaux audio (/ puis ENTER).
12 Utilisation avec un autre appareil Utilisation de i/o link.A Le téléviseur plasma comporte trois fonctions typiques i/o link.A facilitant les connexions entre le téléviseur plasma et d’autres appareils audiovisuels. Vue de dos Lecture commandée par touche unique Le téléviseur plasma étant en veille, il se met automatiquement en service et fournit les images de la source audiovisuelle (par exemple, magnétoscope, lecteur de DVD).
Utilisation avec un autre appareil Utilisation de l’interface USB (Fonction Home Gallery) Appareil photo numérique Connexion d’un appareil USB Tenez le connecteur de l’appareil USB avec sa face supérieure dirigée sur le panneau avant, et insérez-le dans le port USB sur le côté du téléviseur plasma. • Insérez le connecteur de l’appareil USB au maximum. • Lors de l’utilisation du connecteur USB de votre appareil, connectez-le directement au port USB.
12 Utilisation avec un autre appareil • N’insérez ni ne retirez l’appareil USB immédiatement après la mise en ou hors service du système. Cela peut provoquer l’endommagement des données qui se trouvent à l’intérieur de la mémoire. • Ne mettez pas l’appareil photo numérique hors tension pendant que l’écran Home Gallery est affiché. Lancement d’un écran de vignettes Après avoir sélectionné un dossier sur l’écran Home Gallery intial, les images de ce dossier sont affichées sous forme de vignettes.
Utilisation avec un autre appareil P–: Affiche l’image précédente en écran normal ou en plein écran. P+: Affiche l’image suivante en écran normal ou en plein écran. ROUGE: L’image est affichée sur la totalité de l’écran. Pour quitter l’affichage plein écran, appuyez sur RETURN. VERT: HOME MENU: Cette touche permet de quitter la fonction Home Gallery. Remarque • Veillez à ne pas afficher la même image pendant une longue période. Cela pourrait causer le brûlage d’écran/la rémanence d’image.
12 Utilisation avec un autre appareil Commande d’un autre appareil avec le boîtier de télécommande fourni Avec le boîtier de télécommande fourni, vous pouvez commander un autre appareil connecté: terminal (STB), lecteur de DVD, graveur de DVD/HDD (DVR), lecteur BD ou magnétoscope (VCR). Pour utiliser cette fonction, il vous faut d’abord prérégler le boîtier de télécommande fourni avec le code de fabrique de l’appareil à commander.
Utilisation avec un autre appareil DVD 12 Magnétoscope SHARP 512 HITACHI 1 114 SONY 1 513 HITACHI 2 115 SONY 2 514 HITACHI 3 116 SONY 3 515 JVC 1 117 THOMSON 516 JVC 2 118 TOSHIBA 517 JVC 3 119 YAMAHA 518 JVC 4 519 JVC 5 520 LOEWE 1 521 LOEWE 2 522 MATSUI 523 ORION 524 PANASONIC 1 525 PANASONIC 2 526 PHILIPS 1 527 PHILIPS 2 528 PHILIPS 3 529 SANYO 530 SAMSUNG 1 531 SAMSUNG 2 532 SAMSUNG 3 533 SAMSUNG 4 534 SHARP 535 SONY 1 536 SONY 2 537 SON
12 Utilisation avec un autre appareil Touches de commande de terminal (STB) En mode STB, les touches du boîtier de télécommande fonctionnent comme indiqué ci-après. 1 1 2 3 4 2 INPUT 1 1 2 3 4 5 6 7 8 9 INFO 0 PC 3 RETURN Quand l’écran de menu d’émission est affiché, appuyer sur cette touche pour rétablir l’écran immédiatement précédent. 4 ENTER Appuyer sur cette touche pour activer la fonction sélectionnée.
Utilisation avec un autre appareil 12 Touches de commande du lecteur de DVD, graveur de DVD En mode DVD/DVR, les touches du boîtier de télécommande fonctionnent comme indiqué ci-après. 1 2 3 0à9 Fonctionnent comme les touches numériques. 2 P+/P– (Graveur de DVD/HDD (DVR) uniquement) Appuyez sur ces touches pour changer la chaîne du tuner intégré au graveur de DVD/HDD (DVR). 3 RETURN Quand le menu de DVD est affiché, appuyez sur cette touche pour rétablir l’écran immédiatement précédent.
12 Utilisation avec un autre appareil Touches de commande de magnétoscope En mode VCR, les touches du boîtier de télécommande fonctionnent comme indiqué ci-après. 1 1 2 3 4 2 INPUT 1 1 2 3 4 5 6 7 8 9 PC 0 INFO INPUT 5 TV/DTV 2 P SELECT TV DVD/ SOURCE STB DVR VCR 5 HOME MENU RETURN MENU ENTER EXIT EPG 3 4 DVD TOP MENU / GUIDE HDMI CONTROL DISC NAVI 72 Fr DVD HDD 6 7 8 9 0à9 Fonctionnent comme les touches numériques.
Utilisation de la commande HDMI 13 Chapitre 13 Utilisation de la commande HDMI Fonction Avec le boîtier de télécommande du téléviseur plasma, vous pouvez actionner des appareils Pioneer tels qu’un enregistreur, un lecteur, un système AV ou un convertisseur HD, qui prennent en charge les fonctions de commande HDMI.
13 Utilisation de la commande HDMI Panneau de commande sur écran Connexions pour la commande HDMI Pour un système AV Commande HDMI 1 1 5 2 SURROUND+ 2 6 7 INPUT- 3 INPUT+ 3 4 SURROUND- 4 5 HDMI CONTROL Sort.
Utilisation de la commande HDMI 13 Connexion d’un enregistreur de DVD Vue de dos Vue de dos Français Câble compatible HDMI (Câble HDMI portant la marque HDMI) Enregistreur de DVD Remarque • Le nombre maximum d’appareils qui peuvent être connectés et actionnés avec le boîtier de télécommande du téléviseur plasma est comme suit: enregistreur x 2, lecteur x 2, système AV ou convertisseur HD x 1.
13 Utilisation de la commande HDMI Réglage de la commande HDMI Sélection de la préparation de mise en service Sélection de la prise d’entrée Vous pouvez sélectionner si le téléviseur plasma est mis en service quand l’enregistreur ou le lecteur Pioneer connecté est mis en service et que des images sont envoyées au téléviseur plasma. (le réglage par défaut est “Marche”) Afin de pouvoir utiliser les fonctions de commande HDMI, sélectionnez la prise HDMI à laquelle l’appareil externe est connecté.
Utilisation de la commande HDMI 13 Sélection d’entrée pour le convertisseur HD En mode convertisseur HD, vous pouvez sélectionner ENTRÉE 1 à ENTRÉE 5 sur le convertisseur HD en utilisant “INPUT 1” à “INPUT 5” du boîtier de télécommande ou INPUT se trouvant sur le côté droit du téléviseur plasma. Vue de dos Connecter à INPUT 4 Câble compatible HDMI (Câble HDMI portant la marque HDMI) Convertisseur HD Remarque • Pour utiliser le mode convertisseur HD, un convertisseur HD Pioneer est nécessaire.
13 Utilisation de la commande HDMI Utilisation des menus de commande HDMI En sélectionnant et utilisant les menus de commande HDMI correspondants, vous pouvez utiliser diverses fonctions avec l’enregistreur, le lecteur ou le système AV Pioneer connecté qui prend en charge les fonctions de commande HDMI. 1 Appuyez sur HOME MENU. 2 Sélectionnez “Cmde HDMI” (/ puis ENTER). Le menu de commande HDMI est affiché. Cmde HDMI Navigateur disque ENR. pro. (DVR) Lis. ENR. pro.
Utilisation de télétexte 14 Chapitre 14 Utilisation de télétexte Utilisation des fonctions télétexte Français Qu’est-ce que le télétexte ? Le télétexte consiste à diffuser des pages d’information et de divertissement qui peuvent être affichées sur les téléviseurs spécialement conçus pour cela. Votre téléviseur plasma peut recevoir les signaux télétexte diffusés par les réseaux de télévision et en crée des images graphiques qui sont affichées sur l’écran.
14 Utilisation de télétexte k: Affichage des Vision Générale TOP Pour afficher une information masquée, telle que la réponse à une question d’un jeu, appuyez sur k. Appuyez une nouvelle fois sur k pour masquer l’information. Au cours de la réception télétexte TOP, vous pouvez afficher les éléments généraux de TOP. Vision Générale TOP : Pour arrêter la mise à jour des pages de télétexte, appuyez sur Appuyez une nouvelle fois sur Pages de blocage .
Informations supplémentaires 15 Chapitre 15 Informations supplémentaires Guide de dépannage Action corrective possible GÉNÉRAL Français Anomalie • Absence d’alimentation. • Le cordon d’alimentation n’est-il pas débranché ? (Voir page 18.) • Le système ne peut pas être mis • La touche a du téléviseur plasma est-elle en service ? (Voir page 20.) sous tension. • Contrôlez si vous avez appuyé sur les touches 0 à 9 ou a du boîtier de télécommande. (Voir page 20.
15 Informations supplémentaires Anomalie Action corrective possible • Les sons sont inversés, droite • Assurez-vous que les connexions aux enceintes n’ont pas été interverties, et que l’une ou l’autre n’est pas gauche. débranchée (pour PDP-508XD seulement). (Voir page 13.) • Les sons ne sont sortis que d’une • La balance est-elle correctement réglée ? (Voir page 35.) seule enceinte. • Le son est sorti mais aucune image n’est affichée.
Informations supplémentaires 15 Action corrective possible • Pas de son. • Contrôlez si les connexions sont faites correctement entre le téléviseur plasma et l’appareil qui prend en charge les fonctions de commande HDMI. (Voir page 74.) • Contrôlez si vous avez entré les réglages correctement pour “Rég. cmde HDMI”. (Voir page 76.) • Contrôlez si vous avez un système AV commandé par HDMI connecté à une prise HDMI et l’enregistreur ou le lecteur connecté à une autre prise HDMI sur le téléviseur plasma.
15 Informations supplémentaires Brochage du connecteur mini D-sub à 15 broches 84 Fr N° de broche Nom du signal N° de broche Nom du signal 1 R 9 +5 V 2 G 10 GND (Masse) 3 B 11 Non connectée 4 Non connectée 12 SDA 5 Non connectée 13 HD 6 GND (Masse) 14 VD 7 GND (Masse) 15 SCL 8 GND (Masse)
Informations supplémentaires 15 Brochage de prise péritel Divers appareils audio et vidéo peuvent être connectés grâce aux prises péritel.
15 Informations supplémentaires Caractéristiques techniques Élément Téléviseur plasma 50 po., Modèle: PDP508XD Téléviseur plasma 42 po.
Informations supplémentaires 15 Dimensions PDP-508XD Unité: mm 1224 115 717 Français PDP-428XD Unité: mm 115 679 1040 Marques de commerce • est une marque de SRS Labs, Inc. • WOW technologie est incorporé sous licence de SRS Labs, Inc. • Ce produit utilise les polices FontAvenue® sous licence de NEC Corporation. FontAvenue est une marque déposée de NEC Corporation. • DDC est une marque déposée de Video Electronics Standards Association.
WICHTIG CAUTION RISK OF ELECTRIC SHOCK DO NOT OPEN Das Blitzsymbol in einem Dreieck weist den Benutzer darauf hin, dass eine Berührungsgefahr mit nicht isolierten Teilen im Geräteinneren, die eine gefährliche Spannung führen, besteht. Die Spannung kann so hoch sein, dass sie die Gefahr eines elektrischen Schlages birgt. ACHTUNG: UM SICH NICHT DER GEFAHR EINES ELEKTRISCHEN SCHLAGES AUSZUSETZEN, DÜRFEN SIE NICHT DEN DECKEL (ODER DIE RÜCKSEITE) ENTFERNEN.
ACHTUNG Der -Schalter dieses Gerätes trennt das Gerät nicht vollständig vom Stromnetz. Um das Gerät vollständig vom Netz zu trennen, muss der Netzstecker aus der Netzsteckdose gezogen werden. Daher sollte das Gerät so aufgestellt werden, dass stets ein unbehinderter Zugang zur Netzsteckdose gewährleistet ist, damit der Netzstecker in einer Notsituation sofort abgezogen werden kann.
Inhalt Vielen Dank, dass Sie sich für dieses Pioneer-Produkt entschieden haben. Lesen Sie diese Bedienungsanleitung bitte aufmerksam durch, sodass Sie mit der richtigen Bedienungsweise Ihres Modells vertraut werden. Nachdem Sie die Bedienungsanleitung gelesen haben, sollten Sie sie an einer sicheren Stelle griffbereit aufbewahren. In manchen Ländern oder Verkaufsgebieten weichen die Ausführungen von Netzstecker oder Netzsteckdose unter Umständen von den in den Abbildungen gezeigten ab.
Inhalt EPG-Anzeigeformat . . . . . . . . . . . . . . . . . . . . . . . . . . . Über EPG. . . . . . . . . . . . . . . . . . . . . . . . . . . . . . . . . . . . TV-Programme mit EPG vorprogrammieren . . . . . . . Andere praktische EPG-Funktionen . . . . . . . . . . . . . . 45 46 46 49 11 Praktische Einstellmöglichkeiten . . . . 50 Umschalten des vertikalen Aktivierungsmodus (nur AV-Programmquelle) . . . . . . . . . . . . . . . . . . . . 50 Bildposition anpassen (nur AV-Programmquelle) . . . . . . . . . . .
01 Wichtige Informationen für den Anwender Kapitel 1 Wichtige Informationen für den Anwender Damit Sie diesen Plasma-Fernseher Pioneer PDP-508XD/PDP-428XD auch voll genießen können, sollten Sie zunächst diese Informationen aufmerksam lesen. Der Pioneer PDP-508XD/PDP-428XD ist ein hochwertiger Plasma-Fernseher, der sich durch eine lange Lebensdauer und hohe Qualität auszeichnet.
Wichtige Informationen für den Anwender Vorsicht • Pioneer übernimmt keine Verantwortung für jegliche Schäden aufgrund falschen Gebrauchs des Produkts durch den Eigentümer oder andere Personen, Funktionsstörungen bei Gebrauch, andere produktbezogene Probleme und Gebrauch des Produkts außer in Fällen, in denen die Firma haftungspflichtig ist. Schutzfunktion des Plasma-Fernsehers Wenn Standbilder (wie z. B.
01 Wichtige Informationen für den Anwender Vorsicht Einbrenner und Nachbilder Wenn dasselbe Bild, zum Beispiel ein Standbild, über längere Zeit angezeigt wird, können Nachbilder entstehen. Dies kann in den folgenden beiden Fällen auftreten. Nachbild wegen elektrischer Restladung Wenn Bildmuster mit sehr hoher Spitzenluminanz länger als eine Minute angezeigt werden, können Nachbilder wegen elektrischer Restladung verursacht werden. Die Nachbilder lösen sich auf, wenn bewegte Bilder wiedergegeben werden.
Wichtige Sicherheitshinweise 02 Kapitel 2 Wichtige Sicherheitshinweise 10. Belüftung - Das Gehäuse weist Belüftungsöffnungen wie Schlitze usw. auf. Diese Öffnungen dürfen nicht abgedeckt oder blockiert werden, da ungenügende Belüftung einen Wärmestau und/oder eine Verkürzung der Produktlebensdauer verursachen kann. Stellen Sie das Gerät nicht auf Betten, Sofas, Teppichen oder anderen Unterlagen auf, die die Belüftungsöffnungen blockieren könnten. Das Gerät ist nicht für den Einbau bestimmt.
02 Wichtige Sicherheitshinweise Beim Installieren zu beachten Vorsicht Beachten Sie beim Installieren jedes Artikels, wie z. B. des optionalen Fußes, bitte die folgenden Punkte. Bei Gebrauch des optionalen Fußes, von Halterungen oder ähnlichen Gegenständen • Lassen Sie die Installation von Ihrem Händler durchführen. • Achten Sie darauf, dass zur Installation die mitgelieferten Schrauben verwendet werden.
Mitgeliefertes Zubehör 03 Kapitel 3 Mitgeliefertes Zubehör Stellen Sie sicher, dass das folgende Zubehör in der Verpackung enthalten ist. Garantiekarte Fernbedienung Bedienungsanleitung x 2 Deutsch Mignonzelle (AA) x 2 (für die Fernbedienung) Ferritkern Netzkabel Nur das für Ihr Land bzw. Gebiet geeignete Netzkabel ist mitgeliefert.
04 Teilebezeichnungen Kapitel 4 Teilebezeichnungen Plasma-Fernseher (Vorderseite) Seitlich PDP-508XD Seitlich PDP-428XD 11 7 8 12 9 13 10 14 15 ON STANDBY 2 3 TIMER ON 1 4 STANDBY TIMER 5 6 1 2 3 4 5 6 Von der Unterseite des Displays gesehen Von der Vorderseite des Displays gesehen Die Buchsen an den Seitenverkleidungen sind den Modellen PDP-508XD und PDP-428XD gemeinsam.
Teilebezeichnungen 04 Plasma-Fernseher (Rückseite) PDP-508XD PDP-428XD Deutsch 10 11 12 13 14 15 3 2 1 11 12 13 14 15 10 16 17 18 19 4 5 6 7 8 9 * Die genaue Position der Anschlüsse entnehmen Sie dem Anschlusspositionsblatt, das sich neben dem Anschlussfach befindet. 16 17 18 Die Anschlüsse 1 bis 9 sind die gleichen wie beim PDP-508XD.
04 Teilebezeichnungen Fernbedienung c: Schaltet den Bildschirmmodus zwischen 6 Doppelbildschirm, Bild-in-Bild und Einzelbildschirm um. In diesem Abschnitt werden die Funktionen der Tasten beschrieben, die zur Verfügung stehen, nachdem der TV-Modus mit der Taste SELECT gewählt worden ist. Hinweise zu den Tasten für die Steuerung von anderen Geräten finden Sie unter Steuerung anderer Ausrüstung mithilfe der mitgelieferten Fernbedienung beginnend auf Seite 68.
Vorbereitungen 05 Kapitel 5 Vorbereitungen Installieren des Plasma-Fernsehers Transport des Plasma-Fernsehers Zur Installation auf einem Regal o. Ä. halten Sie den PlasmaFernseher wie unten gezeigt. Der Plasma-Fernseher ist schwer. Tragen Sie ihn daher niemals alleine. Über 50 cm (für PDP-508XD) Unterlautsprecher Deutsch Über 10 cm Positionierung • Vermeiden Sie direkte Sonnenbestrahlung. Achten Sie auf ausreichende Belüftung.
05 Vorbereitungen (für PDP-428XD) Vermeiden eines Umkippens des Plasma-Fernsehers Vergewissern Sie sich nach Montage des Fußes, dass der PlasmaFernseher nicht umkippen kann und sowohl an der Wand als auch auf dem Regal stabilisiert ist. Stabilisieren auf einem Tisch oder Regal Stabilisieren Sie den Plasma-Fernseher, wie in der Abbildung gezeigt, mithilfe der mit dem optionalen Fuß mitgelieferten Plastikbänder und Schrauben.
Vorbereitungen 05 Grundlegende Anschlüsse Vorsicht Antennenanschluss Für die Anzeige eines klaren Bilds empfiehlt sich der Anschluss einer Außenantenne. Nachstehend finden Sie eine kurze Beschreibung der bei Verwendung eines Koaxialkabels vorzunehmenden Anschlüsse. Vorsicht • Wenn die Einstellung “Spannungsversorgung” eingestellt ist, schließen Sie die Antenne direkt an die ANT-Eingangsbuchse auf der Rückseite des Plasma-Fernsehers an.
05 Vorbereitungen Verlegen von Kabeln Wenn der Lautsprecher unter dem Plasma-Fernsehbildschirm installiert wird (nur für PDP-508XD): Rückansicht Lautsprecherkabel Hinweis • Verwenden Sie die Schnellverschlussklemmen nach Bedarf. Anbringen des Ferritkerns Bringen Sie den zusätzlichen Ferritkorn am Ende des Netzkabels an, wie in der Begleitabbildung gezeigt. Verwenden Sie den mitgelieferten Kabelbinder, um den Ferritkern gegen Verrutschen am Tisch zu sichern.
Vorbereitungen Vorbereiten der Fernbedienung Einlegen der Batterien 1 Öffnen Sie den Batteriefachdeckel. 05 Wirkungsbereich der Fernbedienung Zur Benutzung der Fernbedienung ist diese auf den Fernbedienungssensor unten rechts an der Vorderseite des Plasma-Fernsehers zu richten. Der Abstand der Fernbedienungseinheit vom Fernbedienungssensor sollte 7 m nicht überschreiten, und ihr Winkel zum Sensor sollte nach rechts, links, oben und unten innerhalb von 30 Grad liegen.
06 Fernsehempfang Kapitel 6 Fernsehempfang Wichtig • Um Fernsehkanäle empfangen zu können, muss zunächst der eingebaute TV-Tuner konfiguriert werden. Siehe Programmieren von Fernsehkanälen auf Seite 26 für Hinweise zu diesem Betriebvorgang. Einschalten • Drücken Sie a am Plasma-Fernseher, wenn die Anzeigen POWER ON und STANDBY erloschen sind. • Das System wird eingeschaltet. • Die Anzeige POWER ON leuchtet blau auf. • Drücken Sie a oder 0 bis 9 auf der Fernbedienung bzw.
Fernsehempfang 06 Kanäle ändern Mit Hilfe von 0 bis 9 auf der Fernbedienung Kanäle können Sie mithilfe der Fernbedienung oder über das Bedienfeld auf der rechten Seite des Plasma-Fernsehers ändern. • Bevor Sie weitere Bedienungsschritte mit der Fernbedienung ausführen, vergewissern Sie sich, dass Sie den TV-Modus mit der Taste SELECT an der Fernbedienung gewählt haben. Siehe Steuerung anderer Ausrüstung mithilfe der mitgelieferten Fernbedienung auf Seite 68.
06 Fernsehempfang Ändern der Lautstärke- und Toneinstellungen In der Tabelle unten sind die verfügbaren Audiokanäle nach Programm-Audiotyp gezeigt. Einstellen Die Lautstärke können Sie mithilfe der Fernbedienung oder über das Bedienfeld auf der rechten Seite des Plasma-Fernsehers einstellen.
Fernsehempfang 06 Verwendung der MultiscreenFunktionen 1 Drücken Sie c, um den Anzeigemodus zu wählen. Mit jedem Druck auf c wird der Anzeigemodus zwischen Doppelbildschirm, Bild-in-Bild und Einzelbildschirm umgeschaltet. • Im Doppelbildschirm- oder im Bild-in-Bild-Modus drücken Sie um die Position der beiden angezeigten Bildschirme umzuschalten. Der linke Bildschirm (im Doppelbildschirmmodus) bzw.
06 Fernsehempfang Hinweis • Mit der Multiscreen-Funktion können Bilder von derselben Eingangsquelle nicht gleichzeitig angezeigt werden. Wenn Sie einen derartigen Versuch unternehmen, erscheint eine Warnmeldung. • Mit der Multiscreen-Funktion können Bilder aus Kombinationen von zwei externen Eingangsquellen (EINGANG 1 bis EINGANG 5, PC) nicht angezeigt werden. Bilder aus den folgenden Eingangsquellenkombinationen können angezeigt werden.
Das Home-Menü 07 Kapitel 7 Das Home-Menü Überblick über das Home-Menü (HOME MENU) Für AV-Programmquelle Punkt Bild AV-Wahl Kontrast Helligkeit Farbsättigung Tint Schärfe Profi-Einstellungen Rückstellen Höhen Bass Balance Rückstellen Klangeffekt Kopfhörer-Leistung Sub-Lautstärke Energiesparmodus Kein Signal -ausKeine Bedienung -aus– Position Auto-Größe Seitenmaske HDMI Einstellungen HDMI-Strg. Einst Blau LED-Dimmer Orbiter Videomuster Aktivierungsmodus TV-System Eingangswahl Spielsteuerprior.
08 Vorbereitung Kapitel 8 Vorbereitung Programmieren von Fernsehkanälen Hinweis • Über das Home-Menü können Sie die automatische Installation jederzeit starten, z. B. nach Umzug in ein anderes Land. Führen Sie vor dem Start der automatischen Installation bitte die folgenden Schritte aus. Drücken Sie HOME MENU, wählen Sie “Grundeinstellungen” (/, dann ENTER), und “Autoinstallation” (/, dann ENTER). Die Passwort-Eingabeanzeige erscheint. Geben Sie Ihr vierstelliges Passwort mit den Tasten 0 bis 9 ein.
Vorbereitung 11 Wählen Sie “TV-System” (/). 12 Wählen Sie ein TV-System (/). Sie können zwischen “Auto”, “PAL”, “SECAM” und “4.43NTSC” wählen. 13 Wählen Sie “Speichern” (/). 14 Wählen Sie “Ja”, “Ja (Liste)” oder “Nein” (/). Punkt Beschreibung Ja Sie können den Kanal mit P+/P– wählen. Ja (Liste) Wählen Sie diese Option, um den Kanal als Favorit zu speichern. Sie können den Kanal mit P+/P– aus der Liste der favorisierten Kanäle wählen. Nein Sie können den Kanal nicht mit P+/P– wählen.
08 Vorbereitung Eingeben von Fernsehkanalnamen Sie können gespeicherten Fernsehkanälen einen aus bis zu fünf Zeichen bestehenden Namen zuweisen. Dies kann später die Programmwahl erleichtern. 1 Drücken Sie HOME MENU. 2 Wählen Sie “Grundeinstellungen” (/, dann ENTER). 3 Wählen Sie “Analog TV Konfigurieren” (/, dann ENTER). Die Passwort-Eingabeanzeige erscheint. Geben Sie Ihr vierstelliges Passwort mit den Tasten 0 bis 9 ein. 4 Wählen Sie “Name” (/, dann ENTER).
Vorbereitung 08 Einstellen der Sprache Für AV-Programmquelle Wählen Sie unter 17 Sprachen für On-Screen-Anzeigen, wie z. B. Menüs und Anweisungen: Englisch, Deutsch, Französisch, Italienisch, Spanisch, Niederländisch, Schwedisch, Portugiesisch, Griechisch, Finnisch, Russisch, Türkisch, Norwegisch, Dänisch, Tschechisch, Polnisch und Ukrainisch. Für die im Videotext-Modus zu verwendende Sprache können Sie unter Westeuropa, Osteuropa, Griechenld./Türkei, Kyrillisch und Arabien wählen.
08 Vorbereitung Grundlegende Bildeinstellungen Für AV-Programmquelle Stellen Sie das Bild wunschgemäß für die gewählte AV-Wahloption (außer DYNAMISCH) ein. 1 Drücken Sie HOME MENU. 2 Wählen Sie “Bild” (/, dann ENTER). 3 Wählen Sie einen Einstellpunkt (/, dann ENTER).
Vorbereitung 08 Erweiterte Bildeinstellungen Der Plasma-Fernseher bietet Ihnen verschiedene fortschrittliche Funktionen zur Optimierung der Bildqualität. Einzelheiten zu diesen Funktionen entnehmen Sie bitte den Tabellen. Verwendung des Intelligent-Modus 1 Wiederholen Sie die Schritte 1 bis 3 von Verwendung von PureCinema. 2 Wählen Sie “Intellig.-Modus” (/, dann ENTER). 3 Wählen Sie den gewünschten Parameter (/, dann ENTER). Verwendung von PureCinema 1 Drücken Sie HOME MENU. Intellig.
08 Vorbereitung • Sie werden eher eine Feineinstellung vornehmen wollen. Hierzu wählen Sie zuerst “Manuell”, dann halten Sie ENTER länger als drei Sekunden gedrückt. Die Anzeige für manuelle Einstellung erscheint. Fahren Sie dann mit Schritt 7 fort. ACL Führt die Kompensation so durch, dass optimale Bildkontrasteigenschaften erhalten werden Einstellungen Aus Ein Deaktiviert ACL Aktiviert ACL 7 Wählen Sie einen Einstellpunkt (/, dann ENTER). 8 Stellen Sie die gewünschte Stufe ein (/).
Vorbereitung 08 Verwendung von Farbmanagement Beseitigen von Bildrauschen 1 Drücken Sie HOME MENU. 1 Drücken Sie HOME MENU. 2 Wählen Sie “Bild” (/, dann ENTER). 2 Wählen Sie “Bild” (/, dann ENTER). 3 Wählen Sie “Profi-Einstellungen” (/, dann ENTER). 3 Wählen Sie “Profi-Einstellungen” (/, dann ENTER). 4 Wählen Sie “Farbeinstellungen” ( /, dann ENTER). 4 Wählen Sie “Rauschunterdrück.” (/, dann ENTER). 5 Wählen Sie “Farbmanagement” (/, dann ENTER).
08 Vorbereitung Verwendung des 3DYC- und des I-P-Modus Vergleich der Bildeinstellungen auf dem Bildschirm 1 Drücken Sie HOME MENU. 2 Wählen Sie “Bild” (/, dann ENTER). 3 Wählen Sie “Profi-Einstellungen” (/, dann ENTER). 4 Wählen Sie “Andere” (/, dann ENTER). Während der Durchführung der Bildeinstellungen können Sie sich schnell das in demselben Parameter eingestellte vorherige Bild ansehen, so dass Sie die Bilder leicht vergleichen und die bevorzugte Bildqualität wählen können.
Vorbereitung 08 Toneinstellungen Klangeffekt Mit den folgenden Einstellungen können Sie die Klangqualität Ihren Wünschen anpassen. Stellen Sie den Ton wunschgemäß für die gewählte AV-Wahloption ein. Siehe AV-Wahl auf Seite 29. 1 2 Drücken Sie HOME MENU. Wählen Sie “Ton” (/, dann ENTER). 3 Wählen Sie einen Einstellpunkt (/). 4 Stellen Sie die gewünschte Stufe ein (/). Sie können einen der folgenden Effekte wählen: SRS FOCUS, SRS oder SRS TruBass. 1 Drücken Sie HOME MENU.
08 Vorbereitung Tonempfang vom Nebenbildschirm über Kopfhörer Bei Anschluss eines Kopfhörers kann Ton vom Nebenbildschirm im Doppelbildschirm- oder Bild-in-Bild-Modus mitgehört werden; Ton vom Hauptbildschirm wird über die Lautsprecher ausgegeben. Um diese Funktion zu verwenden, gehen Sie wie folgt vor. 1 2 3 4 Energiesparmodi Die Energiesparfunktion macht Ihnen das Stromsparen einfach. Energiesparmodus Zur Senkung des Stromverbrauchs stehen Ihnen drei Energiesparmodi zur Verfügung.
Vorbereitung 08 Kein Signal -aus- (nur AV-Signalquelle) Energiemanagement (nur PC-Signalquelle) Schaltet das System automatisch in den Standby-Modus, wenn 15 Minuten lang kein Signal erhalten wird. Schaltet das System automatisch in den Bereitschaftsmodus, wenn vom PC kein Signal empfangen wird. 1 Drücken Sie HOME MENU. 1 Drücken Sie HOME MENU. 2 Wählen Sie “Energiesparmodi” (/, dann ENTER). 2 Wählen Sie “Energiesparmodi” (/, dann ENTER).
09 Wiedergabe von DTV-Programmen Kapitel 9 Wiedergabe von DTV-Programmen DTV-Programme betrachten Digital-TV (DTV) ersetzt nicht nur die herkömmlichen analogen Fernsehprogramme, sondern bietet darüber hinaus ein breiteres Programmangebot, eine bessere Bildqualität und verschiedene zusätzliche Informationen. Weiterhin ermöglicht es eine Reihe weiterer Funktionen wie Untertitel und multiple Tonkanäle.
Wiedergabe von DTV-Programmen 09 Betrachten von Untertiteln Ersetzen bestehender Kanäle Im DTV-Modus können Sie Untertitel durch Drücken von [ einund ausschalten. Durch das folgende Verfahren werden die momentanen DTVKanaleinstellungen zunächst verworfen, dann wird nach empfangbaren Kanälen gesucht, und die Kanalkonfigurierung wird von Neuem durchgeführt. Untertitel ein 1 Wiederholen Sie die Schritte 1 bis 4 in Neuwahl eines Landes. 2 Wählen Sie “Programm ersetzen” (/, dann ENTER).
09 Wiedergabe von DTV-Programmen Signalstärke prüfen 1 Wiederholen Sie die Schritte 1 bis 4 von Signalstärke prüfen. Sie können bei jedem einzelnen TV-Programm die Signalstärke und Signalqualität kontrollieren. 2 Wählen Sie “Auf Werkseinstellungen zurücksetzen” (/, dann ENTER). • Es erscheint ein Bestätigungsfenster. 1 Drücken Sie HOME MENU. 2 Wählen Sie “Grundeinstellungen” (/, dann ENTER). 3 Durch Drücken von “OK” werden die Werksvorgaben wiederhergestellt.
Wiedergabe von DTV-Programmen 09 7 Wenn Sie mit allen Einstellungen fertig sind, ist noch an Folgendes zu denken. • Wenn Sie einen Kanal als Favoritenkanal gespeichert haben, lesen Sie unter Aktivieren der Favoritenfunktion nach, und aktivieren Sie die Favoritenfunktion. • Wenn Sie einen Kanal gesperrt haben, lesen Sie unter Verwendung eines Passworts auf Seite 55, und bestimmen Sie ein geeignetes vierstelliges Passwort. Hinweis • Mit “Autom.
09 Wiedergabe von DTV-Programmen Wählen eines Digital-Audioformats Verwendung von Software-Aktualisierung Zum Umschalten zwischen dem PCM- und dem Dolby-DigitalAudioformat gehen Sie wie nachfolgend beschrieben vor. Diese Funktion führt Download und Aktualisierung der SystemSoftware zum vorgegebenen Zeitpunkt durch. 1 Drücken Sie HOME MENU. 2 Wählen Sie “Grundeinstellungen” (/, dann ENTER). 3 Wählen Sie “DTV-Konfigurierung” (/, dann ENTER).
Wiedergabe von DTV-Programmen 09 Update-Zeit einstellen MHEG-Anwendungen verwenden (nur Großbritannien) Sie können die Zeit einstellen, zu der der Plasma-Fernseher täglich eine automatische Aktualisierung durchführt. Zur Verwendung dieser Funktion ist zunächst “Auto Aktualisierung” auf “Ein” einzustellen. Einige Stationen strahlen Programme mit MHEG-codierten Multimedia-Elementen (MHEG = Multimedia and Hypermedia Expert Group) für interaktives DTV aus.
09 Wiedergabe von DTV-Programmen Allgemeine Schnittstelle 2 Schieben Sie das einzusetzende CA-Modul mit Smart-Card bis zum Anschlag in den Common Interface-Schacht ein. Für den Empfang verschlüsselter DTV-Signale benötigen Sie ein CA-Modul und eine Smart-Card vom Dienstanbieter. Der CA-Modultyp kann je nach Hersteller unterschiedlich sein, wobei jedes CA-Modul ein bestimmtes Verschlüsselungssystem unterstützt. Ihr Plasma-Fernseher unterstützt CA-Module für den DVB-Standard.
Elektronische Programmführung (EPG) verwenden (nur DTV) 10 Kapitel 10 Elektronische Programmführung (EPG) verwenden (nur DTV) EPG-Anzeigeformat Hinweis • Für digitale TV-Programme, die keine EPG-Daten beinhalten, sind die entsprechenden EPG-Informationen nicht verfügbar. • Wenn die aktuelle Zeit nicht korrekt eingestellt ist, kann es vorkommen, dass die EPG-Informationen mancher TVProgramme nicht angezeigt werden. Allgemeine Programmliste So.12.
10 Elektronische Programmführung (EPG) verwenden (nur DTV) • Zum Verlassen der Detail-Informationsanzeige drücken Sie p erneut (oder RETURN). Über EPG Nach dem folgenden Vorgehen können Sie den Sendeplan von digitalen TV-Programmen einsehen, die gewünschten Informationen ansehen und/oder Programme wählen.
Elektronische Programmführung (EPG) verwenden (nur DTV) • Wählen Sie ein Programm, das noch nicht begonnen hat (dann ENTER oder GRÜN): Das Programm kann für die Aufnahme/Betrachtung eingestellt werden. 10 • Bei durch das CA-Modul eingeschränkter Betrachtung ist Aufnahme eventuell nicht möglich. Timer manuell programmieren Über das Menü können Sie digitale Fernsehprogramme auch durch Eingeben von Sendedatum und Uhrzeit vorprogrammieren. So.12.Sept 1 Drücken Sie HOME MENU.
10 Elektronische Programmführung (EPG) verwenden (nur DTV) Hinweis • Die vorprogrammierte Aufnahme/Betrachtung startet sofort, wenn das Vorprogrammieren weniger als drei Minuten vor Programmstart erfolgt. • Mit EPG vorgenommene Voreinstellungen werden automatisch in die Auflistung aufgenommen. • Bei durch das CA-Modul eingeschränkter Betrachtung ist Aufnahme eventuell nicht möglich. Menü-Übersicht Nach folgender Anleitung können Sie ein vorprogrammiertes Programm über das Menü ändern bzw. löschen.
Elektronische Programmführung (EPG) verwenden (nur DTV) Andere praktische EPG-Funktionen Nachstehend finden Sie eine Reihe praktischer Funktionen zum effektiveren und schnelleren Navigieren im EPG-Bildschirm. 10 EPG-Suche 1 Drücken Sie GELB bei angezeigtem EPG-Bildschirm (Programmliste, Detailinformationen und Suchergebnisse). 2 Wählen Sie “Datum” (/). EPG-Springen Datum 1 Drücken Sie ROT bei angezeigtem EPG-Bildschirm (Programmliste, Detailinformationen und Suchergebnisse). 2 So.12.
11 Praktische Einstellmöglichkeiten Kapitel 11 Praktische Einstellmöglichkeiten Über die Menüs “Weiterführende Einstellungen” Das Menü “Weiterführende Einstellungen” besteht aus zwei Bildschirmen. Drücken Sie im gewählten Menü die Taste / wiederholt, um zwischen Bildschirm 1 und Bildschirm 2 umzuschalten. Die Nummer des gegenwärtigen Bildschirms wird rechts oben im Bildschirm eingeblendet.
Praktische Einstellmöglichkeiten Automatisches Einstellen der Bildposition und -breite (nur PC-Programmquelle) Verwenden Sie die automatische Einstellung zur Bestimmung der Position und Bildbreite (Clock) von Bildern von einem Personalcomputer. 1 Drücken Sie HOME MENU. 2 Wählen Sie “Weiterführende Einstellungen” (/, dann ENTER). 3 Wählen Sie “Automatische Einstellung” (/, dann ENTER). Eine Nachrichtenmeldung wird angezeigt, und die automatische Einstellung beginnt.
11 Praktische Einstellmöglichkeiten TV-System-Einstellung Manuelles Wählen einer Bildschirmgröße Falls ein Bild nicht deutlich angezeigt wird, wählen Sie ein anderes TV-System (z. B. PAL, NTSC). Drücken Sie f, um zwischen den Bildschirmgrößenoptionen für den Typ der momentan empfangenen Videosignale umzuschalten. Mit jedem Druck auf f wird die Einstellung umgeschaltet. Die verfügbaren Bildschirmgrößen hängen vom Eingangssignaltyp ab. 1 Drücken Sie HOME MENU.
Praktische Einstellmöglichkeiten AV-Programmquelle PC-Programmquelle 4:3 KINO 11 5 Drücken Sie HOME MENU, um das Menü zu verlassen. Hinweis 4:3 VOLL 14:9 • Wenn das Bildschirmformat automatisch nicht korrekt gewählt wird, stellen Sie es manuell auf ein geeignetes Format um. • Wenn das Videosignal keine Informationen zum Seitenverhältnis enthält, kann diese Funktion nicht verwendet werden, selbst wenn Sie “Natürlich” und “Breit-Zoom” gewählt haben.
11 Praktische Einstellmöglichkeiten Ändern der Helligkeit an beiden Bildschirmseiten (Seitenmaske) Hinweis • Diese Funktion wird deaktiviert, wenn “OPTIMAL” in Menü “AVWahl” gewählt ist. • Diese Funktion steht nicht zur Verfügung, wenn PC-Signale empfangen werden. • Da diese Funktion die Bildqualität automatisch optimiert, wird auf dem Bild ggf. ein Vorgang angezeigt, während dessen sich die Bildeinstellungen, wie Helligkeit und Tint, langsam verändern.
Praktische Einstellmöglichkeiten Hinweis • Das System wird eine Stunde nach dem Einschalten des VideomusterBildschirms automatisch in den Bereitschaftsmodus geschaltet. • Während der Videomuster-Bildschirm eingeschaltet ist, sind alle Tasten betriebsunfähig, mit Ausnahme von a auf der Fernbedienung sowie STANDBY/ON und a am Plasma-Fernseher. • Um den Videomuster-Bildschirm auszuschalten, drücken Siea auf der Fernbedienung oder STANDBY/ON bzw. a am Plasma-Fernseher.
11 Praktische Einstellmöglichkeiten Rückstellen des Passworts 1 Drücken Sie HOME MENU. 2 Wählen Sie “Grundeinstellungen” (/, dann ENTER). 3 Wählen Sie “Passwort” (/, dann ENTER). Die Passwort-Eingabeanzeige erscheint. Geben Sie Ihr gegenwärtiges vierstelliges Passwort mit den Tasten 0 bis 9 ein. 4 Wählen Sie “Rückstellen” (/, dann ENTER). 5 Wählen Sie “Ja” (/, dann ENTER). 6 Drücken Sie HOME MENU, um das Menü zu verlassen.
Verwendung mit anderen Geräten 12 faKapitel 12 Verwendung mit anderen Geräten Der Plasma-Fernseher ist geeignet für den Anschluss einer breiten Palette an externen Geräten wie Decoder, Videorecorder, DVDSpieler, Spielekonsole, Personalcomputer und Camcorder. Zum Betrachten des Bildes von einem externen Gerät wählen Sie die Eingangsquelle mit den Tasten INPUT 1 bis INPUT 5 auf der Fernbedienung (Seite 14) oder INPUT am Plasma-Fernseher.
12 Verwendung mit anderen Geräten Anschließen eines Videorecorders Zum Anschließen eines Videorecorders oder anderen Audio/Video-Geräts verwenden Sie den Anschluss INPUT 2. Wenn Ihr Videorecorder fortgeschrittene “AV-Link“-Systeme für TV-VCRVerbundbetrieb unterstützt, können Sie den Videorecorder über ein voll verdrahtetes 21-Stift-SCART-Kabel an INPUT 2 oder INPUT 3 am Plasma-Fernseher anschließen.
Verwendung mit anderen Geräten • Wenn Sie mit den Anschlüssen und Einstellungen fertig sind, können Sie die zeitverschobene Wiedergabe mit dem DVD/ HDD-Recorder (DVR) durchführen. Sie können auch den Doppelbildschirm- oder den Bild-in-Bild-Modus wählen, um Bilder von der DTV-Eingangsquelle und einer externen Eingangsquelle (INPUT 2 im obigen Anschlussbeispiel), mit der der Ausgang des Recorders verbunden ist, wiederzugeben.
12 Verwendung mit anderen Geräten Anschließen eines Personalcomputers Computer-Kompatibilitätstabelle Verwenden Sie die PC-Buchsen zum Anschließen eines Personalcomputers. Auflösung Frequenz 720 x 400 70 Hz 640 x 480 (VGA) 60 Hz 800 x 600 (SVGA) 60 Hz 1280 x 720 60 Hz 1024 x 768 (XGA) 60 Hz 1360 x 768 (Breit-XGA) 60 Hz 1280 x 1024 (SXGA) 60 Hz Hinweis • Die PC-Eingangsbuchsen sind DDC2B-kompatibel.
Verwendung mit anderen Geräten Verwendung des HDMI-Eingangs Die Buchsen INPUT 1, INPUT 3 und INPUT 4 sind HDMI-Buchsen, an denen digitale Bild- und Tonsignale eingegeben werden können. Um die HDMI-Buchse zu verwenden, aktivieren Sie die Buchse, und geben Sie die Art der Bild- und Tonsignale an, die vom angeschlossenen Gerät empfangen werden sollen. Bezüglich der Signaltypen siehe die Bedienungsanleitung für das entsprechende angeschlossene Gerät.
12 Verwendung mit anderen Geräten Bei Verwendung der HDMI-Buchse INPUT 4: Punkt Beschreibung Video (Vorgabe) Wählen Sie normalerweise diese Option, außer für einen PC-Anschluss PC Wählen Sie diese Option, wenn ein PC an die HDMI-Eingangsbuchse angeschlossen ist Rückansicht 4 Drücken Sie HOME MENU, um das Menü zu verlassen. Vorsicht • Wählen Sie “PC”, wenn ein PC an die HDMI-Eingangsbuchse angeschlossen ist.
Verwendung mit anderen Geräten Anschließen der Steuerkabel Hinweis • Wenn Sie einen anderen Parameter als “Auto” wählen, nehmen Sie eine Einstellung vor, die zu einer natürlichen Farbe führt. • Wenn kein Bild erscheint, geben Sie einen anderen Typ für die digitalen Videosignale vor. • Bezüglich der anzugebenden Typen für die digitalen Videosignale siehe die Bedienungsanleitung für das entsprechende angeschlossene Gerät.
12 Verwendung mit anderen Geräten Verwendung von i/o link.A Der Plasma-Fernseher enthält drei typischte i/o link.A-Funktionen für den problemlosen Anschluss von anderen AV-Geräten am Plasma-Fernseher. Direkter Anschluss Rückansicht Während der Plasma-Fernseher auf der Bereitschaftsmodus geschaltet ist, schaltet er sich automatisch ein und beginnt mit der Wiedergabe der Bilder von AV-Programmquellen (z. B. Videorecorder, DVD). WYSIWYR (What You See Is What You Record, d. h.
Verwendung mit anderen Geräten Wiedergabe über eine USB-Schnittstelle (Funktion Galerie Home) JPEG-Bilder, die mit einer Digital-Standbildkamera aufgenommen und auf einer Speicherkarte gespeichert worden sind, können mit diesem System wiedergegeben werden. Sie können Ihre Digitalkamera mit Hilfe eines USB-Anschlusskabels auch direkt an den Plasma-Fernseher anschließen.
12 Verwendung mit anderen Geräten • Unmittelbar nach dem Ein- oder Ausschalten des Systems darf kein USB-Gerät angeschlossen oder abgetrennt werden. Anderenfalls können die Daten im Speicher beschädigt werden. • Schalten Sie die Digitalkamera nicht aus, solange der Home Gallery-Bildschirm angezeigt wird. Abrufen einer Miniaturbildanzeige Wenn ein Ordner in der Home Gallery-Startanzeige gewählt wird, werden die im Ordner abgelegten Bilder im Miniaturbild-Format angezeigt.
Verwendung mit anderen Geräten P-: Zeigt das vorherige Bild in normaler oder Vollbildgröße an. P+: Zeigt das nächste Bild in normaler oder Vollbildgröße an. ROT: Zeigt das Bild unter Nutzung der gesamten Bildschirmfläche an. Zum Verlassen des Vollschirm-Anzeigemodus drücken Sie RETURN. GRÜN: Dreht das angezeigte Bild im Uhrzeigersinn. Mit jedem Drücken wird das Bild wie folgt gedreht: 90°, 180° und 270°.
12 Verwendung mit anderen Geräten Steuerung anderer Ausrüstung mithilfe der mitgelieferten Fernbedienung Mit der mitgelieferten Fernbedienung können Sie andere angeschlossene Geräte steuern, nämlich: Set-Top Box (STB), DVD-Player, DVD/HDDRecorder (DVR), BD-Player oder Videorecorder. Bevor diese Funktion eingesetzt werden kann, muss die mitgelieferte Fernbedienung mit dem Herstellungscode der zu steuernden Ausrüstung programmiert werden.
Verwendung mit anderen Geräten DVD 12 Videorecorder SHARP 512 HITACHI 1 114 SONY 1 513 HITACHI 2 115 SONY 2 514 HITACHI 3 116 SONY 3 515 JVC 1 117 THOMSON 516 JVC 2 118 TOSHIBA 517 JVC 3 119 YAMAHA 518 JVC 4 519 JVC 5 520 LOEWE 1 521 LOEWE 2 522 MATSUI 523 ORION 524 PANASONIC 1 525 PANASONIC 2 526 PHILIPS 1 527 PHILIPS 2 528 PHILIPS 3 529 SANYO 530 SAMSUNG 1 531 SAMSUNG 2 532 SAMSUNG 3 533 SAMSUNG 4 534 SHARP 535 SONY 1 536 SONY 2 537 SONY 3
12 Verwendung mit anderen Geräten STB (Set-Top Box)-Steuertasten Im STB-Modus haben die Tasten an der Fernbedienung die folgenden Funktionen. 1 2 3 INPUT 1 1 2 3 4 5 6 7 8 9 INFO 0 PC 1 0 bis 9 Fungieren als Zifferntasten. 2 P+/P– Zum Abstimmen eines höheren oder niedrigeren Kanals. 3 RETURN Bei DVD-Menüanzeige drücken, um auf die vorige Bildschirmanzeige zurückzuschalten. 4 ENTER Zum Aktivieren der gewählten Funktion.
Verwendung mit anderen Geräten 12 DVD/DVR-Steuertasten Im DVD/DVR-Modus haben die Tasten an der Fernbedienung die folgenden Funktionen. 1 2 3 4 INPUT 1 1 2 3 4 5 6 7 8 9 0 bis 9 Fungieren als Zifferntasten. 2 P+/P– (nur DVD/HDD-Recorder (DVR)) Zur Änderung des Kanals des im DVD/HDD-Recorder (DVR) eingebauten Tuners. 3 RETURN Bei DVD-Menüanzeige drücken, um auf die vorige Bildschirmanzeige zurückzuschalten. 4 ENTER Zum Aktivieren der gewählten Funktion.
12 Verwendung mit anderen Geräten VCR-Steuertasten Im VCR-Modus haben die Tasten an der Fernbedienung die folgenden Funktionen. 1 2 3 INPUT 1 1 2 3 4 5 6 7 8 9 PC 0 INFO INPUT 5 TV/DTV 2 TV DVD/ SOURCE STB DVR VCR 5 HOME MENU RETURN MENU ENTER EXIT EPG 3 4 DVD TOP MENU / GUIDE HDMI CONTROL DISC NAVI Ge 0 bis 9 Fungieren als Zifferntasten. 2 P+/P– Zur Wahl von TV-Tuner-Kanälen am VCR. 3 F (PAUSE/STANDBILD) Setzt Pausen und Standbilder.
Verwendung der HDMI-Steuerung 13 Kapitel 13 Verwendung der HDMI-Steuerung Verwendung der HDMI-Steuerfunktionen Hinweis • Die Höchstzahl der Geräte, die an den Plasma-Fernseher angeschlossen und mithilfe der Fernbedienung des PlasmaFernsehers bedient werden können, ist wie folgt: Recorder x 2, Player x 2, AV-System oder HD AV Converter x 1. • Gegebenenfalls stehen nicht alle Geräte-Bedienungsvorgänge für die HDMI-Steuerfunktionen zur Verfügung.
13 Verwendung der HDMI-Steuerung Durchführung der HDMI-Anschlüsse Bildschirm-Steuertafel Für ein AV-System 1 HDMI-Strg.
Verwendung der HDMI-Steuerung 13 Anschließen eines DVD-Recorders Rückansicht Rückansicht Deutsch Stereo-Audiokabel HDMI-taugliches Kabel (HDMI-Kabel mit HDMIMarkierung) DVD-Recorder Hinweis • Die Höchstzahl der Geräte, die an den Plasma-Fernseher angeschlossen und mithilfe der Fernbedienung des PlasmaFernsehers bedient werden können, ist wie folgt: Recorder x 2, Player x 2, AV-System oder HD AV Converter x 1.
13 Verwendung der HDMI-Steuerung Einstellung der HDMI-Steuerung Wahl der Einschaltfunktion Wahl einer Eingangsbuchse Sie können wählen, ob der Plasma-Fernseher eingeschaltet wird, wenn der angeschlossene Pioneer Recorder oder Player eingeschaltet wird und die Bilder in den Plasma-Fernseher eingegeben werden. (Die Werksvorgabe ist “Ein”.) Wählen Sie die HDMI-Buchse, an die das externe Gerät angeschlossen ist, um die HDMI-Steuerfunktionen zu verwenden. 1 Drücken Sie HOME MENU.
Verwendung der HDMI-Steuerung 13 Eingangswahl des HD AV Converter Im HD AV Converter-Modus können Sie die Eingangsbuchse EINGANG 1 bis EINGANG 5 am HD AV Converter mit Hilfe der Taste “INPUT 1” bis “INPUT 5” auf der Fernbedienung oder INPUT auf der rechten Seite des Plasma-Fernsehers wählen.
13 Verwendung der HDMI-Steuerung Verwendung der HDMI-Steuermenüs Sie können die verschiedenen Funktionen des angeschlossenen Pioneer Recorders, Players oder AV-Systems verwenden, der bzw. das die HDMI-Steuerfunktionen unterstützt, indem Sie die entsprechenden HDMI-Steuermenüs wählen und verwenden. 1 Drücken Sie HOME MENU. 2 Wählen Sie “HDMI-Steuer.” (/, dann ENTER). Das HDMI-Steuermenü wird angezeigt. HDMI-Steuer. Disc-Navigator Timeraufn(DVR) Timeraufn-Liste(DVR) Pause Live-TV Aufn.
Verwendung von Videotext 14 Kapitel 14 Verwendung von Videotext Verwendung der Videotext-Funktionen Was ist Videotext? Manche Sender strahlen Videotextinfos und –Entertainment aus, die von entsprechend ausgerüsteten Fernsehgeräten empfangen werden können. Ihr Plasma-Fernseher empfängt Videotext-Signale, die von TV-Sendern ausgestrahlt werden, und decodiert sie in ein graphisches Format, damit sie angezeigt werden können.
14 Verwendung von Videotext k: Anzeigen der TOP Übersicht Damit verborgene Informationen, wie etwa die Antwort zu einer Quizfrage, angezeigt werden, drücken Sie k. Drücken Sie k erneut, um die Informationen wieder auszublenden. Bei Empfang von TOP-Videotext können Sie eine TOP Übersicht lesen. T O P Ü b e r s i ch t : Blockseiten Um die Videotext-Seiten zu aktualisieren, drücken Sie Drücken Sie .
Zusäzliche Informationen 15 Kapitel 15 Zusäzliche Informationen Fehlerdiagnose Problem Lösungsansätze ALLGEMEIN • • • • • Plötzliches Ausschalten. • Die Temperatur im Inneren des Systems ist zu hoch. Reinigen Sie das System bzw. entfernen Sie jegliche die Belüftung behindernden Gegenstände. (Siehe Seite 15.) • Prüfen Sie die Energiesparmodus-Einstellung. (Siehe Seite 36.) • Prüfen Sie die Timer-Einstellung. (Siehe Seite 55.) • Systembetrieb nicht möglich.
15 Zusäzliche Informationen Problem Lösungsansätze • Tonausgabe, aber kein Bild. • Überprüfen Sie, ob Sie “Bild Aus” für “Energiesparmodus” gewählt haben. Wenn diese Option gewählt ist, wird der Bildschirm deaktiviert; nur der Ton wird ausgegeben. Zum Wiederherstellen der Bildschirmanzeige drücken Sie eine beliebige Taste außer i + /i – oder e. (Siehe Seite 36.) • Bild vorhanden, aber kein Ton. • • • • • Bild ist verstümmelt. • Stimmt die Bildpositionierung? (Siehe Seiten 50 und 51.
Zusäzliche Informationen 15 Problem Lösungsansätze • Kein Ton. • Überprüfen Sie, ob die Anschlüsse zwischen dem Plasma-Fernseher und dem Gerät, das die HDMI-Steuerfunktionen unterstützt, richtig durchgeführt sind. (Siehe Seite 74.) • Überprüfen Sie, ob Sie die korrekten Einstellungen für “HDMI-Strg. Einst” eingegeben haben. (Siehe Seite 76.
15 Zusäzliche Informationen Signalbelegung der 15-poligen Mini-D-Sub-Steckbuchse 84 Ge Pin-Nr. Signalbezeichnung Pin-Nr.
Zusäzliche Informationen 15 SCART-Anschlussbelegung Verschiedene Audio- und Video-Geräte können über die SCART-Anschlüsse mit dem System verbunden werden.
15 Zusäzliche Informationen Technische Daten 50-Zoll Plasma-Fernseher, Modell: PDP508XD Punkt 42-Zoll Plasma-Fernseher, Modell: PDP428XD Anzahl der Pixel 1365 x 768 Pixel 1024 x 768 Pixel Audio-Verstärker 17 W +17 W (1 kHz, 10 %, 6 Ω) 17 W +17 W (1 kHz, 10 %, 6 Ω) Lautsprecher – Klangeffekt SRS FOCUS/SRS/SRS TruBass Stromversorgung 220 V bis 240 V Wechselstrom, 50 Hz/60 Hz, 220 V bis 240 V Wechselstrom, 50 Hz/60 Hz, 364 W (Bereitschaft 0,4 W) 299 W (Bereitschaft 0,4 W) Gewicht 34,5 kg TV-
Zusäzliche Informationen 15 Abmessungen PDP-508XD Einheit: mm 115 717 1224 Deutsch PDP-428XD Einheit: mm 115 679 1040 Warenzeichen • ist ein Warenzeichen von SRS Labs, Inc. • WOW Technologie wird unter Lizenz von SRS Labs, Inc. mit eingeschlossen. • Bei diesem Produkt sind FontAvenue®-Schriftarten unter Lizenz von NEC Corporation integriert. FontAvenue ist ein eingetragenes Warenzeichen der NEC Corporation. • DDC ist ein eingetragenes Warenzeichen der Video Electronics Standards Association.
Discover the benefits of registering your product online at http://www.pioneer.co.uk (or http://www.pioneer.eu) Découvrez les nombreux avantages offerts en enregistrant votre produit en ligne maintenant sur http://www.pioneer.fr (ou http://www.pioneer.eu) Bitte nutzen Sie die Möglichkeit zur Registrierung Ihres Produktes unter http://www.pioneer.de (oder http://www.pioneer.eu) PIONEER CORPORATION 4-1, Meguro 1-Chome, Meguro-ku, Tokyo 153-8654, Japan PIONEER ELECTRONICS (USA) INC. P.O.