Speaker System Enceinte acoustique Lautsprechersystem Sistema di diffusori Luidsprekersysteem Sistema de altavoces PDP-S40B Operating Instructions Mode d’emploi Bedienungsanleitung Istruzioni di utilizzo Handleiding Manual de instrucciones
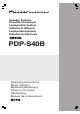
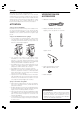
English Thank you for buying this Pioneer product. Please read through these operating instructions before using your speaker system so you will know how to make the most of its performance. After you have finished reading the instructions, put them away in a safe place for future reference. CHECKING THE ACCESSORIES • Speaker Cables × 2 CAUTION About compatibility This product is designed exclusively for use with the Pioneer plasma television.
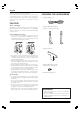
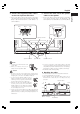
English English INSTALLATION ON THE PLASMA TELEVISION Plasma television with the speaker installed Speaker mounting screw (M5 x 10 mm) Speaker mounting screw (M5 x 10 mm) Speaker mounting screw (M5 x 10 mm) Speaker Speaker mounting fitting (right side) Speaker cable Speaker mounting fitting (left side) Speaker mounting fitting (center) Bead Band (Accessories of the plasma television) When using the table top stand: NOTE: Before attaching the speaker, please attach the PDK-TS28 series table top sta
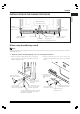
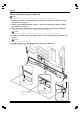
English 2. Fit the speaker to the mounting fittings in the correct direction. • Be sure not to mount the speaker upside down. Protective wrapping Front side of the speaker The upper side of the speaker does not have a round corner. The bottom side of the speaker has a round corner when viewed from the front side of the plasma television. For illustrative purposes, the table top stand is not presented here. Insert the groove on the back of the speaker into the speaker mounting fitting.
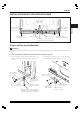
4. Connect the supplied speaker cables to the rear of plasma television. 5. Connect the other end of the speaker cables to the speaker. • Connect the cables correctly with respect to the polarity of the plasma television speaker terminals, that is, cable (Gray) to terminals (Red) and cable (Black) to terminals (Black). • Connect the cables correctly with respect to the polarity of the speaker terminals, that is, cable (Gray) to terminals (Red) and cable (Black) to terminals (Black).
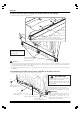
English When using the hung on wall unit: NOTE: First lay the plasma television on top of a soft sheet etc., then attach the speaker mounting fittings. 1. Attach the speaker mounting fittings to the rear of the plasma television (See procedure 1 on page 3). 2. Connect the supplied speaker cables to the rear of the plasma television (See procedure 4 on page 5). 3. Place the plasma television on the mounting fittings of the hung on wall unit.
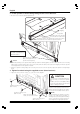
English • Tighten the three screws in order 1, 2, 3 as shown in the diagram (see page 6). The screw hole at the rear surface of the speaker mounting fitting is used when the plasma television is installed with the table top stand. It is not used when installed on the wall. NOTE: If after attaching the speaker its position needs to be adjusted horizontally, first loosen the speaker mounting screws, reposition and then tighten the screws again at the appropriate position. 7.
Français Merci pour votre achat de cet appareil Pioneer. Veuillez lire attentivement la totalite de ce mode d’emploi avant d’utiliser vos enceintes acoustiques de façon à pouvoir en tirer le meilleur profit. Après lecture complète du livret d’instructions de fonctionnement, le ranger dans un endroit sûr afin de pouvoir vous y reporter facilement en cas de besoin lors de l’utilisation des l’enceintes acoustiques.
Français INSTALLATION SUR LE TELEVISEUR PLASMA Téléviseur plasma avec l’enceinte installée Vis de montage de l’enceinte (M5 x 10 mm) Vis de montage de l’enceinte (M5 x 10 mm) Français Vis de montage de l’enceinte (M5 x 10 mm) Enceinte Plaque de fixation d’enceinte (côté droit) Câble d’enceinte Plaque de fixation d’enceinte (centre) Plaque de fixation d’enceinte (côté gauche) Collier à œil (accessoire du téléviseur plasma) Si vous utilisez un pied de table : REMARQUE : Avant d’installer l’enceinte,
Français 2. Placez l’enceinte dans les plaques de fixation dans le sens indiqué. • Veillez à ne pas poser l’enceinte à l’envers. Emballage de protection Face avant de l’enceinte La partie supérieure de l’enceinte n’a pas d’angle arrondi. La partie inférieure de l’enceinte a un angle arrondi quand on regarde depuis la face avant du téléviseur plasma. Pour plus de clarté, le pied de table n’est pas représenté ici. Insérez la rainure située au dos de l’enceinte dans la plaque de fixation.
Français 4. Branchez les câbles d’enceinte fournis à l’arrière du téléviseur plasma. 5. Branchez l’autre extrémité des câbles d’enceinte sur l’enceinte. • Branchez les câbles correctement en respectant la polarité des bornes du téléviseur plasma : le câble (gris) avec les bornes (rouges) et le câble (noir) avec les bornes (noires).
Français En cas d’utilisation de l’unité d’installation murale : REMARQUE : Avant d’installer les plaques de fixation d’enceinte, posez le téléviseur plasma sur un drap, un linge doux, etc. 1. Posez les plaques de fixation d’enceinte au dos du téléviseur plasma (voir la procédure 1, page 9). 2. Branchez les câbles d’enceinte fournis au dos du téléviseur plasma (voir la procédure 4, page 11). 3. Placez le téléviseur plasma sur les plaques de vexation de l’unité d’installation murale.
Français • Serrez les vis dans l’ordre 1, 2, 3 indiqué sur le schéma (voir page 12). Le trou de vis situé à l’arrière de la plaque de fixation d’enceinte est utilisé lorsque le téléviseur plasma est installé avec le pied de table. Il n’est pas utilisé lorsque le téléviseur plasma est installé au mur. REMARQUE : Si après avoir installé l’enceinte, sa position doit être ajustée horizontalement, desserrez les vis, repositionnez l’enceinte puis resserrez les vis dans la position souhaitée. 7.
Deutsch Wir danken Ihnen dafür, dass Sie sich für ein Produkt von Pioneer entschieden haben. Bitte lesen Sie vor der Verwendung Ihrer Lautsprecheranlage diese Anleitung aufmerksam durch, um die Vorzüge des Systems optimal ausnützen zu können. Nachdem Sie die Bedienungsanleitung durchgelesen haben, bewahren Sie sie sorgfältig auf, um sich im Bedarfsfall jederzeit darauf beziehen zu können.
Deutsch INSTALLATION AM PLASMA-FERNSEHER Plasma-Fernseher mit installiertem Lautsprecher LautsprecherMontageschraube (M5 x 10 mm) LautsprecherMontageschraube (M5 x 10 mm) LautsprecherMontageschraube (M5 x 10 mm) Lautsprecher LautsprecherMontageelement (Mitte) Lautsprecher-Kabel Kugelband (Zubehör des Plasma-Fernsehers) LautsprecherMontageelement (linke Seite) Deutsch LautsprecherMontageelement (rechte Seite) Bei Verwendung des Tischständers: HINWEIS: Bitte montieren Sie vor dem Befestigen des Laut
Deutsch 2. Richten Sie den Lautsprecher in der korrekten Richtung zu den Montageelementen aus. • Achten Sie darauf, den Lautsprecher nicht mit der Oberseite nach unten zu montieren. Schutzhülle Vorderseite des Lautsprechers Die obere Seite des Lautsprechers hat keine abgerundete Kante. Die untere Seite des Lautsprechers hat, von der Vorderseite des Plasma-Fernsehers aus betrachtet, eine abgerundete Kante. Zum besseren Verständnis ist der Tischständer hier nicht dargestellt.
Deutsch 4. Schließen Sie die mitgelieferten Lautsprecherkabel auf der Rückseite des Plasma-Fernsehers an. 5. Schließen Sie das jeweilige andere Ende der Lautsprecherkabel an den Lautsprecher an. • Schließen Sie die Kabel hinsichtlich der Polarität der Lautsprecheranschlüsse des Plasma-Fernsehers korrekt an, das heißt, das -Kabel (grau) an den -Anschluss (rot) und das -Kabel (schwarz) an den -Anschluss (schwarz).
Deutsch Bei Verwendung der Wandmontage-Einheit: HINWEIS: Legen Sie zunächst den Plasma-Fernseher auf eine weiche Unterlage wie beispielsweise eine Decke und bringen sie dann die Lautsprecher-Montageelemente an. 1. Befestigen Sie die Lautsprecher-Montageelemente an der Rückseite des PlasmaFernsehers (siehe Schritt 1 auf Seite 15). 2. Schließen Sie die mitgelieferten Lautsprecherkabel an der Rückseite des PlasmaFernsehers an (siehe Schritt 4 auf Seite 17). 3.
Deutsch • Ziehen Sie die drei in der Abbildung auf Seite 18 dargestellten Schrauben in der Reihenfolge 1, 2, 3 fest. Das Schraubloch an der Rückseite des LautsprecherMontageelementes wird verwendet, wenn der PlasmaFernseher am Tischständer installiert wird. Es wird nicht verwendet, wenn er an der Wand montiert wird.
Italiano Grazie per avere acquistato questo prodotto Pioneer. Leggere attentamente queste istruzioni per l’uso prima di utilizzare il sistema di altoparlanti per avvalersi al massimo delle sue prestazioni. Conservare poi il manuale in un luogo sicuro per ogni eventuale futura necessità. CONTROLLO DEGLI ACCESSORI • Cavi dell’altoparlante × 2 ATTENZIONE Problemi di compatibilità Questo prodotto è concepito esclusivamente per essere utilizzato con i televisori al plasma Pioneer.
Italiano INSTALLAZIONE SUL TELEVISORE AL PLASMA Televisore al plasma con altoparlante installato Vite di montaggio per l’altoparlante (M5 x 10 mm) Vite di montaggio per l’altoparlante (M5 x 10 mm) Vite di montaggio per l’altoparlante (M5 x 10 mm) Giunzione di montaggio dell’altoparlante (lato destro) Altoparlante Giunzione di montaggio Giunzione di montaggio Cavo dell’altoparlante dell’altoparlante (centrale) dell’altoparlante (lato sinistro) Fascetta rinforzata (accessori del televisore al plasma) Pe
Italiano 2. Fissate l’altoparlante alle giunzioni di montaggio nella direzione corretta. • Assicuratevi di non montare l’altoparlante al contrario. Involucro protettivo Lato anteriore dell’altoparlante La parte superiore dell’altoparlante non ha angoli arrotondati. Vista frontalmente rispetto al televisore al plasma, la parte inferiore dell’altoparlante ha un angolo arrotondato. Per motivi di illustrazioni, il supporto di tavolo non è stato rappresentato qui.
Italiano 4. Collegate i cavi dell’altoparlante in dotazione al retro del televisore al plasma. 5. Collegate l’altra estremità dei cavi dell’altoparlante all’altoparlante. • Collegate i cavi correttamente, rispettando le polarità dei terminali dell’altoparlante del televisore al plasma, cioè cavo (grigio) nel terminale (rosso) e cavo (nero) nel terminale (nero).
Italiano Per l’uso dell’unità da parete: NOTA: Prima appoggiate il televisore sulla parte frontale di un panno soffice, ecc., quindi fissate le giunzioni di montaggio dell’altoparlante. 1. Fissate le giunzioni di montaggio dell’altoparlante al retro del televisore al plasma (vedi procedura 1 a pag. 21). 2. Collegate i cavi dell’altoparlante in dotazione al retro del televisore al plasma (vedi procedura 4 a pag. 23). 3. Posizionate il televisore al plasma sulle giunzioni di montaggio dell’unità da parete.
Italiano • Stringete le viti nell’ordine 1, 2, 3, come mostrato nella figura (vedi pag. 24). Il foro per la vite sulla superficie posteriore della giunzione di montaggio dell’altoparlante viene usato se il televisore al plasma è montato con il supporto di tavolo. Non si usa se installato a parete.
Nederlands Dank u voor de aanschaf van dit Pioneer product. Lees alvorens het luidsprekersysteem in gebruik te nemen eerst deze gebruiksaanwijzing door zodat u volledig op de hoogte bent van de bediening en werking. Bewaar de gebruiksaanwijzing op een veilige plaats voor het geval u later nog het een en ander wilt nalezen bijvoorbeeld na een verhuizing of dergelijk.
Nederlands INSTALLATIE OP DE PLASMA-TELEVISIE Plasma-televisie met geïnstalleerde luidspreker Montageschroef luidspreker (M5 x 10 mm) Montageschroef luidspreker (M5 x 10 mm) Montageschroef luidspreker (M5 x 10 mm) Luidspreker Montage-onderdeel luidspreker (rechterzijde) Montage-onderdeel luidspreker (midden) Luidsprekersnoer Montage-onderdeel luidspreker (linkerzijde) Kralenbandjes (Bijbehorende onderdelen van de plasma-televisie) Indien de tafelbladstaander wordt gebruikt: N.B.
Nederlands 2. Bevestig de luidspreker in de juiste richting aan de montage-onderdelen. • Zorg ervoor dat de luidspreker niet ondersteboven wordt bevestigd. Beschermend omhulsel Voorzijde van de luidspreker Het bovenste gedeelte van de luidspreker heeft geen ronde hoek. Het onderste gedeelte van de luidspreker heeft een ronde hoek wanneer bezien vanaf de voorzijde van de plasma-televisie. Ter illustratie wordt de tafelbladstaander niet hier getoond.
Nederlands 4. Sluit de meegeleverde luidsprekersnoeren aan op de achterzijde van de plasma-televisie. 5. Sluit het andere uiteinde van de luidsprekersnoeren op de luidspreker aan. • Sluit de snoeren op de juiste polariteit van de luidsprekereindklemmen van de plasma-televisie aan, d.w.z. snoer (grijs) op de eindklemmen (rood) en het snoer (zwart) op de eindklemmen (zwart). • Sluit de snoeren op de juiste polariteit van de luidsprekereindklemmen aan, d.w.z.
Nederlands Indien de eenheid voor wandbevestiging wordt gebruikt: N.B.: Leg eerst de plasma-televisie op een zachte doek of iets dergelijks en bevestig daarna de montage-onderdelen. 1. Bevestig de montage-onderdelen van de luidspreker aan de achterzijde van de plasma-televisie (zie procedure 1 op bladzijde 27). 2. Sluit de meegeleverde luidsprekersnoeren aan op de achterzijde van de plasmatelevisie (zie procedure 4 op bladzijde 29). 3.
Nederlands • Draai de drie schroeven in volgorde 1, 2 en 3 aan zoals op de figuur aangegeven (zie blz. 30). Het schroefgat aan de achterzijde van het montagestuk van de luidspreker wordt gebruikt wanneer de plasmatelevisie met de tafelbladstaander wordt geïnstalleerd. Het schroefgat wordt niet gebruikt wanneer de plasmatelevisie aan de muur wordt bevestigd. N.B.
Español Muchas gracias por comprar este producto Pioneer. Lea completamente estas instrucciones de operación antes de usar su sistema de altavoces de modo que sepa cómo obtener el máximo rendimiento. Después de haber finalizado la lectura del manual de instrucciones de operación, guárdelo en un lugar seguro. De esta manera podrá saber dónde está, en caso de que desee referirse al mismo si algo no está claro mientras se está usando el sistema de altavoces.
Español INSTALACIÓN EN EL TELEVISOR DE PLASMA Televisor de plasma con el altavoz instalado Perno de fijación del altavoz (M5 x 10 mm) Perno de fijación del altavoz (M5 x 10 mm) Perno de fijación del altavoz (M5 x 10 mm) Altavoz Accesorio de montaje del altavoz (lado derecho) Accesorio de montaje Accesorio de montaje del altavoz (lado izquierdo) del altavoz (centro) Abrazadera de cuentas (incluida en los accesorios del televisor de plasma) Cable de altavoz Si se utiliza el soporte de mesa: NOTA: Antes
Español 2. Coloque el altavoz en los accesorios de montaje en la dirección correcta. • Asegúrese de que no coloca el altavoz al revés. Envoltura protectora Parte delantera del altavoz La parte superior del altavoz no presenta una esquina redondeada. La parte inferior del altavoz, al mirarlo desde la parte delantera del televisor de plasma, presenta una esquina redondeada. A efectos ilustrativos, en este manual no se presenta el soporte de mesa.
Español 4. Conecte los cables de altavoz suministrados a la parte posterior del televisor de plasma. • Conecte los cables correctamente con respecto a la polaridad de los terminales de altavoz del televisor de plasma; es decir, el cable (gris) a los terminales (rojos) y el cable (negro) a los terminales (negros). Gris Negro 5. Conecte al altavoz el otro extremo de los cables de altavoz.
Español Si el televisor se instala en la unidad para colgar de la pared: NOTA: Primero coloque el televisor de plasma sobre una sábana suave, etc. Después, proceda a fijar los accesorios de montaje del altavoz. 1. Fije los accesorios de montaje del altavoz en la parte posterior del televisor de plasma (consulte el procedimiento 1 en la página 33). 2. Conecte los cables de altavoz suministrados a la parte posterior del televisor de plasma (consulte el procedimiento 4 en la página 35). 3.
Español 6. Apriete desde abajo los pernos suministrados (tres posiciones). • Apriete los tres pernos en el orden indicado en el diagrama: 1, 2, 3 (consulte la página 36). El agujero roscado situado en la parte posterior del accesorio de montaje del altavoz se utiliza cuando el televisor de plasma se instala en el soporte de mesa. No se utiliza cuando se instala en la pared.
中文 感謝惠購先鋒產品。 在使用該揚聲器系統之前,請通讀操作手冊,以獲知如 何使本揚聲器系統發揮最佳性能。閱讀完畢後,請將其 妥善保管以備日後參考。 檢查配件 揚聲器連接線 x 2 注意 關於兼容性 本產品專門設計用於先鋒電漿顯示器。有關相容性的詳 情,請就近諮詢先鋒授權經銷商或服務中心。 關於安裝與固定 ÷ 如要移動電漿顯示器,務必首先拆除揚聲器。請勿透過 握住安裝配件來移動顯示器,否則可能會導致人身傷害 或設備損壞。 揚聲器固定裝置 左右側托架 x 2 中央托架 ÷ 揚聲器很寬闊,只由一個人安裝,可能會變得很不穩 定。因此,必須由兩個人來進行裝配與安裝。 ÷ 安裝揚聲器時,請勿使用附送螺絲以外的螺絲,否則 揚聲器可能會從本機脫開,甚至於掉落。 ÷ 安裝揚聲器時,請將螺絲擰緊。 ÷ 當揚聲器受到外部的影響時,請充分注意揚聲器的處 理,以免損壞護網和音箱。 ÷ 在揚聲器附近放置C R T 電腦屏幕或C R T 監視器可能會 導致干擾或色彩失真。如果出現這種情況,請使監視 器遠離揚聲器。 關於輸入端子 ÷ 為防止因輸入過載而導致揚聲器系統損壞,請務必遵 循以下注意事項: ÷ 請勿將該揚聲器用
中文 電漿顯示器配備 已安裝揚聲器的電漿顯示器 揚聲器固定螺絲 (M5 x 10 mm) 揚聲器固定螺絲 (M5 x 10 mm) 揚聲器固定螺絲 (M5 x 10 mm) 揚聲器 揚聲器固定裝置(中央) 揚聲器固定裝置(左側) 揚聲器固定裝置(右側) 揚聲器連接線 壓條(電漿顯示器配件) 使用桌上支架時: 備註: 在安裝揚聲器前,請先為電漿顯示器安裝PDK-TS28系列桌上支架(或其他先鋒電漿顯示器支架)。 1 將揚聲器固定裝置安裝到電漿顯示器後方。 使用隨附的螺絲,將左、右側固定裝置安裝到電漿 顯示器後面板底部的左、右側。 揚聲器固定螺絲 (M5 x 10 mm) 使用兩顆隨附的螺絲,將中央固定裝置安裝到電漿顯 示器後面板底部中央。 2. 然後再鎖緊橢圓形 螺絲孔的螺絲。 刻有「L」字母 (右側固定裝置字 樣為「R」)。 2. 然後將另一顆螺絲旋入上 方螺絲孔之下的螺絲孔, 並鎖緊螺絲。 1. 請先鎖緊圓形螺 揚聲器固定螺絲 絲孔的螺絲。 (M5 x 10 mm) 揚聲器中央固定裝置 左側揚聲器固定裝置 (裝設方法與右側裝設方法相同) 39 中文 1.
中文 2 以正確方向將揚聲器安裝到固定裝置上。 切勿裝反揚聲器。 保護膜 揚聲器前方 揚聲器頂側無圓角。 從電漿顯示器的前方觀察,可以看見 揚聲器的底側有圓角。 為使圖示清楚,圖中並未 顯示桌上支架。 使揚聲器背面溝槽插入 揚聲器固定裝置中。 注意 為免揚聲器及桌上支架互相碰撞而受損,在確認位置時,請將揚聲器安裝在固定裝置上。因為您很可能碰撞到桌上支 架,請使用包覆揚聲器的保護膜來隔開揚聲器與支架。 當揚聲器固定裝置無法與揚聲器後方溝槽吻合時,請調整揚聲器固定裝置的角度。 3 使用隨附的螺絲從背後鎖緊(三個位置)。 依照圖中所示的 1、2、3 順序鎖緊三顆螺絲。 注意 如要移動電漿顯示器,務必首先拆除揚 聲器。 此外,移動顯示器時請勿持握固定裝 置。否則將可能導致受傷,或使本機受 損。 3 揚聲器固定螺絲 (M5 x 10 mm) 揚聲器固定裝置底部表面的螺絲孔僅用於 壁掛裝置。 以支架安裝電漿顯示器時,將 不需用到。 1 揚聲器固定螺絲 (M5 x 10 mm) 在使用桌上支架時,請勿 使用這些螺絲孔。 2 揚聲器固定螺絲 (M5 x 10 mm) 40 備註:
中文 4 將隨附的揚聲器連接線接到電漿顯示器 的後方。 5 將揚聲器連接線的另一端接到揚聲器 上。 請正確地依照電漿顯示器揚聲器端子的極性來接上連 接線, 連接線(灰色)應接到 端子(紅色), 連接線(黑色)應接到 端子(黑色)。 請正確地依照揚聲器端子的極性來接上連接線, 連接線(灰色)應接到 端子(紅色), 連接 線(黑色)應接到 端子(黑色)。 灰色 黑色 黑色 灰色 紅色 灰色 紅色 黑色 黑色 紅色 揚聲器端子 揚聲器連接線 備註: 拉動拉柄,插入連接線。 當您鬆開拉柄時,拉柄會自動夾住 揚聲器連接線。 注意 在變更配線或擺設方法前,請務必關閉連線的裝置, 並從插座上拔除電源線。 如果您將揚聲器連接線插入過深,因而 使絕緣部碰到揚聲器端子,反而可能導 致無音效。 插入連接線時,請保持看得 到銅線的深度。 在連線後,請輕拉連接線,檢查揚聲器 連接線是否牢固地連接到端子處。 如果 連接過鬆,將可能導致音效接收不穩定 或出現雜音。 若因引線外露致使 與 連接線短路,將可能造成 電漿顯示器的嚴重負載,
中文 使用壁掛裝置時: 備註: 請先把電漿顯示器放在軟墊之類的物品上,再行安裝揚聲器固定裝置。 1 將揚聲器固定裝置安裝在電漿顯示器後方(請參閱第 39 頁的步驟 1)。 2 將隨附的揚聲器連接線接到電漿顯示器後方(請參閱第 41 頁的步驟 4)。 3 把電漿顯示器放置在壁掛裝置的固定裝置上。 詳情請參閱壁掛裝置所隨附的操作手冊。 注意 在安裝或連接線路時,請注意揚聲器固定裝置。 該裝置可能導致人員受傷。 4 將揚聲器連接線的另一端接上揚聲器(請參閱第 41 頁的步驟 5)。 注意 此步驟需要雙人來執行。 5 以正確方向將揚聲器安裝到固定裝置上。 切勿裝反揚聲器。 3 揚聲器固定螺絲 (M5 x 10 mm) 1 在使用壁掛裝置時,請勿 使用這些螺絲孔。 揚聲器固定螺絲 (M5 x 10 mm) 2 揚聲器固定螺絲 (M5 x 10 mm) 42
中文 依照圖中所示的 1 、2 、3 順序鎖緊三顆螺絲(請 參閱第 42 頁)。 揚聲器固定裝置後方表面的螺絲孔僅用於桌上支架。 以牆壁安裝電漿顯示器時,將不需用到。 備註: 若在揚聲器安裝後,需要調整揚聲器的水平位置,請先 旋鬆揚聲器固定螺絲,再行調整至適當位置,然後鎖緊 螺絲。 7 綑紮連接線(請參閱第 41 頁的步驟 6)。 機殼維護 使用拋光布或乾布來擦拭灰塵和污垢。 當機殼很髒時,用軟布蘸取經水稀釋後的清潔劑進行 擦拭,然後再用乾布擦淨。請勿使用家具蠟或清潔 劑。否則會損壞機殼表面。 切勿對機殼或在機殼附近使用稀釋劑,苯,殺蟲劑以 及其它化學製品,因為它們會腐蝕本機表面。 當使用含化學製品的拭布時,請仔細閱讀該拭布的注 意事項。 規格 機殼 .............................................................. 低音反射型 所用揚聲器(兩路系統): 低音喇叭(用於低音) .............. 4.8 cm x 13 cm 圓型 高音喇叭(用於高音) ..................... 2.
AFTER-SALES SERVICE FOR PIONEER PRODUCTS Please contact the dealer or distributor from where you purchased the product for its after-sales service (including warranty conditions) or any other information. In case the necessary information is not available, please contact the Pioneer's subsidiaries (regional service headquarters) listed below: PLEASE DO NOT SHIP YOUR PRODUCT TO THE COMPANIES at the addresses listed below for repair without advance contact, for these companies are not repair locations.