PLASMA DISPLAY SYSTEM PRO-1120HD PRO-920HD Register Your Product on www.pioneerelectronics.
1) 2) 3) 4) 5) 6) 7) Read these instructions. Keep these instructions. Heed all warnings. Follow all instructions. Do not use this apparatus near water. Clean only with dry cloth. Do not block any ventilation openings. Install in accordance with the manufacturer’s instructions. 8) Do not install near any heat sources such as radiators, heat registers, stoves, or other apparatus (including amplifiers) that produce heat. 9) Do not defeat the safety purpose of the polarized or grounding-type plug.
CAUTION: This product satisfies FCC regulations when shielded cables and connectors are used to connect the unit to other equipment. To prevent electromagnetic interference with electric appliances such as radios and televisions, use shielded cables and connectors for connections.
Contents Thank you for buying this Pioneer product. Please read through these operating instructions so you will know how to operate your model properly. After you have finished reading the instructions, put them away in a safe place for future reference. In some countries or regions, the shape of the power plug and power outlet may sometimes differ from that shown in the explanatory drawings. However the method of connecting and operating the unit is the same.
Contents 10 Adjustments and Settings Connecting other audio equipment .................................. 53 Connecting an AV receiver .......................................... 53 Watching a D-VHS image ................................................... 54 What is i.LINK? .............................................................. 54 Which i.LINK devices are connectable? ..................... 54 What can be recorded through i.LINK? ...................... 54 Connecting D-VHS recorders ..................
01 Important User Guidance Information In order to obtain maximum enjoyment from this Pioneer PureVision PRO-1120HD/PRO-920HD Plasma Display System, please first read this information carefully. With the Pioneer PureVision PRO-1120HD/PRO-920HD, you can be assured of a high quality Plasma Display System with longlife and high reliability.
Important User Guidance Information • Displaying the same images such as still images for a long time may cause after-image lagging. This may occur in the following two cases. English Panel sticking and after-image lag 01 1. After-image lagging due to remaining electric load When image patterns with very high peak luminance are displayed more than 1 minute, after-image lagging may occur due to the remaining electric load.
02 Safety Precautions Electricity is used to perform many useful functions, but it can also cause personal injuries and property damage if improperly handled. This product has been engineered and manufactured with the highest priority on safety. However, improper use can result in electric shock and/or fire. In order to prevent potential danger, please observe the following instructions when installing, operating and cleaning the product.
Safety Precautions 02 Installation Precautions Observe the following precautions when installing with any items such as the optional stand. English When using the optional stand, brackets, or equivalent items • Ask your dealer to perform the installation. • Be sure to use the supplied bolts. • For details, see the instruction manual that comes with the optional stand (or equivalent items). When using other items • Consult your dealer.
03 Operational Precautions Condensation PIONEER bears no responsibility for any damages arising from incorrect use of the product by you or other people, malfunctions when in use, other product related problems, and use of the product except in cases where the company must be liable. • Condensation may take place on the surface or inside of the product when the product is rapidly moved from a cold place to a warm place or just after a heater is switched on in winter morning, for example.
Supplied Accessories 04 Plasma Display English Speed clamp × 3 Cleaning cloth Power cord (2 m/6.6 feet) Bead band × 3 Warranty card Media Receiver Power cord (2 m/6.6 feet) Remote control unit AA size battery × 2 (Alkaline battery) Screw hole cap × 4 System cable (3 m/9.8 feet) Screw × 4 (for stand) Stand VCR controller (1.8 m/5.9 feet) • Always use the power cord supplied with the Plasma Display and the one supplied with the Media Receiver for each respective unit.
05 Part Names Plasma Display Front view (right view) 1 2 5 4 5 6 7 button STANDBY indicator Lights red when the unit is standby mode. (page 24) POWER ON indicator Lights green when the Plasma Display is operating.
Part Names 05 Rear view 3 4 IN OUT CONTROL VCR CONTROL 5 6 7 8 9 10 11 12 English 1 2 13 DIGITAL OUT OPTICAL ANTENNA/ CABLE A IN IN Cable CARD ANTENNA B (TS) S400 INPUT 2 VIDEO R-AUDIO-L AC IN INPUT 1 INPUT 2 S-VIDEO VIDEO R-AUDIO-L INPUT 1 COMPONENT VIDEO Y C B /P B C R /P R BLACK SERVICE ONLY OUT INPUT 1 MONITOR OUT S-VIDEO 14 1 2 3 4 5 6 7 8 9 10 11 12 15 16 VIDEO 17 18 R-AUDIO-L 19 S-VIDEO 20 21 R-AUDIO-L INPUT INPUT 33 Y 22 CONTROL IN terminal CONTROL OUT term
05 Part Names Remote control unit 1 2 Mode switch (with “TV” selected) 14 3 15 16 17 4 5 18 6 19 7 20 21 8 22 9 23 10 11 12 13 24 25 26 27 With the mode switch set to TV 1 TV : Turns on the power to the Plasma Display or places it into standby mode. 2 Transmission confirmation LED 3 INPUT: Selects an input source of the Plasma Display. (INPUT 1, INPUT 2, INPUT 3, INPUT 4, PC, i.LINK) 4 •(dot): Enters a dot. 5 CH RETURN: Returns to the previous channel. 14 En 6 CH +/–: Selects the channel.
Preparation Installing the Plasma Display 06 Using the optional PIONEER stand • This product may be used only with model PDK-1012 stand. Use with other stands may result in instability causing possible injury. Over 50 cm (19 11/16 inches) English For details on installation, refer to the instruction manual supplied with the stand. Using the optional PIONEER speakers For details on installation, refer to the instruction manual supplied with the speaker.
06 Preparation Installing the Media Receiver vertically Installing the Media Receiver POWER ON STANDBY Plasma Display You can use the supplied stand to install the Media Receiver vertically. TIMER REC ACQUISITION DATA 1. Insert the stand into the side of the Media Receiver. Media Receiver (vertical installation) (horizontal installation) Right side POWER ON STANDBY REC DATA TIMER ACQUISITION System cable (approx. 3 m/9.
Preparation 06 3. Remove the shock absorbing pads. English Shock absorbing pad Keep the shock absorbing pads and screws. They are required when you place the Media Receiver in the horizontal position. 4. Plug the screw holes using the supplied caps. Remove the separation sheet. Align with the hole and attach. Screw hole cap • When you have installed the Media Receiver vertically, be sure to use the supplied stand.
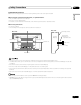
06 Preparation Connecting the system cable Connecting the system cable to the Plasma Display Plasma Display (rear view) For details on optional PIONEER speaker installation, refer to the instruction manual that came with the speaker.
Preparation 06 Routing cables (rear view) When the speakers are installed on the sides Speaker cable Cable binders (supplied with the stand)* Speed clamps English Speed clamps and bead bands are supplied for bunching cables. Once properly bunched, follow the steps below to route the cables. Speaker cable * Cable binder Using the cable binders supplied with the stand, put the speaker and system cables together so that the cables are invisible from the front.
06 Preparation Preparing the remote control unit Inserting batteries 1 Open the battery cover. Allowed operation range of the remote control unit Operate the remote control unit while pointing it toward the remote control sensor located at the bottom right of the front panel of the Plasma Display. The distance from the remote control sensor must be within 7 m (23 feet) and the angle relative to the sensor must be within 30 degrees in the right or left direction.
Preparation 06 Cable connections for watching digital TV channels over air (VHF/UHF) This system is equipped with two terminals for inputting TV broadcasting signals: ANTENNA/CABLE A IN and ANTENNA B. The ANTENNA/CABLE A IN terminal accepts both digital and conventional TV broadcasting signals while the ANTENNA B terminal accepts only conventional TV broadcasting signals. When using a cable TV to watch digital and/or conventional TV channels, connect to the ANTENNA/CABLE A IN terminal as shown.
06 Preparation 3 Insert the specified cable card into the Cable CARD slot Switching between antenna A and B as far as it goes. To watch broadcasts via the two antennas, you can select it by pressing ANT on the remote control unit. • While watching a broadcast, press ANT to view the image received from the other antenna. UT AL O DIGIT AL OPTIC • Pressing ANT while watching in the 2-screen mode (TV image and video image) with TV selected will display the TV image of the other antenna.
Preparation 06 Connecting the power cord Plasma Display (rear view) English Connect the power cord after all component connections have been completed. Power cord Noise filter Partially eliminates noise caused by the power source.
07 Basic Operations Plasma Display Turning on the power (Standby) 1 Press 2 on the Plasma Display if the STANDBY indicator is off. • The STANDBY indicator on the Plasma Display lights up red. Confirm that the STANDBY indicators light up red, and then press TV on the remote control unit or STANDBY/ON on the Plasma Display or POWER on the Media Receiver to turn the system on. • The POWER ON indicators on the Plasma Display and Media Receiver light up green.
Basic Operations 07 Plasma Display (right view) Watching TV channels English Unless you set up TV channels that you can watch under the current conditions, you cannot tune in those channels. For the procedure, see “Setting up TV channels” on page 31. CHANNEL +/– • When watching a digital TV program, you may see emergency alert messages scrolling at the top of the screen. Those messages are broadcasted by TV stations as necessary when in emergency situations.
07 Basic Operations Changing the volume and sound Viewing a channel banner To increase the volume, press VOL + on the remote control unit. To decrease the volume, press VOL –. • VOLUME +/– on the Plasma Display operates the same as VOL +/– on the remote control unit. While watching a digital TV program, pressing DTV INFO causes the following banner to appear. Pressing DTV INFO again causes the banner to disappear. • To mute the sound output, press MUTING. “ ” appears on the screen.
Basic Operations 07 Setting MTS/SAP mode If you have watched digital and/or High Definition TV channels over cable, you can use the POD service provided by the cable TV company. This service presents various types of useful information, using HTML text. When watching conventional TV programs, you may enjoy stereo sound and/or Secondary Audio Programs (SAP), using the Multi-channel Television Sound (MTS) function.
07 Basic Operations When receiving STEREO sound signals Using the multiscreen functions A 125 STEREO In STEREO mode Splitting the screen A 125 STEREO In SAP mode Use the following procedure to select the 2-screen or picture-inpicture mode.
Basic Operations Freezing images Use the following procedure to capture and freeze one frame from a moving image that you are watching. Normal image English • In 2-screen or picture-in-picture mode, press SWAP to switch the position of the 2 screens shown. Left screen is the active screen which will be indicated by “ ”. The user is allowed to operate picture and sound. 07 Still image • In 2-screen mode, press SCREEN SIZE to change the size of the left screen.
08 Menu Setup PC mode menus Menu configuration AV mode menus Home Menu Picture Item AV Selection Contrast Brightness Color Tint Sharpness Pro Adjust Reset Page 40 41 41 41 41 41 41 41 Treble Bass Balance Reset FOCUS Front Surround 43 43 43 43 43 43 Energy Save No Signal off No Operation off 44 44 44 Sleep Timer — 40 Option Position Side Mask HDMI Input Monitor Out Digital Audio Out Language 45 47 51, 52 52, 53 54 47 Channel Setup Parental Control Favorites Closed Captions Recorder Setup Cloc
Tuner Setup 09 Setting for skipping unwanted channels Setting up TV channels Using Auto Channel Preset Auto Channel Preset automatically searches and sets up TV channels. 1 2 3 4 5 6 Press HOME MENU. Select “Tuner Setup”. ( / then ENTER) Select “Channel Setup”. ( / Ant. A Auto Ch. Preset Auto Channel Preset D 7 Cancel then ENTER) Select “Channel Keep/Skip”. ( / then ENTER) Select a channel to be skipped. ( / then ENTER) Channel Keep/Skip Channel Keep/Skip 2.0 4.0 6.0 2.0 4.0 6.
09 Tuner Setup Naming TV channels Checking the Cable Card ID You can name TV channels that you have set up for antenna B. This may help you easily identify the channels during selections. The Media Receiver has a slot for a cable card that is used for managing your information by the cable TV company. The following procedure allows you to check your Cable Card ID and the Host ID. 1 2 3 4 5 6 Press HOME MENU. Select “Tuner Setup”. ( / then ENTER) Select “Channel Setup”. ( / Select “Ant. B”.
Tuner Setup 09 Parental Control Rating Description General audiences. All ages admitted. PG Parental guidance suggested. Some material may not be suitable for children. PG-13 Age-Base R Parents strongly cautioned. Some material may be inappropriate for children under 13. Restricted. Under 17 requires accompanying parent or adult guardian (age varies in some jurisdictions). NC-17 No one 17 and under admitted. Adult A rating that has now been superseded by NC-17. NR Not rated.
09 Tuner Setup Clearing the password Use the following procedure to clear the password. 1 2 3 4 5 Press HOME MENU. Select “Tuner Setup”. ( / then ENTER) Select “Parental Control”. ( / Select “Password”. ( / then ENTER) then ENTER) Select “Clear Password”. ( / then ENTER) Setting the voluntary movie rating system (MPAA) 1 Press HOME MENU. 2 Select “Tuner Setup”. ( / then ENTER) 3 Select “Parental Control”. ( / then ENTER) 4 Select “MPAA Ratings”.
Tuner Setup 09 then ENTER) Parental Control TV Ratings TV Ratings TV-Y TV-Y7 TV-G TV-PG Blocked TV Ratings Blocking Not Rated TV programs Use the following procedure to block TV programs whose rating information is unavailable. 1 2 3 4 5 Press HOME MENU. Select “Tuner Setup”. ( / Select “Parental Control”. ( / Select “Block” or “Don’t Block”. ( / Unavailable Ratings Home Menu Exit then ENTER) Select “Unavailable Ratings”.
09 Tuner Setup Canadian rating systems Canadian French ratings In Canada you can choose the Canadian English ratings or the Canadian French ratings. These ratings are based on the Canadian Radio-Television and Telecommunications Commission (CRTC) policy. Rating E Description Exempt programming. G General: All ages and children, contains minimal direct violence, but may be integrated into the plot in a humorous or unrealistic manner.
Tuner Setup 09 then ENTER) Parental Control Canadian French Ratings Canadian French Ratings E G 8 ans+ Setting your favorite channels Set up to 10 TV channels to each of the four color buttons on the remote control unit (40 channels in total). You can then quickly select from only your favorite channels. 1 2 3 4 5 Blocked Canadian French Ratings xxxxxxxxxxxxxxxxxxxxx E, G, 8 ans+, 13 ans+, 16 ans+, 18 xxxxxxxxxxxxxxxxxxxxx xxxxxxxxxxxxxxxxxxxxx ans+ Select “Tuner Setup”. ( / Select “Favorites”.
09 Tuner Setup Activating the closed caption 1 Press HOME MENU. 2 Select “Tuner Setup”. ( / then ENTER) 3 Select “Closed Captions”. ( / then ENTER) 4 Select “Status”. ( / then ENTER) 5 Select “On” or “On If Mute”. ( / then ENTER) Closed Captions Status Status xxxxxxxxxxxxxxxxxxxxx xxxxxxxxxxxxxxxxxxxxx xxxxxxxxxxxxxxxxxxxxx Off On On If Mute Selecting digital closed captions Use the following procedure to select digital closed captions. 1 2 3 4 5 6 Press HOME MENU. Select “Tuner Setup”.
Tuner Setup 09 The following table shows the parameters selectable for each item.
10 Adjustments and Settings You can also use the menu to change the options. Sleep Timer When the selected time elapses, the Sleep Timer automatically places the system into the standby mode. Press SLEEP to select the desired time. • The timer starts counting. 1 2 3 4 Press HOME MENU. Select “Picture”. ( / Select “AV Selection”. ( / 60 then ENTER) Select the desired option.
Adjustments and Settings 10 For PC source Picture adjustments 1 Press HOME MENU. 2 Select “Picture”. ( / then ENTER) 3 Select an item to be adjusted.
10 Adjustments and Settings Color Temp Adjusts the color temperature, resulting in a better white balance. Selections High White with bluish tone Mid-High Intermediate tone between High and Mid Mid Natural tone Mid-Low Intermediate tone between High and Low Low White with reddish toneMid-Low Manual Allows you to manually adjust the color temperature. Use the following procedure.
Adjustments and Settings 10 FOCUS Sound adjustments This shifts the sound coming direction (sound images) upward and produces clear sound contours. 1 2 3 4 1 2 3 4 Press HOME MENU. Select “Sound”. ( / then ENTER) Select an item to be adjusted. ( / ) Select the desired level. ( / ) Press HOME MENU. Select “Sound”. ( / Select “FOCUS”. ( / ) Select the desired parameter.
10 Adjustments and Settings No Operation off (AV mode only) Power Control Power Control provides convenient functions for power saving. Energy Save You can save power consumption by decreasing the picture brightness. When you need not watch the screen and want to enjoy only audio, you can also deactivate the screen. 1 2 3 4 The system will be automatically placed into the standby mode when no operation is performed for three hours. 1 2 3 4 Press HOME MENU. Select “Power Control”.
Adjustments and Settings Adjust the horizontal and vertical positions of images on the Plasma Display. 1 2 3 4 Press HOME MENU. Select “Option”. ( / Select “Position”. ( / then ENTER) • When Auto Setup is finished, “Auto Setup completed.” appears. • Even when “Auto Setup completed.” appears, Auto Setup may have failed, depending on conditions. • Auto Setup may fail with a PC image composed of similar patterns or monochrome. If not successful, change the PC image and try again.
10 Adjustments and Settings AV mode Selecting a screen size In single-screen mode, press SCREEN SIZE to change the size of the screen from among the selectable options for the type of video signals currently received. • The selectable screen sizes differ depending on the types of input signals. 4:3 WIDE FULL CINEMA ZOOM AV mode Item 4:3 Description For 4:3 “standard” pictures. A side bar appears on each side. FULL For 16:9 squeeze pictures. ZOOM For 16:9 letterbox pictures.
Adjustments and Settings With the 4:3 screen size selected for the AV mode, you can change the brightness of the gray side masks that appear at both sides of the screen. 1 2 3 4 English Changing the brightness at both sides of the screen (Side Mask) 10 Press HOME MENU. Select “Option”. ( / then ENTER) Select “Side Mask”. ( / then ENTER) Select the desired parameter. ( / then ENTER) Item Description Fixed Always sets the same brightness for the (factory default) gray side masks.
11 Timer Presetting Presetting TV programs using the timer Using the menu, you can easily preset TV programs for watching later (auto channel select), recording with a D-VHS recorder, or recording via the supplied VCR controller. With the power to the system left on, the Auto Channel Preset automatically selects the preset TV program when its on-air time comes. Then you will not miss an important TV program when you are enjoying another TV program.
Timer Presetting 11 English • If you set a timer to record a future digital program on a VCR, you must first turn off Parental Control. Otherwise, you will record only a black screen. See “Temporarily deactivating the Parental Control” on page 37. • To change the TV program presetting, repeat the above procedure. To cancel the presetting, press D after selecting a list number in step 4.
12 Enjoying through External Equipment You can connect many types of external equipment to your Plasma Display System, like a DVD player, VCR, personal computer, game console, and camcorder. To view images coming from external equipment, select the input source using the INPUT buttons on the remote control (page 14) or the INPUT button on the Plasma Display.
Enjoying through External Equipment 12 To activate the HDMI terminal: Using HDMI Input 1 2 3 4 5 Press HOME MENU. Select “Option”. ( / then ENTER) Select “HDMI Input”. ( / then ENTER) Select “Setting”. ( / then ENTER) Select “Enable”. ( / then ENTER) Item Description Disable Deactivates the HDMI terminal. (factory default) Input signal correlation table 1920∗1080i@59.94/60Hz Enable Activates the HDMI terminal. 720∗480p@59.94/60Hz 6 Press HOME MENU to exit the menu. 720(1440)∗480i@59.
12 Enjoying through External Equipment Item Description Auto Automatically identifies input audio (factory default) signals. Digital Accepts digital audio signals. Analog Accepts analog audio signals. 6 Press HOME MENU to exit the menu. • If no sound is output, specify another audio signal type. • For the audio signal types to be specified, check the operation manual that came with the connected equipment. • Depending on the equipment to be connected, you also need to connect analog audio cables.
Enjoying through External Equipment Connecting a recorder Connecting other audio equipment DIGITAL OUT OPTICAL VCR CONTROL IN ANTENNA/ CABLE A IN Cable CARD ANTENNA B (TS) S-VIDEO INPUT 2 VIDEO R-AUDIO-L VIDEO VIDEO R-AUDIO-L S-VIDEO S400 R-AUDIO-L INPUT 1 COMPONENT VIDEO Y C B /P B C R /P R English The digital audio output terminal (optical) on this system can output Dolby Digital signals.
12 Enjoying through External Equipment Switching the optical audio signal type Set up for the DIGITAL AUDIO output terminal (OPTICAL), depending on your AV receiver. 1 2 3 4 Media Receiver (rear view) Press HOME MENU. Select “Option”. ( / When connecting a single D-VHS recorder then ENTER) DIGITAL OUT OPTICAL CR CONTROL Select “Digital Audio Out”. ( / then ENTER) Select “Dolby Digital” or “PCM”.
Enjoying through External Equipment Using i.LINK cables you can also connect up to two D-VHS recorders in a daisy chain. Media Receiver D-VHS recorder Displaying a D-VHS image To watch a D-VHS image, press i.LINK on the remote control unit or press INPUT on the Plasma Display to select i.LINK. Useful and important notification English i.LINK cable 12 POWER ON STANDBY REC DATA TIMER ACQUISITION Useful information • D-VHS recorders connected through i.
12 Enjoying through External Equipment Setting up for controlling a D-VHS recorder Editing the i.LINK list You can operate the connected D-VHS recorder from the Plasma Display that shows the control panel screen. After making the connections, use the menu to specify the model of the D-VHS recorder to be operated. You can operate only a single D-VHS recorder from the Plasma Display. The i.LINK list shows all devices connected through i.LINK interfaces.
Enjoying through External Equipment 12 Operating the control panel screen Use the following procedure to enable data transfer between multiple i.LINK devices even when the system is in the standby mode. The control panel screen appears when you press i.LINK. It disappears when you press i.LINK again. To select a button on the control panel screen, press / or / , and then press ENTER on the remote control. 1 2 3 4 5 6 7 Press HOME MENU. Select “Tuner Setup”. ( / then ENTER) Select “Recorder Setup”.
12 Enjoying through External Equipment Watching an image from a personal computer Signal names for 15-pin mini D-sub connecter 5 4 10 15 14 2 3 13 1 6 7 8 9 12 11 Connecting a personal computer Use the PC terminals to connect a personal computer. • The PC input terminals are DDC2B-compatible. • Plug & Play may not correctly function, depending on personal computers in use. Media Receiver (front view) INPUT 4 EC ER DATA ACQUISITION COMPONENT VIDEO Y CR / PR CB / PB ø 3.
Enjoying through External Equipment 12 Use the following procedure to set the manufacture of the recording equipment: Connecting the VCR controller 1 2 3 4 5 • Make sure to leave the VCR power on when presetting TV programs for recording with the VCR controller. • Be sure to firmly connect the VCR controller to the VCR control terminal on the rear of the Media Receiver. If you have mistakenly connected it to the CONTROL IN or CONTROL OUT terminal, remote control or other operations may be disabled.
12 Enjoying through External Equipment The lists of controllable recording equipment manufactures 60 En Manufacture Admiral Manufacture Harley Davidson Manufacture Philco Manufacture Toshiba Advantz Harman/Kardon Philips Totevision Adventura Harwood Pilot Unitech Aiko Headquarter Pioneer Vector Aiwa Hitachi Portland Vector Research Akai JVC Profitronic Video Concepts American High Jensen Proscan Videosonic Asha KEC Protec Wards Audiovox KLH Pulsar White Westinghouse B
Enjoying through External Equipment Connecting control cords • Make sure that the power is turned off when making connections. • Complete all component connections before making control cord connections. Media Receiver (rear view) DIGITAL OUT OPTICAL IN OUT CONTROL VCR CONTROL IN ANTENNA/ CABLE A IN Cable CARD ANTENNA B (TS) S-VIDEO English Connect control cords between the Media Receiver and other PIONEER equipment having the logo.
13 Useful Remote Control Features Learning function of the remote control unit You can operate the connected AV products (AV Receiver, Cable Box, SAT tuner, VCR, DVD, DVD recorder, LD) using the learning function of your remote control unit. This remote control unit has a function that can memorize each remote control code. 2 to 5 cm (0.8 to 2.
Useful Remote Control Features 13 Manufacture codes VCR DVD/DVR PIONEER1(CABLE) PIONEER2(CABLE) JERROLD1(CABLE) JERROLD2(CABLE) JERROLD3(CABLE) JERROLD4(CABLE) JERROLD5(CABLE) JERROLD6(CABLE) JERROLD7(CABLE) JERROLD8(CABLE) JERROLD9(CABLE) JERROLD10(CABLE) S.A.1(CABLE) S.A.2(CABLE) S.A.3(CABLE) S.A.
13 Useful Remote Control Features Using the remote control unit to control other devices Mode switch (with “TV” selected) Receiver control buttons When a Pioneer receiver is connected to the display, the receiver can be operated using buttons 1 to 3. When a non-Pioneer receiver is connected to the display, the signals for 1 to 3 must first be learned before operating. See page 62. 1 RECEIVER (STANDBY/ON) Turns the receiver power on and off.
Useful Remote Control Features 13 Cable control buttons English Mode switch (with “CBL/SAT” selected) When the Mode switch is set to CBL/SAT, the cable converter connected to the display can be operated using 1 to 5. Cable converters made by other manufacturers and not preset can also be operated using the remote control unit if 1 to 5 have learned the functions. See page 62. 1 0–9 Press a button (or buttons) that corresponds to the channel that you want to watch.
13 Useful Remote Control Features SAT control buttons Mode switch (with “CBL/SAT” selected) When the SAT is preset by the learning function of the remote control, the remote control unit buttons will function as shown below. • When the Mode switch is set to CBL/SAT, satellite broadcast tuners made by other manufacturers and not preset can also be operated with the remote control unit if 1 to 8 have learned the functions. See page 62.
Useful Remote Control Features 13 VCR control buttons English Mode switch (with “VCR” selected) When the VCR is preset by the learning function of the remote control, the remote control unit buttons will function as follows when the Mode switch of the remote control unit is set to VCR. • When the input selector button having the same number as the input terminal connecting the VCR is pressed, the VCR can be operated using 1 to 8.
13 Useful Remote Control Features 1 CH +/– (DVD recorder only) Press to change the channel of the tuner built in the DVD recorder. Mode switch (with “DVD/ DVR” selected) 2 RETURN When the DVD menu is in display, press to restore the immediately previous screen. 3 (PLAY) Selects playback. 4 (SCAN)/ (CHAPTER SEARCH) Continue pressing to go backward. Pressing quickly once takes you to the start of the chapter currently playing.
Appendix 14 Troubleshooting Possible Solution • Make sure the Plasma Display and the Media Receiver are connected correctly. (See page 18.) • Is the power cord disconnected? (See page 23.) • Has the main power been turned on? (See page 24.) • Check if you pressed TV on the remote control unit. (See page 24.) If the indicator on the system lights up red, press TV . English Problem • No power.
14 Appendix The video program that you watch may be high definition (HD) or standard definition (SD). This Plasma Display is designed to scale to each type of definition properly. If the video program’s definition type changes while a menu window is displayed on the screen (for example: HD→SD or SD→HD), the menu size may temporarily shrink or enlarge until the scaling is completed.
Appendix Copyright (c) 1998-2004 The OpenSSL Project. All rights reserved. Redistribution and use in source and binary forms, with or without modification, are permitted provided that the following conditions are met: 1. Redistributions of source code must retain the above copyright notice, this list of conditions and the following disclaimer. 2.
14 Appendix Linux Source Notice The Pioneer Plasma Television integrated with the Media Receiver in part is powered by utilizes the Linux operation system. The machine readable copy of the corresponding source code is available for the cost of distribution. To obtain a copy, please visit http://www.pioneerelectronics.com/ for more information. GNU General Public License Version 2, June 1991 Copyright (C) 1989, 1991 Free Software Foundation, Inc.
Appendix 4. 5. 6. 7. 8. English 3. (Exception: if the Program itself is interactive but does not normally print such an announcement, your work based on the Program is not required to print an announcement.) These requirements apply to the modified work as a whole.
14 Appendix 9. The Free Software Foundation may publish revised and/or new versions of the General Public License from time to time. Such new versions will be similar in spirit to the present version, but may differ in detail to address new problems or concerns. Each version is given a distinguishing version number.
Appendix 14 GNU Lesser General Public License English Version 2.1, February 1999 Copyright (C) 1991, 1999 Free Software Foundation, Inc. 59 Temple Place, Suite 330, Boston, MA 02111-1307, USA Everyone is permitted to copy and distribute verbatim copies of this license document, but changing it is not allowed. [This is the first released version of the Lesser GPL. It also counts as the successor of the GNU Library Public License, version 2, hence the version number 2.1.
14 Appendix GNU Lesser General Public License 76 En TERMS AND CONDITIONS FOR COPYING, DISTRIBUTION AND MODIFICATION 0. This License Agreement applies to any software library or other program which contains a notice placed by the copyright holder or other authorized party saying it may be distributed under the terms of this Lesser General Public License (also called “this License”). Each licensee is addressed as “you”.
Appendix English When a “work that uses the Library” uses material from a header file that is part of the Library, the object code for the work may be a derivative work of the Library even though the source code is not. Whether this is true is especially significant if the work can be linked without the Library, or if the work is itself a library. The threshold for this to be true is not precisely defined by law.
14 Appendix If any portion of this section is held invalid or unenforceable under any particular circumstance, the balance of the section is intended to apply, and the section as a whole is intended to apply in other circumstances.
Appendix 14 Specifications 50"Plasma Display, Model: PRO-505PU 1280 × 768 pixels 43" Plasma Display, Model: PRO-435PU 1024 × 768 pixels Audio Amplifier 13 W + 13 W (1 kHz, 10 %, 8 Ω) 13 W + 13 W (1 kHz, 10 %, 8 Ω) Surround System SRS/FOCUS/TruBass SRS/FOCUS/TruBass Power Requirement 120 V AC, 60 Hz, 363 W (0.2 W Standby) 120 V AC, 60 Hz, 298 W (0.
14 Appendix Trademarks • FOCUS, WOW, SRS and symbol are trademarks of SRS Labs, Inc. FOCUS and WOW technologies are incorporated under license from SRS Labs, Inc. • Manufactured under license from Dolby Laboratories. “Dolby” and the double-D symbol are trademarks of Dolby Laboratories. • HDMI, the HDMI logo and High-Definition Multimedia Interface are trademarks or registered trademarks of HDMI Licensing LLC. • This product includes FontAvenue® fonts licensed by NEC Corporation.
Printed on recycled paper Imprimé sur papier recyclé Published by Pioneer Corporation. Copyright © 2004 Pioneer Corporation. All rights reserved. PIONEER CORPORATION 4-1, Meguro 1-Chome, Meguro-ku, Tokyo 153-8654, Japan PIONEER ELECTRONICS (USA) INC. P.O. BOX 1540, Long Beach, California 90810-1540, U.S.A. TEL: (800) 421-1404 PIONEER ELECTRONICS OF CANADA, INC.