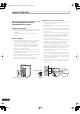
Introduction.book Page 1 Friday, July 8, 2005 2:28 PM RCS-55 SX-SW55 S-ST550 DVD Recorder Home Cinema System Audio Multi-channel Receiver Subwoofer Speaker System DVR-230-AV DVD Recorder Discover the benefits of registering your product online at www.pioneer.uk (www.pioneer-eur.
Introduction.book Page 2 Friday, July 8, 2005 2:28 PM IMPORTANT CAUTION RISK OF ELECTRIC SHOCK DO NOT OPEN The lightning flash with arrowhead symbol, within an equilateral triangle, is intended to alert the user to the presence of uninsulated "dangerous voltage" within the product's enclosure that may be of sufficient magnitude to constitute a risk of electric shock to persons. CAUTION: TO PREVENT THE RISK OF ELECTRIC SHOCK, DO NOT REMOVE COVER (OR BACK). NO USER-SERVICEABLE PARTS INSIDE.
Introduction.book Page 3 Friday, July 8, 2005 2:28 PM CAUTION The STANDBY/ON switch on this unit will not completely shut off all power from the AC outlet. Since the power cord serves as the main disconnect device for the unit, you will need to unplug it from the AC outlet to shut down all power. Therefore, make sure the unit has been installed so that the power cord can be easily unplugged from the AC outlet in case of an accident.
Introduction.book Page 4 Friday, July 8, 2005 2:28 PM Section One Thank you for buying this Pioneer product. Please read through these operating instructions so that you will know how to operate your model properly. After you have finished reading the instructions, put them in a safe place for future reference . Features 1 Home cinema system with the latest features This unit is equipped with a variety of the latest features for DVD recording.
Introduction.book Page 5 Friday, July 8, 2005 2:28 PM Section One Section One 06Before you start ............................................. 16 01Features ............................................................ 4 Switching on . . . . . . . . . . . . . . . . . . . . . . . . . . . . . . Setting up . . . . . . . . . . . . . . . . . . . . . . . . . . . . . . . . Basic operation . . . . . . . . . . . . . . . . . . . . . . . . . . . . Watching a DVD . . . . . . . . . . . . . . . . . . . . . . . . .
Introduction.book Page 6 Friday, July 8, 2005 2:28 PM Speaker Setup Guide Speaker Setup Guide Safety precautions when setting up Home theater sound setup When assembling the speakers, lay them down flat on their side to avoid accidents or injury. Make sure to use a stable surface when assembling, setting up, and placing the speakers.
Introduction.book Page 7 Friday, July 8, 2005 2:28 PM Speaker Setup Guide Surround left English • Front surround 3-spot setup – This setup is ideal when rear surround speaker placement isn't possible or you want to avoid running long speaker cables in your listening area. Use this setup together with the Front Surround modes in page 23 to take advantage of wall and ceiling reflections for a very realistic surround effect.
Introduction.book Page 8 Friday, July 8, 2005 2:28 PM Speaker Setup Guide Additional notes on speaker placement Wall mounting the front and surround speaker system • Install the main front left and right speakers at an equal distance from the TV. Attaching the brackets • Install the center speaker above or below the TV so that the sound of the center channel is localized at the TV screen. • For optimum effect, install the rear speakers slightly above ear level.
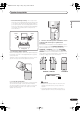
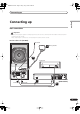
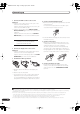
Introduction.book Page 9 Friday, July 8, 2005 2:28 PM Connecting up English Connecting up Basic connections Important • When connecting this system or changing connections, be sure to switch power off and disconnect the power cord from the wall socket. After completing all connections, connect the power cord to the wall socket.
Introduction.book Page 10 Friday, July 8, 2005 2:28 PM Connecting up 1 Connect the DVD recorder to the receiver subwoofer. a. Plug the control cable into the control jack on the rear of the receiver subwoofer. 4 Connect the AM and FM antennas 1. a. Connect one wire of the AM loop antenna to each AM antenna terminal2. For each terminal, press down on the tab to open; insert the wire, then release to secure. Plug the other end of the cable into the control jack on the rear of the DVD recorder. b.
Introduction.
Introduction.book Page 12 Friday, July 8, 2005 2:28 PM Connecting up Caution • These speaker terminals carry HAZARDOUS LIVE voltage. To prevent the risk of electric shock when connecting or disconnecting the speaker cables, disconnect the power cord before touching any uninsulated parts. • Do not connect any speakers other than those supplied to this system. • Do not connect the supplied speakers to any amplifier other than the one supplied with this system.
Introduction.book Page 13 Friday, July 8, 2005 2:28 PM Remote control 5 1 RECORDER MUTE VOLUME – 4 5 DVD Press to select the receiver subwoofer’s DVD/DVR1 audio input.1 RECEIVER 2 DVD 3 + FM/AM FM/AM (page 25) Press to select the built-in radio tuner. AUDIO INPUT CHANNEL 7 VIDEO INPUT AUDIO INPUT (page 29) Press repeatedly to select one of the receiver subwoofer’s audio inputs (DVD/DVR1, DVD/DVR2, DIGITAL or ANALOG).
Introduction.book Page 14 Friday, July 8, 2005 2:28 PM Remote control 13 RETURN Press to go back one level in the on-screen menu or display. + SHIFT: DISPLAY (page 54) Displays/changes the on-screen information displays. 14 Playback controls (page 52) / (page 58) Press to start reverse or forward scanning. Press again to change the speed. Press to start playback. 17 TV CONTROL (page 90) After setting up, use these controls to control your TV.
Introduction.book Page 15 Friday, July 8, 2005 2:28 PM Remote control Please keep in mind the following when using the remote control: • Make sure that there are no obstacles between the remote and the remote sensor on the unit. Putting the batteries in the remote control 1 Open the battery compartment cover on the back of the remote control. English Using the remote control • Remote operation may become unreliable if strong sunlight or fluorescent light is shining on the unit’s remote sensor.
Introduction.book Page 16 Friday, July 8, 2005 2:28 PM Before you start Before you start Switching on The DVD recorder and receiver subwoofer have separate power switches. The power switch for the receiver subwoofer is located on the display unit.
Introduction.book Page 17 Friday, July 8, 2005 2:28 PM Before you start This manual is split into to parts, one covering using the receiver subwoofer, the other using the DVD recorder. Below are some common operations and where to find them explained in this manual. 6 Load a disc. Load a disc with the label side facing up, using the disc tray guide to align the disc (if you’re loading a doublesided DVD disc, load it with the side you want to play face-down).
SX-SW55.
SX-SW55.book Page 19 Thursday, July 7, 2005 3:08 PM Section Two 01 Controls and displays 07 Additional information Display unit . . . . . . . . . . . . . . . . . . . . . . . . . . . . . . . 20 Display . . . . . . . . . . . . . . . . . . . . . . . . . . . . . . . . . 20 Setting the sleep timer . . . . . . . . . . . . . . . . . . . . . . . Dimming the display . . . . . . . . . . . . . . . . . . . . . . . . DTS CD setting . . . . . . . . . . . . . . . . . . . . . . . . . . . . Resetting the system . . . .
SX-SW55.book Page 20 Thursday, July 7, 2005 3:08 PM Controls and displays 01 Chapter 1 Controls and displays Display unit – VOLUME + AUDIO INPUT SURROUND STANDBY/ON 1 2 3 1 STANDBY/ON Press to switch the system on/into standby. 4 5 6 4 AUDIO INPUT (page 29) Press repeatedly to select one of the external audio inputs (DVD/DVR1, DVD/DVR2, DIGITAL or ANALOG). 2 Front panel display See below for details. 5 SURROUND Use to select a Surround mode (page 22).
SX-SW55.book Page 21 Thursday, July 7, 2005 3:08 PM Getting started 02 Chapter 2 English Getting started 1 If the system isn’t already on, press RECEIVER to switch on. System demo setting Switches the automatic demo feature on or off (this starts when you plug in for the first time): 1 Switch the system into standby. 2 Press SHIFT+SYSTEM SETUP. 3 Hold SHIFT and use the / buttons to select DEMO from the menu, then press SHIFT+ENTER.
SX-SW55.book Page 22 Thursday, July 7, 2005 3:08 PM 03 Listening to your system Chapter 3 Listening to your system About the listening modes Listening in surround sound As explained in Home theater sound setup on page 6, there are two basic surround speaker setup options available.
SX-SW55.book Page 23 Thursday, July 7, 2005 3:08 PM Listening to your system 03 Using Advanced Surround The Front Surround modes are effective when you are using the Front surround 3-spot speaker setup as described on page 7. The surround speakers should be placed on top of the front speakers and oriented either towards the walls, or straight ahead, depending on which mode you are using (see below).
SX-SW55.book Page 24 Thursday, July 7, 2005 3:08 PM Listening to your system 03 Enhancing dialogue Adjusting the bass and treble The Dialogue Enhancement feature is designed to make the dialogue stand out from other background sounds in a TV or movie soundtrack. Use the bass and treble controls to adjust the overall tone.
SX-SW55.book Page 25 Thursday, July 7, 2005 3:08 PM Listening to the radio 04 Chapter 4 Listening to the radio The tuner can receive both FM and AM broadcasts, and lets you memorize your favorite stations so you don’t have to manually tune in every time you want to listen. English Listening to the radio • High-speed tuning: Press and hold SHIFT+TUNE +/ – until the frequency display starts to move rapidly. Keep the button held down until you reach the frequency you want.
SX-SW55.book Page 26 Thursday, July 7, 2005 3:08 PM Listening to the radio 04 2 Press SHIFT+SYSTEM SETUP. Displaying RDS information 3 Hold SHIFT and use the / buttons to choose ST.MEM. then press SHIFT+ENTER. Use the SHIFT+RDS DISP button to display the different types of RDS information available.2 4 Hold SHIFT and use the / buttons to select the station preset you want then press SHIFT+ENTER. • Press SHIFT+RDS DISP for RDS information.
SX-SW55.book Page 27 Thursday, July 7, 2005 3:08 PM Surround sound settings 05 Chapter 5 Using the System Setup menu From the System Setup menu you can access all the surround sound settings of the system1, including channel levels, speaker distances, dynamic range adjustment and dual mono audio playback. Use the following buttons to use the System Setup menu.
SX-SW55.book Page 28 Thursday, July 7, 2005 3:08 PM Surround sound settings 05 Dynamic Range Control1 When watching Dolby Digital or DTS material at low volume, low level sounds—including some of the dialog—can be difficult to hear properly. Using one of the Dynamic Range Control (DRC) settings can help by bringing up the low level sounds, while controlling high level peaks. Dynamic Range Control works only with Dolby Digital soundtracks and some DTS soundtracks. 1 Press SHIFT+SYSTEM SETUP.
SX-SW55.book Page 29 Thursday, July 7, 2005 3:08 PM Other connections 06 Chapter 6 English Other connections Important • When connecting this system or changing connections, be sure to switch power off and disconnect the power cord from the wall socket. After completing all connections, connect the power cord to the wall socket. Connecting auxiliary components This system has optical-type digital inputs. Use these to connect external components, such as your MD or CD recorder.
SX-SW55.book Page 30 Thursday, July 7, 2005 3:08 PM Additional information 07 Chapter 7 Additional information Setting the sleep timer DTS CD setting The sleep timer switches off the receiver subwoofer after a specified time so you can fall asleep without worrying about it.1 If you play a DTS-encoded CD, you will need to change this setting to hear the decoded signal. 1 Switch the system into standby. 1 2 Press SHIFT+SYSTEM SETUP. Press SHIFT+SYSTEM SETUP.
SX-SW55.book Page 31 Thursday, July 7, 2005 3:08 PM Additional information 07 Don’t... Hints on installation We want you to enjoy using this system for years to come, so please bear in mind the following points when choosing a location: Do... Use in a well-ventilated room. Place on a solid, flat, level surface, such as a table, shelf or stereo rack. Use in a place exposed to high temperatures or humidity, including near radiators and other heat-generating appliances.
SX-SW55.book Page 32 Thursday, July 7, 2005 3:08 PM 07 Additional information Remedy Problem Can’t operate using the remote • Replace the batteries (Putting the batteries in the remote control on page 15). control. • Operate within 7 m, 30° of the remote sensor ( Using the remote control on page 15). • Remove any obstacles or operate from another position. • Avoid exposing the remote sensor on the front panel to direct light.
SX-SW55.book Page 33 Thursday, July 7, 2005 3:08 PM Additional information 07 S-ST550 Speaker system • (Front speakers x2, surround speakers x2, center speaker x1) Amplifier section RMS Power Output: Front, Center, Surround . . . . . . . . . . . . . 110 W per channel (1 kHz, 10 % T.H.D., 3 Ω) Subwoofer. . . . . . . . . . . . . . . 70 W (200 Hz, 10 % T.H.D., 3 Ω) Front, Center, Surround . . . . . . . . . . . . 60 W per channel (1 kHz, 10 % T.H.D., 6 Ω) Subwoofer . . . . . . . . . . . .
DVR-230_UK.
DVR-230_UK.book Page 35 Thursday, July 7, 2005 3:15 PM Section Three 01 Before you start 06 Recording Features. . . . . . . . . . . . . . . . . . . . . . . . . . . . . . . . . . 36 Disc / content format playback compatibility . . . . . . 37 About DVD recording. . . . . . . . . . . . . . . . . . . . . . . . Recording time and picture quality . . . . . . . . . . . . . Restrictions on video recording . . . . . . . . . . . . . . . . Setting the picture quality/recording time . . . . . . . .
DVR-230_UK.book Page 36 Thursday, July 7, 2005 3:15 PM 01 Before you start Chapter 1 Before you start • Features • Progressive scan-compatible Compared to standard interlaced video, progressive scan effectively doubles the amount of video information fed to your TV or monitor. (Check your TV/monitor for compatibility with this feature.
DVR-230_UK.book Page 37 Thursday, July 7, 2005 3:15 PM Before you start 01 General disc compatibility This recorder is compatible with a wide range of disc types (media) and formats. Playable discs will generally feature one of the following logos on the disc and/or disc packaging. Note however that some disc types, such as recordable CD and DVD, may be in an unplayable format—see below for further compatibility information. DVD-Video DVD-R DVD-RW This recorder cannot record onto DVD-R DL Ver. 3.
DVR-230_UK.book Page 38 Thursday, July 7, 2005 3:15 PM 01 Before you start PC-created disc compatibility Discs recorded using a personal computer may not be playable in this unit due to the setting of the application software used to create the disc. In these particular instances, check with the software publisher for more detailed information. Discs recorded in packet write mode (UDF format) are not compatible with this recorder.
DVR-230_UK.book Page 39 Thursday, July 7, 2005 3:15 PM Connecting up 02 Chapter 2 English Connecting up Rear panel connections 1 2 3 4 5 6 7 8 IN Y PB PR OUTPUT R AUDIO L COMPONENT VIDEO OUT AV 1 ・RGB - TV 2 CONTROL IN Connect to the CONTROL OUT terminal of the receiver subwoofer. 3 COAXIAL DIGITAL OUT Connect to the DVD/DVR1 coaxial jack on the receiver subwoofer. 4 COMPONENT VIDEO OUT A high-quality video output for connecting to a TV or monitor with a component video input.
DVR-230_UK.book Page 40 Thursday, July 7, 2005 3:15 PM 02 Connecting up Extra features for use with compatible TVs When this recorder is connected to a TV that features i/o Link.
DVR-230_UK.book Page 41 Thursday, July 7, 2005 3:15 PM Connecting up 02 The setup described below is a basic setup that allows you to watch and record TV programs, and play discs. Other types of connections are explained starting on the following page. English Easy connections Important • These connections use SCART cables (not supplied). If your TV (or VCR) does not have a SCART connection, see the following page for connecting up using the supplied audio/video cable.
DVR-230_UK.book Page 42 Thursday, July 7, 2005 3:15 PM 02 Connecting up Using other types of audio/video output If you can’t use the SCART AV connector to connect your TV to this recorder, there are standard audio/video output jacks, as well as an S-video output.
DVR-230_UK.book Page 43 Thursday, July 7, 2005 3:15 PM Connecting up 02 If you have a cable or satellite receiver with a built-in decoder, connect it to this recorder and your TV as shown on this page. If you are using a separate decoder box for your cable/satellite TV, set up following the instructions on the next page. English Connecting to a cable box or satellite receiver Using the setup on this page you can: • Record any channel by selecting it on the cable box/satellite tuner.
DVR-230_UK.book Page 44 Thursday, July 7, 2005 3:15 PM 02 Connecting up Connecting an external decoder box (1) If you have an external, dedicated decoder box for your satellite or cable TV system, use the setup described on this page. Important • Do not connect your decoder box directly to this recorder. • Information from the decoder (for example, relating to pay TV services), is only viewable when this recorder is off (in standby).
DVR-230_UK.book Page 45 Thursday, July 7, 2005 3:15 PM Connecting up 02 If you only have a decoder, connect it to this recorder and your TV as shown on this page. Using the setup on this page you can: • Record scrambled channels received using the recorder’s built-in TV tuner. English Connecting an external decoder box (2) Important • Do not connect this recorder ‘through’ your VCR, satellite receiver or cable box. Always connect each component directly to your TV or AV amplifier/receiver.
DVR-230_UK.book Page 46 Thursday, July 7, 2005 3:15 PM 02 Connecting up Connecting other AV sources Plugging in Before plugging in for the first time, make sure that everything is connected properly. Connecting a VCR or analog camcorder REC STANDBY/ON VIDEO L(MONO) INPUT 2 AUDIO R AUDIO/VIDEO INPUT AUDIO/VIDEO OUTPUT AC IN 1 2 Analog camcorder AUDIO/VIDEO OUTPUT AUDIO/VIDEO INPUT VCR 1 Connect a set of audio and video outputs of your VCR or camcorder to a set of inputs on this recorder.
DVR-230_UK.book Page 47 Thursday, July 7, 2005 3:15 PM Controls and displays 03 Chapter 3 English Controls and displays Front panel REC STANDBY/ON VIDEO 1 L(MONO) INPUT 2 AUDIO R 2 3 4 5 6 7 1 STANDBY/ON Press to switch the recorder on/into standby. 2 Front panel inputs (page 39) Audio/video inputs, convenient for connecting a video camera. 8 9 5 Press to start or restart playback (press while playing to pause playback).
DVR-230_UK.book Page 48 Thursday, July 7, 2005 3:24 PM 04 Getting started Chapter 4 Getting started Switching on and setting up When you switch the recorder on for the first time, you can make several basic settings using the Setup Navigator. This takes you through setting the clock and the internal TV tuner settings. If you’re using the recorder for the first time, we strongly recommend you use the Setup Navigator before starting to use the recorder.
DVR-230_UK.book Page 49 Thursday, July 7, 2005 3:24 PM Getting started 04 Country The recorder takes a short while to set the time. After you see that the time has been set, select Next to proceed. Auto England Auto Date TUE 01 / 02 / 2005 Manual Time 12 : 00 • Auto-tuning channels The Auto Scan option automatically scans and sets the channel presets. Clock Set CH English • Use the / (cursor left/right) buttons to choose your country, then press ENTER.
DVR-230_UK.book Page 50 Thursday, July 7, 2005 3:24 PM Getting started 04 Use the / (cursor left/right) buttons to move from one field to another. • You can go back to the previous screen at anytime in the Setup Navigator by pressing RETURN. 7 That’s it! Press ENTER to finish setting up. Making your first recording This quick guide shows you how to make a basic recording of a TV program to a recordable DVD. Recording is covered in much more detail in chapter 6 (Recording).
DVR-230_UK.book Page 51 Thursday, July 7, 2005 3:24 PM Getting started 04 • Channel presets are numbered 1–99. 5 Press REC to start recording. • By default, the recording will be in SP (standard play) mode, which will give you around two hours of recording from a blank DVD disc. The different recording mode and their recommended uses are covered in mode detail in Chapter 6. Note • Channel presets are numbered 1–99.
DVR-230_UK.book Page 52 Thursday, July 7, 2005 3:24 PM 04 Getting started Switching between TV and DVD When the recorder is stopped or recording you can choose whether to have the audio/video from the built-in TV tuner (or external input) play on your TV (‘DVD mode’), or watch the channel that the TV is currently set to (‘TV mode’).
DVR-230_UK.book Page 53 Thursday, July 7, 2005 3:24 PM Getting started Playing audio CDs and MP3s The table below shows the basic playback controls for audio CDs and MP3 files. Playing DVD discs Press to start playback. The table below shows the basic playback controls for DVD-Video, and recordable DVD discs. English • Press RECORDER to switch the recorder into standby. 04 Press to pause playback; press again to restart playback. Press to start or restart playback. Press to stop playback.
DVR-230_UK.book Page 54 Thursday, July 7, 2005 3:24 PM 04 Getting started • During playback, press to start scanning. Press repeatedly to increase the scanning speed. • Press and hold while paused to start slow-motion playback. Press repeatedly to change the playback speed (forward direction only). • While paused, press to advance a single frame (forward direction only). PREV NEXT CM SKIP CLEAR ENTER RETURN Press to skip to previous/next track.
DVR-230_UK.book Page 55 Thursday, July 7, 2005 3:24 PM Getting started 04 Recording display 1 3 Copy control information Shows recording restrictions. Rec DVD-RW VR 4 Lock Disc On or Off 5 Number of titles/tracks/folders on the disc 6 Shows the current mode of the recorder (see Switching between TV and DVD on page 52) Play display 1 Play DVD-R Video Original 00:03:30 01 - 002 1 2 3 1 Disc type and mode Shows the disc type (DVD-R, DVD-RW, CD, MP3, NO DISC, etc.
DVR-230_UK.book Page 56 Thursday, July 7, 2005 3:24 PM 05 Playback Chapter 5 Playback Introduction Most of the features described in this chapter make use of on-screen displays. Navigate these using the / / / (cursor buttons) and ENTER. To go back one level from any screen, use the RETURN button. Remember also that the button guide at the bottom of every screen shows which buttons do what.
DVR-230_UK.book Page 57 Thursday, July 7, 2005 3:24 PM Playback 05 Navigating discs ALL Disc Navigator DVD-VR Titles ORG 03, PL 02 Remain 00h20m (XP) Title 01 Original The lively big tree Recording Time 00h30m00s 01 02 03 During playback you can easily jump to another title, chapter or track on a disc using the number buttons on the remote. – PL01 + DVD TUE 29/06 11:00 WED 30/06 11:00 THU 01/07 11:00 English 2 Use the / (cursor left/right) buttons to select a title to play.
DVR-230_UK.book Page 58 Thursday, July 7, 2005 3:24 PM 05 Playback 3 MP3 1 During playback, use the number buttons to input a track/folder number. For example, for folder 6, press 6; for track 24, press 2, then 4. To resume normal playback, press . Note • Depending on the disc, reverse playback may not be smooth. • Sound can be heard while scanning audio CDs (analog output only). • To clear and start again, press CLEAR. 2 Use the / (cursor up/down) buttons to select either ‘Track’ or ‘Folder’.
DVR-230_UK.book Page 59 Thursday, July 7, 2005 3:24 PM Playback 05 Note • Depending on the disc, normal playback may automatically resume when a new chapter is reached on a DVD disc. The Play Mode menu ALL The Play Mode menu gives you access to search and repeat play functions. Important • No sound is output during slow-motion playback. • You can’t use the Play Mode features with Video CDs playing in PBC mode, or while a DVD disc menu is being displayed.
DVR-230_UK.book Page 60 Thursday, July 7, 2005 3:24 PM Playback 05 Search Mode Tip ALL • You can often select what you want to watch on a DVD disc from the disc menu. Press DVD MENU or TOP MENU to display the disc menu. The Search Mode feature lets you start playback from a specified point in a disc by time or by title/chapter/folder/ track number. 1 Select ‘Search Mode’ from the Play Mode menu. 2 Select one of the search options.
DVR-230_UK.book Page 61 Thursday, July 7, 2005 3:24 PM Playback 05 DVD-Video Switching DVD soundtracks DVD-Video Some DVD discs have subtitles in one or more languages, which you can switch during playback. Check the disc packaging for details of the subtitle options. REC REC MODE When playing a DVD disc recorded with two or more soundtracks (often in different languages), you can switch the soundtrack during playback. Check the disc packaging for details of the soundtrack options.
DVR-230_UK.book Page 62 Thursday, July 7, 2005 3:24 PM 05 Playback Switching audio channels VR mode CD Video CD MP3 For VR mode content recorded with bilingual audio, you can switch between left (L) channel, right (R) channel, or both (L+R). When playing Video CDs and audio CDs you can switch between stereo, just the left channel or just the right channel.
DVR-230_UK.book Page 63 Thursday, July 7, 2005 3:24 PM Recording 06 Chapter 6 About DVD recording This recorder can record on both DVD-R and DVD-RW media. The main difference between the two is that DVDR discs can only be recorded once, while DVD-RW can be recorded, erased and re-recorded many times. A further difference between the two disc types is that only DVD-RW can be initialized for VR mode recording, which offers much more comprehensive editing functions compared to Video mode recording.
DVR-230_UK.book Page 64 Thursday, July 7, 2005 3:24 PM 06 Recording • Except when a recordable Video mode disc is loaded, changing the recording mode will display the recording time for a VR mode disc. Setting the picture quality/recording time VR mode Restrictions on video recording • You cannot record copy-protected video using this recorder. Copy-protected video includes DVD-Video discs and some satellite broadcasts.
DVR-230_UK.book Page 65 Thursday, July 7, 2005 3:24 PM Recording 06 VR mode Video mode Follow the instructions below to record a TV program. Recording starts immediately and continues until the disc is full or you stop the recording. RECORDER RECEIVER MUTE VOLUME – DVD 3 Use the REC MODE button to set the picture quality/recording time. • See Setting the picture quality/recording time above for detailed instructions. 4 Use the AUDIO button to select the audio channel to record.
DVR-230_UK.book Page 66 Thursday, July 7, 2005 3:24 PM Recording 06 Direct recording from TV If you connected this recorder to your TV using a SCART cable, and your TV supports Direct Recording, you can record whatever is currently being shown on the TV without having to worry about what channel preset the recorder is on. Check the instructions that came with your TV if you’re not sure whether your TV supports this feature.
DVR-230_UK.book Page 67 Thursday, July 7, 2005 3:24 PM Recording 06 • RecMode – Select XP, SP, LP, EP, SLP or SEP (See Recording time and picture quality on page 63). 4 After entering all the timer recording information, highlight ‘Program Set’ and press ENTER. The timer recording list screen is displayed again. The timer program you just input appears in the list. Timer Recording VIDEO Plus+ system Timer Rec (View) English 1 Press HOME MENU, select Timer Recording, then Timer Rec (View).
DVR-230_UK.book Page 68 Thursday, July 7, 2005 3:24 PM Recording 06 3 If you want to change the recording quality, use the / buttons to highlight Rec Mode, then use the / buttons to change. Programming a new end time 1 During timer recording, press HOME MENU, select Timer Recording, then Timer Rec (View).
DVR-230_UK.book Page 69 Thursday, July 7, 2005 3:24 PM Recording 2 When you want to stop recording completely, press . Recording from an external component VR mode Video mode You can record from an external component, such as a camcorder or VCR, connected to one of the recorder’s external inputs. Preventing use of the recorder before a timer recording (child lock) VIDEO INPUT You can make all the front panel and remote control buttons inoperative using the child lock feature.
DVR-230_UK.book Page 70 Thursday, July 7, 2005 3:24 PM Recording 06 4 Playing your recordings on other DVD players VR mode Disc Video mode Most regular DVD players can play finalized discs recorded in Video mode. A number of players (including many Pioneer models) can also play DVD-RW discs recorded in VR mode, finalized or not. Check the manual that came with the player to check what kinds of discs it will play. Select ‘Finalize’.
DVR-230_UK.book Page 71 Thursday, July 7, 2005 3:24 PM Recording 06 DVD-RW When you first load a blank disc, the recorder will initialize it automatically for recording. You can also manually initialize DVD-RW discs. You can initialize a disc for either Video mode recording or VR mode recording. Note • By default, the recorder initializes blank DVD-RW discs for VR mode recording. See DVD-RW Auto Init. on page 86 if you want to change the default to Video mode.
DVR-230_UK.book Page 72 Thursday, July 7, 2005 3:24 PM 07 Editing Chapter 7 Editing Using this recorder you can edit video content on unfinalized Video mode and VR mode DVD discs. More detailed editing is possible on VR mode discs, which can be edited at the chapter level. Video mode discs can only be edited at the title level. Editing Titles (Title Edit) Erase Once a Video mode disc has been finalized, further editing is not possible. 1 Press HOME MENU and select ‘Editing’ from the on-screen display.
DVR-230_UK.book Page 73 Thursday, July 7, 2005 3:24 PM Editing 07 Title Name Video mode VR mode You can give titles names up to 64 characters long for VR mode recordings and 32 characters for Video mode recordings. 1 Select ‘Title Name’ from the Title Edit menu options. 2 Use the / buttons to select the title you want to name, then press ENTER to go to the name input screen. 3 Input a name for the selected title.
DVR-230_UK.book Page 74 Thursday, July 7, 2005 3:24 PM Editing 07 Lock Editing chapters (Chapter Edit) VR mode You can lock a title so that it can’t be edited or erased accidentally. If you do need to edit it, you can always unlock it later. 1 Select ‘Lock’ from the Title Edit menu options. 2 Use the / buttons to select the title you want to lock (or unlock), then press ENTER.
DVR-230_UK.book Page 75 Thursday, July 7, 2005 3:24 PM Editing 07 Divide Combine VR mode Use this command to divide a chapter into two new ones. Note that the exact divide point used may be slightly different to the one you choose. 1 Select ‘Divide’ from the Chapter Edit menu options. 2 Use the / buttons to select the title containing the chapter you want to divide, then press ENTER. Use this function to combine two adjacent chapters into one. 1 Select ‘Combine’ from the Chapter Edit menu options.
DVR-230_UK.book Page 76 Thursday, July 7, 2005 7:20 PM The Initial Setup menu 08 Chapter 8 The Initial Setup menu 1 Using the Initial Setup menu Clock The Initial Setup menu is where you can set various recorder options for sound, picture, language and so on. • Select ‘Auto’. Auto Date Manual Time Clock Set CH Press HOME MENU and select ‘Initial Setup’. HOME MENU Disc Navigator Editing 2 Set ‘Clock Set CH‘ to the channel preset number that broadcasts a clock signal.
DVR-230_UK.book Page 77 Thursday, July 7, 2005 7:20 PM The Initial Setup menu • Manual clock setting If no stations in your area are broadcasting time signals, you can set the clock manually: Set your time zone. Set this by selecting a time relative to GMT (see Time Zone list on page 96 for the possible time zones).
DVR-230_UK.book Page 78 Thursday, July 7, 2005 7:20 PM The Initial Setup menu 08 Auto CH Setup : Download from TV 2 If you connected this recorder to your TV using the AV1•RGB-TV AV connector, and if your TV supports this function, you can download all the channels that your TV is tuned to. Check your TV’s instruction manual for more details. 1 Choose ‘Download from TV’. Auto CH Setup Country England 3 Press ENTER to go to the manual channel setup screen.
DVR-230_UK.book Page 79 Thursday, July 7, 2005 7:20 PM The Initial Setup menu 08 Channel Swapping Set Guide Preset 1 Select ‘Channel Swapping’. • Default setting: n/a Guide channels are used by the VIDEO Plus+ system so that the channel number specified in the VIDEO Plus+ programming numbers can be guaranteed to correspond to the correct station. 1 Tuner Auto CH Setup English The preset swap feature lets you swap the channel assignments of different programs.
DVR-230_UK.book Page 80 Thursday, July 7, 2005 7:20 PM 08 The Initial Setup menu • Select ‘OSD Language’ then use the / buttons to select a language option. There are three different recorder IDs. When set to Recorder2 or Recorder3, the remote control mode is shown in the front panel display.
DVR-230_UK.book Page 81 Thursday, July 7, 2005 7:20 PM The Initial Setup menu 08 Setup Navigator English Disc settings • Default setting: n/a Basic Basic Clock OSD Language Disc Tuner Tuner Video OSD Language Clock Audio Display Recording Control Playback Setup Navigator Lock Disc VR mode • Default setting: Off Disc Power Save The Setup Navigator appears automatically when you switch on the recorder for the first time (or after resetting the recorder).
DVR-230_UK.book Page 82 Thursday, July 7, 2005 7:20 PM The Initial Setup menu 08 2 Use the / buttons to change the channel preset then press . Undo Finalize DVD-RW You can undo the finalization on Video mode DVD-RW discs recorded and finalized on this recorder. You need to do this if you want to record more material or edit material already on the disc. 3 Use the / buttons to change the color system for the current input or built-in tuner.
DVR-230_UK.book Page 83 Thursday, July 7, 2005 7:20 PM The Initial Setup menu Important • If you make a setting here that is incompatible with your TV, the TV may not display any picture at all. If this happens either switch everything off and reconnect to the TV using either the supplied video cable, or an S-video cable (see Using the S-video or component video output on page 42 for more on this), or reset the recorder (see Resetting the recorder on page 90 for how to do this).
DVR-230_UK.book Page 84 Thursday, July 7, 2005 7:20 PM 08 The Initial Setup menu Playback Adjust Audio settings Video Basic Video In Pure Cinema Disc Video Out Block NR Video Input Adjust Mosquito NR Audio Playback Adjust White Level Audio Adjust setting Audio Chroma Level Recording Playback Use the various Playback Adjust settings to adjust the picture quality of the video output.
DVR-230_UK.book Page 85 Thursday, July 7, 2005 7:20 PM The Initial Setup menu Audio In From the Audio Out screen, use the / buttons to select a setting, then use the / buttons to adjust it. Audio Out NICAM Select NICAM Dolby Digital Tuner Level Normal 96kHz PCM External Audio Stereo Bilingual Rec On DTS A/L MPEG • NICAM Select – If you want to record the non-NICAM audio in a TV broadcast, select Regular Audio, otherwise set to NICAM.
DVR-230_UK.book Page 86 Thursday, July 7, 2005 7:20 PM 08 The Initial Setup menu On the default setting, if a timer program (Standard or VIDEO Plus+ programming system) is set but there isn’t enough space on the disc at the recording quality set, the recording will start, but it will be cut off when the disc is full. Set Optimized Rec to On to have the recorder automatically adjust the recording quality to fit the available disc space. DVD-RW Auto Init.
DVR-230_UK.book Page 87 Thursday, July 7, 2005 7:20 PM The Initial Setup menu 08 Set Password 3 Press ENTER. 4 Enter a new password. The password you set will enable you to change the Parental Lock level and Country/Area code setting. It is also the password that you will need to enter if you want to play a disc with a parental lock level higher than the recorder.
DVR-230_UK.book Page 88 Thursday, July 7, 2005 7:20 PM The Initial Setup menu 08 Language Country/Area • Default Country/Area code: us (2119) 1 Playback Select ‘Country / Area’. Parental Look Change Password Password Change Level Code Country / Area Number Parental Look Audio Disc Language Subtitle Video Visual DVD Menu Audio Action Subtitle Display Recording Playback 2 Use number buttons to enter your password, then press ENTER.
DVR-230_UK.book Page 89 Thursday, July 7, 2005 7:20 PM The Initial Setup menu Selecting ‘Other’ languages 2 Select the language you want. Language Audio English Subtitle English DVD Menu Other English Language Number • Still Picture – The recorder uses one of two processes when displaying a still frame from a DVD disc. The default Auto setting automatically chooses the best setting each time.
DVR-230_UK.book Page 90 Thursday, July 7, 2005 7:20 PM Additional information 09 Chapter 9 Additional information Using the TV remote control buttons Resetting the recorder If you need to, you can reset the recorder to all its factory settings. 1 Make sure that the recorder is on. 2 Press and hold and press STANDBY/ON. The recorder turns off with all settings reset. Setting up the remote to control your TV You can use the supplied remote to control your TV.
DVR-230_UK.book Page 91 Thursday, July 7, 2005 7:20 PM Additional information 09 Please note that there are cases where only certain functions may be controllable after assigning the proper preset code, or the codes for the manufacturer in the list will not work for the model that you are using.
DVR-230_UK.book Page 92 Thursday, July 7, 2005 7:20 PM 09 Additional information Screen sizes and disc formats When viewing on a standard TV or monitor Screen format of disc Setting Appearance 16:9 4:3 (Letter Box) The program is shown in widescreen with black bars at the top and bottom of the screen. 4:3 (Pan & Scan) The sides of the program are cropped so that the picture fills the whole screen. 16:9 The program appears squashed. Set to either 4:3 (Letter Box) or 4:3 (Pan & Scan).
DVR-230_UK.book Page 93 Thursday, July 7, 2005 7:20 PM Additional information 09 Incorrect operation is often mistaken for trouble and malfunction. If you think there is something wrong with this component, please check the points below. Sometimes the trouble may lie in another component. Investigate the other components and electrical appliances being used.
DVR-230_UK.book Page 94 Thursday, July 7, 2005 7:20 PM 09 Additional information Problem Remedy Screen is stretched vertically or hori- • Make sure that the TV Screen Size setting (page 89) is correct for the kind of TV zontally you have (see also page 92). • If you have a widescreen TV, check its aspect ratio settings. • This recorder’s input switches into wide mode automatically according to the input signal.
DVR-230_UK.book Page 95 Thursday, July 7, 2005 7:20 PM Additional information In this section you can find answers to frequently asked questions on how to use your DVD recorder and what it can do. • What kind of discs can I use for recording? You can use DVD-R and DVD-RW discs for recording. DVD-RAM, CD-R and CD-RW discs are not recordable using this recorder. • I changed the batteries in the remote control and now it doesn’t work! Most likely the remote control ID does not match the recorder.
DVR-230_UK.
DVR-230_UK.
DVR-230_UK.book Page 98 Thursday, July 7, 2005 7:20 PM 09 Additional information On-screen displays and recorder displays The table below shows a list of error messages that you may encounter when using the recorder and an explanation of their meaning. 98 En Message Explanation/Action • Initializing disc. Please wait a moment. When you load a blank DVD-RW disc, the recorder automatically initializes it. • Incompatible region number.
DVR-230_UK.book Page 99 Thursday, July 7, 2005 7:20 PM Additional information 09 Damaged discs When holding discs of any type, take care not to leave fingerprints, dirt or scratches on the disc surface. Hold the disc by its edge or by the center hole and edge. Discs spin at high speed inside the recorder. If you can see that a disc is cracked, chipped, warped, or otherwise damaged, don't risk using it; you could end up damaging the recorder.
DVR-230_UK.book Page 100 Thursday, July 7, 2005 7:20 PM 09 Additional information Hints on installation Glossary We want you to enjoy using this unit for years to come, so please bear in mind the following points when choosing a suitable location for it: Analog audio Use in a well-ventilated room. An electrical signal that directly represents sound. Compare this to digital audio which can be an electrical signal, but is an indirect representation of sound. See also digital audio.
DVR-230_UK.book Page 101 Thursday, July 7, 2005 7:20 PM Additional information 09 PureCinema The difference between the quietest and loudest sounds possible in an audio signal (without distorting or getting lost in noise). Dolby Digital and DTS soundtracks are capable of a wide dynamic range, delivering dramatic cinema-like effects. DVD-Video may be either video material (originally shot on video) or film material (originally shot film).
DVR-230_UK.book Page 102 Thursday, July 7, 2005 7:20 PM 09 Additional information Tuner Specifications Receivable channels PAL B/G General System . . . . . . . . . . . . . . . . . . . . . . . DVD-Video, DVD-R/RW, Video-CD, CD, CD-R/RW (MP3, CD-DA) Power requirements. . . . . . . . . . . . . . . .220–240 V, 50/60 Hz Power Consumption. . . . . . . . . . . . . . . . . . . . . . . . . . . . 25 W Power consumption in standby mode . . . . . . . . . . . . . 0.
DVR-230_UK.book Page 103 Thursday, July 7, 2005 7:20 PM Additional information English RGB output Output level . . . . . . . . . . . . . . . . . . . . . . . . . . 0.7 Vp-p (75 Ω) Jacks . . . . . . . . . . . . . . . . . . . . . . . . . AV connector 1 (AV1) Audio output . . . . . . . . . . . . . . . . . . . . . . . . . . . . .AV1 Output During audio output . . . . . . . . . . . . . . . . . . . . . . . . . 2V rms (Output impedance: less than 1.5 kΩ) Jacks . . . . . . . . . . . . . . .
DVR-230_UK.book Page 104 Thursday, July 7, 2005 7:20 PM If you want to dispose this product, do not mix it with general household waste. There is a separate collection system for used electronic products in accordance with legislation that requires proper treatment, recovery and recycling.