SN29402396_SC-LX801_701_BAS_En.book > Before start 1 ページ 2016年5月30日 > Hookup 月曜日 午後3時27分 > Setup > Playback Basic Manual SC-LX801 SC-LX701 AV RECEIVER RECEPTEUR AV > Part Names En Fr Hookup Step1: Speaker Layout ........................................................... 3 Step2: Connect the Speakers ............................................... 10 Step3: Connect the TV ......................................................... 12 Step4: Connect the AV Components ................................
SN29402396_SC-LX801_701_BAS_En.book > Before start 2 ページ 2016年5月30日 > Hookup 月曜日 午後3時27分 > Setup > Playback > Part Names What's in the box 1. Main unit 2. Remote controller (RC-927R) ×1, Batteries (AAA/R03) ×2 3. Indoor FM antenna ×1 4. AM loop antenna ×1 5. Speaker setup microphone ×1 6. Power cord ×1 Glossary Dolby Atmos This unit supports playback in the Dolby Atmos format which provides 360e sound placement.
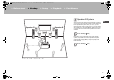
SN29402396_SC-LX801_701_BAS_En.book > Before start 3 ページ 2016年5月30日 > Hookup 月曜日 午後3時27分 > Setup > Playback > Part Names Step1: Speaker Layout 7.1-Channel System *1 *2 *3 En Front speakers output front stereo sound and a center speaker outputs center sound such as dialogs and vocals. Surround speakers create back sound field. Powered subwoofer reproduces bass sounds and creates rich sound field.
SN29402396_SC-LX801_701_BAS_En.book > Before start 4 ページ 2016年5月30日 > Hookup 月曜日 午後3時27分 > Setup > Playback > Part Names Height Speakers; Front High Speakers/ Rear High Speakers These are types of height speakers. Furthermore, by installing height speakers, you can select the Dolby Atmos listening mode, which realizes the most up-to-date 3D sound including overhead sounds, when the input format is Dolby Atmos. Front high speakers or rear high speakers should be situated at least 0.
SN29402396_SC-LX801_701_BAS_En.book > Before start 5 ページ 2016年5月30日 > Hookup 月曜日 午後3時27分 > Setup > Playback > Part Names Height Speakers; Ceiling Speakers *3 *2 *1 En These are types of height speakers. Furthermore, by installing height speakers, you can select the Dolby Atmos listening mode, which realizes the most up-to-date 3D sound including overhead sounds, when the input format is Dolby Atmos.
SN29402396_SC-LX801_701_BAS_En.book > Before start 6 ページ 2016年5月30日 > Hookup 月曜日 午後3時27分 > Setup > Playback > Part Names Height Speakers; Dolby Enabled Speakers (Dolby Speakers) *1 *2 These are types of height speakers. Dolby enabled speakers are special speakers designed to face the ceiling so that sound is heard after bouncing off the ceiling so that sound appears to be coming from overhead.
SN29402396_SC-LX801_701_BAS_En.book > Before start 7 ページ 2016年5月30日 > Hookup 月曜日 午後3時27分 > Setup > Playback > Part Names Speaker B System Speaker B Speaker B *1 *2 En Apart from the main speaker system (Speaker A System), you can also connect another system of front speakers to be the Speaker B System. When you do so, you can switch the same audio to output from A, B, or A+B. Switch with "Speakers" in AV Adjust (P28).
SN29402396_SC-LX801_701_BAS_En.book > Before start 8 ページ 2016年5月30日 > Hookup 月曜日 午後3時27分 > Setup > Playback > Part Names Bi-Amping the Speakers *1 It is possible to connect front speakers, a center speaker, and surround speakers supporting Bi-Amping to improve quality of the bass and treble. The effects and placements for speakers are the same as for a system that doesn't use Bi-Amping speakers. The following shows the combinations you can connect with Bi-Amping speakers.
SN29402396_SC-LX801_701_BAS_En.book > Before start 9 ページ 2016年5月30日 > Hookup 月曜日 午後3時27分 > Setup > Playback > Part Names Speaker combinations In any of the combinations, up to two powered subwoofers can be connected. Speaker Channels FRONT CENTER SURROUND SURROUND BACK HEIGHT 1 HEIGHT 2 SP B * 1 (Speaker B) Bi-AMP * 1 ZONE 2 * 1 (P19) *2 FRONT 3.1 ch *2 FRONT, FRONT/CENTER 4.1 ch *2 FRONT, FRONT/SURROUND 5.1 ch *2 FRONT, FRONT/CENTER, FRONT/SURROUND 6.
SN29402396_SC-LX801_701_BAS_En.book 10 ページ > Before start 2016年5月30日 > Hookup 月曜日 午後3時27分 > Setup > Playback > Part Names Step2: Connect the Speakers Standard Connections Refer to the illustration to connect the speaker system. 2 * Depending on the combination of speakers, you may need to connect to other jacks. See "Points to note with speaker combinations" (P9) for details. 3/8˝ (10 mm) Make sure the exposed wires of the speakers do not stick out of the speaker terminals when connecting.
SN29402396_SC-LX801_701_BAS_En.book > Before start 11 ページ 2016年5月30日 > Hookup 月曜日 午後3時27分 > Setup > Playback > Part Names Connections with Bi-Amping speakers En With a Center Speaker When using Bi-Amping connections for Front Speakers For highfrequency For lowfrequency With Surround Speakers For highfrequency For highfrequency For lowfrequency For lowfrequency With the Speaker B system For highfrequency In case of Bi-Amping connection, refer to the instruction manual of your speakers.
SN29402396_SC-LX801_701_BAS_En.book > Before start 12 ページ 2016年5月30日 > Hookup 月曜日 午後3時27分 > Setup > Playback > Part Names Step3: Connect the TV TV-1 (ARC TV) This describes the connections for a TV that supports the ARC (Audio Return Channel) feature. By connecting with a single HDMI cable, you can not only output the video input to this unit to the TV, but you can also play the sound from the TV through this unit. Choose an HDMI IN jack on the TV that supports ARC when connecting.
SN29402396_SC-LX801_701_BAS_En.book > Before start 13 ページ 2016年5月30日 > Hookup 月曜日 午後3時27分 > Setup > Playback > Part Names TV-2 (Non-ARC TV) En This describes the connections for a TV that does not support the ARC (Audio Return Channel) feature. By connecting with both an HDMI cable and a digital optical cable, you can not only output the video input to this unit to the TV, but you can also play the sound from the TV through this unit.
SN29402396_SC-LX801_701_BAS_En.book > Before start 14 ページ 2016年5月30日 > Hookup 月曜日 午後3時27分 > Setup > Playback > Part Names Step4: Connect the AV Components HDMI AV Components This is an example of connection with an AV component that has an HDMI jack.
SN29402396_SC-LX801_701_BAS_En.book > Before start 15 ページ 2016年5月30日 > Hookup 月曜日 午後3時27分 > Setup > Playback > Part Names Non-HDMI AV Components 1 3 OR 2 En This is an example of connection with an AV component that does not have an HDMI jack. Make the connections to the AV component to match the jacks it has.
SN29402396_SC-LX801_701_BAS_En.book > Before start 16 ページ 2016年5月30日 > Hookup 月曜日 午後3時27分 > Setup > Playback > Part Names Audio Components Example of a connection with an Audio Component. Connect a CD player using a digital optical cable or analog audio cable. You can also connect a turntable that has an MM-type cartridge to the PHONO jack. 0 If the turntable has a built-in audio equalizer, connect it to an AUDIO IN jack other than the PHONO jack.
SN29402396_SC-LX801_701_BAS_En.book > Before start 17 ページ 2016年5月30日 > Hookup 月曜日 午後3時27分 > Setup > Playback > Part Names Component Video Monitor En Use a component video cable to connect a TV or projector that has component video input jacks rather than an HDMI input jack. To output video from the COMPONENT VIDEO OUT jacks, you must connect the external AV components using a component video cable. 1 BD/DVD Projector, etc.
SN29402396_SC-LX801_701_BAS_En.book > Before start 18 ページ 2016年5月30日 > Hookup 月曜日 午後3時27分 > Setup > Playback > Part Names Step5: Multi-zone Connection ZONE 2 TV You can enjoy content from a Blu-ray Disc player on a TV equipped with an HDMI input jack in the separate room (ZONE 2) by playing a Blu-ray Disc player in the main room (where this unit is located), or play the content from another AV component.
SN29402396_SC-LX801_701_BAS_En.book > Before start 19 ページ 2016年5月30日 > Hookup 月曜日 午後3時27分 > Setup > Playback > Part Names ZONE 2 PRE/LINE OUT / ZONE 2 SPEAKER En You can enjoy audio in the separate room by, for example, playing a Blu-ray Disc player in the main room (where this unit is located) and listening to internet radio in the separate room (ZONE 2). Connections with an AV component Connect with HDMI IN 1 to 5 if you want to output an external AV component to ZONE 2.
SN29402396_SC-LX801_701_BAS_En.book > Before start 20 ページ 2016年5月30日 > Hookup 月曜日 午後3時27分 > Setup > Playback > Part Names ZONE 3 PRE/LINE OUT / ZONE 3 SPEAKER Along with the main room and ZONE 2, you can also enjoy audio in yet another room (ZONE 3). Connections with an AV component To output the audio of an external AV component to ZONE 3, connect using an analog audio cable. Output to ZONE 3 is not possible when you connect with an HDMI cable or digital optical/coaxial cable.
SN29402396_SC-LX801_701_BAS_En.book > Before start 21 ページ 2016年5月30日 > Hookup 月曜日 午後3時27分 > Setup > Playback > Part Names Step6: Connect Other Cables (North American models) Antenna Hookup Move the antenna around while playing the radio to find the position with the best reception. Use a thumb tack or similar to attach the indoor FM antenna to a wall. (European and Asian models) En Network Hookup Connect this unit to the network using wired LAN or Wi-Fi (wireless LAN).
SN29402396_SC-LX801_701_BAS_En.book > Before start 22 ページ 2016年5月30日 > Hookup 月曜日 午後3時27分 > Setup > Playback > Part Names Step7: Power On & Initial Setup 1. Full Auto MCACC Place the supplied speaker setup microphone in the listening position, measure the test tones emitted by the speakers, then the unit automatically sets the optimum volume level for each speaker, the crossover frequencies, and the distance from the listening position.
SN29402396_SC-LX801_701_BAS_En.book 23 ページ > Before start 2016年5月30日 > Hookup 月曜日 午後3時27分 > Setup > Playback > Part Names HDMI Setup 2. Source Connection Check that each input source is connected correctly. Follow the guidance, select the input you want to confirm, start play of the selected player, and confirm that the images appear on the TV and that sound is played. 3. Network Connection Set up Wi-Fi connection with an access point such as a wireless LAN router.
SN29402396_SC-LX801_701_BAS_En.book 24 ページ > Before start 2016年5月30日 > Hookup 月曜日 午後3時27分 > Setup > Playback > Part Names Basic Playback AV Component Playback a f b e d c 1. Switch the input on the TV to that assigned to the unit. 2. Press the input selector (a) on the remote controller with the same name as the jack to which you connected the player to switch the input. For example, press BD/DVD to play the player connected to the BD/DVD jack. 0 Press TV to listen the TV's sound.
SN29402396_SC-LX801_701_BAS_En.book > Before start 25 ページ 2016年5月30日 > Hookup 月曜日 午後3時27分 > Setup > Playback > Part Names Network Functions Network Services 1. Switch the input on the TV to that assigned to the unit. 2. Press NET to display the network service list screen. Player 11 or 12 network servers or NAS that are compatible with home network functionality. You may need to make some settings in advance to use Windows Media® Player 11 or 12.
SN29402396_SC-LX801_701_BAS_En.book > Before start iPhone 26 ページ 2016年5月30日 > Hookup 月曜日 午後3時27分 > Setup > Playback AirPlay BLUETOOTH® Playback You can wirelessly enjoy the music files on an iPhone®, iPod touch®, or iPad® connected to the same access point as this unit. 0 Update the OS version on your iOS device to the latest version. 1. Connect the iOS device to the access point. 2. Press NET. 3.
SN29402396_SC-LX801_701_BAS_En.book > Before start 27 ページ 2016年5月30日 > Hookup 月曜日 午後3時27分 > Setup > Playback > Part Names Others Listening To the Radio a b c d e Multi-zone e 1. Press TUNER (a) on the remote controller repeatedly to select either "AM" or "FM" on the display. 2. Press MODE (c) on the remote controller, so that the "TunMode: Auto" is displayed on the display. 3.
SN29402396_SC-LX801_701_BAS_En.book > Before start 28 ページ 2016年5月30日 > Hookup "USB" input selector. 4. To adjust the volume on the power amplifier in the separate room or the ZONE speaker, adjust with VOL+/– on the remote controller. To control on the main unit, press ZONE CONTROL several times to display either "Z2" or "Z3" in the display, and within 8 seconds, adjust with the MASTER VOLUME dial. 0 The information for a connected device can be displayed on the TV screen in a separate room.
SN29402396_SC-LX801_701_BAS_En.book > Before start 29 ページ 2016年5月30日 > Hookup 月曜日 午後3時27分 > Setup > Playback > Part Names Home When the unit is operating erratically When the subwoofer produces no sound When you press on the remote controller, the Home is displayed and you can make settings in the various menus. Select the item with the cursors of the remote controller and press ENTER to confirm your selection. To return to the previous screen, press .
SN29402396_SC-LX801_701_BAS_En.book > Before start 30 ページ 2016年5月30日 > Hookup 月曜日 午後3時27分 > Setup > Playback > Part Names Front Panel 1 2 3 4 5 6 7 8 9 10 11 12 13 14 27 15 16 1. INPUT SELECTOR dial: Switch the input to be played. 2. MCACC PRO indicator: This lights when you have enabled the speaker calibration made with MCACC. 3. FL OFF indicator: This lights when you have pressed DIMMER repeatedly to turn the display off. 4. INFO button: Switches the information on the display. 5.
SN29402396_SC-LX801_701_BAS_En.book > Before start 31 ページ 2016年5月30日 > Hookup 月曜日 午後3時27分 > Setup > Playback > Part Names Rear Panel SC-LX801 1 3 2 4 5 6 7 8 9 10 11 En 10 12 13 14 15 1. COMPONENT VIDEO IN/OUT jacks: Transfer the video signals of an AV component with a component video cable. 2. ZONE 2/ZONE 3 PRE/LINE OUT jacks: Output audio signals with an analog audio cable to a pre-main amplifier or a power amplifier in a separate room (ZONE 2/ZONE 3). (P19, 20) 3.
SN29402396_SC-LX801_701_BAS_En.book > Before start SC-LX701 32 ページ 2016年5月30日 > Hookup 1 月曜日 午後3時27分 > Setup 3 2 4 > Playback 5 6 7 > Part Names 8 9 10 11 10 12 13 14 15 1. COMPONENT VIDEO IN/OUT jacks: Transfer the video signals of an AV component with a component video cable. 2. ZONE 2/ZONE 3 PRE/LINE OUT jacks: Output audio signals with an analog audio cable to a pre-main amplifier or a power amplifier in a separate room (ZONE 2/ZONE 3). (P19, 20) 3.
SN29402396_SC-LX801_701_BAS_En.book > Before start 33 ページ 2016年5月30日 > Hookup 月曜日 午後3時27分 > Setup > Playback Remote Controller 1 2 3 4 12 5 6 13 7 8 Display 1. Í button: Turns the unit on or into standby mode. 2. Input selector buttons: Select the input to be played. Use the buttons in 3 to select "STRM BOX", "AUX", or "PHONO". 3. 21 buttons: Input source played switches each time you press one of these buttons. 4. (AV ADJUST) button: You can perform common settings on the TV screen.
SN29402396_SC-LX801_701_BAS_En.book 34 ページ 2016年5月30日 月曜日 午後3時27分 License and Trademark Information “Alle andere handelsmerken zijn eigendom van de desbetreffende rechthebbenden.” PANDORA, the PANDORA logo, and the Pandora trade dress are trademarks or registered trademarks of Pandora Media, Inc. Used with permission. Manufactured under license from Dolby Laboratories. Dolby, Dolby Atmos, Dolby Surround and the double-D symbol are trademarks of Dolby Laboratories.
SN29402396_SC-LX801_701_BAS_En.book 35 ページ 2016年5月30日 月曜日 午後3時27分 DISCLAIMER Through this device you are able to link to other services or websites which are not under the control of any company which has designed, manufactured or distributed/have distributed this device, and its affiliates (collectively, “Company”). We have no control over the nature, content and availability of those services.
SN29402396_SC-LX801_701_BAS_En.
SN29402396_SC-LX801_701_BAS_Fr.book 1 ページ > Avant de démarrer 2016年5月30日 月曜日 午後3時51分 > Raccordement > Configuration Mode d'Emploi Base SC-LX801 SC-LX701 RECEPTEUR AV > Lecture > Nom des pièces Fr Raccordement Étape 1 : Disposition d’enceinte ............................................. 3 Étape 2 : Raccordez les enceintes ....................................... 10 Étape 3 : Raccordez le téléviseur ......................................... 12 Étape 4 : Raccordez les appareils AV ..................
SN29402396_SC-LX801_701_BAS_Fr.book 2 ページ > Avant de démarrer 2016年5月30日 月曜日 午後3時51分 > Raccordement > Configuration > Lecture > Nom des pièces Ce que contient la boîte 1. Appareil principal 2. Télécommande (RC-927R) ×1, Piles (AAA/R03) ×2 3. Antenne FM d'intérieur ×1 4. Antenne cadre AM ×1 5. Microphone de configuration d'enceinte ×1 6. Cordon d'alimentation ×1 Lexique Dolby Atmos Cet appareil prend en charge la lecture du format Dolby Atmos lequel fournit un placement sonore à 360e.
SN29402396_SC-LX801_701_BAS_Fr.book 3 ページ 2016年5月30日 > Avant de démarrer 月曜日 午後3時51分 > Raccordement > Configuration > Lecture > Nom des pièces Étape 1 : Disposition d’enceinte Système 7.1 *1 *2 *3 Les enceintes avant reproduisent le son stéréo avant et l'enceinte centrale reproduit le son central comme les dialogues et les voix. Les enceintes surround produisent un champ sonore arrière.
SN29402396_SC-LX801_701_BAS_Fr.book 4 ページ > Avant de démarrer 2016年5月30日 月曜日 午後3時51分 > Raccordement > Configuration > Lecture > Nom des pièces Enceintes en hauteur; Enceintes en hauteur avant / Enceintes en hauteur arrière Celles-ci sont des types d'enceintes en hauteur. De plus, en installant des enceintes en hauteur, vous pouvez sélectionner le mode d'écoute Dolby Atmos, qui crée le son en 3D le plus actuel en incluant des sons au-dessus de la tête, lorsque le format d’entrée est Dolby Atmos.
SN29402396_SC-LX801_701_BAS_Fr.book 5 ページ 2016年5月30日 > Avant de démarrer 月曜日 午後3時51分 > Raccordement > Configuration > Lecture > Nom des pièces Enceintes en hauteur; Enceintes pour plafond *3 *2 *1 Celles-ci sont des types d'enceintes en hauteur. De plus, en installant des enceintes en hauteur, vous pouvez sélectionner le mode d'écoute Dolby Atmos, qui crée le son en 3D le plus actuel en incluant des sons au-dessus de la tête, lorsque le format d’entrée est Dolby Atmos.
SN29402396_SC-LX801_701_BAS_Fr.book 6 ページ > Avant de démarrer 2016年5月30日 月曜日 午後3時51分 > Raccordement > Configuration > Lecture > Nom des pièces Enceintes en hauteur; Enceintes activées Dolby (Enceintes Dolby) *1 *2 * 1: 22e à 30e, * 2: 90e à 120e, * 3: 135e à 150e 9 : Enceintes en hauteur $ Enceintes activées Dolby (Avant) $ Enceintes activées Dolby (Surround) $ Enceintes activées Dolby (Surround arriere) 6 *3 Celles-ci sont des types d'enceintes en hauteur.
SN29402396_SC-LX801_701_BAS_Fr.book 7 ページ 2016年5月30日 > Avant de démarrer 月曜日 午後3時51分 > Raccordement > Configuration > Lecture > Nom des pièces Systeme d'Enceinte B Speaker B Speaker B Outre le système d'enceintes principal (Système d'enceintes A), vous pouvez raccorder un autre système d'enceintes avant qui sera le Système d'enceintes B. Lorsque vous faites cela, vous pouvez faire en sorte que le même son soit reproduit par A, B, ou A+B. Commutez avec "Speakers" dans AV Adjust (P28).
SN29402396_SC-LX801_701_BAS_Fr.
SN29402396_SC-LX801_701_BAS_Fr.book 9 ページ 2016年5月30日 > Avant de démarrer 月曜日 午後3時51分 > Raccordement > Configuration > Lecture > Nom des pièces Combinaisons d’enceintes Avec chacune des combinaisons, il est possible de raccorder jusqu'à deux caissons de basse sous tension. Canaux d’enceinte FRONT CENTER SURROUND SURROUND BACK HEIGHT 1 HEIGHT 2 SP B * 1 (Enceinte B) Bi-AMP * 1 ZONE 2 * 1 (P19) *2 FRONT 3.1 ch *2 FRONT, FRONT/CENTER 4.1 ch *2 FRONT, FRONT/SURROUND 5.
SN29402396_SC-LX801_701_BAS_Fr.book 10 ページ > Avant de démarrer 2016年5月30日 月曜日 午後3時51分 > Raccordement > Configuration > Lecture > Nom des pièces Étape 2 : Raccordez les enceintes Raccordements de base Référez-vous à l'illustration pour raccorder le système d'enceintes. 2 * En fonction des combinaisons d'enceintes, vous aurez besoin de raccorder d'autres prises. Voir "Points à noter avec les combinaisons d'enceintes" (P9) pour avoir plus de détails.
SN29402396_SC-LX801_701_BAS_Fr.
SN29402396_SC-LX801_701_BAS_Fr.book 12 ページ > Avant de démarrer 2016年5月30日 月曜日 午後3時51分 > Raccordement > Configuration > Lecture > Nom des pièces Étape 3 : Raccordez le téléviseur TV-1 (ARC TV) Ceci décrit les raccordements d'un téléviseur qui prend en charge la fonctionnalité ARC (Audio Return Channel). En raccordant un seul câble HDMI, vous pouvez non seulement reproduire la vidéo entrant dans cet appareil vers le téléviseur, mais vous pouvez également lire le son du téléviseur via cet appareil.
SN29402396_SC-LX801_701_BAS_Fr.book 13 ページ > Avant de démarrer 2016年5月30日 月曜日 午後3時51分 > Raccordement > Configuration > Lecture > Nom des pièces TV-2 (Non-ARC TV) Ceci décrit les raccordements d'un téléviseur qui ne prend pas en charge la fonctionnalité ARC (Audio Return Channel).
SN29402396_SC-LX801_701_BAS_Fr.book 14 ページ 2016年5月30日 > Avant de démarrer 月曜日 午後3時51分 > Raccordement > Configuration > Lecture > Nom des pièces Étape 4 : Raccordez les appareils AV Des appareils AV HDMI Il s'agit d'un exemple de raccordement avec un appareil AV possédant une prise HDMI.
SN29402396_SC-LX801_701_BAS_Fr.book 15 ページ > Avant de démarrer 2016年5月30日 月曜日 午後3時51分 > Raccordement > Configuration > Lecture > Nom des pièces Des appareils AV non HDMI 1 3 OR BD/DVD 1 Câble vidéo composante, 2 Câble coaxial numérique, 3 Câble audio analogique 2 Il s'agit d'un exemple de raccordement avec un appareil AV ne possédant pas de prise HDMI. Effectuez les raccordements de l'appareil AV en fonction des prises qu'il possède.
SN29402396_SC-LX801_701_BAS_Fr.book 16 ページ > Avant de démarrer 2016年5月30日 月曜日 午後3時51分 > Raccordement > Configuration > Lecture > Nom des pièces Des appareils audio Exemple de raccordement avec un appareil audio. Raccordez un lecteur CD à l'aide d'un câble optonumérique ou d'un câble audio analogique. Vous pouvez également raccorder une platine disque possédant une cartouche de type MM à la prise PHONO.
SN29402396_SC-LX801_701_BAS_Fr.book 17 ページ 2016年5月30日 > Avant de démarrer 月曜日 午後3時51分 > Raccordement > Configuration > Lecture > Nom des pièces Moniteur vidéo composante Utilisez un câble de vidéo composante pour raccorder un téléviseur ou un projecteur qui possède des entrées vidéo composante plutôt qu'une entrée HDMI. Pour reproduire la vidéo par les prises COMPONENT VIDEO OUT, vous devez raccorder les appareils AV externes à l'aide d'un câble vidéo composante. Fr 1 BD/DVD Projecteur, etc.
SN29402396_SC-LX801_701_BAS_Fr.book 18 ページ > Avant de démarrer 2016年5月30日 月曜日 午後3時51分 > Raccordement > Configuration > Lecture > Nom des pièces Étape 5 : Raccordement multizone ZONE 2 TV MAIN ROOM ZONE2 1 TV 18 1 Câble HDMI Vous pouvez voir le contenu provenant d'un lecteur de Blu-ray Disc situé dans la pièce principale (là où cet appareil est situé) sur un téléviseur équipé d'une entrée HDMI situé dans une pièce différente (ZONE 2) ou lire le contenu provenant d'un autre appareil AV.
SN29402396_SC-LX801_701_BAS_Fr.book 19 ページ 2016年5月30日 > Avant de démarrer 月曜日 午後3時51分 > Raccordement > Configuration > Lecture > Nom des pièces ZONE 2 PRE/LINE OUT / ZONE 2 SPEAKER Vous pouvez écouter le son dans une pièce différente, par exemple, en faisant jouer un lecteur de Blu-ray Disc dans la pièce principale (là où cet appareil est situé) et en écoutant la radio Internet dans une autre pièce (ZONE 2).
SN29402396_SC-LX801_701_BAS_Fr.book 20 ページ 2016年5月30日 > Avant de démarrer 月曜日 午後3時51分 > Raccordement > Configuration > Lecture > Nom des pièces ZONE 3 PRE/LINE OUT / ZONE 3 SPEAKER En même temps que dans la pièce principale et la ZONE 2, vous pouvez également profiter du son dans une autre pièce supplémentaire (ZONE 3). Raccordements avec un appareil AV Pour reproduire le son d'un appareil AV externe vers la ZONE 3, raccordez en utilisant un câble audio analogique.
SN29402396_SC-LX801_701_BAS_Fr.book 21 ページ > Avant de démarrer 2016年5月30日 月曜日 午後3時51分 > Raccordement > Configuration > Lecture > Nom des pièces Étape 6 : Raccordement d'autres câbles (Modèles nordaméricains) Raccordement de l'antenne Déplacez l'antenne tout en écoutant la radio pour trouver la meilleure position de réception. Utilisez une punaise ou quelque chose de similaire pour accrocher le fil de l'antenne FM intérieure au mur.
SN29402396_SC-LX801_701_BAS_Fr.book 22 ページ > Avant de démarrer 2016年5月30日 月曜日 午後3時51分 > Raccordement > Configuration > Lecture > Nom des pièces Étape 7 : Mise sous tension & Configuration initiale 1.
SN29402396_SC-LX801_701_BAS_Fr.book 23 ページ > Avant de démarrer 2016年5月30日 月曜日 午後3時51分 > Raccordement > Configuration > Lecture > Nom des pièces Configuration HDMI 2. Connexion de la source Vérifiez que chaque source d'entrée est correctement raccordée. Suivez le guide, sélectionnez l'entrée que vous désirez vérifier, démarrez la lecture sur le lecteur sélectionné, et vérifiez que les images apparaissent sur le téléviseur et que le son est lu. 3.
SN29402396_SC-LX801_701_BAS_Fr.book 24 ページ > Avant de démarrer 2016年5月30日 月曜日 午後3時51分 > Raccordement > Configuration > Lecture > Nom des pièces Lecture de base Lecture d'un appareil AV a f b e d c 1. Réglez l'entrée du téléviseur sur celle assignée à l'appareil. 2. Appuyez sur le sélecteur d'entrée (a) de la télécommande portant le même nom que la prise à laquelle vous avez raccordé le lecteur pour changer l'entrée.
SN29402396_SC-LX801_701_BAS_Fr.book 25 ページ > Avant de démarrer 2016年5月30日 月曜日 午後3時51分 > Raccordement > Configuration > Lecture > Nom des pièces Fonctions réseau Services réseau 1. Réglez l'entrée du téléviseur sur celle assignée à l'appareil. 2. Appuyez sur NET pour afficher l'écran de la liste des services réseau. pour lancer la lecture. La lecture démarre lorsque le tampon affiche 100%.
SN29402396_SC-LX801_701_BAS_Fr.book 26 ページ > Avant de démarrer iPhone 2016年5月30日 月曜日 午後3時51分 > Raccordement > Configuration > Nom des pièces AirPlay Lecture BLUETOOTH® Vous pouvez profiter à distance des fichiers musicaux présents sur un iPhone®, iPod touch®, ou un iPad® connecté au même point d'accès que cet appareil. 0 Mettez à jour la version OS de votre périphérique iOS. 1. Connectez le dispositif iOS au point d'accès. 2. Appuyez sur NET. 3.
SN29402396_SC-LX801_701_BAS_Fr.book 27 ページ > Avant de démarrer 2016年5月30日 月曜日 午後3時51分 > Raccordement > Configuration > Lecture > Nom des pièces Autres Écoute de la radio a b c d e Multizone e 1. Appuyez plusieurs fois sur la touche TUNER (a) de la télécommande pour sélectionner “AM” ou “FM” sur l'afficheur. 2. Appuyez sur la touche MODE (c) de la télécommande pour que "TunMode: Auto" soit visualisé sur l'afficheur. 3.
SN29402396_SC-LX801_701_BAS_Fr.book 28 ページ > Avant de démarrer 2016年5月30日 午後3時51分 > Raccordement principale et vous sélectionnez "USB" dans l'autre pièce, la pièce principale passe à "USB". Vous ne pouvez pas sélectionner de stations différentes pour la pièce principale et l'autre pièce avec la radio AM/FM. 0 Les signaux audio DSD et Dolby TrueHD ne sont pas reproduits vers la ZONE 2/ZONE 3 si sélectionnés avec le sélecteur d'entrée "NET", "USB". 4.
SN29402396_SC-LX801_701_BAS_Fr.book 29 ページ > Avant de démarrer 2016年5月30日 月曜日 午後3時51分 > Raccordement Home Si vous appuyez sur sur la télécommande, le Home s’affiche et vous pouvez effectuer les réglages dans les divers menus. Sélectionnez l'élément grâce aux curseurs de la télécommande et appuyez sur ENTER pour confirmer votre sélection. Pour retourner à l'écran précédent, appuyez sur . "System Setup": Paramètres avancés pour vous fournir une expérience encore meilleure.
SN29402396_SC-LX801_701_BAS_Fr.book 30 ページ > Avant de démarrer 2016年5月30日 月曜日 午後3時51分 > Raccordement > Configuration > Lecture > Nom des pièces Panneau frontal 1 2 3 4 5 6 7 8 9 10 11 12 13 14 27 15 16 1. Molette INPUT SELECTOR : Change l'entrée à lire. 2. Témoin MCACC PRO : Il s'allume quand vous avez activé le mode de réglage d'enceinte par MCACC. 3. Témoin FL OFF : Il s'allume quand vous avez appuyé sur DIMMER plusieurs fois pour éteindre l'écran. 4.
SN29402396_SC-LX801_701_BAS_Fr.book 31 ページ 2016年5月30日 > Avant de démarrer 月曜日 午後3時51分 > Raccordement > Configuration > Lecture > Nom des pièces Panneau arrière SC-LX801 1 3 2 4 5 6 7 8 9 10 11 Fr 10 12 13 14 15 1. Prises COMPONENT VIDEO IN/OUT : Transfère les signaux vidéo provenant d'un appareil AV avec un câble vidéo composante. 2.
SN29402396_SC-LX801_701_BAS_Fr.book 32 ページ > Avant de démarrer SC-LX701 1 2016年5月30日 月曜日 午後3時51分 > Raccordement 3 2 4 5 > Configuration 6 7 8 > Lecture 9 10 > Nom des pièces 11 10 12 13 14 15 1. Prises COMPONENT VIDEO IN/OUT : Transfère les signaux vidéo provenant d'un appareil AV avec un câble vidéo composante. 2.
SN29402396_SC-LX801_701_BAS_Fr.book 33 ページ > Avant de démarrer 2016年5月30日 月曜日 午後3時51分 > Raccordement > Configuration Télécommande 2 3 12 5 6 13 7 8 9 1. Touche Í : Permet la mise en marche ou en veille de l'appareil. 2. Sélecteurs d'entrée : Sélectionnez l'entrée à lire. Utilisez les touches du point 3 pour sélectionner "STRM BOX", "AUX", ou "PHONO". 3. Touches 21 : La source d’entrée lue change chaque fois que vous appuyez sur l’une de ces touches. 4.
SN29402396_SC-LX801_701_BAS_Fr.book 34 ページ 2016年5月30日 月曜日 午後3時51分 Informations relatives à la licence et à la marque commerciale “El resto de marcas comerciales son propiedad de sus respectivos propietarios”. “Tutti gli altri marchi di fabbrica sono di proprietà dei rispettivi proprietari.” The Bluetooth® word mark and logos are registered trademarks owned by the Bluetooth SIG, Inc. “Alle anderen Warenzeichen sind das Eigentum ihrer jeweiligen Eigentümer.
SN29402396_SC-LX801_701_BAS_Fr.book 35 ページ 2016年5月30日 月曜日 午後3時51分 AVERTISSEMENT Par l'intermédiaire de cet appareil, vous avez la possibilité de vous connectez vers d'autres services ou sites internet qui échappent au contrôle de toute société, qui a conçu, fabriqué ou distribué cet appareil ainsi que ses filiales (collectivement, “Société”). Il n'y a pas de contrôle sur la nature, le contenu et la disponibilité de ces services.
SN29402396_SC-LX801_701_BAS_Fr.book 36 ページ 2016年5月30日 月曜日 午後3時51分 2-3-12 Yaesu, Chuo-ku, Tokyo 104-0028 JAPAN 18 PARK WAY, UPPER SADDLE RIVER, NEW JERSEY 07458, U.S.A.