> Before Start > Part Names > Install > Initial Setup > Playback Advanced Setup | Firmware Update | Others NETWORK STEREO RECEIVER SX-S30DAB Instruction Manual Before Start What's in the box .................................................................... 2 Part Names Front Panel ............................................................................. 3 Rear Panel .............................................................................. 4 Remote Controller ..............................
> Before Start > Part Names > Install > Initial Setup > Playback Advanced Setup | Firmware Update | Others What's in the box Before Start E N Main unit (1) Remote controller (RC-933R) (1), batteries (AAA/R03) (2) Speaker setup microphone (1) DAB/FM antenna (1) 2 0 Connect speakers with 4 Ω to 8 Ω impedance. 0 The power cord must be connected only after all other cable connections are completed.
> Before Start > Part Names > Install > Initial Setup > Playback Advanced Setup | Firmware Update | Others Front Panel Part Names 1. Í STANDBY/ON button: Turns the unit on or into standby mode. 2. DIRECT button: This switches the unit to the "Direct" mode (ÄP27) which shuts down processing that affects sound quality, so sound closer to the original is reproduced. Press again to cancel. DIRECT indicator: This lights when the listening mode is "Direct" or "Pure Direct".
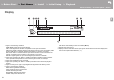
> Before Start > Part Names > Install > Initial Setup > Playback Advanced Setup | Firmware Update | Others Rear Panel E N 90° 180° 1. ANTENNA DAB / FM jack: Connect the supplied antenna. 2. Wireless antenna: Raise for Wi-Fi connection or when using a BLUETOOTH enabled device. The diagram shows the movable range for the wireless antenna. Do not try to force it beyond this range otherwise you may break it. 3.
> Before Start > Part Names > Install > Initial Setup > Playback Advanced Setup | Firmware Update | Others Remote Controller 1. Í button: Turns the unit on or into standby mode. 2. Input selector buttons: Switches the input to be played. 3. (AV ADJUST) button: You can perform common settings on the TV screen. (ÄP29) 4. Cursors, ENTER button: Select the item with the cursors and press ENTER to confirm. 5. button: Displays the Home. 6. Volume buttons: Allows you to adjust the volume.
> Before Start > Part Names > Install > Initial Setup > Playback Advanced Setup | Firmware Update | Others Display Neo:6 1. Lights in the following conditions. HDMI: HDMI signals are input and selected. ARC: Audio signals from the ARC compatible TV are input and selected. USB: When "USB" is selected with the input selector and the unit is connected by USB and the USB device is selected. Flashes if the USB is not properly connected.
> Before Start > Part Names > Install > Initial Setup > Playback Advanced Setup | Firmware Update | Others 1. Connect the Speakers Install 1 1 2 Refer to the illustration to connect the speaker system. Twist the wires of the speaker cable tightly before inserting into the SPEAKERS terminals. After inserting the cables, tighten the terminals firmly by turning to the right. Make correct connection between the unit’s jacks and speaker’s jacks (+ to + and – to –) for each channel.
> Before Start > Part Names > Install > Initial Setup > Playback Advanced Setup | Firmware Update | Others 2. Connect the TV To ARC TV 1 For a TV that supports the ARC (Audio Return Channel) (ÄP55) feature, use an HDMI cable and connect according to illustration "a". Choose an HDMI IN jack on the TV that supports ARC when connecting.
> Before Start > Part Names > Install > Initial Setup > Playback Advanced Setup | Firmware Update | Others 3. Connect the HDMI AV Components E N 1 a a BD/DVD HDMI OUT e.g. BD Cable/Satellite set-top box This is an example of connection with an AV component that has an HDMI jack.
> Before Start > Part Names > Install > Initial Setup > Playback Advanced Setup | Firmware Update | Others 4. Connect the Audio Components Connecting a CD player Use a digital coaxial cable to connect a CD player to the DIGITAL IN COAXIAL jack. Connecting a turntable You can also connect a turntable that has an MM-type cartridge to the PHONO jack. 0 If the turntable has a built-in audio equalizer, connect it to an AUDIO IN jack other than the PHONO jack.
> Before Start > Part Names > Install > Initial Setup > Playback Advanced Setup | Firmware Update | Others 5. Connect Other Cables 1 Antenna Hookup 2 Network Hookup a b 3 E N Connect the supplied DAB/FM antenna to the ANTENNA DAB/FM terminal. Make sure the plug is pushed in all the way, then fix in place by turning the nut to the right. Use a tack or similar to fix the antenna to a wall. Connect this unit to the network using wired LAN or Wi-Fi (wireless LAN).
> Before Start > Part Names > Install > Initial Setup > Playback Advanced Setup | Firmware Update | Others Initial Setup with Auto Start-up Wizard Initial Setup 1 2 Initial Setup starts automatically 1. Switch the input on the TV to that assigned to the unit. 2. Put batteries into the remote controller of this unit. 3. Press Í on the remote controller.
> Before Start > Part Names > Install > Initial Setup > Playback Advanced Setup | Firmware Update | Others 1. Full Auto MCACC Place the supplied speaker setup microphone in the listening position, measure the test tones emitted by the speakers, then the unit automatically sets the optimum volume level for each speaker, the crossover frequencies, and the distance from the listening position.
> Before Start > Part Names > Install > Initial Setup > Playback Advanced Setup | Firmware Update | Others button on the remote controller and press ENTER, then follow the on-screen instructions. Wi-Fi Setup Ðáóó÷ïòä a b c d e f g h i j k l m n o p q r s t u v w x y z 1 2 3 4 5 6 7 8 9 0 - ^ \ , . / ; : @ [ ] A/a OK When finished, select the "OK" key.
> Before Start > Part Names > Install > Initial Setup > Playback Advanced Setup | Firmware Update | Others AV Component Playback Playback Basic operations E N Play an AV component or TV connected to this unit with an HDMI cable or other cable. 1. Switch the input on the TV to that assigned to the unit. 2. Press the input selector (a) on the remote controller with the same name as the jack to which you connected the player to switch the input.
> Before Start > Part Names > Install > Initial Setup > Playback Advanced Setup | Firmware Update | Others Internet Radio Basic operations 1 When this unit is connected to a network, you can listen to TuneIn or other preregistered Internet radio services. Depending on the internet radio service, the user may need to register from their computer first. 1. Switch the input on the TV to that assigned to the unit. 2. Press NET on the remote controller. a 3.
> Before Start > Part Names > Install > Initial Setup > Playback Advanced Setup | Firmware Update | Others Spotify Basic operations 1 Wi-Fi 2 a b 3 c d e 4 Pioneer SX-S30DAB XXX E N Spotify Connect play is possible by connecting this unit to the same network as a smart phone or tablet. To enable Spotify Connect, install the Spotify application on your smartphone or tablet and create a Spotify premium account. 1. Connect the smartphone to the network that this unit is connected to. 2.
> Before Start > Part Names > Install > Initial Setup > Playback Advanced Setup | Firmware Update | Others Music Server It is possible to stream music files stored on PCs or NAS devices connected to the same network as this unit. The network servers this unit is compatible with are those PCs with players installed that have the server functionality of Windows Media® Player 11 or 12, or NAS that are compatible with home network functionality.
> Before Start > Part Names > Install > Initial Setup > Playback Advanced Setup | Firmware Update | Others 0 For music files on a server, there can be up to 20,000 tracks per folder, and folders may be nested up to 16 levels deep. The following remote controller operations are also possible. (a) When the folder or file lists are not shown on one screen, you can change the screen. (c) Pressed during play, this button changes the displayed track information.
> Before Start > Part Names > Install > Initial Setup > Playback Advanced Setup | Firmware Update | Others USB Storage Device Basic play 1 Play music files on a USB storage device. 1. Switch the input on the TV to that assigned to the unit. 2. Plug your USB storage device with the music files into the USB port on the front of this unit. 3. Press "USB" on the remote controller. 0 If the "USB" indicator flashes on the display, check whether the USB storage device is plugged in properly.
> Before Start > Part Names > Install > Initial Setup > Playback Advanced Setup | Firmware Update | Others USB Storage Device Requirements 0 Note that operation is not guaranteed with all USB storage devices. 0 This unit can use USB storage devices that comply with the USB mass storage device class standard. The unit is also compatible with USB storage devices using the FAT16 or FAT32 file system formats.
> Before Start > Part Names > Install > Initial Setup > Playback Advanced Setup | Firmware Update | Others AirPlay® 1 Basic play 3 Wi-Fi 4 2 iPhone Pioneer SX-S30DAB XXX 5 22 You can wirelessly enjoy the music files on an iPhone®, iPod touch®, or iPad® connected to the same access point as this unit. 0 Update the OS version on your iOS device to the latest version. 1. Connect the iOS device to the access point. 2. Press NET. 3.
> Before Start > Part Names > Install > Initial Setup > Playback Advanced Setup | Firmware Update | Others BLUETOOTH® Playback Pairing Pairing Playing Back 1 1 Pioneer SX-S30DAB 2 2 E N 1. When you press the button on the remote controller, "Now Pairing..." is displayed on this unit's display, and the pairing mode is enabled. 2. Enable (turn on) the BLUETOOTH function of the BLUETOOTH enabled device, then select this unit from amongst the devices displayed.
> Before Start > Part Names > Install > Initial Setup > Playback Advanced Setup | Firmware Update | Others Listening to the FM/DAB Radio 1 Listening to FM Radio Using RDS Tuning Automatically RDS stands for Radio Data System and is a method of transmitting data in FM radio signals. In regions using RDS, the radio station name is displayed when you tune into a radio station broadcasting program information.
> Before Start > Part Names > Install > Initial Setup > Playback Advanced Setup | Firmware Update | Others Easy M (Middle of the road music) Light M (Light classics) Classics (Serious classics) Other M (Other music) Weather Finance Children (Children's programmes) Social (Social affairs) Religion Phone In Travel Leisure Jazz (Jazz music) Country (Country music) Nation M (National music) Oldies (Oldies music) Folk M (Folk music) Document (Documentary) 0 The information displayed may sometimes not match
> Before Start > Part Names > Install > Initial Setup > Playback Advanced Setup | Firmware Update | Others Presetting a Radio Station It allows you to register up to 40 of your favorite FM/DAB stations. Registering radio stations in advance allows you to tune into your radio station of choice directly. 1. Tune into the radio station you want to register. 2. Press +Fav (d) on the remote controller so that the preset number on the display flashes. 3.
> Before Start > Part Names > Install > Initial Setup > Playback Advanced Setup | Firmware Update | Others Listening Modes Selecting Listening Modes You can change the listening mode during play by pressing repeatedly "AUTO/DIRECT" or "SURR". The listening mode last selected for the source is remembered for each of the AUTO/DIRECT and SURR buttons.
> Before Start > Part Names > Install > Initial Setup > Playback Advanced Setup | Firmware Update | Others 0 Listening modes available when headphones are connected are: Stereo only. How to Check Listening Modes and Other Information Press (a) repeatedly to switch the display of the main unit in order of: Input source & volume Listening mode Signal format The display changes few seconds later.
> Before Start > Part Names > Install > Initial Setup > Playback Advanced Setup | Firmware Update | Others AV Adjust 1 By pressing the button on the remote controller during play, you can adjust frequently used settings, such as the sound quality, using on-screen menus. Note that there is no display on the TV screen when the input selector is "CD", "TV", "PHONO", or "TUNER", so follow the display while doing the operations. 1. Press on the remote controller. 2.
> Before Start > Part Names > Install > Initial Setup > Playback Advanced Setup | Firmware Update | Others need to reduce the volume while watching a movie late night. You can enjoy the effect only when playing Dolby series and DTS series input signals. 0 It cannot be set if the listening mode is Direct or Pure Direct. 0 The setting cannot be used in the following cases.
> Before Start > Part Names > Install > Initial Setup > Playback Advanced Setup | Firmware Update | Others System Setup Advanced Setup 1 2 TV's remote controller The unit allows you to configure advanced settings to provide you with an even better experience. 1. Switch the input on the TV to that assigned to the unit. 2. Press on the remote controller to display the Home screen, then select System Setup with the cursors on the remote controller and press ENTER. E N 3.
> Before Start > Part Names > Install > Initial Setup > Playback Advanced Setup | Firmware Update | Others Impose OSD Screen Saver Set whether or not to display the information on the TV when the volume is adjusted or input is changed, for example. "On (Default Value)": OSD displayed on the TV "Off": OSD not displayed on the TV 0 OSD may not be displayed depending on the input signal even if "On" is selected. If the operation screen is not displayed, change the resolution of the connected device.
> Before Start > Part Names > Install > Initial Setup > Playback Advanced Setup | Firmware Update | Others TV "AUDIO 1" to "AUDIO 2": Assign a desired AUDIO IN jack to the TV input selector. (Default Value is "-----") Speaker E N You can make changes to the connection environment of the speakers and change the volume level. Settings are automatically configured if you use Full Auto MCACC.
> Before Start > Part Names > Install > Initial Setup > Playback Advanced Setup | Firmware Update | Others Double Bass This can be selected only when "Configuration" - "Subwoofer" is set to "Yes" and "Front" is set to "Large". Boost bass output by feeding bass sounds from the front left and right speakers to the subwoofer. "On": Bass output will be boosted "Off": Bass output will not be boosted 0 The setting will not automatically be configured even if you performed Full Auto MCACC.
> Before Start > Part Names > Install > Initial Setup > Playback Advanced Setup | Firmware Update | Others Audio Adjust Source ∫ Dual Mono/Mono ∫ Input Volume Absorber Dual Mono Mono Input Channel Set the audio channel or language to be output when playing multiplex audio or multilingual TV broadcasts etc. "Main (Default Value)": Main channel only "Sub": Sub channel only "Main / Sub": Main and sub channels will be output at the same time.
> Before Start > Part Names > Install > Initial Setup > Playback Advanced Setup | Firmware Update | Others ∫ Audio Select Fixed PCM Select the priority for input selection when multiple audio sources are connected to one input selector, such as connections to both the "BD/DVD" HDMI IN jack and the "BD/DVD" AUDIO IN jack. The setting can be separately set to each input selector button. Select the input selector to configure. Note that there are some default values you cannot change.
> Before Start > Part Names > Install > Initial Setup > Playback Advanced Setup | Firmware Update | Others Hardware HDMI Standby Through ∫ HDMI HDMI CEC Setting to "On" enables the input selection link and other link functions with HDMI connected CEC compliant device. "On": Use this function "Off (Default Value)": Do not use this function When changing this setting, turn off and then on again the power of all connected components.
> Before Start > Part Names > Install > Initial Setup > Playback Advanced Setup | Firmware Update | Others Audio TV Out 38 You can enjoy audio through the speakers of the TV while this unit is on. "On": Use this function "Off (Default Value)": Do not use this function 0 The setting is fixed to "Auto" if "HDMI CEC" is set to "On". If you change this setting, set "HDMI CEC" to "Off".
> Before Start > Part Names > Install > Initial Setup > Playback Advanced Setup | Firmware Update | Others Network Standby Bluetooth Wakeup When this feature is turned "On (Default Value)", you can turn on the power of the unit via the network using an application that can control this unit. 0 When "Network Standby" is used, the power consumption increases even when the unit is on standby.
> Before Start > Part Names > Install > Initial Setup > Playback Advanced Setup | Firmware Update | Others ∫ Initial Setup You can make the Initial Setup from the System Setup menu. 0 Wait for a while if "Initial Setup" cannot be selected. It will appear when the network feature is started. ∫ Lock Setup Parameter Lock the Setup menu to protect the settings. "Locked": The menu is locked. "Unlocked (Default Value)": The menu is unlocked.
> Before Start > Part Names > Install > Initial Setup > Playback Advanced Setup | Firmware Update | Others MCACC 1 2 TV's remote controller Setup the speakers automatically or make desired changes to the equalizer. You can also check the values set currently for each speaker setting. 1. Switch the input on the TV to that assigned to the unit. 2. Press on the remote controller to display the Home screen, then select MCACC with the cursors on the remote controller and press ENTER. E N 3.
> Before Start > Part Names > Install > Initial Setup > Playback Advanced Setup | Firmware Update | Others in "AV Adjust" - "MCACC" - "Manual EQ Select" (ÄP29). Front Left Front Right Subwoofer After selecting the speaker frequency from between "63 Hz" and "16 kHz" with the cursors w/x, adjust the volume of that frequency between "-12.0 dB" and "+12.0 dB" with y/z. (Default Value is "0.
> Before Start > Part Names > Install > Initial Setup > Playback Advanced Setup | Firmware Update | Others Network/Bluetooth 1 2 TV's remote controller Make settings related to network connections and BLUETOOTH. 1. Switch the input on the TV to that assigned to the unit. 2. Press on the remote controller to display the Home screen, then select Network/ Bluetooth with the cursors on the remote controller and press ENTER. E N 3.
> Before Start > Part Names > Install > Initial Setup > Playback Advanced Setup | Firmware Update | Others 44 MAC Address This is the MAC address of this unit. This value is specific to the component and cannot be changed. DHCP "Enable (Default Value)": Auto configuration by DHCP "Disable": Manual configuration without DHCP If selecting "Disable", you must set "IP Address", "Subnet Mask", "Gateway", and "DNS Server" manually. IP Address Displays/Sets the IP address.
> Before Start > Part Names > Install > Initial Setup > Playback Advanced Setup | Firmware Update | Others Bluetooth Status Bluetooth Select whether or not to use the BLUETOOTH function. "On (Default Value)": Enables connection with a BLUETOOTH enabled device by using the BLUETOOTH function. Select "On" also when making various BLUETOOTH settings.
> Before Start > Part Names > Install > Initial Setup > Playback Advanced Setup | Firmware Update | Others Firmware Update Firmware Update Update function of this unit How to update firmware Updating the Firmware via Network This unit has functionality to update the firmware (the system software) over a network or by the USB port. This enables us to make improvements to a variety of operations and to add features. For details about the updated play features, see here.
> Before Start > Part Names > Install > Initial Setup > Playback Advanced Setup | Firmware Update | Others System Setup Input/Output Assign Speaker Hardware are still unable to connect to the Internet, the DNS server or proxy server may be temporarily down. Check the service status with your ISP provider. 0 Others: Disconnect then reconnect the AC power cord, then repeat from the beginning.
> Before Start > Part Names > Install > Initial Setup > Playback Advanced Setup | Firmware Update | Others 8. Press ENTER with "Update" selected to start update. 0 During the update, the TV screen may go black depending on the updated program. In that case, check the progress on the display of this unit. The TV screen will remain black until the update is complete and the power is turned on again. 0 During the update, do not turn off, or disconnect then reconnect the USB storage device.
> Before Start > Part Names > Install > Initial Setup > Playback Advanced Setup | Firmware Update | Others Troubleshooting Others Before starting the procedure Problems may be solved by simply turning the power on/off or disconnecting/connecting the power cord, which is easier than working on the connection, setting and operating procedure. Try the simple measures on both the unit and the connected device.
> Before Start > Part Names > Install > Initial Setup > Playback Advanced Setup | Firmware Update | Others A speaker produces no sound 0 Make sure that the polarity of the speaker cables (_/`) is correct, and that no bare wires are in contact with the metal part of speaker terminals. 0 Make sure that the speaker cables are not shorting. 0 Check that the speaker connections have been made correctly. (ÄP7) Settings for the speaker connection environment need to be made in "1.
> Before Start > Part Names > Install > Initial Setup > Playback Advanced Setup | Firmware Update | Others ∫ Linked operation There is no linked operation with CEC compliant devices, such as a TV 0 In the Home of the unit, set "System Setup" - "Hardware" - "HDMI" - "HDMI CEC" to "On". 0 It is also necessary to set HDMI linking on the CEC compliant device. Check the instruction manual.
> Before Start > Part Names > Install > Initial Setup > Playback Advanced Setup | Firmware Update | Others Playback stops while listening to music files on the network server 0 Make sure the network server is compatible with this unit. 0 When the PC is serving as the network server, try quitting any application software other than the server software (Windows Media® Player 12, etc.). 0 If the PC is downloading or copying large files, the playback may be interrupted.
> Before Start > Part Names > Install > Initial Setup > Playback Advanced Setup | Firmware Update | Others ∫ Others E N Strange noises can be heard from this unit 0 If you have connected another unit to the same wall outlet as this unit, this noise may be an effect from the other unit. If the symptoms improve by unplugging the power cord of the other unit, use different wall outlets for this unit and the other unit.
> Before Start > Part Names > Install > Initial Setup > Playback Advanced Setup | Firmware Update | Others General Specifications Amplifier (Audio) section Rated Output Power (IEC) 2 ch k 85 W at 4 ohms, 1 kHz, 1 ch driven of 1% THD Input Sensitivity and Impedance (1 kHz 85 W/4 h) 200 mV/47 kh (LINE (Unbalance)) 6.
> Before Start > Part Names > Install > Initial Setup > Playback Advanced Setup | Firmware Update | Others About HDMI Compatible Functions HDMI (High Definition Multimedia Interface) is a digital interface standard for connecting TVs, projectors, Blu-ray Disc/DVD players, set-top boxes, and other video components. Until now, several separate video and audio cables have been required to connect AV components.
> Before Start > Part Names > Install > Initial Setup > Playback Advanced Setup | Firmware Update | Others License and Trademark Information Windows and the Windows logo are trademarks of the Microsoft group of companies. Manufactured under license from Dolby Laboratories. Dolby, Dolby Audio, Pro Logic, and the double-D symbol are trademarks of Dolby Laboratories. Bluetooth® The word mark and logos are registered trademarks owned by the Bluetooth SIG, Inc.
2-3-12 Yaesu, Chuo-ku, Tokyo 104-0028 JAPAN 18 PARK WAY, UPPER SADDLE RIVER, NEW JERSEY 07458, U.S.A. Tel: 1-201-785-2600 Tel: 1-844-679-5350 Hanns-Martin-Schleyer-Straße 35, 47877 Willich, Germany Tel: +49(0)2154 913222 E N Anteros Building, Odyssey Business Park, West End Road, South Ruislip, Middlesex, HA4 6QQ United Kingdom Tel: +44(0)208 836 3612 6, Avenue de Marais F - 95816 Argenteuil Cedex FRANCE Tel: +33(0)969 368 050 Корпорация О энд Пи 2-3-12, Яэсу, Чуо-ку, г.