
User's Manual


Installation 01
11
En
English Deutsch Italiano Español
Pyccкий
Français
Nederlands
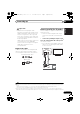
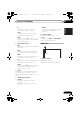
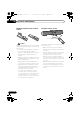
1 Paste the supplied wall mounting
template on the area of installation.
Attach the template level to the ground using
an adhesive such as tape. Make sure the
template is straight to avoid mounting the unit
crookedly. Pasting the template too close to
the TV may cause the TV to get in the way of the
unit when installing. Make sure the template
and TV do not overlap.
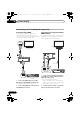
2 Attach the bracket to the specified
location on the template.
Align the brackets to the specified locations on
the template,
and attach with two screws as
shown.
Adjust the attachment position of the bracket
so that it is aligned with the template.
•After attach
the right and left brackets, take
down the template.
3 Hang the main unit on the brackets.
Align the two mounting holes on the rear of the
main unit with the bracket’s exposed top
mounting screws, and hang the main unit on
the screws as shown.
• Confirm that the screws come fully to the
top of the mounting holes.
Additional notes on the
system placement
Precautions:
• When installing the main unit on top of the
TV, be sure to secure it with tape or some
other suitable means. Otherwise, the main
unit may fall from the TV due to external
shocks such as earthquakes, endangering
those nearby or damaging the main unit.
• The main unit is magnetically shielded.
However, depending on the installation
location, color distortion may occur if the
main unit is installed extremely close to the
screen of a television set. If this case
happens, turn the power switch of the
television set OFF, and turn it ON after
15 min. to 30 min. If the problem persists,
place the main unit away from the
television set.
• The subwoofer is not magnetically shielded
and so should not be placed near a TV or
monitor. Magnetic storage media (such as
floppy discs and tape or video cassettes)
should also not be kept close to the
subwoofer.
• Do not attach the subwoofer to a wall or
ceiling. They may fall off and cause injury.
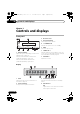
Template
Template
Bracket
Screw and washer
(not supplied)
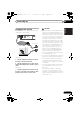
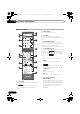
HDMI
OPTICAL
DC IN
24V
COAXIA
L
OUT IN 1 IN 2
AUDIO IN
*625$A%/%:0A'PDQQMࡍࠫ㧞㧜㧜㧥ᐕ㧥㧝㧣ᣣޓᧁᦐᣣޓඦᓟ㧤ᤨ㧡㧥ಽ