
User's Manual


Installation01
8
En
Chapter 1
Installation
Before you start
Before installing the unit and performing
connections with other components, confirm
that the main unit and subwoofer properly
support wireless communication.
• Place the main unit and subwoofer near
together.
• The power cords are furnished with
different connectors for the subwoofer and
AC adapter. As shown in the accompanying
illustration, confirm the shape of the plug
that connects to the AC inlet when making
connections. Note that the power cord for
the AC adapter is contained in the same
box as the AC adapter.
1 Plug the supplied AC adapter into the
DC
IN
socket on the back of the unit.
2 Plug the supplied power cord into the AC
adapter then plug the other end into a power
outlet.
3 Plug the supplied power cord into the
AC
IN
socket on the back of the subwoofer then
plug the other end into a power outlet.
4 Press
1 STANDBY/ON
on the main unit.
Confirm that the indicators of the main unit
and subwoofer both light green.
• If either of the indicators does not light
green, perform pairing (see below).
• After confirming communication between
the two units, unplug the power cords and
perform installation and connections.
Pairing main unit and subwoofer
1 After you’ve finished making the AC
adapter and power cord connections, press
1
STANDBY/ON
on the main unit (see above).
2 Press on remote control.
3 While holding the main unit’s
STEREO/
A.L.C.
button depressed, simultaneously
press the remote control’s
SHIFT
and
TV
CONTROL CH–
buttons.
The indicator of the subwoofer light green, and
the pairing of main unit and subwoofer is
completed.
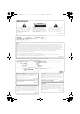
For subwoofer
For AC adapter
OPTICAL
DC IN
24V
COAXIAL
OUT
AUDIO IN
To AC outlet
Main unit
Subwoofer
AC adapter
SYSTEM
SYSTEM
TV CONTROL
HDMI1 HDMI2
OPTICAL COAXIAL
CH
SOURCEINPUT
INPUT
INPUT
ENTER
STANDBY/ON INPUT STEREO/ A.L.C.
*625$A%/%:0A'PDQQMࡍࠫ㧞㧜㧜㧥ᐕ㧥㧝㧣ᣣޓᧁᦐᣣޓඦᓟ㧤ᤨ㧡㧥ಽ