VSX-423-K /-S VSX-323-K AV Receiver Discover the benefits of registering your product online at http://www.pioneer.co.uk (or http://www.pioneer.eu).
CAUTION TO PREVENT THE RISK OF ELECTRIC SHOCK, DO NOT REMOVE COVER (OR BACK). NO USER-SERVICEABLE PARTS INSIDE. REFER SERVICING TO QUALIFIED SERVICE PERSONNEL. D3-4-2-1-1_B1_En This product is for general household purposes. Any failure due to use for other than household purposes (such as long-term use for business purposes in a restaurant or use in a car or ship) and which requires repair will be charged for even during the warranty period. K041_A1_En WARNING This equipment is not waterproof.
Information for users on collection and disposal of old equipment and used batteries Symbol for equipment These symbols on the products, packaging, and/or accompanying documents mean that used electrical and electronic products and batteries should not be mixed with general household waste. For proper treatment, recovery and recycling of old products and used batteries, please take them to applicable collection points in accordance with your national legislation.
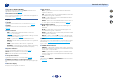
Contents Thank you for buying this Pioneer product. Please read through these operating instructions so you will know how to operate your model properly. Before you start . . . . . . . . . . . . . . . . . . . . . . . . . . . . . 5 Checking what’s in the box. . . . . . . . . . . . . . . . . . . . . . . . . 5 Installing the receiver . . . . . . . . . . . . . . . . . . . . . . . . . . . . . 5 Flow of settings on the receiver . . . . . . . . . . . . . . 5 01 Controls and displays Front panel . . . . . . . .
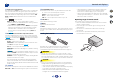
Before you start Checking what’s in the box Please check that you’ve received the following supplied accessories: • Setup microphone (VSX-423 only) • Remote control • AAA size IEC R03 dry cell batteries (to confirm system operation) x2 • AM loop antenna • FM wire antenna • Power cord (For U.K.
Chapter 1 Controls and displays 4 Front panel 1 2 3 4 5 6 7 8 9 17 18 19 20 21 19 22 6 37 23 24 25 26 27 27 28 VSX-423 10 11 12 13 14 1 INPUT SELECTOR dial Selects an input source (page 22). 2 MCACC indicator (VSX-423 only) Lights when Acoustic Calibration EQ (page 30) is on (Acoustic Calibration EQ is automatically set to on after the Auto MCACC setup (page 19)). 3 Receiver control buttons SPEAKERS – Use to change the speaker system on or off.
1 15 iPod iPhone DIRECT CONTROL Change the receiver’s input to the iPod and enable iPod operations on the iPod (page 24). 16 iPod/iPhone terminal Use to connect your Apple iPod or USB mass storage device as an audio source (page 17). Display 17 PHASE Lights when the Phase Control is switched on (page 31). 18 AUTO Lights when the Auto Surround feature is switched on (page 29). 19 Tuner indicators RDS – Lights when an RDS broadcast is received (page 27).
1 Controls and displays As for operating other devices, the remote control codes for the Pioneer products are preset. The settings cannot be changed. Remote control 1 2 3 4 13 RECEIVER SLEEP SOURCE RECEIVER INPUT 14 1 SLEEP Press to change the amount of time before the receiver switches into standby (30 min – 60 min – 90 min – Off). You can check the remaining sleep time at any time by pressing SLEEP once. 2 RECEIVER Switches the receiver between standby and on.
1 Controls and displays 11 Component control buttons The main buttons (, , etc.) are used to control a component after you have selected it using the input function buttons. The controls above these buttons can be accessed after you have selected the corresponding input function button (BD, DVD and CD). These buttons also function as described below. Press RECEIVER first to access: BASS +/–, TRE +/– – Use to adjust Bass or Treble.
Chapter 2 Connecting your equipment Hints on the speaker placement Placing the speakers By connecting the left and right front speakers (L/R), the center speaker (C), the left and right surround speakers (SL/SR), and the subwoofer (SW), a 5.1 ch surround system can be enjoyed. To achieve the best possible surround sound, install your speakers as shown below. 5.1 channel surround system: R L C 120 SW 120 SR SL Where you put your speakers in the room has a big effect on the quality of the sound.
2 Connecting your equipment Subwoofer Connecting the speakers Front right Front left Center The receiver will work with just two stereo speakers (the front speakers in the diagram) but using at least three speakers is recommended, and a complete setup is best for surround sound. Make sure you connect the speaker on the right to the right (R) terminal and the speaker on the left to the left (L) terminal.
2 Connecting your equipment Making cable connections Make sure not to bend the cables over the top of this unit (as shown in the illustration). If this happens, the magnetic field produced by the transformers in this unit may cause a humming noise from the speakers. • If the video signal does not appear on your TV, try adjusting the resolution settings on your component or display. Note that some components (such as video game units) have resolutions that may not be displayed.
2 Connecting your equipment Analog audio cables Standard RCA video cables Use stereo RCA phono cables to connect analog audio components. These cables are typically red and white, and you should connect the red plugs to R (right) terminals and white plugs to L (left) terminals. These cables are the most common type of video connection and are used to connect to the composite video terminals. The yellow plugs distinguish them from cables for audio.
2 Connecting your equipment Connecting a TV and playback components Connecting using HDMI If you have an HDMI or DVI (with HDCP) equipped component (Blu-ray Disc player, etc.), you can connect it to this receiver using a commercially available HDMI cable. • The following connection/setting is required to listen to the sound of the TV over this receiver. - If the TV does not support the HDMI Audio Return Channel function, connect the receiver and TV with audio cables (as shown).
2 Connecting your equipment Connecting your component with no HDMI terminal This diagram shows connections of a TV and DVD player (or other playback component) with no HDMI terminal to the receiver. Note • In order to listen to the audio from the TV that is connected to this receiver using a analog audio cables, set-up for analog audio input is required (see The Input Assign menu on page 35). • You can only connect one component to the optical input terminal.
2 Connecting your equipment 3 Place the AM antenna on a flat surface and in a direction giving the best reception. Connecting antennas Connect the AM loop antenna and the FM wire antenna as shown below. To improve reception and sound quality, connect external antennas (see Using external antennas below). fig. b fig. a 4 Connect the FM wire antenna into the FM antenna socket. For best results, extend the FM antenna fully and fix to a wall or door frame. Don’t drape loosely or leave coiled up.
2 Connecting your equipment Connecting an iPod Connecting a USB device This receiver has a dedicated iPod/iPhone terminal that will allow you to control playback of audio content from your iPod using the controls of this receiver. It is possible to listen to two-channel audio using the USB interface on the front of this receiver. Switch the receiver into standby then connect your USB device to the iPod/iPhone terminal on the front panel of this receiver. • This receiver does not support a USB hub.
2 Connecting your equipment 4 Plugging in the receiver Only plug in after you have connected all your components to this receiver, including the speakers. 6 For U.K. and Australia 1 Plug the supplied power cord into the AC IN socket on the back of the receiver. 37 2 Plug the other end into a power outlet. For Europe and Russia 1 Plug the AC power cord into a convenient AC power outlet. CAUTION • Handle the power cord by the plug.
Chapter 3 Basic Setup (VSX-423 only) Before setting up (For Australia) This receiver allows you to adjust the system setup, using the on-screen display (OSD) that is shown on the TV screen. • The OSD will not appear if you have connected using the HDMI output to your TV. Use composite connections for system setup. First, follow the procedure below to make sure that the OSD screen is displayed. 1 Switch on the receiver and your TV.
3 Basic Setup (VSX-423 only) on the remote control, then press the 4 Press HOME MENU button. RECEIVER The Home Menu appears on your TV. Use /// and ENTER on the remote control to navigate through the screens and select menu items. Press RETURN to exit the current menu. • Press HOME MENU at any time to exit the Home Menu. If you cancel the Auto MCACC setup at any time, the receiver automatically exits and no settings will be made.
3 Basic Setup (VSX-423 only) 4 Other problems when using the Auto MCACC setup If the room environment is not optimal for the Auto MCACC setup (too much background noise, echo off the walls, obstacles blocking the speakers from the microphone) the final settings may be incorrect. Check for household appliances (air conditioner, fridge, fan, etc.), that may be affecting the environment and switch them off if necessary. If there are any instructions showing in the front panel display, please follow them.
Chapter 4 Basic playback Playing a source Here are the basic instructions for playing a source (such as a DVD disc) with your home theater system. on your system components and receiver. 1 Switch Start by switching on the playback component (for example a DVD player), your TV and subwoofer (if you have one), then the receiver (press RECEIVER). • Make sure the setup microphone is disconnected. the TV input to the input that connects this 2 Switch receiver.
4 • Some DVD players don’t output DTS signals. For more details, refer to the instruction manual supplied with your DVD player. Basic playback Tip • In order to enjoy the picture and/or sound from devices connected to each terminal, select the input by doing the following. 6 Audio (TV input) 1. 37 TV 2.
4 Basic playback Playing an iPod This receiver has a dedicated iPod terminal that will allow you to control playback of audio content from your iPod using the controls of this receiver. Important • Pioneer cannot under any circumstances accept responsibility for any direct or indirect loss arising from any inconvenience or loss of recorded material resulting from the iPod failure.
4 Basic playback Playing a USB device It is possible to listen to two-channel audio using the USB interface on the front of this receiver. Important • Pioneer cannot guarantee compatibility (operation and/or bus power) with all USB mass storage devices and assumes no responsibility for any loss of data that may occur when connected to this receiver. • • • • • • • Note This includes playback of WMA/MP3/MPEG-4 AAC files (except files with copy-protection or restricted playback).
4 Basic playback Listening to the radio The following steps show you how to tune in to FM and AM radio broadcasts using the automatic (search) and manual (step) tuning functions. Once you are tuned to a station you can memorize the frequency for recall later—see Saving station presets below for more on how to do this.
4 Basic playback Changing the radio frequency step (For Australia) If you find that you can’t tune into stations successfully, the frequency step may not be suitable for your country/region. Here’s how to switch the setting: 1 Switch the receiver into standby. holding down TUNE button, press and hold 2 While STANDBY/ON button for about two seconds. The channel tuning step alternates between 10K STEP and 9K STEP each time you do this.
4 Basic playback 4 Displaying RDS information Use the DISP button to display the different types of RDS information available. 6 DISP for RDS information. Press Each press changes the display as follows: • • • • Listening mode Master volume Radio Text (RT) – Messages sent by the radio station. For example, a talk radio station may provide a phone number as RT. • Program Service Name (PS) – The name of the radio station.
Chapter 5 Listening to your system Choosing the listening mode This receiver offers a variety of listening modes to accommodate playback of various audio formats. Choose one according to your speaker environment or the source. listening to a source, press the listening mode While button repeatedly to select a listening mode you want. • The listening mode is shown on the display on the front panel.
5 Listening to your system Using the Advanced surround ADV SURR ADVANCED SURROUND The Advanced surround feature creates a variety of surround effects. Try different modes with various soundtracks to see which you like. ACTION Designed for action movies with dynamic soundtracks. DRAMA Designed for movies with lots of dialog. ADVANCED GAME Suitable for video games. SPORTS Suitable for sports programs. CLASSICAL Gives a large concert hall-type sound.
5 Listening to your system Better sound using Phase Control Setting the Audio options This receiver’s Phase Control feature uses phase correction measures to make sure your sound source arrives at the listening position in phase, preventing unwanted distortion and/or coloring of the sound. Phase Control technology provides coherent sound reproduction through the use of phase matching for an optimal sound image at your listening position.
5 Setting/What it does Listening to your system Option(s) Setting/What it does DRC (Dynamic Range Control) Adjusts the level of dynamic range for movie soundtracks optimized for Dolby Digital, DTS, Dolby Digital Plus, Dolby TrueHD, DTS-HD and DTS-HD Master Audio (you may need to use this feature when listening to surround sound at low volumes). AUTO LFE ATT (LFE Attenuate) Some Dolby Digital and DTS audio sources include ultra-low bass tones.
Chapter 6 Home Menu Using the Home Menu The following section shows you how to make detailed settings to specify how you’re using the receiver, and also explains how to fine-tune individual speaker system settings to your liking. 4 Select the setting you want to adjust. Home Menu Manual speaker setup Ho me Me nu 1.Auto MCACC 2.Manual SP Setup 3.Input Assign 4.Auto Power Down 5.HDMI Setup 1. Manual SP Setup 2.Input Assign 3.Auto Power Down 4.
6 • Surr – Select LARGE if your surround speakers reproduce bass frequencies effectively. Select SMALL to send bass frequencies to the other speakers or subwoofer. If you didn’t connect surround speakers choose NO (the sound of the surround channels is sent to the other speakers). • Subwoofer – LFE signals and bass frequencies of channels set to SMALL are output from the subwoofer when YES is selected (see notes below).
6 Home Menu Adjust the level of each speaker as the test tone is emitted. Note • If you are using a Sound Pressure Level (SPL) meter, take the readings from your main listening position and adjust the level of each speaker to 75 dB SPL (C-weighting/slow reading). • The subwoofer test tone is output at low volumes. You may need to adjust the level after testing with an actual soundtrack. you’re finished, press RETURN. 6 When You return to the Manual SP Setup menu. the distance of each speaker using /.
6 Home Menu The HDMI Setup menu If your TV supports an audio return channel (ARC) function, connect your TV and this unit with an HDMI cable and the TV audio will be inputted into this unit via the HDMI terminal without the need for an audio cable to be connected. It is possible to transfer signals from an HDMI connected player to the TV even when this receiver’s power is on standby (VSX-423 only). Important HDMI®/™ • Use a High Speed Cable when using the ARC function.
Chapter 7 Additional information Troubleshooting Incorrect operations are often mistaken for trouble and malfunctions. If you think that there is something wrong with this component, check the points below. Take a look at the other components and electrical appliances being used, because sometimes the problem may lie there. If the trouble isn’t sorted out even after going through the checks below, ask your nearest Pioneer authorized independent service company to carry out repair work.
7 Can’t operate the remote control. Replace the batteries (page 9). Operate within 7 m, 30º of the remote sensor (page 9). Remove the obstacle or operate from another position. Avoid exposing the remote sensor on the front panel to direct light. Press the remote control’s RECEIVER button and switch to receiver control mode. The display is dark. Press DIMMER on the remote control repeatedly to return to the default. During ECO mode, the brightness switches between 2 levels.
7 Additional information About iPod/iPhone “Made for iPod” and “Made for iPhone” mean that an electronic accessory has been designed to connect specifically to iPod or iPhone, respectively, and has been certified by the developer to meet Apple performance standards. Apple is not responsible for the operation of this device or its compliance with safety and regulatory standards. Please note that the use of this accessory with iPod or iPhone may affect wireless performance.
7 Specifications (VSX-323) Audio section Rated power output Front, Center, Surround . . . . . . . . . . . . . . . . . 100 W per channel (1 kHz, 6 , 0.7 %) For Oceania Model Maximum power output (Front, Center, Surround) . . . . . . . . . . . . . . . . . . 120 W per channel (1 kHz, 6 , 10 %) Total Harmonic Distortion . . . . . . . . . . . . . . . . . 0.06 % (20 Hz to 20 kHz, 8 , 50 W/ch) Frequency response (LINE Pure Direct mode) . . . . . . . . . . . . . . . . . . . . . . . . . . . . . . . . . .
http://www.pioneer.co.uk http://www.pioneer.eu © 2013 PIONEER CORPORATION. All rights reserved. PIONEER CORPORATION 1-1, Shin-ogura, Saiwai-ku, Kawasaki-shi, Kanagawa 212-0031, Japan PIONEER ELECTRONICS (USA) INC. P.O. BOX 1540, Long Beach, California 90801-1540, U.S.A. TEL: (800) 421-1404 PIONEER ELECTRONICS OF CANADA, INC. 340 Ferrier Street, Unit 2, Markham, Ontario L3R 2Z5, Canada TEL: 1-877-283-5901, 905-479-4411 PIONEER EUROPE NV Haven 1087, Keetberglaan 1, B-9120 Melsele, Belgium TEL: 03/570.