VSX-521_SYXCN_En.book 1 ページ 2011年2月9日 水曜日 午後4時6分 VSX-521-K AUDIO/VIDEO MULTI-CHANNEL RECEIVER Discover the benefits of registering your product online at http://www.pioneer.co.uk (or http://www.pioneer.eu).
VSX-521_SYXCN_En.book 2 ページ 2011年2月9日 水曜日 午後4時6分 WARNING IMPORTANT To prevent a fire hazard, do not place any naked flame sources (such as a lighted candle) on the equipment.
VSX-521_SYXCN_En.book 3 ページ 2011年2月9日 水曜日 午後4時6分 Information for users on collection and disposal of old equipment and used batteries Symbol for equipment These symbols on the products, packaging, and/or accompanying documents mean that used electrical and electronic products and batteries should not be mixed with general household waste.
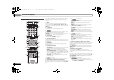
VSX-521_SYXCN_En.book 4 ページ 2011年2月9日 水曜日 午後4時6分 Thank you for buying this Pioneer product. Please read through these operating instructions so you will know how to operate your model properly. After you have finished reading the instructions, put them away in a safe place for future reference. Contents Before you start . . . . . . . . . . . . . . . . . . . . . . . . . . . . 5 Checking what’s in the box . . . . . . . . . . . . . . . . . . . . . . . . 5 Installing the receiver . . . . . . . . . . . . . .
VSX-521_SYXCN_En.book 5 ページ 2011年2月9日 水曜日 午後4時6分 Before you start Checking what’s in the box Please check that you’ve received the following supplied accessories: • Setup microphone • Remote control • AAA size IEC R03 dry cell batteries (to confirm system operation) x2 • AM loop antenna • FM wire antenna • Power cord • Warranty card • Quick start guide • These operating instructions (CD-ROM) Installing the receiver • When installing this unit, make sure to put it on a level and stable surface.
VSX-521_SYXCN_En.
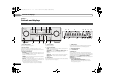
VSX-521_SYXCN_En.book 7 ページ 2011年2月9日 水曜日 午後4時6分 Controls and displays ALC/STANDARD SURR – Press for standard decoding and to switch between the modes of 2 Pro Logic II, 2 Pro Logic IIx, 2 Pro Logic IIz and NEO:6, and the Auto level control stereo mode (page 26). ADVANCED SURROUND – Switches between the various surround modes (page 27). 12 SOUND RETRIEVER AIR When the button is pressed, the input switches to ADAPTER and the listening mode is automatically set to S.R AIR (page 23).
VSX-521_SYXCN_En.book 8 ページ 01 2011年2月9日 水曜日 午後4時6分 Controls and displays As for operating other devices, the remote control codes for the Pioneer products are preset. The settings cannot be changed.
VSX-521_SYXCN_En.book 9 ページ 2011年2月9日 水曜日 午後4時6分 Controls and displays • When the front speaker is set at SMALL in the Speaker Setting (or automatically via the Auto MCACC setup) and the Crossover Network is set above 150 Hz, the subwoofer channel level will be adjusted by pressing BASS –/+ (page 32). 11 Number buttons and other component controls Use the number buttons to directly select a radio frequency (page 24) or the tracks on a CD, etc.
VSX-521_SYXCN_En.book 10 ページ 02 2011年2月9日 水曜日 午後4時6分 Connecting your equipment Chapter 2: Hints on the speaker placement Connecting your equipment Placing the speakers By connecting the left and right front speakers (L/R), the center speaker (C), the left and right surround speakers (SL/SR), and the subwoofer (SW), a 5.1 ch surround system can be enjoyed.
VSX-521_SYXCN_En.book 11 ページ 2011年2月9日 水曜日 午後4時6分 Connecting your equipment 02 Front right Connecting the speakers The receiver will work with just two stereo speakers (the front speakers in the diagram) but using at least three speakers is recommended, and a complete setup is best for surround sound. Make sure you connect the speaker on the right to the right (R) terminal and the speaker on the left to the left (L) terminal.
VSX-521_SYXCN_En.book 12 ページ 02 2011年2月9日 水曜日 午後4時6分 Connecting your equipment Making cable connections Make sure not to bend the cables over the top of this unit (as shown in the illustration). If this happens, the magnetic field produced by the transformers in this unit may cause a humming noise from the speakers. • If the video signal does not appear on your TV, try adjusting the resolution settings on your component or display.
VSX-521_SYXCN_En.book 13 ページ 2011年2月9日 水曜日 午後4時6分 Connecting your equipment Analog audio cables Use stereo RCA phono cables to connect analog audio components. These cables are typically red and white, and you should connect the red plugs to R (right) terminals and white plugs to L (left) terminals. 02 Video cables About video outputs connection Standard RCA video cables This receiver is not loaded with a video converter.
VSX-521_SYXCN_En.book 14 ページ 02 2011年2月9日 水曜日 午後4時6分 Connecting your equipment Connecting a TV and playback components HDMI DVR/BDR IN DVD IN BD IN OUT VIDEO IN COAXIAL IN 1 If you have an HDMI or DVI (with HDCP) equipped component (Blu-ray Disc player, etc.), you can connect it to this receiver using a commercially available HDMI cable.
VSX-521_SYXCN_En.book 15 ページ 2011年2月9日 水曜日 午後4時6分 Connecting your equipment 02 Connecting your component with no HDMI terminal Connecting a satellite receiver or other digital set-top box This diagram shows connections of a TV and DVD player (or other playback component) with no HDMI terminal to the receiver. • If both TV and player has a component video jacks, you can connect these too. See Using the component video jacks on page 16 for more on this.
VSX-521_SYXCN_En.book 16 ページ 02 2011年2月9日 水曜日 午後4時6分 Connecting your equipment Connecting an HDD/DVD recorder, Blu-ray Disc recorder and other video sources This receiver has audio/video inputs and outputs suitable for connecting analog or digital video recorders, including HDD/DVD recorders and Blu-ray Disc recorders. • Only the signals that are input to the VIDEO IN terminal can be output from the VIDEO OUT terminal.
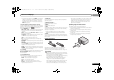
VSX-521_SYXCN_En.book 17 ページ 2011年2月9日 水曜日 午後4時6分 Connecting your equipment 02 Connecting other audio components Connecting optional Bluetooth® ADAPTER Connecting antennas The number and kind of connections depends on the kind of component you’re connecting. Follow the steps below to connect a CD-R, MD, DAT, tape recorder or other audio component.
VSX-521_SYXCN_En.book 18 ページ 02 2011年2月9日 水曜日 午後4時6分 Connecting your equipment Using external antennas Connecting to the front panel audio mini jack Plugging in the receiver To improve FM reception Front audio connections are accessed via the front panel using the INPUT SELECTOR or PORTABLE button on the remote control. Use a stereo mini-jack cable to connect a digital audio player, etc. Only plug in after you have connected all your components to this receiver, including the speakers.
VSX-521_SYXCN_En.book 19 ページ 2011年2月9日 水曜日 午後4時6分 Basic Setup 03 Chapter 3: INPUT SELECT DTV/TV VOLUME TOOLS MENU TUNE TOP MENU PRESET RECEIVER TV SOURCE CONTROL ENTER PRESET Basic Setup PARAMETER RECEIVER SLEEP INPUT Canceling the demo display The display on the front panel shows various information (demo displays) when the receiver is not operating. You can turn off the demo display. For details, see The FL Demo Mode menu on page 34.
VSX-521_SYXCN_En.book 20 ページ 03 2011年2月9日 水曜日 午後4時6分 Basic Setup 7 Wait for the test tones to finish. 9 Make sure ‘OK’ is selected, then press ENTER. A progress report is displayed on-screen while the receiver outputs test tones to determine the speakers present in your setup. Try to be as quiet as possible while it’s doing this. If the screen in step 7 is left untouched for 10 seconds and ENTER is not pressed in step 8, the Auto MCACC setup will start automatically as shown. 1.Auto MCACC 1.
VSX-521_SYXCN_En.book 21 ページ 2011年2月9日 水曜日 午後4時6分 Basic playback 04 Chapter 4: If you selected the proper input source and there is still no sound, select the audio input signal for playback (see Selecting the audio input signal below). Basic playback 4 Press AUTO/DIRECT to select ‘AUTO SURROUND’ and Playing a source Here are the basic instructions for playing a source (such as a DVD disc) with your home theater system.
VSX-521_SYXCN_En.book 22 ページ 04 2011年2月9日 水曜日 午後4時6分 Basic playback • You may get digital noise when a LD or CD player compatible with DTS is playing an analog signal. To prevent noise, make the proper digital connections (page 13) and set the signal input to C1/O1/O2 (digital). • Some DVD players don’t output DTS signals. For more details, refer to the instruction manual supplied with your DVD player.
VSX-521_SYXCN_En.book 23 ページ 2011年2月9日 水曜日 午後4時6分 Basic playback Important • Pioneer does not guarantee proper connection and operation of this unit with all Bluetooth wireless technology enabled devices. Remote control operation The remote control supplied with this unit allows you to play and stop media, and perform other operations. • It must be necessary that the Bluetooth wireless technology enabled device supports AVRCP profiles.
VSX-521_SYXCN_En.book 24 ページ Basic playback Listening to the radio Saving station presets Listening to station presets The following steps show you how to tune in to FM and AM radio broadcasts using the automatic (search) and manual (step) tuning functions. Once you are tuned to a station you can memorize the frequency for recall later—see Saving station presets below for more on how to do this.
VSX-521_SYXCN_En.book 25 ページ 2011年2月9日 水曜日 午後4時6分 Basic playback 04 AUDIO PARAMETER NEWS – News AFFAIRS – Current Affairs INFO – General Information SPORT – Sport EDUCATE – Educational DRAMA – Radio plays, etc. CULTURE – National or regional culture, theater, etc. SCIENCE – Science and technology VARIED – Usually talk-based material, such as quiz shows or interviews.
VSX-521_SYXCN_En.book 26 ページ Chapter 5: Listening to your system Choosing the listening mode This receiver offers a variety of listening modes to accommodate playback of various audio formats. Choose one according to your speaker environment or the source. While listening to a source, press the listening mode button repeatedly to select a listening mode you want.
VSX-521_SYXCN_En.book 27 ページ 2011年2月9日 水曜日 午後4時6分 Listening to your system 05 a. If surround back channel processing (page 28) is switched off, or the surround back speakers are set to NO, DOLBY PLIIx becomes DOLBY PLII (5.1 channel sound). b. You can also adjust the C.WIDTH, DIMEN., and PNRM. effect (see Setting the Audio options on page 29). c. You can also adjust the H.GAIN effect (see Setting the Audio options on page 29). d. You can also adjust the C.
VSX-521_SYXCN_En.book 28 ページ 05 2011年2月9日 水曜日 午後4時6分 Listening to your system Better sound using Phase Control Using surround back channel processing Setting the Up Mix function This receiver’s Phase Control feature uses phase correction measures to make sure your sound source arrives at the listening position in phase, preventing unwanted distortion and/or coloring of the sound.
VSX-521_SYXCN_En.book 29 ページ 2011年2月9日 水曜日 午後4時6分 Listening to your system 05 Setting/What it does Setting the Audio options There are a number of additional sound settings you can make using the AUDIO PARAMETER menu. The defaults, if not stated, are listed in bold. Important • Note that if a setting doesn’t appear in the AUDIO PARAMETER menu, it is unavailable due to the current source, settings and status of the receiver.
VSX-521_SYXCN_En.book 30 ページ 05 2011年2月9日 水曜日 午後4時6分 Listening to your system Setting/What it does PNRM. (Panorama)h Extends the front stereo image to include surround speakers for a ‘wraparound’ effect. Option(s) OFF ON 0 to 10 C.IMG (Center Image)i Default: 3 (Applicable only when using a center speaker) (NEO:6 MUSIC), Adjust the center image to create a wider 10 (NEO:6 stereo effect with vocals.
VSX-521_SYXCN_En.book 31 ページ 2011年2月9日 水曜日 午後4時6分 The System Setup menu 06 4 Select the setting you want to adjust. Chapter 6: The System Setup menu Using the System Setup menu The following section shows you how to make detailed settings to specify how you’re using the receiver, and also explains how to fine-tune individual speaker system settings to your liking. Important • The OSD will not appear if you have connected using the HDMI output to your TV.
VSX-521_SYXCN_En.book 32 ページ 06 2011年2月9日 水曜日 午後4時6分 The System Setup menu • Front – Select LARGE if your front speakers reproduce bass frequencies effectively, or if you didn’t connect a subwoofer. Select SMALL to send the bass frequencies to the subwoofer. • Center – Select LARGE if your center speaker reproduces bass frequencies effectively, or select SMALL to send bass frequencies to the other speakers or subwoofer.
VSX-521_SYXCN_En.book 33 ページ 2011年2月9日 水曜日 午後4時6分 The System Setup menu 5 Adjust the level of each channel using /. If you selected Manual, use / to switch speakers. The Auto setup will output test tones in the order shown onscreen: 2c.Channel Level Front L Center Front R Surround R Surr. Back R Surr. Back L Surround L Subwoofer [ [ [ [ [ [ [ 0dB 0dB] 0dB] 0dB] ––– ] ––– ] 0dB] 0dB] Return Adjust the level of each speaker as the test tone is emitted.
VSX-521_SYXCN_En.book 34 ページ 06 2011年2月9日 水曜日 午後4時6分 The System Setup menu The Pre Out Setting Specify either using the surround back speaker or the front height speaker connection with the PRE OUT SURR BACK/ FRONT HEIGHT outputs. An additional amplifier is required for the speaker connection. • Default setting: Surr. Back 1 Select ‘Pre Out Setting’ from the System Setup menu. System Setup 4.Pre Out Setting 1 . Auto MCACC 2 . Manual SP Setup 3 . Input Assign 4 . Pre Out Setting 5 . HDMI Setup 6 .
VSX-521_SYXCN_En.book 35 ページ 2011年2月9日 水曜日 午後4時6分 Control with HDMI function Chapter 7: Control with HDMI function Synchronized operations below with a Control with HDMIcompatible Pioneer TV or Blu-ray Disc player or with a component of another make that supports the Control with HDMI functions are possible when the component is connected to the receiver using an HDMI cable. • Synchronized amp mode The receiver’s volume can be set and the sound can be muted using the TV’s remote control.
VSX-521_SYXCN_En.book 36 ページ 07 2011年2月9日 水曜日 午後4時6分 Control with HDMI function 6 Select the ‘ARC’ setting you want. When a TV supporting the HDMI Audio Return Channel function is connected to the receiver, the sound of the TV can be input via the HDMI terminal. • ON – The TV’s sound is input via the HDMI terminal. This can only be selected when Control is set to ON. • OFF – The TV’s sound is input from the audio input terminals other than HDMI inputs. 7 When you’re finished, press RETURN.
VSX-521_SYXCN_En.book 37 ページ 2011年2月9日 水曜日 午後4時6分 Additional information Chapter 8: Additional information Troubleshooting Incorrect operations are often mistaken for trouble and malfunctions. If you think that there is something wrong with this component, check the points below. Take a look at the other components and electrical appliances being used, because sometimes the problem may lie there.
VSX-521_SYXCN_En.book 38 ページ 08 2011年2月9日 水曜日 午後4時6分 Additional information Can’t operate the remote control. Replace the batteries (refer to page 9). Operate within 7 m, 30º of the remote sensor (refer to page 9). Remove the obstacle or operate from another position. Avoid exposing the remote sensor on the front panel to direct light. The display is dark or off. Press DIMMER on the remote control repeatedly to return to the default.
VSX-521_SYXCN_En.book 39 ページ 2011年2月9日 水曜日 午後4時6分 Additional information 08 Miscellaneous Resetting the main unit Specifications Use this procedure to reset all the receiver’s settings to the factory default. Use the front panel controls to do this. Audio section 1 Switch the receiver into standby. 2 While holding down BAND, press and hold STANDBY/ON for about two seconds. 3 When you see RESET? appear in the display, press AUTO SURROUND/STREAM DIRECT. OK? shows in the display.
VSX-521_SYXCN_En.book 40 ページ 2011年2月9日 水曜日 午後4時6分 http://www.pioneer.co.uk http://www.pioneer.eu © 2011 PIONEER CORPORATION. All rights reserved. PIONEER CORPORATION 1-1, Shin-ogura, Saiwai-ku, Kawasaki-shi, Kanagawa 212-0031, Japan PIONEER ELECTRONICS (USA) INC. P.O. BOX 1540, Long Beach, California 90801-1540, U.S.A. TEL: (800) 421-1404 PIONEER ELECTRONICS OF CANADA, INC.