AUDIO/VIDEO MULTI-CHANNEL RECEIVER VSX-D412 VSX-D512 Operating Instructions
Thank you for buying this Pioneer product. Please read through these operating instructions so you will know how to operate your model properly. After you have finished reading the instructions, put them away in a safe place for future reference. IMPORTANT NOTICE H006AEn The serial number for this equipment is located in the rear panel. Please write this serial number on your enclosed warranty card and keep it in a secure area. This is for your security.
Manufactured under license from Dolby Laboratories. “Dolby”, “Pro Logic” and the double-D symbol are trademarks of Dolby Laboratories. "DTS", and "DTS Digital Surround" are registered trademarks of Digital Theater Systems, Inc.
Contents 1 Before you start 4 Controls and displays Checking what’s in the box ...............................6 Installing the receiver ........................................6 Making cable connections ................................6 Loading the batteries .........................................6 Operating range of remote control unit ........... 7 Remote Control (VSX-D512) ............................21 Remote Control (VSX-D412) ............................24 Front Panel ............................
7 Using the tuner Listening to the radio ...................................... 40 Tuning directly to a station (VSX-D512 only) ............................................... 41 Improving FM stereo sound ....................... 41 Saving station presets .....................................42 Naming station presets .................................. 43 Listening to station presets ............................ 43 8 Making recordings Making an audio or a video recording ..........
01 Before you start Checking what’s in the box Please check that you've received the following supplied accessories: • AM loop antenna Loading the batteries VSX-D412 • FM wire antenna • Dry cell batteries (AA size IEC R6) x 2 • Remote control • These operating instructions Installing the receiver Please note the following points: • Do not place objects directly on top of this unit. This would prevent proper heat dispersal.
Before you start 01 Operating range of remote control unit The remote control may not work properly if: • There are obstacles between the remote control and the receiver's remote sensor. • Direct sunlight or fluorescent light is shining onto the remote sensor. • The receiver is located near a device that is emitting infrared rays. • The receiver is operated simultaneously with another infrared remote control unit.
02 5 minute guide Introduction to home theater You are probably used to using stereo equipment to listen to music, but may not be used to home theater systems that give you many more options (such as surround sound) when listening to soundtracks. Home theater refers to the use of multiple audio tracks to create a surround sound effect, making you feel like you're in the middle of the action or concert.
5 minute guide 02 Listening to Surround Sound This receiver was designed with the easiest possible setup in mind, so with the following quick setup guide, you should have your system hooked up for surround sound in no time at all. In most cases, you can simply leave the receiver in the default settings. 1 Hook up your DVD player. For surround sound, you’ll want to hook up using a digital connection from the DVD player to the receiver.
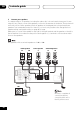
02 5 minute guide 3 Connect your speakers. A complete setup of six speakers (including the subwoofer) is shown here, but everyone’s home setup will vary. Simply connect the speakers you have in the manner shown below. The receiver will work with just two stereo speakers (the front speakers in the diagram) but using at least three speakers is recommended, and all six is best. If you’re not using a subwoofer, change the front speaker setting (see Speaker setting on page 36) to large.
5 minute guide 02 4 Plug in the receiver and switch it on, followed by your DVD player, your subwoofer and the TV. Make sure you’ve set the video input on your TV to this receiver. Check the manual that came with the TV if you don’t know how to do this. Also make sure that DVD/LD is showing in the receiver’s display, indicating that the DVD input is selected. If it isn’t, press DVD/LD on the remote control to set the receiver to the DVD input.
02 5 minute guide Using the Quick Setup You can use the Quick Setup to get your system up and running with just a few button presses. The receiver automatically makes the necessary settings after you have selected your speaker setup and room size. If you want to make more specific settings, refer to Choosing your receiver setup on pages 35 to 39. Use the front panel controls for the steps below. Check the table below to find the speaker setup that corresponds with your system.
Connecting up 03 Before making or changing the connections, switch off the power and disconnect the power cord from the AC outlet. Audio/Video cords Digital audio cords/Optical cables Use audio/video cords (not supplied) to connect the audio/video components and a video cord to connect the monitor TV. Commercially available digital audio coaxial cords (standard video cords can also be used) or optical cables (not supplied) are used to connect digital components to this receiver.
03 Connecting up Connecting digital components For proper decoding of Dolby Digital/DTS soundtracks, you need to make digital audio connections. You can do this by either coaxial or optical connections (you don’t need to do both). The quality of these two types of connections is the same, but since some digital components only have one type of digital terminal, it is a matter of matching like with like (for example, the coaxial output from the component to the coaxial input on the receiver).
Connecting up 03 Connecting DVD 5.1 channel components If you prefer to use a seperate component for decoding DVDs, you can connect a decoder or a DVD player with multi-channel analog outputs to the multi-channel inputs of this receiver. When connecting your equipment, always make sure the power is turned off and the power cord is disconnected from the wall outlet. CENTER OUTPUT SUBWOOFER OUTPUT SURROUND OUTPUT DVD/multi-channel decoder VIDEO with 5.
03 Connecting up AUDIO OUTPUT VIDEO OUTPUT S-VIDEO TV tuner (or Satellite tuner) OUTPUT The arrows indicate the direction of the signal. S-VIDEO OUTPUT VIDEO OUTPUT AUDIO DVD player (or LD player) OUTPUT S-VIDEO INPUT The arrows indicate the direction of the signal. VIDEO INPUT TV (monitor) Connecting antennas Connect the AM loop antenna and the FM wire antenna as shown at right. To improve reception and sound quality, connect external antennas (see Using external antennas, next page).
Connecting up 03 AM loop antenna Using external antennas Assemble the antenna and connect to the receiver. Attach to a wall, etc. (if desired) and face in the direction that gives the best reception. To improve FM reception Connect an external FM antenna. FM UNBAL 75Ω Antenna snap connectors 75 Ω coaxial cable Twist the exposed wire strands together and insert into the hole, then snap the connector shut.
03 Connecting up Connecting the speakers A complete setup of six speakers (including the subwoofer) is shown here, but everyone’s home setup will vary. Simply connect the speakers you have in the manner shown below. The receiver will work with just two stereo speakers (the front speakers in the diagram) but using at least three speakers is recommended, and a complete setup is best for surround sound.
Connecting up 03 Make sure that all the bare speaker wire is twisted together and inserted fully into the speaker terminal. If any of the bare speaker wire touches the rear panel it may cause the power to cut off as a safety measure. Use good quality speaker wire to connect the speakers to the receiver. Hints on speaker placement Speakers are usually designed with a particular placement in mind. Some are designed to be floorstanding, while others should be placed on stands to sound their best.
03 Connecting up AC outlet [switched 100 W (0.8 A) max] Power supplied through this outlet is turned on and off by the receiver's power switch. Total electrical power consumption of connected equipment should not exceed 100 W (0.8 A). AC OUTLET SWITCHED 100 W MAX 0.8 A MAX DO NOT CONNECT A MONITOR, TV SET, HEATER, OR SIMILAR APPLIANCE TO THIS UNIT'S AC OUTLET. Do not connect appliances with high power consumption to the AC OUTLET in order to avoid overheating and fire risk.
Controls and displays 04 ADVANCED SURROUND (page 30, 32) Use to switch between the various surround modes. Remote Control (VSX-D512) 12 13 RECEIVER SOURCE INPUT SELECT 1 STEREO/DIRECT (pages 30–31) Switches direct playback on or off. Direct playback bypasses the tone controls and channel levels for the most accurate reproduction of a source.
04 Controls and displays 9 Component/Tuner controls The main buttons (3, 7, etc.) are used to control a component after you have selected it using the MULTI CONTROL buttons. The tuner/ DTV controls above these buttons can be accessed after you have selected the corresponding MULTI CONTROL button (TUNER or TV/SAT (when connected to DTV)). RETURN Returns to the last screen selected when using a digital TV tuner. BAND DTV ON/OFF Use to switch between the AM and FM bands when the tuner is selected.
Controls and displays 19 04 GUIDE Use to display the guides on a digital TV. SUBTITLE Displays/changes the subtitles included in multilingual DVD-Video discs. 20 ENTER (page 48–50) It can be used to enter commands for TV, CATV and TUNER. 21 TV CONTROL buttons: These controls are for your TV. They are dedicated TV controls and will work no matter what mode the remote control is in. They can, however, be set for different TVs. By default they will control the TV.
04 Controls and displays ADVANCED SURROUND (page 30, 32) Use to switch between the various surround modes. Remote Control (VSX-D412) STEREO (pages 30–31) Switches direct playback on or off. Direct playback bypasses the tone controls and channel levels for the most accurate reproduction of a source.
Controls and displays 04 EFFECT +/– (page 32) Use to add or subtract the amount of effect in the Movie, Music and Expanded Advanced Surround modes. 10 Tuner controls The TUNING +/– buttons can be used to find radio frequencies. The STATION +/– buttons can be used to select preset radio stations (pages 42–43). BAND (page 41) Use to switch between the AM and FM bands when the tuner is selected. CLASS (pages 42–43) Use to switch between the three banks (classes) of station presets.
04 Controls and displays Front Panel 1 2 4 3 5 6 7 INPUT SELECTOR MULTI JOG ENTER STANDBY STANDBY/ON MASTER VOLUME STATION STANDARD TUNING ADVANCED SURROUND STEREO/ DIRECT SIGNAL SELECT MONITOR MIDNIGHT LOUDNESS TONE QUICK SETUP DOWN LISTENING MODE TUNER EDIT PHONES CLASS BAND MPX INPUT ATT UP MULTI JOG FL DIMMER MULTI JOG R 8 9 10 11 12 13 14 15 16 17 18 19 20 21 1 STANDBY/ON Switches the receiver between on and standby.
Controls and displays 04 ADVANCED SURROUND (pages 30, 32) Use to switch between the various surround modes. STEREO/DIRECT (pages 30–31) Switches direct playback on or off. Direct playback bypasses the tone controls and channel levels for the most accurate reproduction of a source. 16 SIGNAL SELECT (page 31, 34) Use to select between an analog or digital signal. 17 MONITOR (page 44) Press to switch tape monitoring on/off. 18 MIDNIGHT (page 32) Use when listening to movie soundtracks at low volumes.
04 Controls and displays Display 2 1 SIGNAL AUTO DIGITAL DIGITAL ANALOG DTS 3 4 DIGITAL PROLOGIC ADV.SURR. 5 ATT 6 7 8 9 DIRECT MONITOR MIDNIGHT STEREO LOUDNESS MONO TUNED SP A dB 10 1 SIGNAL SELECT indicators Lights to indicate the type of input signal assigned for the current component: AUTO : Lights when AUTO signal select is on. DIGITAL : Lights when a digital audio signal is detected. 2 DIGITAL : Lights when a Dolby Digital signal is detected.
Controls and displays 04 12 LOUDNESS Lights during Loudness listening. 13 TUNER indicators STEREO : Lights when a stereo FM broadcast is being received in auto stereo mode. MONO : Lights when the mono mode is set using the MPX button. TUNED : Lights when a broadcast is being received. 14 Master volume level Shows the overall volume level. --- dB indicates the minimum level, and – 0dB indicates the maximum level.
05 Playing sources Introduction to Sound Modes There are three basic sound options: Stereo/ Direct, Standard or Advanced Surround. Stereo/Direct When you select STEREO or DIRECT, you will hear the source through just the front left and right speakers (and possibly your subwoofer depending on your speaker settings). Dolby Digital and DTS multi-channel sources are downmixed to stereo.
Playing sources 05 Expanded This mode is especially designed to give sound depth to stereo sources. The overall effect builds a dynamic and broad sound space, allowing two-channel (stereo) signals to imitate a five speaker sound. Use with Dolby Pro Logic for a stereo surround effect. You can also use with Dolby Digital sources for a wider stereo field than the Standard modes. 5-Channel Stereo This can be selected to give multi-channel sound to a stereo source, using all the speakers in your setup.
05 Playing sources Listening to multi-channel playback VSX-D412 VSX-D512 INPUT SELECTOR CD CD-R/ VCR/ TUNER TAPE/MD DVR Using Advanced Surround Dolby Pro Logic, Dolby Digital and DTS signal processing is done automatically corresponding to the input signal. RECEIVER RECEIVER DVD/LD TV/SAT 5 Start playback of the component you selected in step 1.
Playing sources 05 • Press MIDNIGHT/LOUDNESS. Each press cycles through the effects as follows: • The tone controls can only be used with the Stereo sound mode. Midnight • When the receiver is switched to Direct, using the tone controls automatically switches the receiver to Stereo mode. Off Loudness You can also press MIDNIGHT or LOUDNESS on the front panel. Each press switches the effect on or off.
05 Playing sources Selecting the multi-channel analog inputs Connect a DVD player with 5.1 channel output to listen to 5.1 channel playback. 1 Select DVD/LD if it is not already selected. Use the INPUT SELECTOR (VSX-D412)/MULTI CONTROL (VSX-D512) buttons on the remote (or the MULTI JOG/INPUT SELECTOR dial on the front panel). 2 Press SIGNAL SELECT (front panel) repeatedly to select DVD 5.1 ch. To cancel 5.1 channel playback, use the SIGNAL SELECT button to select an input signal (other than DVD 5.1 ch).
Setting up the receiver 06 Choosing your receiver setup Even though you may already have your system up and running after using the 5 minute guide on pages 8 to 12, you should also be sure to complete the following set up operations to ensure the best possible surround sound. This is particularly important when using Dolby surround. You only need to make these settings once (unless you change the placement of your current speaker system or add new speakers, etc.).
06 Setting up the receiver 4 Use ’ or ‘ to adjust the setting. The setting is entered automatically. 5 Repeat steps 3 and 4 to set other surround modes. 6 When you’re done, press ENTER to exit. The setting display is automatically exited after 20 seconds of inactivity. • Default setting: S (all speakers) You must let the receiver know how many speakers you have, and how big they are. The size you choose (large or small) determines how much bass is sent from the receiver to the speakers.
Setting up the receiver 100Hz 150Hz 06 Front speaker distance setting • Default setting: 10 ft. Sets the distance from the front speakers to the listening position. 200Hz 100 Hz Sends bass frequencies below 100 Hz to the subwoofer (or L speakers). 150 Hz Sends bass frequencies below 150 Hz to the subwoofer (or L speakers). 200 Hz Sends bass frequencies below 200 Hz to the subwoofer (or L speakers).
06 Setting up the receiver When S is selected in the speaker setting, the surround distance cannot be set. ch 1. R ch 2 setting, the left front speaker will play channel 1 and the right front speaker will play channel 2. • Use ’ or ‘ to cycle through the possible DUAL MONO settings. Dynamic range control setting • Default setting: OFF Dynamic range is the difference between the loudest and softest sounds in any given signal.
Setting up the receiver Setting the relative volume level of each channel • Default setting: 0 dB For best surround sound playback, you should set the relative channel levels from the main listening position. You can set seperate levels for each surround mode. 1 Press STANDARD. 06 • Test tone is only output in Standard modes. • Since the subwoofer transmits an ultra-low frequency its sound may seem quieter than it actually is. VSX-D412 VSX-D512 2 Press TEST TONE to output the test tone.
07 Using the tuner 3 Listening to the radio The following steps show you how to tune to FM and AM radio broadcasts using the automatic (search) and manual (step) tuning functions. Once you are tuned to a station you can memorize the frequency for recall later—see Saving station presets on the next page for more on how to do this. VSX-D412 VSX-D512 Tune to a station.
Using the tuner 07 Tuning directly to a station (VSX-D512 only) Sometimes, you'll already know the frequency of the station you want to listen to. In this case, you can simply enter the frequency directly using the number buttons on the remote control. 1 Press the TUNER button on the remote control to select the tuner. 2 Use the BAND button to change the band (FM or AM), if necessary. Each press switches the band between FM and AM. 3 Press D.ACCESS (Direct Access).
07 Using the tuner Saving station presets If you often listen to a particular radio station, it's convenient to have the receiver store the frequency for easy recall whenever you want to listen to that station. This saves the effort of manually tuning in each time. This unit can memorize up to 30 stations, stored in three banks, or classes, (A, B and C) of 10 stations each. When saving an FM frequency, the MPX setting (see previous page) is also stored.
Using the tuner 07 Naming station presets Listening to station presets For easier identification, you can name your station presets. Having stored up to 30 stations (see previous page), preset stations can be easily recalled. 1 Choose the station preset you want to name. See Listening to station presets (this page) for how to do this. 1 Press the TUNER button on the remote control to select the tuner. 2 If you’re using the remote control, press RECEIVER (VSX-D412 only). 3 Press TUNER EDIT (T.
08 Making Recordings Making an audio or a video recording You can make an audio or a video recording from the built-in tuner, or from an audio or video source connected to the receiver (such as a CD player or TV) through the analog jacks. You will need to connect a CD recorder, tape deck, MD, VCR, or DVR deck to the CD-R/TAPE/MD or VCR/DVR outputs on the receiver to do so (see pages 14–15 for more on this).
Controlling the rest of your system Setting the remote to control other components (VSX-D512 only) There are several ways to set your remote to control the other components in your system. The easiest way to do this is to assign the component’s manufacturer preset code (listed on pages 51–52) to one of the MULTI CONTROL buttons on the remote control.
09 Controlling the rest of your system 2 Press the MULTI CONTROL button for the component you want to control. The LED lights. Direct function (VSX-D512 only) • Default setting: ON 3 Use the number buttons to enter the 3 digit setup code (see pages 51 for “Preset Code List”). The LED blinks again. If the correct code has been input the power of the component being input will turn on or off.
Controlling the rest of your system 09 Clearing the Preset Codes (VSX-D512 only) You can clear all presets and restore the factory default settings. 1 While pressing the RECEIVER button press and hold the 0 button for three seconds. The LED on the remote control blinks three times indicating all the preset codes have been cleared. The remote control will reset as described in the box below.
09 Controlling the rest of your system Controls for TVs (VSX-D512 only) This remote control can control components after entering the proper codes (see pages 45–46). Use the MULTI CONTROL buttons to select the component. Button (s) TV Function Switches the DTV on or off. DTV Switches the TV or CATV between standby and on. Cable TV/Satellite TV/TV INPUT SELECT Switches the TV input. (Not possible with all models.) TV CHANNEL +/– Selects channels.
Controlling the rest of your system Button (s) Function }]’‘ & Select or adjust and navigate items on the menu screen. ENTER ENTER brings up the DTV menus. Press to select or adjust and navigate items on the menu screen. 09 Components DTV Cable TV/Satellite TV/TV/ DTV The six TV CONTROL buttons on the remote control are dedicated to control the TV assigned to the TV CONT button. Thus if you only have one TV to hook up to this system assign it to the TV CONT MULTI CONTROL button.
09 Controlling the rest of your system Button (s) 50 En Function Components ¡ Hold down for fast forward playback. CD/MD/CD-R/VCR/DVD/LD/ DVR player/Cassette deck 1 Hold down for fast reverse playback. CD/MD/CD-R/VCR/DVD/LD/ DVR player/Cassette deck 7 Stops playback (on some models, pressing this when the disc is already stopped will cause the disc tray to open). CD/MD/CD-R/VCR/DVD/LD/ DVR player/Cassette deck Number buttons Directly access tracks on a program source.
Controlling the rest of your system 09 Preset Code List (VSX-D512 only) You should have no problem controlling a component if you find the manufacturer in this list, but please note that there are cases where codes for the manufacturer in the list will not work for the model that you are using. There are also cases where only certain functions may be controllable after assigning the proper preset code. The TV, STB and DTV codes can only be set to the TV/SAT or TV CONT button.
09 Controlling the rest of your system VCR Manufacturer ORION FUNAI RCA ZENITH MAGNAVOX FISHER PANASONIC TOSHIBA JVC HITACHI SONY MITSUBISHI SANYO SHARP GOLDSTAR OPTIMUS GRADIENTE LOEWE PIONEER DVD Recorder Manufacturer PIONEER TAPE Manufacturer DENON FISHER JVC KENWOOD ONKYO OPTIMUS PANASONIC SONY TEAC TECHNICS YAMAHA PIONEER 52 En Code 424 441 401, 406, 408, 414, 405, 413 411, 415 403, 404, 417 414, 408, 426, 403 410, 426, 412, 427, 425, 420 408, 432, 433 405, 409, 426 428, 430, 429, 408, 414, 431 407
Additional information 10 Troubleshooting Incorrect operations are often mistaken for trouble and malfunctions. If you think that there is something wrong with this component, check the points below. Sometimes the trouble may lie in another component. Investigate the other components and electrical appliances being used. If the trouble cannot be rectified even after exercising the checks listed below, ask your nearest Pioneer authorized service center or your dealer to carry out repair work.
10 Additional information Problem Remedy No sound from surround or center speakers. • Refer to Speaker setting on page 36 to check the speaker settings. • Refer to Setting the relative volume level of each channel on page 39 to check the speaker levels. • Connect the speakers properly (refer to pages 18–19). Noise during playback of a cassette deck. • Move the cassette deck further from your receiver, until the noise disappears. Sound is produced from other components, but not from LD or DVD player.
Additional information 10 Specifications Video Section Amplifier Section Input (Sensitivity/Impedance) VCR/DVR, DVD/LD, TV/SAT ............. 1 Vp-p/75 Ω Continuous average power output of 100 watts* per channel, min., at 8 ohms, from 20 Hz to 20,000 Hz with no more than 0.2 %** total harmonic distortion (front). Continuous Power Output (Stereo) Front ...................................... 100 W per channel (20–20,000 Hz, THD 0.2 %, 8 Ω) Continuous Power Output (Surround) Front ........................
10 Additional information Miscellaneous Power Requirements ................ AC 120 V, 60 Hz Power Consumption ................................. 260 W In Standby ................................................... 1.0 W AC Outlet .................. 100 W MAX. (SWITCHED) Dimensions .......................... 420 (W) x 158 (H) x 393 (D) mm (16-9/16 (W) x 6-4/16 (H) x 15-8/16 (D) in.) Weight (without package) ......................... 9.0 kg (19.8 lb) Furnished Parts AM loop antenna ..........................
Additional information 10 57 En
10 58 En Additional information
Additional information 10 59 En
Published by Pioneer Corporation. Copyright © 2002 Pioneer Corporation. All rights reserved. PIONEER CORPORATION 4-1, Meguro 1-Chome, Meguro-ku, Tokyo 153-8654, Japan PIONEER ELECTRONICS (USA) INC. P.O. BOX 1540, Long Beach, California 90810-1540, U.S.A. TEL: (800) 421-1404 PIONEER ELECTRONICS OF CANADA, INC. 300 Allstate Parkway, Markham, Ontario L3R OP2, Canada TEL: (905) 479-4411 PIONEER EUROPE NV Haven 1087, Keetberglaan 1, B-9120 Melsele, Belgium TEL: 03/570.05.