
User manual


Home Menu
7
7
54
58
7
4
The Auto Power Down menu
Set to automatically turn off the receiver after a specified time
has passed (when the power has been on with no operation
for several hours).
1
Select ‘Auto Power Down’ from the Home Menu.
2
Set the receiver to automatically turn off after a
specified time has passed (VSX-S510 only) with no
operation and no input volume.
VSX-S510 only
•
Select 15 minutes (default setting) or 30 minutes,
60 minutes or OFF.
VSX-S310 only
•
You can select 2, 4 or 6 hours (default setting), or OFF
(if no automatic shutoff is desired).
Important
•
Auto power down will occur if the HDMI AUDIO
PARAMETER is set to THRU and no controls are performed.
VSX-S510 only
•
When the network standby is ON, will move to network
standby condition.
•
Even if images are being output, if the input volume level is
exceptionally low, it will automatically turn OFF.
•
Depending on the connected device, the static caused by
the device may prevent the auto power down function from
activating.
•
If the input volume level is exceptionally low, in some cases
the auto power down function may be activated.
•
During photo viewer playback, continuing playback without
performing any control operations will activate auto power
down.
3
When you’re finished, press
RETURN
.
You return to the Home Menu.
The Network Standby menu (VSX-S510 only)
This setting allows the AirPlay function for operating the
receiver from a computer connected on the same LAN as the
receiver to be used even when the receiver is in the standby
mode.
•
Default setting: OFF
1
Select ‘Network Standby’ from the Home Menu.
2
Choose ON or OFF for the Network Standby.
•
ON – The AirPlay function can be used even when the
receiver is in the standby mode.
•
OFF – The AirPlay function cannot be used when the
receiver is in the standby mode (This lets you reduce
power consumption in the standby mode).
-
If the Network Standby setting is set to ON, the
power consumption during standby will increase.
3
When you’re finished, press
RETURN
.
You return to the Home Menu.
The MHL Setup menu (VSX-S510 only)
Select whether or not to switch the input automatically to the
MHL input when an MHL-compatible device is connected.
Note
•
This is only valid for MHL-compatible devices supporting
this function.
1
Select ‘MHL Setup’ from the Home Menu.
2
Choose ON or OFF for the MHL Setup.
3
When you’re finished, press
RETURN
.
You return to the Home Menu.
The Speaker System setting (VSX-S510 only)
Set the usage for the surround back speaker terminals and
speaker B terminals.
•
Default setting: NORMAL
1
Select ‘Speaker System’ from the Home Menu.
2
Select the speaker system setting using
/
.
•
Normal – Regular 5.1 or 7.1 channel surround sound
system (Plan [A] or Plan [D]).
•
SP-B – Enables Speaker B to be installed in another
room so that the sound of the stereo can be enjoyed
(Plan [B]).
•
SB-Single – A surround system with an additional
surround back speaker (one unit) at the back.
3
When you’re finished, press
RETURN
.
You return to the Home Menu.
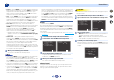
Home Menu
1
. Auto MCACC
2
. Manual SP Setup
3
. Input Assign
4. Auto Power Down
5. HDMI Setup
6. Network Standby
7. MHL Setup
8. Speaker System
9. OSD Setup
4
. Auto Power Down
Return
Auto Power Down
OFF
VSX-S510
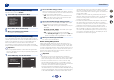
6
. Network Standby
Return
Network Standby
OFF
Home Menu
1
. Auto MCACC
2
. Manual SP Setup
3
. Input Assign
4. Auto Power Down
5. HDMI Setup
6. Network Standby
7. MHL Setup
8. Speaker System
9. OSD Setup
7
. HML Setup
Return
Auto Switching
ON
Home Menu
1
. Auto MCACC
2
. Manual SP Setup
3
. Input Assign
4. Auto Power Down
5. HDMI Setup
6. Network Standby
7. MHL Setup
8. Speaker System
9. OSD Setup
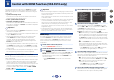
Home Menu
1
. Auto MCACC
2
. Manual SP Setup
3
. Input Assign
4. Auto Power Down
5. HDMI Setup
6. Network Standby
7. MHL Setup
8. Speaker System
9. OSD Setup
8
. Speaker System
Return
SP System Normal