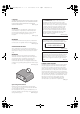
X-CM32_VXE8_En.book 1 ページ 2014年3月12日 水曜日 午後2時52分 X-CM32BTD-K/-W X-CM325BTD-W X-CM42BTD-K/-W CD Receiver System Discover the benefits of registering your product online at http://www.pioneer.co.uk (or http://www.pioneer.eu).
X-CM32_VXE8_En.book 2 ページ 2014年3月12日 CAUTION TO PREVENT THE RISK OF ELECTRIC SHOCK, DO NOT REMOVE COVER (OR BACK). NO USER-SERVICEABLE PARTS INSIDE. REFER SERVICING TO QUALIFIED SERVICE PERSONNEL. D3-4-2-1-1_B1_En WARNING This equipment is not waterproof. To prevent a fire or shock hazard, do not place any container filled with liquid near this equipment (such as a vase or flower pot) or expose it to dripping, splashing, rain or moisture.
X-CM32_VXE8_En.book 3 ページ 2014年3月12日 水曜日 午後2時52分 Information for users on collection and disposal of old equipment and used batteries Symbol for equipment These symbols on the products, packaging, and/or accompanying documents mean that used electrical and electronic products and batteries should not be mixed with general household waste.
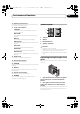
X-CM32_VXE8_En.book 4 ページ 2014年3月12日 水曜日 午後2時52分 Thank you for buying this Pioneer product. Please read through these operating instructions so that you will know how to operate your model properly. After you have finished reading the instructions, put them in a safe place for future reference. Contents 01 Before you start What’s in the box . . . . . . . . . . . . . . . . . . . . . . . . . . . . . . . . . . . .5 Loading the batteries in the remote control . . . . . . . . . . . . . .
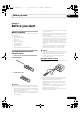
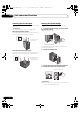
X-CM32_VXE8_En.book 5 ページ 2014年3月12日 水曜日 午後2時52分 Before you start 01 English Chapter 1: Before you start Loading the batteries in the remote control 1 Open the rear lid and load the batteries as illustrated below. Español Please confirm that the following accessories are in the box when you open it.
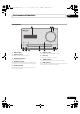
X-CM32_VXE8_En.book 02 6 ページ 2014年3月12日 水曜日 午後2時52分 Part names and functions Chapter 2: Part names and functions 1 Remote control 2 1 2 STANDBY/ON OPEN/CLOSE CD USB TUNER AUDIO IN iPod BT AUDIO CLOCK/TIMER SLEEP 3 2 iPod (X-CM42BTD only) 12 Use to switch between the iPod controls and the receiver controls (page 16). BT AUDIO Use to play the audio file using the Bluetooth network (page 31). 3 3 P.
X-CM32_VXE8_En.book 7 ページ 2014年3月12日 水曜日 午後2時52分 Part names and functions 10 Playback control buttons Speaker system 11 Tuner control buttons ST/MONO Use to switch the sound mode between stereo and monaural. (page 25) 3 2 4 Use to search for RDS Auto station program memory (page 26). 1 Use to search for RDS program types (page 26). 2 Woofer RDS DISPLAY 3 Bass Reflex Duct Press to change the RDS display for information mode (page 26).
X-CM32_VXE8_En.book 02 8 ページ 2014年3月12日 水曜日 午後2時52分 Part names and functions Attaching the Non-skid pads Rotating the Speaker Badge Apply the accessory non-skid pads to the bottom surfaces of the speakers. The grill frame speaker badge can be rotated. Operate as follows. Important • Use the speaker is usually in an upright position. When placing speakers upright 1 Grasp the speaker badge (1), pull forward (2), and turn left (3). The speaker badge will rotate.
X-CM32_VXE8_En.book 9 ページ 2014年3月12日 水曜日 午後2時52分 Part names and functions 02 1 2 English Front panel 3 Français PHONES AUDIO IN 4 5 1 Main display 2 Volume control 6 Use to set the listening volume (page 13). 3 Volume illumination Light when the power on. 4 Headphone socket Use to connect headphones. When the headphones are connected, there is no sound output from the speakers.
X-CM32_VXE8_En.book 02 10 ページ 2014年3月12日 水曜日 午後2時52分 Part names and functions Top panel 1 PUSH OPEN STANDBY/ON 2 1 iPod/iPhone connector port (X-CM42BTD only) To connect the iPod/iPhone, press the PUSH OPEN tab (page 17). 2 STANDBY/ON Switches the receiver between standby and on (page 19). 3 Playback control buttons Selects the desired track or file to be played back. Use to stop the playback. Stops playback or resumes playback from the pause point.
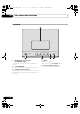
X-CM32_VXE8_En.book 11 ページ 2014年3月12日 水曜日 午後2時52分 Connections 03 Connections Speaker connection Left speaker Right speaker This unit’s rear panel Español • Push open the tabs and insert exposed wire. • The provided speaker wire with red tube is for the (+) terminal. Connect the wire with red tube the (+) terminal, and other wire to the (–) terminal. • Both speakers can be used on either the right or the left side.
X-CM32_VXE8_En.book 03 12 ページ 2014年3月12日 水曜日 午後2時52分 Connections Connecting antennas Plugging in • Connect the DAB/FM wire antenna as shown below. • To improve reception and sound quality, connect external antennas (see Using external antennas). Before making or changing the connections, switch off the power and disconnect the power cord from the AC outlet. After you’ve finished making all connections, plug the unit into an AC outlet.
X-CM32_VXE8_En.book 13 ページ 2014年3月12日 水曜日 午後2時52分 Getting started 04 English Chapter 4: Getting started General control Press the STANDBY/ON to turn the power on. After use: Input function Press the STANDBY/ON to enter the power stand-by mode. When the INPUT on main unit is pressed, the current function will change to different mode. Press the INPUT repeatedly to select desired function.
04_Getting_started_X-CM32.fm 04 14 ページ 2014年4月8日 Sound controls Setting the wake-up timer Equalizer Used to change the existing timer setting, or to set a new timer. FLAT A flat and basic sound 1 Press STANDBY/ON to turn the power on. 2 Press and hold CLOCK/TIMER. 3 Press / to select “ONCE” or “DAILY”, then press ENTER. ONCE – Once timer play works for one time only at a preset time. DAILY – Daily timer play works at the same preset time and days of week.
X-CM32_VXE8_En.book 15 ページ 2014年3月12日 水曜日 午後2時52分 Getting started It can be used to re-use an existing timer setting. Using Headphones 1 As well as steps 1 through 3 in “Setting the wake-up timer”. Connect to the jack plug of the headphones. When the headphones are connected, there is no sound output from the speakers. Cancelling the wake-up timer It can be used to turn off the timer setting. 1 As well as steps 1 through 3 in “Setting the wake-up timer”.
X-CM32_VXE8_En.book 05 16 ページ 2014年3月12日 水曜日 午後2時52分 iPod/iPhone/iPad playback Chapter 5: iPod/iPhone/iPad playback Merely by connecting your iPod/iPhone/iPad to this unit, you can enjoy high-quality sound from your iPod/iPhone/iPad. Confirming what iPod/iPhone/iPad models are supported The iPod/iPhone/iPad playable on this unit are shown below.
X-CM32_VXE8_En.book 17 ページ 2014年3月12日 水曜日 午後2時52分 iPod/iPhone/iPad playback 1 Press the PUSH OPEN. Close the iPod/iPhone connector port (X-CM42BTD only) • While pull the PULL CLOSE knob (1), close the iPod/ iPhone/iPad connector port firmly (2). • When iPod/iPhone is not connected to the unit, close the iPod/iPhone connector port firmly. 2 Open the iPod/iPhone connector port. 3 Connect your iPod/iPhone.
X-CM32_VXE8_En.book 05 18 ページ 2014年3月12日 水曜日 午後2時52分 iPod/iPhone/iPad playback 2 Set up to stand the iPod/iPhone/iPad. When using an iPod/iPhone Make sure the iPod/iPhone cable is aligned along the groove for it on the back of the stand that comes with the unit. Back of stand Playing iPad 1 Connect your iPad. If an iPad is connected when this unit is on, playback of the iPad will not begin. 2 Press USB as the input source. “USB/IPOD” is shown on the main display.
06_DiscPlayback_X-CM32.fm 19 ページ 2014年4月8日 火曜日 午後8時33分 Disc playback 06 Disc playback MP3: WMA: WMA (Windows Media Audio) files are Advanced System Format files that include audio files which are compressed with Windows Media Audio codec. WMA is developed by Microsoft as an audio format file for Windows Media Player. • This system supports WMA (Sampling rates: 32 kHz/44.1 kHz/48 kHz; Bit rates: 64 kbps to 320 kbps).
X-CM32_VXE8_En.book 06 20 ページ 2014年3月12日 水曜日 午後2時52分 Disc playback Advanced CD or MP3/WMA disc playback STANDBY/ON OPEN/CLOSE CD USB TUNER AUDIO IN iPod BT AUDIO CLOCK/TIMER SLEEP DISPLAY FOLDER TUNE+ MEMORY /PROGRAM MENU 2 3 P.BASS 4 5 PRESET 7 8 + + 6 MUTE – 9 REPEAT VOLUME TUNE– BASS/TREBLE CLEAR RANDOM 0 Repeat play can play one track, all tracks or a programmed sequence continuously. To repeat one track: Press REPEAT repeatedly until “RPT ONE” appears.
X-CM32_VXE8_En.book 21 ページ 2014年3月12日 水曜日 午後2時52分 Disc playback 06 There are many music sites on the internet that you can download MP3/WMA music files. Follow the instructions from the website on how to download the music files. You can then play back these downloaded music files by burning them to a CD-R/RW disc. • Your downloaded song/files are for personal use only. Any other usage of the song without owner’s permission, is against the law.
X-CM32_VXE8_En.book 06 22 ページ 2014年3月12日 Switch the display contents Specify the folder to play, do the follwing steps. STANDBY/ON OPEN/CLOSE DISPLAY TUNE+ 1 FOLDER CD USB TUNER iPod BT AUDIO CLOCK/TIMER AUDIO IN ENTER SLEEP MEMORY /PROGRAM MENU EQUALIZER 1 2 3 P.BASS 4 5 6 7 8 9 PRESET CLEAR 1 REPEAT TUNE– Title/Artist/Album display – Kind of file display Number of folder/track display DIMMER Press CD, and load an MP3/WMA disc.
X-CM32_VXE8_En.book 23 ページ 2014年3月12日 水曜日 午後2時52分 USB playback 07 English Chapter 7: USB playback Repeat play 1 To repeat one track: Press REPEAT repeatedly until “RPT ONE” appears. Press ENTER. To repeat all tracks: Press REPEAT repeatedly until “RPT ALL” appears. Press ENTER. To repeat desired tracks: Press USB as the input source. “USB/IPOD” is shown on the main display. 2 Repeat play can play one track, all tracks or a programmed sequence continuously. Connect the USB storage device.
X-CM32_VXE8_En.book 07 24 ページ 2014年3月12日 水曜日 午後2時52分 USB playback Specify the folder to play Specify the folder to play, do the follwing steps. 1 Press USB, and connect the USB storage device. 2 Press FOLDER, and press / to select desired playback folder. 3 Press ENTER. Playback will start from the first song of the selected folder. • In case of stop, press /, and the folder can be selected. Switch the display contents This unit can switch the information recorded in the USB storage device.
X-CM32_VXE8_En.book 25 ページ 2014年3月12日 水曜日 午後2時52分 Using the tuner 08 English Chapter 8: Using the tuner Listening to the radio broadcasts OPEN/CLOSE CD USB TUNER AUDIO IN iPod BT AUDIO CLOCK/TIMER SLEEP DISPLAY FOLDER TUNE+ ENTER MEMORY /PROGRAM MENU EQUALIZER 1 2 3 4 5 6 P.
X-CM32_VXE8_En.book 08 26 ページ 2014年3月12日 水曜日 午後2時52分 Using the tuner To recall a memorised station 1 Press PRESET +/– to select the desired station. To scan the preset stations The stations saved in the memory can be scanned automatically. (Preset memory scan) 1 Press and hold PRESET +/–. The preset number will appear and the programmed stations will be tuned in sequentially, for 5 seconds each. 2 Press PRESET +/– again when the desired station is located.
X-CM32_VXE8_En.book 27 ページ 2014年3月12日 水曜日 午後2時52分 Using the tuner 08 Information provided by RDS Each time the RDS DISPLAY is pressed, the display will switch as follows: OPEN/CLOSE DVD/CD USB iPod BT AUDIO SUBTITLE ANGLE 1 2 3 ZOOM MEMORY PROGRAM 4 5 ENTER SLEEP EQUALIZER PRESET P.
X-CM32_VXE8_En.book 08 28 ページ 2014年3月12日 After the scan: About DAB+ (Digital Audio Broadcasting) Digital Audio Broadcasting is a digital transmission system where audio signals are converted to digital signals for broadcasting. DAB+ is broadcast as a group of data called multiplex (ensemble) which may contain one or more stations (services). Each station contains a primary service and there may be one or more secondary services.
X-CM32_VXE8_En.book 29 ページ 2014年3月12日 水曜日 午後2時52分 Using the tuner You can switch DAB+ display information. Press the DAB DISPLAY button. Each time the button is pressed, the information display changes in the following order. When "NO SIG" appears, the DAB DISPLAY button does not allow you to change the display. DAB Frequency table (BAND III) Frequency Label Frequency Label 208.064 MHz 9D 176.640 MHz 5B 209.936 MHz 10A 178.352 MHz 5C 211.648 MHz 10B Station name is displayed.
X-CM32_VXE8_En.book 09 30 ページ 2014年3月12日 水曜日 午後2時52分 Other connections Chapter 9: Other connections CAUTION • Before making or changing the connections, switch off the power and disconnect the power cord from the AC outlet. Connect the rear panel LINE IN audio jacks to your auxiliary playback component. This unit’s rear panel Connecting auxiliary components Connect the front panel AUDIO IN mini-plug jack to your auxiliary playback component.
X-CM32_VXE8_En.book 31 ページ 2014年3月12日 水曜日 午後2時52分 Bluetooth® Audio playback 10 Bluetooth® Audio playback Remote control operation The remote control supplied with this unit allows you to play and stop media, and perform other operations.
X-CM32_VXE8_En.book 10 32 ページ 2014年3月12日 Note 4 Confirm on the Bluetooth capable device that pairing has been completed. If pairing with the Bluetooth capable device has been completed correctly, the name of the Bluetooth capable device will be displayed on the front panel of the unit. (Only single-byte alphanumeric characters can be displayed. Any character that cannot be displayed will be indicated by a “*”.) Listen to music on the unit from a Bluetooth capable device 1 Press the BT AUDIO.
X-CM32_VXE8_En.book 33 ページ 2014年3月12日 水曜日 午後2時52分 Bluetooth® Audio playback The radio waves received by this unit include the radio wave coming directly from the device equipped with Bluetooth wireless technology (direct wave) and waves coming from various directions due to reflections by walls, furniture and building (reflected waves).
X-CM32_VXE8_En.book 11 34 ページ 2014年3月12日 水曜日 午後2時52分 Additional information Chapter 11: Additional information Troubleshooting Incorrect operations are often mistaken for trouble and malfunctions. If you think that there is something wrong with this component, check the points below. Sometimes the trouble may lie in another component. Investigate the other components and electrical appliances being used.
X-CM32_VXE8_En.book 35 ページ 2014年3月12日 水曜日 午後2時52分 Additional information 11 When a USB storage device is connected Check Remedy USB storage device is not recognized. Is the USB storage device properly connected? Connect the device securely (all the way in). English Problem Is the USB storage device connected This unit does not support USB hubs. Connect the USB storage via a USB hub? device directly. This unit supports portable flash memory and digital audio playback devices.
X-CM32_VXE8_En.book 11 36 ページ 2014年3月12日 水曜日 午後2時52分 Additional information When the Bluetooth wireless technology device is connected or operated Problem Remedy The Bluetooth wireless technology device cannot be connected or operated. Sound from the Bluetooth wireless technology device is not emitted or the sound is interrupted. Check that no object that emits electromagnetic waves in the 2.
X-CM32_VXE8_En.book 37 ページ 2014年3月12日 水曜日 午後2時52分 Additional information When moving this unit Place of installation Avoid the following locations: • • • • • • Places exposed to direct sunlight Humid or poorly ventilated places Extremely hot places Places exposed to vibrations Places in which there is much dust or cigarette smoke Places exposed to soot, steam or heat (kitchens, etc.) Do not place objects on this unit Do not place any objects on top of this unit.
X-CM32_VXE8_En.book 11 38 ページ 2014年3月12日 水曜日 午後2時52分 Additional information Handling discs About iPod/iPhone/iPad Storing • Always place discs in their cases and store them vertically, avoiding hot, humid places, places exposed to direct sunlight and extremely cold places. • Be sure to read the cautions included with the disc. Cleaning discs • Discs may not play if there are fingerprints or dust on them. In this case, use a cleaning cloth, etc.
X-CM32_VXE8_En.book 39 ページ 2014年3月12日 水曜日 午後2時52分 Additional information • Amplifier section RMS Power Output: . . . . . . . . . . . . . . . . . . . . . . . 15 W + 15 W (1 kHz, 10 %, T.H.D., 8 ) • Tuner section • Bluetooth Español Version . . . . . . . . . . . . . . . . . . Bluetooth Specification Ver. 3.0 Output . . . . . . . . . . . . . . . . . . . Bluetooth Specification Class 2 Estimated line-of-sight transmission distance* . . . . . . . . . . . . . . . . . . . . . . . . . . . . . . . . .
X-CM32_VXE8_En.
X-CM32_VXE8_En.
X-CM32_VXE8_En.book 40 ページ 2014年3月12日 水曜日 午後2時52分 Declaration of Conformity with regard to the R&TTE Directive 1999/5/EC Manufacturer: PIONEER HOME ELECTRONICS CORPORATION 1-1, Shin-ogura, Saiwai-ku, Kawasaki-shi, Kanagawa 212-0031, Japan EU Representative’s: Pioneer Europe NV Haven 1087, Keetberglaan 1, 9120 Melsele, Belgium http://www.pioneer.
X-CM32_VXE8_En.book 41 ページ 2014年3月12日 Português: Pioneer declara que este [*] está conforme com os requisitos essenciais e outras disposições da Directiva 1999/5/CE. Čeština: Pioneer tímto prohlašuje, že tento [*] je ve shodě se základními požadavky a dalšími příslušnými ustanoveními směrnice 1999/5/ES Eesti: Käesolevaga kinnitab Pioneer seadme [*] vastavust direktiivi 1999/5/EÜ põhinõuetele ja nimetatud direktiivist tulenevatele teistele asjakohastele sätetele.
X-CM32_VXE8_En.book 42 ページ 2014年3月12日 水曜日 午後2時52分 http://www.pioneer.co.uk http://www.pioneer.eu © 2014 PIONEER HOME ELECTRONICS CORPORATION. All rights reserved. PIONEER HOME ELECTRONICS CORPORATION 1-1, Shin-ogura, Saiwai-ku, Kawasaki-shi, Kanagawa 212-0031, Japan PIONEER ELECTRONICS (USA) INC. P.O. BOX 1540, Long Beach, California 90801-1540, U.S.A. TEL: (800) 421-1404 PIONEER ELECTRONICS OF CANADA, INC.