
Operation Manual

Connections 03
11
En
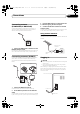
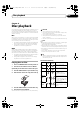
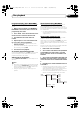
Connecting antenna
(X-HM21DAB, X-HM11DAB)
Connect the DAB/FM wire antenna as shown below. To
improve reception and sound quality, connect external
antenna (see Using external antennas below).
1 Connect the DAB/FM wire antenna into the
DAB/FM antenna socket.
For best results, extend the DAB/FM antenna fully and fix to a
wall or door frame. Don’t drape loosely or leave coiled up.
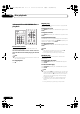
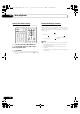
Connecting antennas (X-HM11)
Connect the AM loop antenna and the FM wire antenna as
shown below. To improve reception and sound quality,
connect external antennas (see Using external antennas
below).
1 Connect the AM antenna wires.
Hold the terminal part of the wire when connecting.
2 Fix the AM loop antenna to the attached
stand.
To fix the stand to the antenna, bend in the direction indicated
by the arrow (fig. a) then clip the loop onto the stand (fig. b).
3 Place the AM antenna on a flat surface and
in a direction giving the best reception.
4 Connect the FM wire antenna into the FM
antenna socket.
For best results, extend the FM antenna fully and fix to a wall
or door frame. Don’t drape loosely or leave coiled up.
Using external antennas
To improve FM reception
Use a PAL connector (not supplied) to connect an external FM
antenna.
Plugging in
CAUTION
• Do not use any power cord other than the one supplied
with this unit.
• Do not use the supplied power cord for any purpose
other than that described below.
Before making or changing the connections, switch off the
power and disconnect the power cord from the AC outlet.
After you’ve finished making all connections, plug the unit
into an AC outlet.
ANTENNA
DAB/FM
AM
LOOP
ANTENNA
FM
UNBAL
75 Ω
2
1
3
4
fig. a
fig. b
ANTENNA
DAB/FM
One-touch PAL
connector
75 coaxial
cable
AC IN
To AC outlet
This unit’s rear panel
Power cord
X-HM21_11DAB_X-HM11.book 11 ページ 2012年12月13日 木曜日 午後8時24分