; 60&B6<;( B(Q ERRN ࣮࣌ࢪ 㸰㸮㸯㸱ᖺ㸱᭶㸰㸳᪥ࠉ᭶᭙᪥ࠉ༗ᚋ㸵㸰㸲ศ X-SMC00 X-SMC00-W X-SMC00BT X-SMC00BT-W Slim Micro System | Système compact | Slim-Mikrosystem | Slim Micro System | Slim Microsysteem | Sistema Micro Slim | Сверхкомпактная микросистема Operating Instructions Mode d’emploi Bedienungsanleitung Istruzioni per l’uso Handleiding Manual de instrucciones Инструкции по эксплуатации
; 60&B6<;( B(Q ERRN ࣮࣌ࢪ 㸰㸮㸯㸱ᖺ㸱᭶㸰㸳᪥ࠉ᭶᭙᪥ࠉ༗ᚋ㸵㸰㸲ศ CAUTION TO PREVENT THE RISK OF ELECTRIC SHOCK, DO NOT REMOVE COVER (OR BACK). NO USER-SERVICEABLE PARTS INSIDE. REFER SERVICING TO QUALIFIED SERVICE PERSONNEL. D3-4-2-1-1_B1_En WARNING This equipment is not waterproof. To prevent a fire or shock hazard, do not place any container filled with liquid near this equipment (such as a vase or flower pot) or expose it to dripping, splashing, rain or moisture.
; 60&B6<;( B(Q ERRN ࣮࣌ࢪ 㸰㸮㸯㸱ᖺ㸯᭶㸰㸯᪥ࠉ᭶᭙᪥ࠉ༗ᚋ㸳㸯㸴ศ Information for users on collection and disposal of old equipment and used batteries Symbol for equipment These symbols on the products, packaging, and/or accompanying documents mean that used electrical and electronic products and batteries should not be mixed with general household waste.
; 60&B6<;( B(Q ERRN ࣮࣌ࢪ 㸰㸮㸯㸱ᖺ㸯᭶㸰㸯᪥ࠉ᭶᭙᪥ࠉ༗ᚋ㸳㸯㸴ศ Thank you for buying this Pioneer product. Please read through these operating instructions so that you will know how to operate your model properly. After you have finished reading the instructions, put them in a safe place for future reference. Contents 01 Before you start What’s in the box . . . . . . . . . . . . . . . . . . . . . . . . . . . . . . . 5 Loading the batteries in the remote control . . . . . . . . . 5 Using the remote control . . . . . .
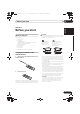
; 60&B6<;( B(Q ERRN ࣮࣌ࢪ 㸰㸮㸯㸱ᖺ㸱᭶㸰㸳᪥ࠉ᭶᭙᪥ࠉ༗ᚋ㸵㸰㸲ศ Before you start 01 English Chapter 1: Before you start Loading the batteries in the remote control 1 Open the rear lid and load the batteries as illustrated below. 2 Close the rear lid. The batteries included with the unit have been provided to allow you check product operation and may not last long. We recommend using alkaline batteries that have a longer life.
; 60&B6<;( B(Q ERRN ࣮࣌ࢪ 㸰㸮㸯㸱ᖺ㸯᭶㸰㸯᪥ࠉ᭶᭙᪥ࠉ༗ᚋ㸳㸯㸴ศ 01 Before you start Using the remote control The remote has a range of about 7 m at an angle of about 30º from the remote sensor. 30° 30° 7m Keep in mind the following when using the remote control: • Make sure that there are no obstacles between the remote and the remote sensor on the unit. • Remote operation may become unreliable if strong sunlight or fluorescent light is shining on the unit’s remote sensor.
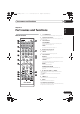
; 60&B6<;( B(Q ERRN ࣮࣌ࢪ 㸰㸮㸯㸱ᖺ㸯᭶㸰㸯᪥ࠉ᭶᭙᪥ࠉ༗ᚋ㸳㸯㸴ศ Part names and functions 02 Part names and functions 1 Remote control USB TUNER AUDIO IN iPod BT AUDIO CLOCK/TIMER SLEEP 1 2 3 4 5 6 7 8 9 3 12 SLEEP See Using the sleep timer on page 15. 4 P.BASS 13 CLEAR Use to clear the programmed play (page 20). REPEAT RANDOM 0 DISPLAY Numeric buttons (0 to 9) Use to enter the number (page 19).
; 60&B6<;( B(Q ERRN ࣮࣌ࢪ 㸰㸮㸯㸱ᖺ㸯᭶㸰㸯᪥ࠉ᭶᭙᪥ࠉ༗ᚋ㸳㸯㸴ศ 02 Part names and functions 11 Tuner control buttons ST/MONO Use to switch the sound mode between stereo and monaural. (page 24) 1 Screw the wall hanging screws into the wall, putting them the specified attachment measurement (130 mm) apart. RDS ASPM Wall hanging screws (commercially available) 2 mm to 3 mm Use to search for RDS Auto station program memory (page 25). RDS PTY Use to search for RDS program types (page 25).
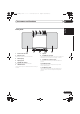
; 60&B6<;( B(Q ERRN ࣮࣌ࢪ 㸰㸮㸯㸱ᖺ㸯᭶㸰㸯᪥ࠉ᭶᭙᪥ࠉ༗ᚋ㸳㸯㸴ศ Part names and functions 02 1 2 3 4 English Front panel 5 6 POWER ON TIMER Français Español PUSH OPEN AUDIO IN 7 8 9 10 11 7 1 Electric slide CD door 7 Speaker 2 Remote sensor 8 iPod/iPhone terminal Receives the signals from the remote control. 3 Main display 4 Display panel 5 POWER ON indicator Use to connect your USB mass storage device or Apple iPod/ iPhone/iPad mini as an audio source (pages 17 and 22).
; 60&B6<;( B(Q ERRN ࣮࣌ࢪ 㸰㸮㸯㸱ᖺ㸯᭶㸰㸯᪥ࠉ᭶᭙᪥ࠉ༗ᚋ㸳㸯㸴ศ 02 Part names and functions Top panel/Rear panel STANDBY/ON INPUT BT AUDIO 1 2 3 – + VOLUME X-SMC00BT 7 4 DC IN 8 ANTENNA 1 STANDBY/ON button 5 Use to set the listening volume (page 13). 2 INPUT button 6 VOLUME –/+ Disc tray open/close button Selects the input source. Use to open or close the electric slide CD door (page 18). 3 7 EQ button (X-SMC00) Used when switching sound mode (page 14).
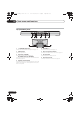
; 60&B6<;( B(Q ERRN ࣮࣌ࢪ 㸰㸮㸯㸱ᖺ㸱᭶㸰㸳᪥ࠉ᭶᭙᪥ࠉ༗ᚋ㸵㸰㸲ศ Part names and functions 02 English Change the interchangeable panel (X-SMC00-W and X-SMC00BT-W do not have an interchangeable panel in the box) 3 Align the line below the arrow and the bottom of the changeable panel, then slide downward using both hands until you hear a clicking sound. Français Español CAUTION • Exchange of the changeable panel should be performed on a stable surface.
; 60&B6<;( B(Q ERRN ࣮࣌ࢪ 㸰㸮㸯㸱ᖺ㸯᭶㸰㸯᪥ࠉ᭶᭙᪥ࠉ༗ᚋ㸳㸯㸴ศ 03 Connections Chapter 3: Connections CAUTION • Be sure to turn off the power and unplug the power cord from the power outlet whenever making or changing connections. • Connect the power cord after all the connections between devices have been completed. Connecting antenna Connect the FM wire antenna as shown below. To improve reception and sound quality, connect external antennas (see Using external antennas below).
; 60&B6<;( B(Q ERRN ࣮࣌ࢪ 㸰㸮㸯㸱ᖺ㸯᭶㸰㸯᪥ࠉ᭶᭙᪥ࠉ༗ᚋ㸳㸯㸴ศ Getting started 04 English Chapter 4: Getting started General control Press the 1 STANDBY/ON to turn the power on. After use: Input function Press the 1 STANDBY/ON to enter the power stand-by mode. When the INPUT on main unit is pressed, the current function will change to different mode. Press the INPUT repeatedly to select desired function.
; 60&B6<;( B(Q ERRN ࣮࣌ࢪ 㸰㸮㸯㸱ᖺ㸯᭶㸰㸯᪥ࠉ᭶᭙᪥ࠉ༗ᚋ㸳㸯㸴ศ 04 Getting started Sound controls Setting the wake-up timer Equalizer Used to change the existing timer setting, or to set a new timer. When the EQUALIZER is pressed, the current mode setting will be displayed. To change to a different mode, press the EQUALIZER repeatedly until the desired sound mode appears. FLAT ACTIVE A flat and basic sound. A powerful sound that emphasizes low and high tones.
; 60&B6<;( B(Q ERRN ࣮࣌ࢪ 㸰㸮㸯㸱ᖺ㸯᭶㸰㸯᪥ࠉ᭶᭙᪥ࠉ༗ᚋ㸳㸯㸴ศ Getting started An existing timer setting can be reused. Using Headphones 1 Follow steps 1 to 3 in “Setting the wake-up timer”. Connect the headphones plug to the PHONES terminal. When the headphones are connected, there is no sound output from the speakers. 2 Press H I to select “TIMER ON”, then press ENTER. POWER ON TIMER Français Cancelling the wake-up timer Turn off the timer setting. 1 Follow steps 1 to 3 in “Setting the wake-up timer”.
; 60&B6<;( B(Q ERRN ࣮࣌ࢪ 㸰㸮㸯㸱ᖺ㸯᭶㸰㸯᪥ࠉ᭶᭙᪥ࠉ༗ᚋ㸳㸯㸴ศ 05 iPod/iPhone/iPad mini playback Chapter 5: iPod/iPhone/iPad mini playback Merely by connecting your iPod/iPhone/iPad mini to this unit, you can enjoy high-quality sound from your iPod/iPhone/iPad mini. Playback setting for iPod/iPhone/iPad mini music can be performed from this unit or the iPod/iPhone/iPad mini itself.
; 60&B6<;( B(Q ERRN ࣮࣌ࢪ 㸰㸮㸯㸱ᖺ㸯᭶㸰㸯᪥ࠉ᭶᭙᪥ࠉ༗ᚋ㸳㸯㸴ศ iPod/iPhone/iPad mini playback Playing iPod/iPhone/iPad mini 1 PUSH OPEN 2 Press iPod or USB as the input source. “IPOD” or “USB/IPOD” is shown on the main display. 3 When the recognition is completed, will begin playing automatically. Connecting iPod/iPhone/iPad mini using supplied iPhone stand 1 Connect the iPod/iPhone/iPad mini cable to the iPod/iPhone terminal on the front of the unit.
; 60&B6<;( B(Q ERRN ࣮࣌ࢪ 㸰㸮㸯㸱ᖺ㸯᭶㸰㸯᪥ࠉ᭶᭙᪥ࠉ༗ᚋ㸳㸯㸴ศ 06 Disc playback Chapter 6: Disc playback This system can play back a standard CD, CD-R/RW in the CD format and CD-R/RW with MP3 or WMA files, but cannot record on them. Some audio CD-R and CD-RW discs may not be playable due to the state of the disc or the device that was used for recording. MP3: MP3 is a form of compression. It is an acronym which stands for MPEG Audio Layer 3.
; 60&B6<;( B(Q ERRN ࣮࣌ࢪ 㸰㸮㸯㸱ᖺ㸯᭶㸰㸯᪥ࠉ᭶᭙᪥ࠉ༗ᚋ㸳㸯㸴ศ Disc playback 06 0 STANDBY/ON OPEN/CLOSE USB TUNER AUDIO IN BT AUDIO CLOCK/TIMER SLEEP EQUALIZER 1 2 3 4 5 6 P.BASS 8 CLEAR MEMORY /PROGRAM MENU PRESET + MUTE 9 REPEAT VOLUME TUNE– + RANDOM – FOLDER – TUNE+ DIMMER ST/MONO RDS ASPM PTY DISPLAY Direct track search By using the numeric buttons, the desired tracks on the current disc can be played.
; 60&B6<;( B(Q ERRN ࣮࣌ࢪ 㸰㸮㸯㸱ᖺ㸯᭶㸰㸯᪥ࠉ᭶᭙᪥ࠉ༗ᚋ㸳㸯㸴ศ 06 Disc playback Programmed play (CD or MP3/WMA) About downloading MP3/WMA You can choose up to 32 selections for playback in the order you like. There are many music sites on the internet that you can download MP3/WMA music files. Follow the instructions from the website on how to download the music files. You can then play back these downloaded music files by burning them to a CD-R/RW disc. • Your downloaded song/files are for personal use only.
; 60&B6<;( B(Q ERRN ࣮࣌ࢪ 㸰㸮㸯㸱ᖺ㸯᭶㸰㸯᪥ࠉ᭶᭙᪥ࠉ༗ᚋ㸳㸯㸴ศ Disc playback 06 Switch the display contents To specify the folder to play, perform the following steps. STANDBY/ON 0 OPEN/CLOSE CD USB TUNER iPod BT AUDIO CLOCK/TIMER DISPLAY FOLDER TUNE+ AUDIO IN SLEEP ENTER 1 2 3 MEMORY /PROGRAM MENU Press DISPLAY. If the title, artist and album name has been written to the file, that information will be displayed. (The unit can only display alphanumeric characters.
; 60&B6<;( B(Q ERRN ࣮࣌ࢪ 㸰㸮㸯㸱ᖺ㸯᭶㸰㸯᪥ࠉ᭶᭙᪥ࠉ༗ᚋ㸳㸯㸴ศ 07 USB playback Chapter 7: USB playback Repeat play Playing USB storage devices It is possible to listen to two-channel audio using the USB interface on the front of this receiver. • Pioneer does not guarantee that any file recorded on a USB storage device will play or that power will be supplied to a USB storage device.
; 60&B6<;( B(Q ERRN ࣮࣌ࢪ 㸰㸮㸯㸱ᖺ㸯᭶㸰㸯᪥ࠉ᭶᭙᪥ࠉ༗ᚋ㸳㸯㸴ศ USB playback 07 To specify the folder to play, perform the following steps. 1 Press USB, and connect the USB storage device. 3 Press ENTER. Playback will start from the first song of the selected folder. • Even if it is stopped, it is possible to press F G, to select a folder. The unit can play folders stored on a USB storage device in the desired order. For details, see Programmed play (CD or MP3/WMA) on page 20.
; 60&B6<;( B(Q ERRN ࣮࣌ࢪ 㸰㸮㸯㸱ᖺ㸯᭶㸰㸯᪥ࠉ᭶᭙᪥ࠉ༗ᚋ㸳㸯㸴ศ 08 Using the tuner Chapter 8: Using the tuner Listening to the radio broadcasts The following steps show you how to tune in to FM radio broadcasts using the automatic (search) and manual (step) tuning functions. Once you are tuned to a station you can memorize the frequency for recall later. See Saving station presets below for more on how to do this.
; 60&B6<;( B(Q ERRN ࣮࣌ࢪ 㸰㸮㸯㸱ᖺ㸯᭶㸰㸯᪥ࠉ᭶᭙᪥ࠉ༗ᚋ㸳㸯㸴ศ Using the tuner 1 Press PRESET +/– to select the desired station. To scan the preset stations 1 Press and hold PRESET +/–. The preset number will appear and the programmed stations will be tuned in sequentially, for 5 seconds each. 2 Press PRESET +/– again when the desired station is located. 1 Press TUNER on the remote control. 2 Press CLEAR until “MEM CLR” appears. Note • All stations will be erased.
; 60&B6<;( B(Q ERRN ࣮࣌ࢪ 㸰㸮㸯㸱ᖺ㸯᭶㸰㸯᪥ࠉ᭶᭙᪥ࠉ༗ᚋ㸳㸯㸴ศ 08 Using the tuner • If no station can be found, “NO FOUND” will appear for 4 seconds. Information provided by RDS Each time the RDS DISPLAY is pressed, the display will switch as follows: STANDBY/ON OPEN/CLOSE CD USB TUNER iPod BT AUDIO CLOCK/TIMER DISPLAY FOLDER TUNE+ AUDIO IN SLEEP ENTER EQUALIZER 1 2 MEMORY /PROGRAM MENU 3 P.
; 60&B6<;( B(Q ERRN ࣮࣌ࢪ 㸰㸮㸯㸱ᖺ㸯᭶㸰㸯᪥ࠉ᭶᭙᪥ࠉ༗ᚋ㸳㸯㸴ศ Other connections Other connections Connecting auxiliary components POWER ON Español Connect the front panel AUDIO IN mini-plug jack to your auxiliary playback component. • This method can be used to play music on this unit from iPod/iPhone/iPad mini that do not support use of an iPod Dock and iPod/iPhone terminal. Français CAUTION • Before making or changing the connections, switch off the power and disconnect the power cord from the AC outlet.
; 60&B6<;( B(Q ERRN ࣮࣌ࢪ 㸰㸮㸯㸱ᖺ㸯᭶㸰㸯᪥ࠉ᭶᭙᪥ࠉ༗ᚋ㸳㸯㸴ศ 10 Bluetooth® Audio playback Chapter 10: Bluetooth® Audio playback Music playback using Bluetooth wireless technology Bluetooth wireless technology enabled device: Cell phone Bluetooth wireless technology enabled device: Digital music player Device not equipped with Bluetooth wireless technology: Digital music player + Bluetooth® audio transmitter (commercially available) Music data POWER ON TIMER PUSH OPEN AUDIO IN The unit is capable of playing
; 60&B6<;( B(Q ERRN ࣮࣌ࢪ 㸰㸮㸯㸱ᖺ㸯᭶㸰㸯᪥ࠉ᭶᭙᪥ࠉ༗ᚋ㸳㸯㸴ศ Bluetooth® Audio playback 1 Press the BT AUDIO. The unit will switch to BT AUDIO input. Procedures for connecting to the unit should be performed from the Bluetooth capable device. • Please refer to the user’s manual for your Bluetooth capable device for details of the connection procedures. Español 3 Playback music from the Bluetooth capable device. This unit uses a 2.
; 60&B6<;( B(Q ERRN ࣮࣌ࢪ 㸰㸮㸯㸱ᖺ㸯᭶㸰㸯᪥ࠉ᭶᭙᪥ࠉ༗ᚋ㸳㸯㸴ศ 10 Bluetooth® Audio playback • If you live in a heavily populated residential area (apartment, townhouse, etc.) and if your neighbor’s microwave is placed near your system, you may experience radio wave interference. If this occurs, move your unit to a different place. When the microwave is not in use, there will be no radio wave interference.
; 60&B6<;( B(Q ERRN ࣮࣌ࢪ 㸰㸮㸯㸱ᖺ㸯᭶㸰㸯᪥ࠉ᭶᭙᪥ࠉ༗ᚋ㸳㸯㸴ศ Additional information 11 Additional information Incorrect operations are often mistaken for trouble and malfunctions. If you think that there is something wrong with this component, check the points below. Sometimes the trouble may lie in another component. Investigate the other components and electrical appliances being used.
; 60&B6<;( B(Q ERRN ࣮࣌ࢪ 㸰㸮㸯㸱ᖺ㸯᭶㸰㸯᪥ࠉ᭶᭙᪥ࠉ༗ᚋ㸳㸯㸴ศ 11 Additional information Problem Check Unable to connect to a Bluetooth capable device, no sound comes out at all or sound cuts out when connected. Are there any devices nearby that If so, either move these devices away from the unit, or stop using emit electromagnetic waves in the other devices that emit electromagnetic waves. 2.4 GHz band (microwaves, wireless LAN devices, other Bluetooth capable devices etc.
; 60&B6<;( B(Q ERRN ࣮࣌ࢪ 㸰㸮㸯㸱ᖺ㸯᭶㸰㸯᪥ࠉ᭶᭙᪥ࠉ༗ᚋ㸳㸯㸴ศ Additional information 11 Check Power is not supplied to the USB storage device. Is AUTH ERR displayed on the front Turn the power off then back on. panel display? No power is supplied if the power consumption is too high. Turn the power off, then disconnect and reconnect the USB storage device. Remedy English Problem Press INPUT to switch to the other mode, then switch again to the USB mode.
; 60&B6<;( B(Q ERRN ࣮࣌ࢪ 㸰㸮㸯㸱ᖺ㸯᭶㸰㸯᪥ࠉ᭶᭙᪥ࠉ༗ᚋ㸳㸯㸴ศ 11 Additional information Playable discs and formats Audio CD • Commercially available audio CDs • CD-R/ -RW/ -ROM discs containing music recorded in the CD-DA format WMA WMA files recorded on CD-R/ -RW/ -ROM discs or USB storage devices MP3 MP3 files recorded on CD-R/ -RW/ -ROM discs or USB storage devices • Only the discs that have been finalized can be played. • Discs recorded in packet write mode (UDF format) are not compatible with this unit.
; 60&B6<;( B(Q ERRN ࣮࣌ࢪ 㸰㸮㸯㸱ᖺ㸯᭶㸰㸯᪥ࠉ᭶᭙᪥ࠉ༗ᚋ㸳㸯㸴ศ Additional information Do not place any objects on top of this unit. Do not obstruct the ventilation holes. Do not use this unit on shaggy rugs, beds, sofas, etc., or wrapped in cloth, etc. Doing so will prevent the heat from dispersing, leading to damage. • Always place discs in their cases and store them vertically, avoiding hot, humid places, places exposed to direct sunlight and extremely cold places.
; 60&B6<;( B(Q ERRN ࣮࣌ࢪ 㸰㸮㸯㸱ᖺ㸯᭶㸰㸯᪥ࠉ᭶᭙᪥ࠉ༗ᚋ㸳㸯㸴ศ 11 Additional information About iPod/iPhone “Made for iPod” and “Made for iPhone” mean that an electronic accessory has been designed to connect specifically to iPod or iPhone, respectively, and has been certified by the developer to meet Apple performance standards. Apple is not responsible for the operation of this device or its compliance with safety and regulatory standards.
; 60&B6<;( B(Q ERRN ࣮࣌ࢪ 㸰㸮㸯㸱ᖺ㸱᭶㸰㸳᪥ࠉ᭶᭙᪥ࠉ༗ᚋ㸵㸰㸲ศ Additional information 11 • Amplifier section RMS Power Output: . . . . . . . . . . . . . . . . . . . . . . . 10 W + 10 W (1 kHz, 10 %, T.H.D., 8 :) • Tuner section Miscellaneous • Speaker Español iPod/iPhone connector port . . . . . . . . . . . . . . . . . . . . . 5 V, 1 A iPod/iPhone terminal . . . . . . . . . . . . . . . . . . . . . . . . . . . 5 V, 1 A Power source . . . . . . . . . . . . .
; 60&B6<;( B)U ERRN ࣮࣌ࢪ 㸰㸮㸯㸱ᖺ㸱᭶㸰㸳᪥ࠉ᭶᭙᪥ࠉ༗ᚋ㸵㸰㸳ศ ATTENTION POUR ÉVITER TOUT RISQUE D’ÉLECTROCUTION, NE PAS ENLEVER LE COUVERCLE (NI LE PANNEAU ARRIÈRE). AUCUNE PIÈCE RÉPARABLE PAR L’UTILISATEUR NE SE TROUVE À L’INTÉRIEUR. CONFIER TOUT ENTRETIEN À UN PERSONNEL QUALIFIÉ UNIQUEMENT. Ce produit est destiné à une utilisation domestique générale.
; 60&B6<;( B)U ERRN ࣮࣌ࢪ 㸰㸮㸯㸱ᖺ㸯᭶㸰㸯᪥ࠉ᭶᭙᪥ࠉ༗ᚋ㸳㸴ศ Information à destination des utilisateurs sur la collecte et l’élimination des équipements et batteries usagés Marquage pour les équipements Ces symboles qui figurent sur les produits, les emballages et/ou les documents d’accompagnement signifient que les équipements électriques et électroniques et batteries usagés ne doivent pas être jetés avec les déchets ménagers et font l’objet d’une collecte sélective.
; 60&B6<;( B)U ERRN ࣮࣌ࢪ 㸰㸮㸯㸱ᖺ㸯᭶㸰㸯᪥ࠉ᭶᭙᪥ࠉ༗ᚋ㸳㸴ศ Nous vous remercions d’avoir acheté ce produit Pioneer. Veuillez lire attentivement ce mode d’emploi afin d’apprendre à manipuler votre modèle correctement. Lorsque vous avez terminé, rangez ces instructions en lieu sûr afin de pouvoir vous y référer à l’avenir. Table des matières 01 Préparatifs Contenu de l’emballage . . . . . . . . . . . . . . . . . . . . . . . . . 5 Mise en place des piles dans la télécommande . . . . . .
; 60&B6<;( B)U ERRN ࣮࣌ࢪ 㸰㸮㸯㸱ᖺ㸱᭶㸰㸳᪥ࠉ᭶᭙᪥ࠉ༗ᚋ㸵㸰㸳ศ Préparatifs 01 English Chapitre 1 : Préparatifs Refermez le couvercle arrière. • N’utilisez que les piles spécifiées à l’exclusion de toute autre. N’utilisez pas non plus une pile neuve avec une pile usée. • Lorsque vous insérez les piles dans la télécommande, orientez-les correctement, comme indiqué par les symboles de polarité ( et ). • Ne chauffez pas les piles, ne les ouvrez pas et ne les jetez pas au feu ou dans l’eau.
; 60&B6<;( B)U ERRN ࣮࣌ࢪ 㸰㸮㸯㸱ᖺ㸯᭶㸰㸯᪥ࠉ᭶᭙᪥ࠉ༗ᚋ㸳㸴ศ 01 Préparatifs Utilisation de la télécommande La télécommande a une portée d’environ 7 mètres avec un angle de 30° par rapport au capteur de télécommande. 30° 30° 7m Gardez à l’esprit ce qui suit lorsque vous utilisez la télécommande : • Assurez-vous de l’absence d’obstacles entre la télécommande et le capteur de l’appareil.
; 60&B6<;( B)U ERRN ࣮࣌ࢪ 㸰㸮㸯㸱ᖺ㸯᭶㸰㸯᪥ࠉ᭶᭙᪥ࠉ༗ᚋ㸳㸴ศ Les organes et leurs fonctions 02 Les organes et leurs fonctions 1 STANDBY/ON 1 2 2 OPEN/CLOSE USB TUNER AUDIO IN iPod BT AUDIO CLOCK/TIMER SLEEP 3 12 3 3 SLEEP Voir la section Utilisation du minuteur de mise en veille à la page 15. P.BASS 4 5 6 7 8 9 13 BASS/TREBLE 5 CLEAR REPEAT RANDOM 14 15 5 6 6 FOLDER MEMORY /PROGRAM MENU Pour accéder au menu.
; 60&B6<;( B)U ERRN ࣮࣌ࢪ 㸰㸮㸯㸱ᖺ㸯᭶㸰㸯᪥ࠉ᭶᭙᪥ࠉ༗ᚋ㸳㸴ศ 02 Les organes et leurs fonctions 10 Touches de commande de la fonction de lecture Ces touches permettent de contrôler chacune des fonctions après avoir sélectionné la fonction désirée à l’aide des touches de fonctions d’entrée (page 18). 1 Vissez les vis de fixation murale dans le mur, en respectant l’écartement (130 mm) du dispositif de fixation.
; 60&B6<;( B)U ERRN ࣮࣌ࢪ 㸰㸮㸯㸱ᖺ㸯᭶㸰㸯᪥ࠉ᭶᭙᪥ࠉ༗ᚋ㸳㸴ศ Les organes et leurs fonctions 02 1 2 3 4 English Panneau avant 5 6 POWER ON TIMER Français Deutsch PUSH OPEN AUDIO IN 8 9 10 11 7 7 Enceintes 8 Borne iPod/iPhone 2 Permet de raccorder votre périphérique de stockage de masse USB ou votre iPod/iPhone/iPad mini Apple pour l’utiliser comme source audio (pages 17 et 22). Capteur de télécommande Reçoit les signaux provenant de la télécommande.
; 60&B6<;( B)U ERRN ࣮࣌ࢪ 㸰㸮㸯㸱ᖺ㸯᭶㸰㸯᪥ࠉ᭶᭙᪥ࠉ༗ᚋ㸳㸴ศ 02 Les organes et leurs fonctions Face supérieure/Face arrière STANDBY/ON INPUT BT AUDIO 1 2 3 – + VOLUME X-SMC00BT 7 1 4 DC IN Touche INPUT 6 Touche d’ouverture/fermeture du tiroir disque Touche EQ (X-SMC00) Permet de changer de mode audio (page 14). Touche BT AUDIO (X-SMC00BT) Permet de lire de la musique à partir d’un équipement doté de la fonctionnalité Bluetooth (page 28).
; 60&B6<;( B)U ERRN ࣮࣌ࢪ 㸰㸮㸯㸱ᖺ㸱᭶㸰㸳᪥ࠉ᭶᭙᪥ࠉ༗ᚋ㸵㸰㸳ศ Les organes et leurs fonctions 02 English Remplacez le panneau modulable (Le boîtier des modèles X-SMC00-W et X-SMC00BT-W ne comporte pas de panneau interchangeable) Flèches Italiano Nederlands 2 À l’aide des deux mains, faites glisser le panneau interchangeable vers le haut pour le déposer. Deutsch 1 Vérifiez que la trappe électrique coulissante du compartiment CD est fermée.
; 60&B6<;( B)U ERRN ࣮࣌ࢪ 㸰㸮㸯㸱ᖺ㸯᭶㸰㸯᪥ࠉ᭶᭙᪥ࠉ༗ᚋ㸳㸴ศ 03 Connexions Chapitre 3 : Connexions ATTENTION • Veillez à mettre l’appareil hors tension et à débrancher le cordon d’alimentation de la prise secteur à chaque fois que vous effectuez ou que vous modifiez des connexions. • Branchez le cordon d’alimentation une fois que toutes les connexions entre les différents équipements ont été effectuées. Raccordement de l’antenne Raccordez l’antenne filaire FM comme indiqué ci-dessous.
; 60&B6<;( B)U ERRN ࣮࣌ࢪ 㸰㸮㸯㸱ᖺ㸯᭶㸰㸯᪥ࠉ᭶᭙᪥ࠉ༗ᚋ㸳㸴ศ Pour commencer 04 English Chapitre 4 : Pour commencer Remarque Appuyez sur la touche 1 STANDBY/ON pour mettre l’appareil sous tension. • Remettre l’horloge à l’heure lorsque l’alimentation est rétablie après que l’appareil ait été rebranché ou après une panne d’électricité. Après utilisation : Appuyez sur 1 STANDBY/ON pour passer en mode veille.
; 60&B6<;( B)U ERRN ࣮࣌ࢪ 㸰㸮㸯㸱ᖺ㸯᭶㸰㸯᪥ࠉ᭶᭙᪥ࠉ༗ᚋ㸳㸴ศ 04 Pour commencer ATTENTION • Le niveau sonore émis à un réglage donné du volume dépend, entre autres facteurs, du rendement des enceintes et du lieu d’utilisation. Il est conseillé d’éviter l’exposition à des niveaux de volume élevés. Éviter de trop élever le volume. Écoutez de la musique à des niveaux modérés. Un volume sonore excessif émis par les écouteurs et le casque peut endommager l’ouïe.
; 60&B6<;( B)U ERRN ࣮࣌ࢪ 㸰㸮㸯㸱ᖺ㸯᭶㸰㸯᪥ࠉ᭶᭙᪥ࠉ༗ᚋ㸳㸴ศ Pour commencer Un réglage de réveille-matin peut être réutilisé. Utilisation avec un casque 1 Suivez les étapes 1 à 3 décrite dans la section « Setting the wake-up timer ». Branchez le connecteur du casque à la prise PHONES. Lorsque le casque est branché, les enceintes ne fournissent aucun son. 2 Appuyez sur H I pour sélectionner « TIMER ON », puis appuyez sur ENTER.
; 60&B6<;( B)U ERRN ࣮࣌ࢪ 㸰㸮㸯㸱ᖺ㸯᭶㸰㸯᪥ࠉ᭶᭙᪥ࠉ༗ᚋ㸳㸴ศ 05 Lecture d’une source iPod/iPhone/iPad mini Chapitre 5 : Lecture d’une source iPod/iPhone/iPad mini En raccordant simplement votre iPod/iPhone/iPad mini à cet appareil, vous pouvez profiter d’un son de grande qualité directement à partir de votre iPod/iPhone/iPad mini. Les commandes de lecture de musique stockées sur un iPod/ iPhone/iPad mini peuvent être effectuées directement sur cet appareil ou depuis l’iPod/iPhone/iPad mini.
; 60&B6<;( B)U ERRN ࣮࣌ࢪ 㸰㸮㸯㸱ᖺ㸯᭶㸰㸯᪥ࠉ᭶᭙᪥ࠉ༗ᚋ㸳㸴ศ Lecture d’une source iPod/iPhone/iPad mini Lecture à partir d’un iPod/iPhone/ iPad mini 1 PUSH OPEN Connexion d’un iPod/iPhone/iPad mini à l’aide du support iPhone fourni 2 Faites passer le câble de l’iPod/iPhone/iPad mini à travers le bas du support et connectez-le à l’iPod/iPhone/iPad mini. 3 Une fois l’équipement connecté reconnu, la lecture commence automatiquement.
; 60&B6<;( B)U ERRN ࣮࣌ࢪ 㸰㸮㸯㸱ᖺ㸯᭶㸰㸯᪥ࠉ᭶᭙᪥ࠉ༗ᚋ㸳㸴ศ 06 Lecture de disque Chapitre 6 : Lecture de disque Ce système peut lire un disque CD standard, un disque CD-R/ RW en format CD et un CD-R/RW avec un fichier MP3 ou WMA, mais ne peut pas enregistrer sur ces types de CD. Certains disques audio CD-R et CD-RW peuvent être illisibles à cause de l’état du disque ou du dispositif utilisé pour l’enregistrement. MP3 : MP3 est un format de compression. Il s’agit de l’acronyme de MPEG Audio Layer 3.
; 60&B6<;( B)U ERRN ࣮࣌ࢪ 㸰㸮㸯㸱ᖺ㸯᭶㸰㸯᪥ࠉ᭶᭙᪥ࠉ༗ᚋ㸳㸴ศ Lecture de disque 06 Fonction Appareil Télécommande principal Lecture Arrêt Pause Plage haut/bas Utilisable en cours de lecture. Appuyez sur la touche ! pour reprendre la lecture à partir du point où la lecture a été mise en pause. Presser en mode de lecture ou d’arrêt.
; 60&B6<;( B)U ERRN ࣮࣌ࢪ 㸰㸮㸯㸱ᖺ㸯᭶㸰㸯᪥ࠉ᭶᭙᪥ࠉ༗ᚋ㸳㸴ศ 06 Lecture de disque Lecture des morceaux programmés (CD ou MP3/WMA) À propos du téléchargement de fichiers MP3/WMA On peut sélectionner 32 morceaux (maxi) pour la lecture dans un ordre souhaité. Il y a de nombreux sites de musique sur l’Internet d’où on peut télécharger des fichiers musicaux MP3/WMA. Suivre les instructions de ces sites pour télécharger ce type de fichiers.
; 60&B6<;( B)U ERRN ࣮࣌ࢪ 㸰㸮㸯㸱ᖺ㸯᭶㸰㸯᪥ࠉ᭶᭙᪥ࠉ༗ᚋ㸳㸴ศ Lecture de disque 06 Sélection des informations affichées Pour spécifier le dossier à lire, effectuer la procédure suivante. 1 STANDBY/ON OPEN/CLOSE USB TUNER iPod BT AUDIO CLOCK/TIMER FOLDER TUNE+ AUDIO IN SLEEP ENTER EQUALIZER 1 2 3 MEMORY /PROGRAM MENU P.BASS 4 5 7 8 6 PRESET BASS/TREBLE CLEAR – DIMMER ST/MONO RDS ASPM PTY DISPLAY 1 Appuyez sur la touche CD et chargez un disque MP3/WMA.
; 60&B6<;( B)U ERRN ࣮࣌ࢪ 㸰㸮㸯㸱ᖺ㸯᭶㸰㸯᪥ࠉ᭶᭙᪥ࠉ༗ᚋ㸳㸴ศ 07 Lecture USB Chapitre 7 : Lecture USB Lecture à partir de contenu stocké sur un périphérique USB Il est possible d’obtenir un son à deux canaux en utilisant l’interface USB située à l’avant de ce récepteur. • Pioneer ne garantit pas que tout fichier enregistré sur un périphérique de stockage USB puisse être lu par l’appareil, ni que ce dernier puisse fournir l’alimentation nécessaire au périphérique de stockage USB.
; 60&B6<;( B)U ERRN ࣮࣌ࢪ 㸰㸮㸯㸱ᖺ㸯᭶㸰㸯᪥ࠉ᭶᭙᪥ࠉ༗ᚋ㸳㸴ศ Lecture USB 07 Un fichier sur un périphérique de stockage USB peut être lu automatiquement en ordre aléatoire. Pour lire tous les morceaux dans un ordre aléatoire : Pour annuler la lecture aléatoire : Appuyez à plusieurs reprises sur la touche RANDOM jusqu’à ce que l’indication « RDM OFF » apparaisse. Appuyez sur la touche ENTER.
; 60&B6<;( B)U ERRN ࣮࣌ࢪ 㸰㸮㸯㸱ᖺ㸯᭶㸰㸯᪥ࠉ᭶᭙᪥ࠉ༗ᚋ㸳㸴ศ 08 Utilisation du tuner Chapitre 8 : Utilisation du tuner • La recherche automatique complète des stations peut être effectuée pour les stations RDS en utilisant le mode ASPM de mémorisation automatique des stations de radio (voir page 26). Écoute d’émissions de radio Les étapes suivantes décrivent la façon de régler les bandes FM à l’aide de la recherche automatique et des fonctions de réglage manuel.
; 60&B6<;( B)U ERRN ࣮࣌ࢪ 㸰㸮㸯㸱ᖺ㸯᭶㸰㸯᪥ࠉ᭶᭙᪥ࠉ༗ᚋ㸳㸴ศ Utilisation du tuner Remarque Rappel d’une station mémorisée Pour balayer les stations préréglées On peut balayer les stations mises en mémoire automatiquement. (Balayage dans la mémoire de présélection) Le numéro de préréglage s’affiche et le tuner fait défiler les stations mémorisées en s’arrêtant 5 secondes sur chacune. 2 Appuyez de nouveau sur PRESET +/– lorsque le tuner passe sur la station souhaitée.
; 60&B6<;( B)U ERRN ࣮࣌ࢪ 㸰㸮㸯㸱ᖺ㸯᭶㸰㸯᪥ࠉ᭶᭙᪥ࠉ༗ᚋ㸳㸴ศ 08 Utilisation du tuner 4 Alors que le type de programme sélectionné est affiché (pendant 6 secondes), appuyez de nouveau sur la touche RDS PTY. Le type de programme sélectionné s’affiche pendant 2 secondes, puis l’indication « SEARCH » apparaît et la recherche commence. Remarque • Si l’affichage arrête de clignoter, renouveler l’opération depuis l’étape 2.
; 60&B6<;( B)U ERRN ࣮࣌ࢪ 㸰㸮㸯㸱ᖺ㸯᭶㸰㸯᪥ࠉ᭶᭙᪥ࠉ༗ᚋ㸳㸴ศ Autres raccordements Autres raccordements Connexion de composants auxiliaires Italiano POWER ON Deutsch Connectez l’équipementde lecture auxiliaire à la prise minijack AUDIO IN située sur le panneau avant de l’appareil. • Cette méthode permet de lire de la musique sur cet appareil à partir d’un iPod/iPhone/iPad mini qui ne prend pas en charge la connexion via une station d’accueil iPod ou une prise pour iPod/iPhone.
; 60&B6<;( B)U ERRN ࣮࣌ࢪ 㸰㸮㸯㸱ᖺ㸯᭶㸰㸯᪥ࠉ᭶᭙᪥ࠉ༗ᚋ㸳㸴ศ 10 Lecture audio Bluetooth® Chapitre 10 : Lecture audio Bluetooth® Lecture de musique par la technologie sans fil Bluetooth Périphérique optimisé pour la technologie sans fil Bluetooth : Téléphone portable Périphérique optimisé pour la technologie sans fil Bluetooth : Lecteur de musique numérique Périphérique non équipé de la technologie sans fil Bluetooth : Lecteur de musique numérique + Émetteur audio Bluetooth® (disponible dans le commerce) Données
; 60&B6<;( B)U ERRN ࣮࣌ࢪ 㸰㸮㸯㸱ᖺ㸯᭶㸰㸯᪥ࠉ᭶᭙᪥ࠉ༗ᚋ㸳㸴ศ Lecture audio Bluetooth® Si l’association avec le périphérique sans fil Bluetooth a été réalisée correctement, le nom du périphérique s’affiche sur le panneau avant de l’appareil. (Seuls les caractères alphanumériques d’un seul octet peuvent être affichés. Les caractères qui ne peuvent pas être affichés normalement sont remplacés par le symbole « * ».) Appuyez sur BT AUDIO. L’appareil passe sur l’entrée BT AUDIO.
; 60&B6<;( B)U ERRN ࣮࣌ࢪ 㸰㸮㸯㸱ᖺ㸯᭶㸰㸯᪥ࠉ᭶᭙᪥ࠉ༗ᚋ㸳㸴ศ 10 Lecture audio Bluetooth® • Dans un emplacement exposé au champ magnétique, à de l’électricité statique ou des parasites provenant d’équipements de communication radio, utilisant la même bande de fréquence (2,4 GHz) que cet appareil, tel qu’un périphérique LAN sans fil de 2,4 GHz (IEEE802.11b/g) ou un four à micro-ondes. • Si vous vivez dans une zone résidentielle très peuplée (appartement, maison en ville, etc.
; 60&B6<;( B)U ERRN ࣮࣌ࢪ 㸰㸮㸯㸱ᖺ㸯᭶㸰㸯᪥ࠉ᭶᭙᪥ࠉ༗ᚋ㸳㸴ศ Informations supplémentaires 11 Informations supplémentaires Souvent, les opérations incorrectes sont interprétées comme des problèmes ou des dysfonctionnements. Si vous estimez que cet appareil ne fonctionne pas correctement, vérifiez les points ci-dessous. Parfois, le problème peut provenir d’un autre composant. Examinez les autres composants et les appareils électriques utilisés.
; 60&B6<;( B)U ERRN ࣮࣌ࢪ 㸰㸮㸯㸱ᖺ㸯᭶㸰㸯᪥ࠉ᭶᭙᪥ࠉ༗ᚋ㸳㸴ศ 11 Informations supplémentaires Problème éventuel Vérification Connexion à un périphérique sans fil Bluetooth impossible, aucun son ne sort ou le son « saute » lorsque la connexion est établie. Des équipements produisant des Dans ce cas, éloignez de tels équipements de l’appareil, ou arrêtez ondes électromagnétiques dans la d’utiliser les autres équipements qui émettent des ondes bande de fréquences 2,4 GHz (fours à électromagnétiques.
; 60&B6<;( B)U ERRN ࣮࣌ࢪ 㸰㸮㸯㸱ᖺ㸯᭶㸰㸯᪥ࠉ᭶᭙᪥ࠉ༗ᚋ㸳㸴ศ Informations supplémentaires Vérification Solution Les noms de dossiers ou de fichiers ne sont pas affichés dans l’ordre alphabétique. Ce problème ne provient pas de cet appareil. L’ordre d’affichage des noms de dossier et de fichier dépend de l’ordre dans lequel les dossiers et les fichiers ont été enregistrés sur le périphérique de stockage USB. Le lecteur prend beaucoup de temps à reconnaître le périphérique de stockage USB.
; 60&B6<;( B)U ERRN ࣮࣌ࢪ 㸰㸮㸯㸱ᖺ㸯᭶㸰㸯᪥ࠉ᭶᭙᪥ࠉ༗ᚋ㸳㸴ศ 11 Informations supplémentaires Types de disque et formats de fichier lisibles CD audio • CD Audio en vente dans le commerce • Disques CD-R/-RW/-ROM contenant de la musique enregistrée en format CD-DA WMA Fichiers WMA enregistrés sur des disques CD-R/ -RW/ -ROM ou sur des périphériques de stockage USB MP3 Fichiers MP3 enregistrés sur des disques CD-R/ -RW/ -ROM ou sur des périphériques de stockage USB • Seuls les disques qui ont été finalisés peuve
; 60&B6<;( B)U ERRN ࣮࣌ࢪ 㸰㸮㸯㸱ᖺ㸯᭶㸰㸯᪥ࠉ᭶᭙᪥ࠉ༗ᚋ㸳㸴ศ Informations supplémentaires Ne posez pas d’objets sur le dessus de cet appareil. N’obstruez pas les orifices de ventilation. N’utilisez pas cet appareil sur une couverture, un lit, un sofa, etc. pelucheux, et ne l’enveloppez pas dans un tissu, etc. La chaleur ne pourra pas se dégager et causera des dommages.
; 60&B6<;( B)U ERRN ࣮࣌ࢪ 㸰㸮㸯㸱ᖺ㸯᭶㸰㸯᪥ࠉ᭶᭙᪥ࠉ༗ᚋ㸳㸴ศ 11 Informations supplémentaires • N’attachez pas de morceaux de papier ou d’autocollants sur les disques. Cela pourrait déformer les disques et les rendre illisibles. Notez aussi que souvent, une étiquette est collée sur les disques de location, et que la colle de l’étiquette peut avoir débordé. Vérifiez que la colle n’a pas débordé des bords de l’étiquette avant d’utiliser un disque de location.
; 60&B6<;( B)U ERRN ࣮࣌ࢪ 㸰㸮㸯㸱ᖺ㸱᭶㸰㸳᪥ࠉ᭶᭙᪥ࠉ༗ᚋ㸵㸰㸳ศ Informations supplémentaires • Section Amplificateur Puissance de sortie RMS : . . . . . . . . . . . . . . . . . 10 W + 10 W (1 kHz, 10 %, T.H.D., 8 :) • Section tuner Divers • Enceintes Italiano Type Récupérateur passif Toute gamme . . . . . . . . . . . . . . . . . . . . . . . . . . cône de 6,6 cm Récupérateur passif . . . . . . . . . . . . . . . . . . . . . cône de 7,7 cm Bande de fréquences de lecture. . . . . . . . . . . .
; 60&B6<;( B'H ERRN ࣮࣌ࢪ 㸰㸮㸯㸱ᖺ㸱᭶㸰㸳᪥ࠉ᭶᭙᪥ࠉ༗ᚋ㸵㸰㸴ศ ACHTUNG UM SICH NICHT DER GEFAHR EINES ELEKTRISCHEN SCHLAGES AUSZUSETZEN, DÜRFEN SIE NICHT DEN DECKEL (ODER DIE RÜCKSEITE) ENTFERNEN. IM GERÄTEINNEREN BEFINDEN SICH KEINE VOM BENUTZER REPARIERBAREN TEILE. ÜBERLASSEN SIE REPARATUREN DEM QUALIFIZIERTEN KUNDENDIENST. D3-4-2-1-1_B1_De WARNUNG Dieses Gerät ist nicht wasserdicht. Zur Vermeidung der Gefahr von Brand und Stromschlag keine Behälter mit Flüssigkeiten (z.B.
; 60&B6<;( B'H ERRN ࣮࣌ࢪ 㸰㸮㸯㸱ᖺ㸯᭶㸰㸯᪥ࠉ᭶᭙᪥ࠉ༗ᚋ㸳㸮ศ Informationen für Anwender zur Sammlung und Entsorgung von Altgeräten und gebrauchten Batterien Symbol für Geräte Diese Symbole auf den Produkten, der Verpackung und/oder Begleitdokumenten bedeuten, dass gebrauchte elektrische und elektronische Produkte und Batterien nicht über den Haushaltsmüll entsorgt werden dürfen.
; 60&B6<;( B'H ERRN ࣮࣌ࢪ 㸰㸮㸯㸱ᖺ㸯᭶㸰㸯᪥ࠉ᭶᭙᪥ࠉ༗ᚋ㸳㸮ศ Wir danken Ihnen dafür, dass Sie sich für dieses Produkt von Pioneer entschieden haben. Bitte lesen Sie diese Bedienungsanleitung sorgfältig, damit Sie wissen, wie Sie Ihr Gerät ordnungsgemäß bedienen. Bitte bewahren Sie diese Anleitung anschließend für spätere Bezugnahme griffbereit auf. Inhaltsverzeichnis 01 Vor der Inbetriebnahme Lieferumfang . . . . . . . . . . . . . . . . . . . . . . . . . . . . . . . . . .
; 60&B6<;( B'H ERRN ࣮࣌ࢪ 㸰㸮㸯㸱ᖺ㸱᭶㸰㸳᪥ࠉ᭶᭙᪥ࠉ༗ᚋ㸵㸰㸴ศ Vor der Inbetriebnahme 01 English Kapitel 1: Vor der Inbetriebnahme Pyccкий • Verwenden Sie keine anderen als die vorgeschriebenen Batterien. Verwenden Sie außerdem niemals eine neue Batterie gemeinsam mit einer alten. • Legen Sie die Batterien unter Bezugnahme auf die Polaritätsmarkierungen ( und ) im Inneren des Batteriefachs polaritätsgerecht ein. • Batterien dürfen nicht erhitzt, zerlegt oder in ein Feuer oder in Wasser geworfen werden.
; 60&B6<;( B'H ERRN ࣮࣌ࢪ 㸰㸮㸯㸱ᖺ㸯᭶㸰㸯᪥ࠉ᭶᭙᪥ࠉ༗ᚋ㸳㸮ศ 01 Vor der Inbetriebnahme • WARNUNG Verwenden oder lagern Sie Batterien nicht bei direkter Sonneneinstrahlung oder in übermäßig warmen Umgebungen wie zum Beispiel in Fahrzeugen oder in der Nähe von Heizungen. Dies kann zu Leckage, Überhitzung, Explosion oder Brand der Batterien führen. Außerdem kann sich die Lebensdauer der Batterien verringern. Verwendung der Fernbedienung Die Reichweite der Fernbedienung beträgt ca. 7 m innerhalb eines Winkels von ca.
; 60&B6<;( B'H ERRN ࣮࣌ࢪ 㸰㸮㸯㸱ᖺ㸯᭶㸰㸯᪥ࠉ᭶᭙᪥ࠉ༗ᚋ㸳㸮ศ Bezeichnungen und Funktionen der Teile Bezeichnungen und Funktionen der Teile STANDBY/ON 2 2 OPEN/CLOSE CD USB TUNER AUDIO IN iPod BT AUDIO CLOCK/TIMER SLEEP 3 12 3 3 SLEEP Siehe Verwendung des Sleep-Timers auf Seite 15. P.BASS 4 4 5 13 6 BASS/TREBLE 7 8 9 CLEAR REPEAT RANDOM 0 DISPLAY FOLDER TUNE+ Zifferntasten (0 bis 9) Verwendung zur Eingabe der Zahl (Seite 19).
; 60&B6<;( B'H ERRN ࣮࣌ࢪ 㸰㸮㸯㸱ᖺ㸯᭶㸰㸯᪥ࠉ᭶᭙᪥ࠉ༗ᚋ㸳㸮ศ 02 Bezeichnungen und Funktionen der Teile 10 Wiedergabe-Steuertasten Verwendung zur Steuerung jeder Funktion, nachdem Sie sie unter Verwendung der Eingabefunktionstasten gewählt haben (Seite 18). 1 Die Schrauben zur Wandaufhängung in die Wand einschrauben und sie dabei im angegebenen Befestigungsmaß (130 mm) auseinander anbringen.
; 60&B6<;( B'H ERRN ࣮࣌ࢪ 㸰㸮㸯㸱ᖺ㸯᭶㸰㸯᪥ࠉ᭶᭙᪥ࠉ༗ᚋ㸳㸮ศ Bezeichnungen und Funktionen der Teile 02 1 2 3 4 English Vorderes Bedienfeld 5 6 POWER ON TIMER Français Deutsch PUSH OPEN AUDIO IN 8 9 10 11 7 1 Elektrische CD-Schiebetür 7 Lautsprecher 2 Fernbedienungssignal-Sensor 8 iPod/iPhone-Anschluss Empfängt die Signale der Fernbedienung. Hauptdisplay 4 Anzeige-Bedienfeld 9 5 POWER ON-Anzeige Drücken Sie zum Anschluss des iPods/iPhones den Tab PUSH OPEN (Seite 16).
; 60&B6<;( B'H ERRN ࣮࣌ࢪ 㸰㸮㸯㸱ᖺ㸯᭶㸰㸯᪥ࠉ᭶᭙᪥ࠉ༗ᚋ㸳㸮ศ 02 Bezeichnungen und Funktionen der Teile Bedienfeld oben/Bedienfeld hinten STANDBY/ON INPUT BT AUDIO 1 2 3 – + VOLUME X-SMC00BT 7 4 DC IN 8 ANTENNA Taste 1 STANDBY/ON 5 Verwenden Sie diese Taste, um die Hörlautstärke einzustellen (Seite 13). 2 Taste INPUT Wählt die Eingabequelle aus.
; 60&B6<;( B'H ERRN ࣮࣌ࢪ 㸰㸮㸯㸱ᖺ㸱᭶㸰㸳᪥ࠉ᭶᭙᪥ࠉ༗ᚋ㸵㸰㸴ศ Bezeichnungen und Funktionen der Teile 02 English Wechseln des austauschbaren Bedienfelds (X-SMC00-W und X-SMC00BT-W haben kein austauschbares Bedienfeld in der Box) Arrows Italiano Nederlands 2 Schieben Sie das austauschbare Bedienfeld mit beiden Händen nach oben, um es zu entfernen. Deutsch 1 Es ist darauf zu achten, dass die elektrische CD-Schiebetür geschlossen ist.
; 60&B6<;( B'H ERRN ࣮࣌ࢪ 㸰㸮㸯㸱ᖺ㸯᭶㸰㸯᪥ࠉ᭶᭙᪥ࠉ༗ᚋ㸳㸮ศ 03 Anschlüsse Kapitel 3: Anschlüsse ACHTUNG • Achten sie darauf, immer dann, wenn Sie Anschlüsse vornehmen oder ändern, vorher den Strom auszuschalten und das Netzkabel aus der Netzsteckdose zu ziehen. • Schließen Sie das Stromkabel erst an, nachdem alle Anschlüsse zwischen den Geräten vorgenommen worden sind. Anschließen der Antenne Die UKW-Drahtantenne wie unten dargestellt anschließen.
; 60&B6<;( B'H ERRN ࣮࣌ࢪ 㸰㸮㸯㸱ᖺ㸯᭶㸰㸯᪥ࠉ᭶᭙᪥ࠉ༗ᚋ㸳㸮ศ Die ersten Schritte 04 English Kapitel 4: Die ersten Schritte Drücken Sie 1 STANDBY/ON, um den Strom einzuschalten. Nach Gebrauch: Drücken Sie 1 STANDBY/ON, um den Strom-StandbyModus einzugeben. Hinweis Einstellen der Uhr CD USB TUNER AUDIO IN iPod BT AUDIO CLOCK/TIMER SLEEP FOLDER TUNE+ MEMORY /PROGRAM EQUALIZER 3 PRESET TUNE– VOLUME 1 Drücken Sie 1 STANDBY/ON, um das Gerät einzuschalten.
; 60&B6<;( B'H ERRN ࣮࣌ࢪ 㸰㸮㸯㸱ᖺ㸯᭶㸰㸯᪥ࠉ᭶᭙᪥ࠉ༗ᚋ㸳㸮ศ 04 Die ersten Schritte Schalten Sie das Gerät nicht bei voller Lautstärke ein. Hören Sie Musik bei angemessener Lautstärke. Überhöhter Schalldruck von den Kopfhörern kann zu einem Hörverlust führen. Muting Der Ton wird vorübergehend stummgeschaltet, wenn auf der Fernbedienung MUTE gedrückt wird. Drücken Sie nochmals die Taste, um die Lautstärke wieder herzustellen.
; 60&B6<;( B'H ERRN ࣮࣌ࢪ 㸰㸮㸯㸱ᖺ㸯᭶㸰㸯᪥ࠉ᭶᭙᪥ࠉ༗ᚋ㸳㸮ศ Die ersten Schritte Eine vorhandene Timer-Einstellung kann wiederverwendet werden. 1 Folgen Sie den Schritten 1 bis 3 in „Setting the wake-up timer“. Verwenden von Kopfhörern Die Kopfhörer an den Anschluss PHONES anschließen. Wenn die Kopfhörer angeschlossen sind, kommt aus den Lautsprechern kein Ton. 2 Drücken Sie H I, um „TIMER ON“ zu wählen und drücken Sie dann ENTER.
; 60&B6<;( B'H ERRN ࣮࣌ࢪ 㸰㸮㸯㸱ᖺ㸯᭶㸰㸯᪥ࠉ᭶᭙᪥ࠉ༗ᚋ㸳㸮ศ 05 iPod/iPhone/iPad mini-Wiedergabe Kapitel 5: iPod/iPhone/iPad mini-Wiedergabe Durch einfaches Anschließen Ihres iPods/iPhones/iPad minis an dieses Gerät können Sie in den Genuss der hohen Klangqualität Ihres iPods/iPhones/iPad minis kommen. Die Wiedergabe-Einstellung für iPod/iPhone/iPad-mini Musik kann von dieser Einheit aus oder dem iPod/iPhone/iPad mini selbst aus erfolgen.
; 60&B6<;( B'H ERRN ࣮࣌ࢪ 㸰㸮㸯㸱ᖺ㸯᭶㸰㸯᪥ࠉ᭶᭙᪥ࠉ༗ᚋ㸳㸮ศ iPod/iPhone/iPad mini-Wiedergabe Abspielen des iPods/iPhones/iPad minis 1 PUSH OPEN 2 Drücken Sie iPod oder USB als die Eingabequelle ein. Auf dem Hauptdisplay erscheint „IPOD“ oder „USB/IPOD“. 3 Wenn die Erkennung abgeschlossen ist, beginnt die Wiedergabe automatisch. 1 Das iPod/iPhone/iPad mini-Kabel an den iPod/iPhone-Anschluss an der Vorderseite der Einheit anschließen. - Suchen einer Datei nach Interpretenname oder Musikgattung.
; 60&B6<;( B'H ERRN ࣮࣌ࢪ 㸰㸮㸯㸱ᖺ㸯᭶㸰㸯᪥ࠉ᭶᭙᪥ࠉ༗ᚋ㸳㸮ศ 06 Disc-Wiedergabe Kapitel 6: Disc-Wiedergabe Diese Anlage kann Standard-CDs und -CD-R/RWs im CDFormat sowie CD-R/RWs mit MP3- oder WMA-Dateien wiedergeben, sie kann diese aber nicht bespielen. Einige Audio-CD-Rs/CD-RWs können nicht abspielbar sein, abhängend vom Zustand der zur Aufnahme verwendeten Disc oder Vorrichtung. MP3: MP3 ist ein Kompressionsformat. Es ist eine Abkürzung für MPEG Audio Layer 3.
; 60&B6<;( B'H ERRN ࣮࣌ࢪ 㸰㸮㸯㸱ᖺ㸯᭶㸰㸯᪥ࠉ᭶᭙᪥ࠉ༗ᚋ㸳㸮ศ Disc-Wiedergabe 06 OPEN/CLOSE USB TUNER iPod BT AUDIO CLOCK/TIMER AUDIO IN SLEEP 2 3 4 5 6 MEMORY /PROGRAM MENU P.BASS PRESET 7 8 + MUTE 9 REPEAT – RANDOM 0 DISPLAY TUNE+ FOLDER – DIMMER ST/MONO RDS ASPM PTY DISPLAY Direkter Titel-Suchlauf Hinweis Beenden der Wiedergabe: Drücken Sie #.
; 60&B6<;( B'H ERRN ࣮࣌ࢪ 㸰㸮㸯㸱ᖺ㸯᭶㸰㸯᪥ࠉ᭶᭙᪥ࠉ༗ᚋ㸳㸮ศ 06 Disc-Wiedergabe Programmierte Wiedergabe (CD oder MP3/WMA) Zur Wiedergabe können Sie bis zu 32 Titel in der gewünschten Reihenfolge wählen. 1 Drücken Sie im Stopp-Modus auf der Fernbedienung MEMORY/PROGRAM, um den Programmierspeichermodus einzugeben. 2 Drücken Sie + , oder die Zifferntasten auf der Fernbedienung, um die gewünschten Tracks zu wählen. 3 Drücken Sie ENTER, um das Verzeichnis und die Tracknummer zu speichern.
; 60&B6<;( B'H ERRN ࣮࣌ࢪ 㸰㸮㸯㸱ᖺ㸯᭶㸰㸯᪥ࠉ᭶᭙᪥ࠉ༗ᚋ㸳㸮ศ Disc-Wiedergabe 06 STAMM VERZEICHNIS A VERZEICHNIS C (VERZEICHNIS 1) (VERZEICHNIS 2) (VERZEICHNIS 4) VERZEICHNIS B (VERZEICHNIS 3) DATEI 6 DATEI 7 DATEI 8 VERZEICHNIS E (VERZEICHNIS 6) DATEI 9 DATEI 10 DATEI 1 DATEI 2 0 OPEN/CLOSE USB TUNER iPod BT AUDIO CLOCK/TIMER DISPLAY FOLDER TUNE+ AUDIO IN SLEEP ENTER EQUALIZER 1 2 3 4 5 6 7 8 9 MEMORY /PROGRAM MENU Anzeige Titel/Interpret/ Album Anzeige Nummer des Verzeichnisses/des T
; 60&B6<;( B'H ERRN ࣮࣌ࢪ 㸰㸮㸯㸱ᖺ㸯᭶㸰㸯᪥ࠉ᭶᭙᪥ࠉ༗ᚋ㸳㸮ศ 07 USB-Wiedergabe Kapitel 7: USB-Wiedergabe Wiedergeben von USB-Speichern (USB-Geräten) Die Verwendung der USB-Schnittstelle an der Vorderseite dieses Receivers ermöglicht es, Zweikanal-Audio zu hören. • Pioneer garantiert nicht, dass jede Datei, die auf einem USB-Speicher gespeichert ist, wiedergegeben wird oder dass Strom an einen USB-Speicher geliefert wird.
; 60&B6<;( B'H ERRN ࣮࣌ࢪ 㸰㸮㸯㸱ᖺ㸯᭶㸰㸯᪥ࠉ᭶᭙᪥ࠉ༗ᚋ㸳㸮ศ USB-Wiedergabe 07 Die Dateien des USB-Speichers können in zufälliger Reihenfolge oder automatisch wiedergegeben werden. Zufallswiedergabe aller Titel: Drücken Sie wiederholt RANDOM, bis „RDM ON“ erscheint. Drücken Sie ENTER. Drücken Sie wiederholt RANDOM, bis „RDM OFF“ erscheint. Drücken Sie ENTER. Hinweis 1 Drücken Sie USB und schließen Sie den USBSpeicher (USB-Gerät) an. 3 Drücken Sie ENTER.
; 60&B6<;( B'H ERRN ࣮࣌ࢪ 㸰㸮㸯㸱ᖺ㸯᭶㸰㸯᪥ࠉ᭶᭙᪥ࠉ༗ᚋ㸳㸮ศ 08 Verwendung des Tuners Kapitel 8: Verwendung des Tuners • Wenn ein RDS-Sender (Radio Data System) eingestellt wird, wird zuerst die Frequenz angezeigt. Danach erscheint der Sendername. • Mit dem Modus Auto Station Program Memory (ASPM) kann eine vollautomatische Einstellung von RDSSendern realisiert werden (siehe Seite 26).
; 60&B6<;( B'H ERRN ࣮࣌ࢪ 㸰㸮㸯㸱ᖺ㸯᭶㸰㸯᪥ࠉ᭶᭙᪥ࠉ༗ᚋ㸳㸮ศ Verwendung des Tuners Hinweis Abrufen eines gespeicherten Senders Festsender-Suchlauf Die abgespeicherten Sender können automatisch abgetastet werden. (Festsenderspeicher-Suchlauf) Die voreingestellte Zahl erscheint, und die programmierten Sender werden nacheinander gewählt, jeder 5 Sekunden lang. 2 Drücken Sie PRESET +/– erneut, wenn der gewünschte Sender lokalisiert worden ist. 1 Drücken Sie TUNER auf der Fernbedienung.
; 60&B6<;( B'H ERRN ࣮࣌ࢪ 㸰㸮㸯㸱ᖺ㸯᭶㸰㸯᪥ࠉ᭶᭙᪥ࠉ༗ᚋ㸳㸮ศ 08 Verwendung des Tuners 1 Hinweis • Hat das Display zu blinken aufgehört, wiederholen Sie das Verfahren ab Schritt 2. Wenn die Einheit einen gewählten Programmtyp findet, leuchtet die zugehörige Kanalnummer etwa 8 Sekunden lang, und dann wird der Name des Senders angezeigt. • Wenn Sie sich den gleichen Programmtyp auf einem anderen Sender anhören wollen, dann drücken Sie RDS PTY, während die Kanalnummer oder der Name des Senders blinkt.
; 60&B6<;( B'H ERRN ࣮࣌ࢪ 㸰㸮㸯㸱ᖺ㸯᭶㸰㸯᪥ࠉ᭶᭙᪥ࠉ༗ᚋ㸳㸮ศ Andere Anschlüsse Andere Anschlüsse Anschluss zusätzlicher Komponenten Italiano POWER ON Deutsch Schließen Sie die auf dem vorderen Bedienfeld befindliche Ministeckerbuchse AUDIO IN an Ihr Zusatz-Wiedergabegerät an. • Diese Methode kann angewendet werden, um auf dieser Einheit Musik von einem iPod/iPhone/iPad mini wiederzugeben, das die Verwendung einer iPodAndockstation und eines iPod/iPhone-Anschlusses nicht unterstützt.
; 60&B6<;( B'H ERRN ࣮࣌ࢪ 㸰㸮㸯㸱ᖺ㸯᭶㸰㸯᪥ࠉ᭶᭙᪥ࠉ༗ᚋ㸳㸮ศ 10 Bluetooth® Audio-Wiedergabe Kapitel 10: Bluetooth® Audio-Wiedergabe Musikwiedergabe unter Einsatz von Bluetooth drahtloser Technologie Mit kabelloser Bluetooth-Technologie ausgerüstetes Gerät: Mobiltelefon Mit kabelloser BluetoothTechnologie ausgerüstetes Gerät: Digitaler Musikplayer Nicht mit kabelloser BluetoothTechnologie ausgerüstetes Gerät: Digitaler Musikplayer + Bluetooth® Audiosender (im Fachhandel erhältlich) Musikdaten POWER ON TIMER PU
; 60&B6<;( B'H ERRN ࣮࣌ࢪ 㸰㸮㸯㸱ᖺ㸯᭶㸰㸯᪥ࠉ᭶᭙᪥ࠉ༗ᚋ㸳㸮ศ Bluetooth® Audio-Wiedergabe Wenn das Pairing mit dem Bluetooth-fähigen Gerät korrekt abgeschlossen worden ist, wird auf dem vorderen Bedienfeld der Einheit die Bezeichnung des Bluetooth-fähigen Geräts angezeigt. (Nur alphanumerische Zeichen mit einem Byte können angezeigt werden. Jedes Zeichen, das nicht angezeigt werden kann, wird durch a „*“ angegeben.) 1 Drücken Sie BT AUDIO.
; 60&B6<;( B'H ERRN ࣮࣌ࢪ 㸰㸮㸯㸱ᖺ㸯᭶㸰㸯᪥ࠉ᭶᭙᪥ࠉ༗ᚋ㸳㸮ศ 10 Bluetooth® Audio-Wiedergabe • Neben großen Möbelstücken aus Metall. • In einer Menschenmenge oder in der Nähe eines Gebäudes oder Hindernisses. • An einem Standort, der einem Magnetfeld, statischer Elektrizität oder HF-Einstreuungen von Funkanlagen ausgesetzt ist, die das gleiche Frequenzband (2,4 GHz) wie diese Anlage nutzen, z. B. ein drahtloses 2,4-GHzLAN-Gerät (IEEE802.11b/g) oder ein Mikrowellenherd.
; 60&B6<;( B'H ERRN ࣮࣌ࢪ 㸰㸮㸯㸱ᖺ㸯᭶㸰㸯᪥ࠉ᭶᭙᪥ࠉ༗ᚋ㸳㸮ศ Zusätzliche Informationen 11 Zusätzliche Informationen Allgemeine Probleme Prüfpunkt Maßnahme zur Behebung Einstellungen, die Sie vorgenommen haben, sind gelöscht worden. War das Netzkabel nicht angeschlossen? Wenn das Netzkabel nicht angeschlossen ist, werden die Einstellungen, die Sie vorgenommen haben, gelöscht. Bitte stellen Sie die Uhr erneut ein. Wenn Sie die Einstellungen nicht löschen wollen, dann trennen Sie das Netzkabel nicht vom Netz.
; 60&B6<;( B'H ERRN ࣮࣌ࢪ 㸰㸮㸯㸱ᖺ㸯᭶㸰㸯᪥ࠉ᭶᭙᪥ࠉ༗ᚋ㸳㸮ศ 11 Zusätzliche Informationen Problem Prüfpunkt Maßnahme zur Behebung Der Anschluss an ein Bluetooth-fähiges Gerät ist nicht möglich, es wird überhaupt kein Ton ausgegeben oder der Ton wird abgeschaltet, wenn das Gerät angeschlossen wird. Befinden sich irgendwelche Geräte in der Nähe, die elektromagnetische Wellen im 2,4 GHz-Band aussenden (Mikrowellen, WLAN-Geräte, andere Bluetooth-fähige Geräte usw.
; 60&B6<;( B'H ERRN ࣮࣌ࢪ 㸰㸮㸯㸱ᖺ㸯᭶㸰㸯᪥ࠉ᭶᭙᪥ࠉ༗ᚋ㸳㸮ศ Zusätzliche Informationen Prüfpunkt Maßnahme zur Behebung Ordner- oder Dateinamen Enthalten die Namen der Die maximale Anzahl von anzeigbaren Zeichen für die Verzeichniswerden überhaupt nicht oder Verzeichnisse oder Dateien mehr als und die Dateinamen beträgt 30. nicht richtig angezeigt.
; 60&B6<;( B'H ERRN ࣮࣌ࢪ 㸰㸮㸯㸱ᖺ㸯᭶㸰㸯᪥ࠉ᭶᭙᪥ࠉ༗ᚋ㸳㸮ศ 11 Zusätzliche Informationen Abspielbare Discs und Formate Audio-CD • Handelsübliche Audio-CDs • CD-R/-RW/-ROM-Discs, die im CD-DA-Format aufgezeichnete Musikdaten enthalten. WMA WMA-Dateien, die auf CD-R/CD-RW/CD-ROM-Discs oder USB-Speicher (USB-Gerät) aufgenommen wurden. MP3 MP3- Dateien, die auf CD-R/CD-RW/CD-ROM-Discs oder USB-Speicher (USB-Gerät) aufgenommen wurden. • Mit diesem Gerät können ausschließlich finalisierte Discs abgespielt werden.
; 60&B6<;( B'H ERRN ࣮࣌ࢪ 㸰㸮㸯㸱ᖺ㸯᭶㸰㸯᪥ࠉ᭶᭙᪥ࠉ༗ᚋ㸳㸮ศ Zusätzliche Informationen Stellen Sie keine Gegenstände oben auf dieses Gerät. Verstopfen Sie nicht die Lüftungsöffnungen. Setzen Sie den Receiver nicht der Hitze aus. Aufbewahren • Platzieren Sie Discs stets in Ihren Hüllen und bewahren Sie sie vertikal auf. Vermeiden Sie für den Aufbewahrungsort Hitze, Feuchtigkeit, direktes Sonnenlicht und extreme Kälte. • Lesen Sie unbedingt die mit der Disc mitgelieferten Behandlungshinweise.
; 60&B6<;( B'H ERRN ࣮࣌ࢪ 㸰㸮㸯㸱ᖺ㸯᭶㸰㸯᪥ࠉ᭶᭙᪥ࠉ༗ᚋ㸳㸮ศ 11 Zusätzliche Informationen • Bringen Sie kein Papier und keine Sticker auf der Oberfläche der Discs an. Wenn Sie dies tun, könnten sich die betreffenden Discs verziehen, so dass es unmöglich wird, sie abzuspielen. Bitte beachten Sie auch, dass geliehene Discs oft Etiketten haben, die auf ihnen angebracht sind, und dass der Klebstoff der Etiketten herausgequollen ist.
; 60&B6<;( B'H ERRN ࣮࣌ࢪ 㸰㸮㸯㸱ᖺ㸱᭶㸰㸳᪥ࠉ᭶᭙᪥ࠉ༗ᚋ㸵㸰㸴ศ Zusätzliche Informationen • Verstärkerteil Effektive Ausgangsleistung: . . . . . . . . . . . . . . . . 10 W + 10 W (1 kHz, 10 %, THD, 8 :) • Tunerbereich Verschiedenes • Lautsprecher Italiano Typ Passiv-Radiator Breitband-Lautsprecher. . . . . . . . . . . . . . . . . . . .6,6-cm-Konus Passivstrahler . . . . . . . . . . . . . . . . . . . . . . . . . . . .7,7-cm-Konus Wiedergabe-Frequenzbereich . . . . . . . . . . . .
; 60&B6<;( B,W ERRN ࣮࣌ࢪ 㸰㸮㸯㸱ᖺ㸱᭶㸰㸳᪥ࠉ᭶᭙᪥ࠉ༗ᚋ㸵㸰㸶ศ ATTENZIONE PER EVITARE IL RISCHIO DI SCOSSE ELETTRICHE, NON RIMUOVERE IL COPERCHIO (O IL RETRO). NON CI SONO PARTI INTERNE LA CUI MANUTENZIONE POSSA ESSERE EFFETTUATA DALL’UTENTE. IN CASO DI NECESSITÀ, RIVOLGERSI ESCLUSIVAMENTE A PERSONALE DI SERVIZIO QUALIFICATO. Questo prodotto è destinato esclusivamente all'uso domestico.
; 60&B6<;( B,W ERRN ࣮࣌ࢪ 㸰㸮㸯㸱ᖺ㸯᭶㸰㸯᪥ࠉ᭶᭙᪥ࠉ༗ᚋ㸳㸵ศ Informazioni per gli utilizzatori finali sulla raccolta e lo smaltimento di vecchi dispositivi e batterie esauste Simbolo per il prodotto Questi simboli sui prodotti, confezioni, e/o documenti allegati significano che vecchi prodotti elettrici ed elettronici e batterie esauste non devono essere mischiati ai rifiuti urbani indifferenziati.
; 60&B6<;( B,W ERRN ࣮࣌ࢪ 㸰㸮㸯㸱ᖺ㸯᭶㸰㸯᪥ࠉ᭶᭙᪥ࠉ༗ᚋ㸳㸵ศ Vi ringraziamo per avere acquistato questo prodotto Pioneer. Leggere attentamente queste istruzioni per l’uso in modo da imparare come azionare correttamente il modello. Finito di leggerle, conservarle in un luogo sicuro per poterle riutilizzare in futuro. Indice 01 Prima di cominciare Contenuto della confezione . . . . . . . . . . . . . . . . . . . . . . 5 Inserimento delle batterie nel telecomando . . . . . . . . . 5 Utilizzo del telecomando . . . . .
; 60&B6<;( B,W ERRN ࣮࣌ࢪ 㸰㸮㸯㸱ᖺ㸱᭶㸰㸳᪥ࠉ᭶᭙᪥ࠉ༗ᚋ㸵㸰㸶ศ Prima di cominciare 01 English Capitolo 1: Prima di cominciare Chiudere il coperchio posteriore. • Non usare batterie diverse da quelle specificate. Inoltre, non usare insieme batterie vecchie e nuove. • Nel caricare le batterie nel telecomando, fare attenzione ad orientarle correttamente seguendo le indicazioni di polarità (indicazioni e ). • Non riscaldare le batterie, non smontarle e non gettarle in acqua o nel fuoco.
; 60&B6<;( B,W ERRN ࣮࣌ࢪ 㸰㸮㸯㸱ᖺ㸯᭶㸰㸯᪥ࠉ᭶᭙᪥ࠉ༗ᚋ㸳㸵ศ 01 Prima di cominciare Utilizzo del telecomando Il telecomando dispone di un raggio di circa 7 m con un angolo di circa 30º dal sensore remoto. 30° 30° 7m Usando il telecomando, tenere presente quanto segue: • Verificare che tra il telecomando e il sensore per il controllo a distanza dell’unità non siano presenti ostacoli.
; 60&B6<;( B,W ERRN ࣮࣌ࢪ 㸰㸮㸯㸱ᖺ㸯᭶㸰㸯᪥ࠉ᭶᭙᪥ࠉ༗ᚋ㸳㸵ศ Nome delle parti e loro funzione 02 Nome delle parti e loro funzione 1 2 STANDBY/ON 1 2 AUDIO IN iPod BT AUDIO CLOCK/TIMER SLEEP 1 2 3 4 5 6 7 8 9 3 12 SLEEP EQUALIZER Vedi Come utilizzare il timer di spegnimento a pagina 15. 4 13 REPEAT RANDOM 0 FOLDER TUNE+ CLEAR Usare per annullare la riproduzione programmata (pagina 20).
; 60&B6<;( B,W ERRN ࣮࣌ࢪ 㸰㸮㸯㸱ᖺ㸯᭶㸰㸯᪥ࠉ᭶᭙᪥ࠉ༗ᚋ㸳㸵ศ 02 Nome delle parti e loro funzione 11 Tasti di comando Tuner ST/MONO Usare per commutare la modalità di suono tra stereo e mono (pagina 24). 1 Serrare le viti a muro alla parete, inserendo viti della misura dell’attaccatura specificate a parte (130 mm). RDS ASPM Viti a muro (disponibili in commercio) da 2 mm a 3 mm Usare per cercare la memoria di programmi da una stazione RDS Auto (pagina 25).
; 60&B6<;( B,W ERRN ࣮࣌ࢪ 㸰㸮㸯㸱ᖺ㸯᭶㸰㸯᪥ࠉ᭶᭙᪥ࠉ༗ᚋ㸳㸵ศ Nome delle parti e loro funzione 02 1 2 3 4 English Pannello anteriore 5 6 POWER ON TIMER Français Deutsch PUSH OPEN AUDIO IN 8 9 10 11 7 1 Portello scorrevole elettrico del CD 7 Altoparlante 2 Sensore remoto 8 Terminale iPod/iPhone Riceve i segnali dal telecomando. Display principale 4 Pannello dello schermo 9 5 Indicatore POWER ON Per connettere l’iPod/iPhone, premere il pulsante PUSH OPEN (pagina 16).
; 60&B6<;( B,W ERRN ࣮࣌ࢪ 㸰㸮㸯㸱ᖺ㸯᭶㸰㸯᪥ࠉ᭶᭙᪥ࠉ༗ᚋ㸳㸵ศ 02 Nome delle parti e loro funzione Pannello frontale/pannello posteriore STANDBY/ON INPUT BT AUDIO 1 2 3 – + VOLUME X-SMC00BT 7 4 DC IN 8 ANTENNA Tasto 1 STANDBY/ON 5 Usati per impostare il volume d’ascolto (pagina 13). 2 Tasto INPUT Seleziona la sorgente di entrata. 6 Tasto di apertura/chiusura del vassoio del disco 3 Usare per aprire e chiudere il portello scorrevole del CD (pagina 18).
; 60&B6<;( B,W ERRN ࣮࣌ࢪ 㸰㸮㸯㸱ᖺ㸱᭶㸰㸳᪥ࠉ᭶᭙᪥ࠉ༗ᚋ㸵㸰㸶ศ Nome delle parti e loro funzione 02 English Sostituire il pannello intercambiabile (X-SMC00-W e X-SMC00BT-W non sono dotati di panello intercambiabile nel contenitore) Frecce Italiano Nederlands 2 Usando entrambe le mani, far scivolare il pannello intercambiabile per rimuoverlo. Deutsch 1 Assicurarsi che il portello scorrevole del CD sia chiuso.
; 60&B6<;( B,W ERRN ࣮࣌ࢪ 㸰㸮㸯㸱ᖺ㸯᭶㸰㸯᪥ࠉ᭶᭙᪥ࠉ༗ᚋ㸳㸵ศ 03 Collegamenti Capitolo 3: Collegamenti ATTENZIONE • Assicurarsi di spegnere la corrente e togliere la spina del cavo di corrente dalla presa mentre si eseguono o modificano le connessioni. • Connettere il cavo di corrente solo dopo aver completato tutte le connessioni tra gli apparecchi. Connettere l’antenna Connettere l’antenna FM a cavo come mostrato qui sotto.
; 60&B6<;( B,W ERRN ࣮࣌ࢪ 㸰㸮㸯㸱ᖺ㸯᭶㸰㸯᪥ࠉ᭶᭙᪥ࠉ༗ᚋ㸳㸵ศ Come iniziare 04 English Capitolo 4: Come iniziare Nota Premere 1 STANDBY/ON per attivare l’alimentazione. Dopo l’uso: Premere 1 STANDBY/ON per inserire la modalità di corrente stand-by. Nota TUNE+ CD TUNER AUDIO IN iPod BT AUDIO CLOCK/TIMER SLEEP 2 3 IPOD AUDIO IN MEMORY /PROGRAM MENU EQUALIZER X-SMC00BT CD PRESET TUNE– FM USB/IPOD VOLUME 1 Premere 1 STANDBY/ON per attivare l’alimentazione. Premere CLOCK/TIMER sul telecomando.
; 60&B6<;( B,W ERRN ࣮࣌ࢪ 㸰㸮㸯㸱ᖺ㸯᭶㸰㸯᪥ࠉ᭶᭙᪥ࠉ༗ᚋ㸳㸵ศ 04 Come iniziare Muting Il volume viene momentaneamente silenziato se si preme, e si tiene premuto, il tasto MUTE sul telecomando. Premerlo di nuovo per ripristinare il volume. Comandi audio Se si preme EQUALIZER, si visualizzeranno le impostazioni della modalità corrente. Per selezionare una modalità diversa, premere EQUALIZER ripetutamente finché non appare la modalità di suono desiderata. ACTIVE Un sono piatto e basico.
; 60&B6<;( B,W ERRN ࣮࣌ࢪ 㸰㸮㸯㸱ᖺ㸯᭶㸰㸯᪥ࠉ᭶᭙᪥ࠉ༗ᚋ㸳㸵ศ Come iniziare Un’impostazione esistente dell’orologio può essere riutilizzata. 1 Seguire i passaggi da 1 a 3 in “Impostare l’orologio sveglia”. Usare le cuffie Connettere lo spinotto delle cuffie al terminale PHONES. Se le cuffie sono collegate, non viene emesso alcun suono dagli altoparlanti. 2 Premere H I per selezionare “TIMER ON”, quindi premere ENTER.
; 60&B6<;( B,W ERRN ࣮࣌ࢪ 㸰㸮㸯㸱ᖺ㸯᭶㸰㸯᪥ࠉ᭶᭙᪥ࠉ༗ᚋ㸳㸵ศ 05 Riproduzione di iPod/iPhone/iPad mini Capitolo 5: Riproduzione di iPod/iPhone/iPad mini Semplicemente collegando un iPod/iPhone/iPad mini a questa unità potrete riprodurre audio di alta qualità con l’iPod/iPhone/iPad mini. Le impostazioni musicali per iPod/ iPhone/iPad mini possono essere eseguite da questa unità o dallo stesso iPod/iPhone/iPad mini.
; 60&B6<;( B,W ERRN ࣮࣌ࢪ 㸰㸮㸯㸱ᖺ㸯᭶㸰㸯᪥ࠉ᭶᭙᪥ࠉ༗ᚋ㸳㸵ศ Riproduzione di iPod/iPhone/iPad mini Riprodurre da iPod/iPhone/iPad mini 1 PUSH OPEN 2 Premere iPod o USB come sorgente in entrata. Si visualizzerà “IPOD” o “USB/IPOD” sulla schermata principale. 1 Connettere il cavo dell’iPod/iPhone/iPad mini al terminale di iPod/iPhone sulla parte frontale dell’apparecchio. Ricerca di un file col nome dell’artista o genere musicale. Riprodurre in modalità ripetuta o in modalità casuale.
; 60&B6<;( B,W ERRN ࣮࣌ࢪ 㸰㸮㸯㸱ᖺ㸯᭶㸰㸯᪥ࠉ᭶᭙᪥ࠉ༗ᚋ㸳㸵ศ 06 Riproduzione di dischi Capitolo 6: Riproduzione di dischi Questo sistema può eseguire riproduzioni di CD standard, CD-R/RW nel formato CD e CD-R/RW con file MP3 o WMA, ma non può registrare su di essi. La riproduzione di alcuni dischi-CD-R e CD-RW potrebbe non essere possibile a causa delle condizioni del disco o dell’apparecchiatura usata per la registrazione. MP3: MP3 è una forma di compressione. È l’acronimo per MPEG Audio Layer 3.
; 60&B6<;( B,W ERRN ࣮࣌ࢪ 㸰㸮㸯㸱ᖺ㸯᭶㸰㸯᪥ࠉ᭶᭙᪥ࠉ༗ᚋ㸳㸵ศ Riproduzione di dischi 06 OPEN/CLOSE USB TUNER iPod BT AUDIO CLOCK/TIMER AUDIO IN SLEEP EQUALIZER 1 2 3 4 5 6 P.BASS MEMORY /PROGRAM PRESET 8 + 9 REPEAT RANDOM 0 DISPLAY MUTE – TUNE+ FOLDER – DIMMER ST/MONO RDS ASPM PTY DISPLAY Ricerca diretta di un brano Nota Per fermare la riproduzione: Premere #.
; 60&B6<;( B,W ERRN ࣮࣌ࢪ 㸰㸮㸯㸱ᖺ㸯᭶㸰㸯᪥ࠉ᭶᭙᪥ࠉ༗ᚋ㸳㸵ศ 06 Riproduzione di dischi Riproduzione programmabile (CD o MP3/WMA) Si possono scegliere fino a 32 selezioni da riprodurre nell’ordine preferito. 1 In modalità di arresto, premere MEMORY/ PROGRAM sul telecomando per immettere la modalità di salvataggio programmazione. 2 Premere + , o i tasti Numerici sul telecomando per selezionare le piste desiderate. 3 Premere ENTER per salvare il numero di cartella e di pista.
; 60&B6<;( B,W ERRN ࣮࣌ࢪ 㸰㸮㸯㸱ᖺ㸯᭶㸰㸯᪥ࠉ᭶᭙᪥ࠉ༗ᚋ㸳㸵ศ Riproduzione di dischi 06 Per specificare la cartella da riprodurre, eseguire i seguenti passaggi. Commutare i contenuti della schermata 1 STANDBY/ON OPEN/CLOSE USB TUNER BT AUDIO CLOCK/TIMER FOLDER TUNE+ AUDIO IN SLEEP Premere DISPLAY. Se i nomi di titolo, artista e album sono stati scritti sul file, questa informazione sarà visualizzata. (L’unità può visualizzare solo caratteri alfanumerici.
; 60&B6<;( B,W ERRN ࣮࣌ࢪ 㸰㸮㸯㸱ᖺ㸯᭶㸰㸯᪥ࠉ᭶᭙᪥ࠉ༗ᚋ㸳㸵ศ 07 Riproduzione USB Capitolo 7: Riproduzione USB Riprodurre dispositivi di memoria USB • Questa unità può non riconoscere un dispositivo di memoria di massa USB, riprodurne i file ed alimentarlo. Per maggiori dettagli, vedi Quando si collega un dispositivo di memoria di massa USB a pagina 32. • Se un dispositivo di memoria USB non viene riprodotto e non vengono eseguite operazioni per più di 30 minuti, l’unità si spegne automaticamente.
; 60&B6<;( B,W ERRN ࣮࣌ࢪ 㸰㸮㸯㸱ᖺ㸯᭶㸰㸯᪥ࠉ᭶᭙᪥ࠉ༗ᚋ㸳㸵ศ Riproduzione USB 07 Il file sul dispositivo di memoria USB può essere riprodotto automaticamente in ordine casuale. Per la riproduzione ad accesso casuale di tutti i brani: Per cancellare la lettura casuale: Premere RANDOM ripetutamente finché non appare “RDM OFF”. Premere ENTER. L’unità può riprodurre cartelle archiviate su un dispositivo di memoria USB nell’ordine desiderato.
; 60&B6<;( B,W ERRN ࣮࣌ࢪ 㸰㸮㸯㸱ᖺ㸯᭶㸰㸯᪥ࠉ᭶᭙᪥ࠉ༗ᚋ㸳㸵ศ 08 Come usare il sintonizzatore Capitolo 8: Come usare il sintonizzatore • Si può ottenere una sintonizzazione completamente automatica per le stazioni RDS. usando la modalità Auto Station Program Memory (ASPM), vedi pagina 26. Ascoltare trasmissioni radio I seguenti passaggi mostrano come sintonizzarsi su una trasmissione radio FM usando la (ricerca) automatica e il (passaggio) manuale per sintonizzarsi.
; 60&B6<;( B,W ERRN ࣮࣌ࢪ 㸰㸮㸯㸱ᖺ㸯᭶㸰㸯᪥ࠉ᭶᭙᪥ࠉ༗ᚋ㸳㸵ศ Come usare il sintonizzatore Nota Per richiamare una stazione memorizzata Scansione delle stazioni preselezionate Le stazioni memorizzate possono essere ricercate automaticamente. (Scansione della memoria delle stazioni preselezionate) Premere e tenere premuto PRESET +/–. Il numero preimpostato apparirà e le stazioni programmate verranno sintonizzate in sequenza, ciascuna per 5 secondi.
; 60&B6<;( B,W ERRN ࣮࣌ࢪ 㸰㸮㸯㸱ᖺ㸯᭶㸰㸯᪥ࠉ᭶᭙᪥ࠉ༗ᚋ㸳㸵ศ 08 Come usare il sintonizzatore • Se si vuole ascoltare lo stesso tipo di programma di un’altra stazione, premere RDS PTY mentre il numero di canale o di stazione lampeggia. L’unità cercherà la stazione successiva. • Se non può essere trovata nessuna stazione, “NO FOUND” apparirà per 4 secondi.
; 60&B6<;( B,W ERRN ࣮࣌ࢪ 㸰㸮㸯㸱ᖺ㸯᭶㸰㸯᪥ࠉ᭶᭙᪥ࠉ༗ᚋ㸳㸵ศ Altri collegamenti Altri collegamenti Connessione di componenti ausiliari POWER ON Deutsch Connettere la mini-presa jack AUDIO IN del pannello frontale a un componente di playback ausiliario. • Questo metodo può essere usato per riprodurre musica su questa unità da iPod/iPhone/iPad mini che non supportano l’uso di un Aggancio iPod e di un terminale iPod/iPhone.
; 60&B6<;( B,W ERRN ࣮࣌ࢪ 㸰㸮㸯㸱ᖺ㸯᭶㸰㸯᪥ࠉ᭶᭙᪥ࠉ༗ᚋ㸳㸵ศ 10 Riproduzione Bluetooth® Audio Capitolo 10: Riproduzione Bluetooth® Audio Riproduzione con tecnologia wireless Bluetooth Dispositivo con tecnologia wireless Bluetooth: Telefono cellulare Dispositivo con tecnologia wireless Bluetooth: Lettore di musica digitale Dispositivo non dotato di tecnologia wireless Bluetooth: Lettore di musica digitale + Trasmettitore audio Bluetooth® (da acquistare separatamente) Dati musicali POWER ON TIMER PUSH OPEN AUD
; 60&B6<;( B,W ERRN ࣮࣌ࢪ 㸰㸮㸯㸱ᖺ㸯᭶㸰㸯᪥ࠉ᭶᭙᪥ࠉ༗ᚋ㸳㸵ศ Riproduzione Bluetooth® Audio 1 Premere BT AUDIO. L’unità si commuterà sull’entrata BT AUDIO. 2 Sarà creata una connessione Bluetooth tra l’apparecchio abilitato a tecnologia Bluetooth e l’unità. Pyccкий L’uso di questo apparecchio è limitato all’uso casalingo. (La distanza di trasmissione può ridursi a seconda dell’ambiente di comunicazione).
; 60&B6<;( B,W ERRN ࣮࣌ࢪ 㸰㸮㸯㸱ᖺ㸯᭶㸰㸯᪥ࠉ᭶᭙᪥ࠉ༗ᚋ㸳㸵ศ 10 Riproduzione Bluetooth® Audio • In un luogo esposto a campi magnetici, elettricità statica o interferenze radio provenienti da apparecchiature radio che utilizzano la stessa banda di frequenze (2,4 GHz) di questa unità, ad esempio un dispositivo wireless LAN da 2,4 GHz (IEEE802.11b/g) o un forno a microonde. • Chi vive in aree densamente popolate (appartamenti, caseggiati, ecc.) può subire interferenze causate dal forno a microonde del vicino.
; 60&B6<;( B,W ERRN ࣮࣌ࢪ 㸰㸮㸯㸱ᖺ㸯᭶㸰㸯᪥ࠉ᭶᭙᪥ࠉ༗ᚋ㸳㸵ศ Informazioni aggiuntive 11 Informazioni aggiuntive Problema di carattere generale Problema Controllare Soluzione Le impostazioni che avevate fatto sono state cancellate. Il cavo di corrente era scollegato? Se si scollega il cavo di corrente, le impostazioni eseguite vengono cancellate. Si prega di riprogrammare l’orologio. Se non si vogliono cancellare le impostazioni, non scollegare il cavo di corrente.
; 60&B6<;( B,W ERRN ࣮࣌ࢪ 㸰㸮㸯㸱ᖺ㸯᭶㸰㸯᪥ࠉ᭶᭙᪥ࠉ༗ᚋ㸳㸵ศ 11 Informazioni aggiuntive Problema Controllare Impossibile connettersi a un apparecchio abilitato a tecnologia Bluetooth, non viene emesso alcun suono o il suono è troncato. Vi sono apparecchi nelle vicinanze In tal caso, allontanare gli apparecchi dall’unità o smettere di usare che emettono onde altri dispositivi che emettono onde elettromagnetiche.
; 60&B6<;( B,W ERRN ࣮࣌ࢪ 㸰㸮㸯㸱ᖺ㸯᭶㸰㸯᪥ࠉ᭶᭙᪥ࠉ༗ᚋ㸳㸵ศ Informazioni aggiuntive Controllare Soluzione Il numero massimo di caratteri visualizzabili per la cartella o per i nomi dei file è di 30. I nomi della cartella o del file Questo non è un un problema con non sono visualizzati in questa unità. ordine alfabetico. L’ordine in cui si visualizzano i nomi delle cartelle e dei file dipende da quello in cui le cartelle o i file sono stati registrati sul dispositivo di memoria USB.
; 60&B6<;( B,W ERRN ࣮࣌ࢪ 㸰㸮㸯㸱ᖺ㸯᭶㸰㸯᪥ࠉ᭶᭙᪥ࠉ༗ᚋ㸳㸵ศ 11 Informazioni aggiuntive Dischi e formati riproducibili CD-Audio • CD audio disponibili in commercio • CD-R/-RW/-ROM contenenti musica e registrati in formato CD-DA WMA File WMA registrati su dischi CD-R/ -RW/ -ROM o su dispositivi di memoria USB MP3 File MP3 registrati su dischi CD-R/ -RW/ -ROM o su dispositivi di memoria USB • Si possono riprodurre solo dischi finalizzati.
; 60&B6<;( B,W ERRN ࣮࣌ࢪ 㸰㸮㸯㸱ᖺ㸯᭶㸰㸯᪥ࠉ᭶᭙᪥ࠉ༗ᚋ㸳㸵ศ Informazioni aggiuntive Non appoggiare oggetti sopra a questa unità. Non ostruire i fori di ventilazione. Non esporlo al calore. La condensa Pulire i dischi • I dischi possono non funzionare se vi sono impronte digitali o polvere su di essi. In tal caso, usare un panno di pulizia ecc. per spolverare dolcemente il disco dall’interno verso l’esterno. Non usare panni di pulizia sporchi.
; 60&B6<;( B,W ERRN ࣮࣌ࢪ 㸰㸮㸯㸱ᖺ㸯᭶㸰㸯᪥ࠉ᭶᭙᪥ࠉ༗ᚋ㸳㸵ศ 11 Informazioni aggiuntive Dischi con forma particolare I dischi non circolari (a cuore, esagonali, ecc.) non possono venire riprodotti con questa unità. Non tentare di riprodurre simili dischi, dato che possono danneggiare questa unità.
; 60&B6<;( B,W ERRN ࣮࣌ࢪ 㸰㸮㸯㸱ᖺ㸱᭶㸰㸳᪥ࠉ᭶᭙᪥ࠉ༗ᚋ㸵㸰㸶ศ Informazioni aggiuntive 11 • Sezione amplificatore Uscita alimentazione RMS: . . . . . . . . . . . . . . . . . 10 W + 10 W (1 kHz, 10 %, T.H.D., 8 :) • Sezione sintonizzatore Generalità • Altoparlante Accessori Pyccкий © 2013 PIONEER CORPORATION. Tutti i diritti riservati. 2 2 1 1 Español Nota • Le specifiche e il design sono soggetti a possibili modifiche senza preavviso, per eventuali migliorie del prodotto.
; 60&B6<;( B1O ERRN ࣮࣌ࢪ 㸰㸮㸯㸱ᖺ㸱᭶㸰㸳᪥ࠉ᭶᭙᪥ࠉ༗ᚋ㸵㸰㸷ศ WAARSCHUWING OM HET GEVAAR VOOR EEN ELEKTRISCHE SHOCK TE VOORKOMEN, DEKSEL (OF RUG) NIET VERWIJDEREN. AAN DE BINNENZIJDE BEVINDEN ZICH GEEN ELEMENTEN DIE DOOR DE GEBRUIKER KUNNEN BEDIEND WORDEN. ENKEL DOOR GEKWALIFICEERD PERSONEEL TE BEDIENEN. D3-4-2-1-1_B1_Nl WAARSCHUWING Dit apparaat is niet waterdicht.
; 60&B6<;( B1O ERRN ࣮࣌ࢪ 㸰㸮㸯㸱ᖺ㸯᭶㸰㸯᪥ࠉ᭶᭙᪥ࠉ༗ᚋ㸳㸶ศ Gebruikersinformatie voor het verzamelen en verwijderen van oude producten en batterijen Symbool voor toestellen De symbolen op producten, verpakkingen en bijbehorende documenten geven aan dat de gebruikte elektronische producten en batterijen niet met het gewone huishoudelijk afval kunnen worden samengevoegd.
; 60&B6<;( B1O ERRN ࣮࣌ࢪ 㸰㸮㸯㸱ᖺ㸯᭶㸰㸯᪥ࠉ᭶᭙᪥ࠉ༗ᚋ㸳㸶ศ Hartelijk dank voor de aanschaf van dit Pioneer produkt. Lees deze handleiding zorgvuldig door zodat u weet hoe u uw apparaat moet gebruiken. Bewaar de handleiding op een veilige plaats voor eventuele naslag in de toekomst. Inhoudsopgave 01 Voordat u begint Inhoud van de doos . . . . . . . . . . . . . . . . . . . . . . . . . . . . . 5 Aanbrengen van de batterijen in de afstandsbediening . . . . . . . . . . . . . . . . . . . . . . . . . . . . . .
; 60&B6<;( B1O ERRN ࣮࣌ࢪ 㸰㸮㸯㸱ᖺ㸱᭶㸰㸳᪥ࠉ᭶᭙᪥ࠉ༗ᚋ㸵㸰㸷ศ Voordat u begint 01 English Hoofdstuk 1: Voordat u begint Controleer of de volgende onderdelen zich bij opening in de doos bevinden. • Afstandsbediening • Netadapter • Verwisselbaar paneel x 2 • • • • • AAA-batterijen (R03) x 2 FM-draadantenne iPhonehouder Garantiebewijs Handleiding (dit document) Sluit het achterdekseltje.
; 60&B6<;( B1O ERRN ࣮࣌ࢪ 㸰㸮㸯㸱ᖺ㸯᭶㸰㸯᪥ࠉ᭶᭙᪥ࠉ༗ᚋ㸳㸶ศ 01 Voordat u begint Gebruik van de afstandsbediening De afstandsbediening heeft een bereik van ongeveer 7 m bij een hoek van ongeveer 30º vanaf de afstandsbedieningssensor. 30° 30° 7m Wanneer u de afstandsbediening gebruikt, houd dan rekening met het volgende: • Zorg ervoor dat zich geen obstakels tussen de afstandsbediening en de sensor op het apparaat bevinden.
; 60&B6<;( B1O ERRN ࣮࣌ࢪ 㸰㸮㸯㸱ᖺ㸯᭶㸰㸯᪥ࠉ᭶᭙᪥ࠉ༗ᚋ㸳㸶ศ Overzicht van de bedieningstoetsen Overzicht van de bedieningstoetsen 1 2 STANDBY/ON 1 2 AUDIO IN iPod BT AUDIO CLOCK/TIMER SLEEP 1 2 3 4 5 6 7 8 9 3 12 SLEEP EQUALIZER Zie De slaaptimer gebruiken op bladzijde 15. 4 13 REPEAT RANDOM 0 FOLDER TUNE+ CLEAR Gebruiken om geprogrammeerd afspelen te annuleren (bladzijde 20).
; 60&B6<;( B1O ERRN ࣮࣌ࢪ 㸰㸮㸯㸱ᖺ㸯᭶㸰㸯᪥ࠉ᭶᭙᪥ࠉ༗ᚋ㸳㸶ศ 02 Overzicht van de bedieningstoetsen 11 Tuner-bedieningsfuncties ST/MONO Gebruik deze functie om het geluid tussen stereo en mono te wijzigen (bladzijde 24). 1 Draai de bevestigingsschroeven op de aangegeven bevestigingsafmeting (130 mm) aan de wand. RDS ASPM Schroeven wandbevestiging (in de handel verkrijgbaar) 2 mm tot 3 mm RDS Auto station gebruiken om te zoeken naar stations voor geheugenopslag (bladzijde 25).
; 60&B6<;( B1O ERRN ࣮࣌ࢪ 㸰㸮㸯㸱ᖺ㸯᭶㸰㸯᪥ࠉ᭶᭙᪥ࠉ༗ᚋ㸳㸶ศ Overzicht van de bedieningstoetsen 02 1 2 3 4 English Voorpaneel 5 6 POWER ON TIMER Français Deutsch PUSH OPEN AUDIO IN 8 9 10 11 7 1 Elektrische cd-schuifdeur 7 Luidspreker 2 Afstandsbedieningssensor 8 Aansluitpunt iPod/iPhone Hier komen de signalen van de afstandsbediening binnen. Hoofddisplay 4 Displaypaneel 9 5 POWER ON indicator Druk op PUSH OPEN om de iPod/iPhone aan te sluiten (bladzijde 16).
; 60&B6<;( B1O ERRN ࣮࣌ࢪ 㸰㸮㸯㸱ᖺ㸯᭶㸰㸯᪥ࠉ᭶᭙᪥ࠉ༗ᚋ㸳㸶ศ 02 Overzicht van de bedieningstoetsen Bovenpaneel/Achterpaneel STANDBY/ON INPUT BT AUDIO 1 2 3 – + VOLUME X-SMC00BT 7 1 4 DC IN 1 STANDBY/ON-toets Schakelen tussen ruststand en aan (bladzijde 13). 2 INPUT-toets Selecteren van de ingangsbron. 3 EQ-toets (X-SMC00) Wordt gebruikt om de geluidsmodus te wijzigen (bladzijde 14).
; 60&B6<;( B1O ERRN ࣮࣌ࢪ 㸰㸮㸯㸱ᖺ㸱᭶㸰㸳᪥ࠉ᭶᭙᪥ࠉ༗ᚋ㸵㸰㸷ศ Overzicht van de bedieningstoetsen 02 English Verwisselen van het verwisselbare paneel (Bij de X-SMC00-W en X-SMC00BT-W bevindt er zich geen inwisselbaar paneel in de behuizing) Pijlen Italiano Nederlands 2 Schuif het verwisselbare paneel met beide handen omhoog om het te verwijderen. Deutsch 1 Zorg ervoor dat de elektrische cdschuifdeur is gesloten.
; 60&B6<;( B1O ERRN ࣮࣌ࢪ 㸰㸮㸯㸱ᖺ㸯᭶㸰㸯᪥ࠉ᭶᭙᪥ࠉ༗ᚋ㸳㸶ศ 03 Aansluitingen Hoofdstuk 3: Aansluitingen WAARSCHUWING • Zorg er te allen tijde voor dat het apparaat is uitgeschakeld en verwijder het netsnoer van het stopcontact als u aansluitingen doet of wijzigt. • Sluit het netsnoer aan nadat alle aansluitingen tussen de diverse apparaten zijn voltooid. Aansluiting van de antenne Sluit de FM-draadantenne aan zoals hieronder aangegeven.
; 60&B6<;( B1O ERRN ࣮࣌ࢪ 㸰㸮㸯㸱ᖺ㸯᭶㸰㸯᪥ࠉ᭶᭙᪥ࠉ༗ᚋ㸳㸶ศ Aan de slag 04 English Hoofdstuk 4: Aan de slag Opmerking Druk op de toets 1 STANDBY/ON om het apparaat in te schakelen. • Wanneer stroomvoorziening is weergegeven nadat het apparaat weer is ingestoken of door vermogensuitval, stel de klok in opnieuw. Na gebruik: Druk op de toets 1 STANDBY/ON om het apparaat op standby te zetten. • Als een iPod/iPhone/iPad mini is aangesloten, gaat het apparaat terwijl het op stand-by staat over op de laadmodus.
; 60&B6<;( B1O ERRN ࣮࣌ࢪ 㸰㸮㸯㸱ᖺ㸯᭶㸰㸯᪥ࠉ᭶᭙᪥ࠉ༗ᚋ㸳㸶ศ 04 Aan de slag Muting Het volume wordt tijdelijk gedempt als MUTE op de afstandsbediening wordt ingedrukt. Druk opnieuw op deze toets, om het geluidsvolume te herstellen. Geluidsbediening Als de EQUALIZER wordt ingedrukt, wordt de huidige modusinstelling getoond. Om de modus te wijzigen, drukt u herhaaldelijk op EQUALIZER totdat de gewenste geluidsmodus verschijnt. FLAT Basisgeluid met weinig intonatie.
; 60&B6<;( B1O ERRN ࣮࣌ࢪ 㸰㸮㸯㸱ᖺ㸯᭶㸰㸯᪥ࠉ᭶᭙᪥ࠉ༗ᚋ㸳㸶ศ Aan de slag Een bestaande timerinstelling kan opnieuw worden gebruikt. Gebruik van hoofdtelefoons 1 Volg stap 1 en 3 in “Setting the wake-up timer”. Sluit de aansluitplug van de hoofdtelefoon aan op het aansluitpunt PHONES. Wanneer een hoofdtelefoon is aangesloten, wordt er geen geluid weergegeven via de luidsprekers. POWER ON TIMER Uitschakelen van de wekkertimer Zet de timerinstelling uit. 1 Volg stap 1 en 3 in “Setting the wake-up timer”.
; 60&B6<;( B1O ERRN ࣮࣌ࢪ 㸰㸮㸯㸱ᖺ㸯᭶㸰㸯᪥ࠉ᭶᭙᪥ࠉ༗ᚋ㸳㸶ศ 05 Weergave van iPod/iPhone/iPad mini Hoofdstuk 5: Weergave van iPod/iPhone/iPad mini Door enkel uw iPod/iPhone/iPad mini op dit apparaat aan te sluiten, kunt u genieten van topkwaliteit geluid van uw iPod/ iPhone/iPad mini. De weergave voor muziek van de iPod/ iPhone/iPad mini kan via dit apparaat of via de iPod/iPhone/ iPad mini zelf worden ingesteld.
; 60&B6<;( B1O ERRN ࣮࣌ࢪ 㸰㸮㸯㸱ᖺ㸯᭶㸰㸯᪥ࠉ᭶᭙᪥ࠉ༗ᚋ㸳㸶ศ Weergave van iPod/iPhone/iPad mini De iPod/iPhone/iPad mini afspelen 1 PUSH OPEN 2 Druk op iPod of USB als ingangsbron. “IPOD” of “USB/IPOD” verschijnt op de hoofddisplay. 3 Zodra het apparaat de iPod/iPhone heeft herkend, wordt deze automatisch afgespeeld. Aansluiting van de iPod/iPhone/iPad mini via de bijgeleverde iPhone-stand Zoeken van een bestand op naam van de artiest of op genre. Afspelen in de modus Repeat of Random.
; 60&B6<;( B1O ERRN ࣮࣌ࢪ 㸰㸮㸯㸱ᖺ㸯᭶㸰㸯᪥ࠉ᭶᭙᪥ࠉ༗ᚋ㸳㸶ศ 06 Disc-weergave Hoofdstuk 6: Disc-weergave Dit systeem kan een standaard CD, CD-R/RW in CD-formaat en CD-R/RW met MP3- of WMA-bestanden afspelen, maar kan deze niet opnemen. Bepaalde audio CD-R en CD-RW discs kunnen vanwege de status van de disc of opnameapparatuur niet worden afgespeeld. MP3: MP3 is een compressieformaat. De afkorting staat voor MPEG Audio Layer 3.
; 60&B6<;( B1O ERRN ࣮࣌ࢪ 㸰㸮㸯㸱ᖺ㸯᭶㸰㸯᪥ࠉ᭶᭙᪥ࠉ༗ᚋ㸳㸶ศ Disc-weergave 06 0 STANDBY/ON OPEN/CLOSE USB TUNER AUDIO IN BT AUDIO CLOCK/TIMER SLEEP EQUALIZER 1 2 3 4 5 6 P.
; 60&B6<;( B1O ERRN ࣮࣌ࢪ 㸰㸮㸯㸱ᖺ㸯᭶㸰㸯᪥ࠉ᭶᭙᪥ࠉ༗ᚋ㸳㸶ศ 06 Disc-weergave Geprogrammeerde weergave (CD of MP3/WMA) Informatie over het downloaden van MP3/WMA U kunt maximaal 32 fragmenten voor weergave in de gewenste volgorde kiezen. Op het Internet bevinden zich veel muziek-websites, waar u MP3/WMA kunt downloaden. Volg de instructies van de website, hoe u de muziekbestanden kunt downloaden. U kunt deze gedownloade muziekbestanden dan afspelen door ze op een CD-R/RW disc te branden.
; 60&B6<;( B1O ERRN ࣮࣌ࢪ 㸰㸮㸯㸱ᖺ㸯᭶㸰㸯᪥ࠉ᭶᭙᪥ࠉ༗ᚋ㸳㸶ศ Disc-weergave 06 Voer de volgende stappen uit om de map te kiezen die moet worden afgespeeld. STANDBY/ON 0 OPEN/CLOSE USB TUNER AUDIO IN iPod BT AUDIO CLOCK/TIMER SLEEP 2 3 DISPLAY FOLDER TUNE+ 1 Druk op DISPLAY. Als de titel, artiest en albumnaam naar het bestand zijn geschreven, dan wordt die informatie getoond. (Het systeem toont uitsluitend alfanumerieke tekens. Niet-alfanumerieke tekens verschijnen als “*”.
; 60&B6<;( B1O ERRN ࣮࣌ࢪ 㸰㸮㸯㸱ᖺ㸯᭶㸰㸯᪥ࠉ᭶᭙᪥ࠉ༗ᚋ㸳㸶ศ 07 USB-weergave Hoofdstuk 7: USB-weergave Afspelen van USBopslagapparaten Het is mogelijk om naar tweekanaals audio te luisteren met behulp van de USB-interface aan de voorzijde van deze receiver. • Pioneer garandeert niet dat bestanden die op een USBopslagapparaat zijn opgenomen kunnen worden afgespeeld of dat stroom naar een USB-opslagapparaat kan worden toegevoerd.
; 60&B6<;( B1O ERRN ࣮࣌ࢪ 㸰㸮㸯㸱ᖺ㸯᭶㸰㸯᪥ࠉ᭶᭙᪥ࠉ༗ᚋ㸳㸶ศ USB-weergave 07 Het bestand van het USB-opslagapparaat kan in willekeurige volgorde automatisch worden afgespeeld. Willekeurig weergave van alle nummers: Druk herhaaldelijk op RANDOM totdat “RDM ON” verschijnt. Druk op ENTER. Druk herhaaldelijk op RANDOM totdat “RDM OFF” verschijnt. Druk op ENTER. Het apparaat kan de in het USB-opslagapparaat opgeslagen mappen in de gewenste volgorde afspelen.
; 60&B6<;( B1O ERRN ࣮࣌ࢪ 㸰㸮㸯㸱ᖺ㸯᭶㸰㸯᪥ࠉ᭶᭙᪥ࠉ༗ᚋ㸳㸶ศ 08 Gebruik van de tuner Hoofdstuk 8: Gebruik van de tuner • RDS-stations kunnen geheel automatisch worden afgestemd via de functie Auto Station Program Memory (ASPM), zie bladzijde 26. Luisteren naar de radiouitzendingen De volgende stappen geven aan hoe de FM-radiostations worden ingesteld via de automatische (zoekfunctie) en handmatige (stap-voor-stap) tuningfuncties.
; 60&B6<;( B1O ERRN ࣮࣌ࢪ 㸰㸮㸯㸱ᖺ㸯᭶㸰㸯᪥ࠉ᭶᭙᪥ࠉ༗ᚋ㸳㸶ศ Gebruik van de tuner Instellen van een voorkeurzender Aftasten van de voorkeuzezenders De in het geheugen opgeslagen zenders kunnen automatisch worden afgetast. (Aftasten voorkeuzegeheugen) Houd PRESET +/– ingedrukt. Het presetnummer verschijnt en de geprogrammeerde stations worden elk 5 seconden lang één voor één ingesteld. 2 Druk nogmaals op PRESET +/– als het gewenste station is gevonden. 1 Druk op TUNER op de afstandsbediening.
; 60&B6<;( B1O ERRN ࣮࣌ࢪ 㸰㸮㸯㸱ᖺ㸯᭶㸰㸯᪥ࠉ᭶᭙᪥ࠉ༗ᚋ㸳㸶ศ 08 Gebruik van de tuner • Als u naar hetzelfde programmatype van een ander station wilt luisteren, drukt u op de RDS PTY terwijl het kanaalnummer of de stationnaam knippert. Het toestel zal dan de volgende zender opzoeken. • Als er geen zender gevonden kan worden, zal de aanduiding “NO FOUND” 4 seconden lang getoond worden.
; 60&B6<;( B1O ERRN ࣮࣌ࢪ 㸰㸮㸯㸱ᖺ㸯᭶㸰㸯᪥ࠉ᭶᭙᪥ࠉ༗ᚋ㸳㸶ศ Overige aansluitingen Overige aansluitingen Aansluiten van extra apparatuur POWER ON Deutsch Sluit de ministeker AUDIO IN op het voorpaneel aan op uw hulpweergavecomponent. • Deze methode kan worden gebruikt om muziek op dit systeem af te spelen vanaf een iPod/iPhone/iPad mini die het aansluitpunt voor de iPod-dock en iPod/iPhone niet ondersteunt.
; 60&B6<;( B1O ERRN ࣮࣌ࢪ 㸰㸮㸯㸱ᖺ㸯᭶㸰㸯᪥ࠉ᭶᭙᪥ࠉ༗ᚋ㸳㸶ศ 10 Bluetooth® audioweergave Hoofdstuk 10: Bluetooth® audioweergave Muziek weergeven met behulp van Bluetooth draadloze technologie Apparaat met Bluetooth draadloze technologie: Mobiele telefoon Apparaat met Bluetooth draadloze technologie: Digitale muziekspeler Apparaat zonder Bluetooth draadloze technologie: Digitale muziekspeler + Bluetooth® audiozender (los verkrijgbaar) Muziekgegevens POWER ON TIMER PUSH OPEN AUDIO IN Op het systeem kan muziek
; 60&B6<;( B1O ERRN ࣮࣌ࢪ 㸰㸮㸯㸱ᖺ㸯᭶㸰㸯᪥ࠉ᭶᭙᪥ࠉ༗ᚋ㸳㸶ศ Bluetooth® audioweergave Als de paring met het met Bluetooth uitgeruste apparaat op de juiste wijze is voltooid, wordt de naam van het met Bluetooth uitgeruste apparaat op het voorpaneel van het systeem weergegeven. (Alleen alfanumerieke tekens van één byte kunnen worden weergegeven. Alle tekens die niet kunnen worden weergegeven worden door “*” aangegeven.) Druk op BT AUDIO. Het systeem schakelt over op de BT AUDIO-ingang.
; 60&B6<;( B1O ERRN ࣮࣌ࢪ 㸰㸮㸯㸱ᖺ㸯᭶㸰㸯᪥ࠉ᭶᭙᪥ࠉ༗ᚋ㸳㸶ศ 10 Bluetooth® audioweergave • In een menigte mensen of in de buurt van een gebouw of een obstakel. • Op een locatie die is blootgesteld aan het magnetische veld, statische elektriciteit of radiogolfinterferentie van radiocommunicatieapparatuur die gebruik maakt van dezelfde frequentieband (2,4 GHz) als dit apparaat, zoals een 2,4 GHz draadloos LAN-apparaat (IEEE802.11b/g) of een magnetron.
; 60&B6<;( B1O ERRN ࣮࣌ࢪ 㸰㸮㸯㸱ᖺ㸯᭶㸰㸯᪥ࠉ᭶᭙᪥ࠉ༗ᚋ㸳㸶ศ Aanvullende informatie 11 Aanvullende informatie Algemeen probleem Controle Oplossing De instellingen die u hebt gedaan zijn gewist. Is het netsnoer uitgetrokken? Als het netsnoer is uitgetrokken, worden de gedane instellingen gewist. Stel de tijd nogmaals in. Verwijder het netsnoer niet als u niet wilt dat de instellingen worden gewist. Verschil in volume tussen CD’s, MP3, WMA, iPod/ iPhone/iPad mini, Tuner en AUDIO IN.
; 60&B6<;( B1O ERRN ࣮࣌ࢪ 㸰㸮㸯㸱ᖺ㸯᭶㸰㸯᪥ࠉ᭶᭙᪥ࠉ༗ᚋ㸳㸶ศ 11 Aanvullende informatie Probleem Controle Kan geen met Bluetooth uitgerust apparaat aansluiten, er komt geen geluid uit, of het geluid wordt bij de aansluiting afgebroken. Bevindt er zich apparatuur in de Als dat het geval is moet deze apparatuur van het systeem buurt die elektromagnetische golven verwijderd worden of moet andere apparatuur die in de 2,4 GHz band (microgolven, elektromagnetische golven uitzendt niet meer worden gebruikt.
; 60&B6<;( B1O ERRN ࣮࣌ࢪ 㸰㸮㸯㸱ᖺ㸯᭶㸰㸯᪥ࠉ᭶᭙᪥ࠉ༗ᚋ㸳㸶ศ Aanvullende informatie Controle Oplossing Mappen of bestandsnamen Bevatten de map- of bestandsnamen Het maximum aantal tekens dat voor de map en bestandsnamen worden niet juist of helemaal meer dan 30 tekens? kan worden weergegeven is 30. niet aangegeven. De volgorde waarin de map- en bestandsnamen worden weergegeven is afhankelijk van de volgorde waarin de mappen of bestanden op het USB-opslagapparaat zijn opgenomen.
; 60&B6<;( B1O ERRN ࣮࣌ࢪ 㸰㸮㸯㸱ᖺ㸯᭶㸰㸯᪥ࠉ᭶᭙᪥ࠉ༗ᚋ㸳㸶ศ 11 Aanvullende informatie Afspeelbare schijven en indelingen Audio CD WMA MP3 • In de audiohandel verkrijgbare audio-CD’s • CD-R/-RW/-ROM discs met muziek die is opgenomen in het CD-DA formaat WMA-bestanden die op CD-R/-RW/-ROM-schijven zijn opgenomen of USB-opslagapparatuur MP3-bestanden die op CD-R/-RW/-ROM-schijven of USB-opslagapparaten zijn opgenomen • Alleen discs die gefinaliseerd zijn kunnen worden afgespeeld.
; 60&B6<;( B1O ERRN ࣮࣌ࢪ 㸰㸮㸯㸱ᖺ㸯᭶㸰㸯᪥ࠉ᭶᭙᪥ࠉ༗ᚋ㸳㸶ศ Aanvullende informatie Plaats nooit enig voorwerp bovenop het apparaat. Zorg ervoor dat de ventilatiegaten vrij zijn. Niet aan hitte blootstellen. • De schijven kunnen mogelijk niet worden afgespeeld als ze vingerafdrukken of stof bevatten. Gebruik in dat geval bijv. een reinigingsdoek en reinig de schijf voorzichtig aan de binnen- en buitenzijde. Gebruik geen vervuilde reinigingsdoeken.
; 60&B6<;( B1O ERRN ࣮࣌ࢪ 㸰㸮㸯㸱ᖺ㸯᭶㸰㸯᪥ࠉ᭶᭙᪥ࠉ༗ᚋ㸳㸶ศ 11 Aanvullende informatie Informatie over schijven met speciale vormen Gebruik in dit apparaat geen discs met afwijkende vormen (zeshoekig, hartvormig e.d.). Probeer niet om dergelijke discs af te spelen, want dat kan dit apparaat beschadigen.
; 60&B6<;( B1O ERRN ࣮࣌ࢪ 㸰㸮㸯㸱ᖺ㸱᭶㸰㸳᪥ࠉ᭶᭙᪥ࠉ༗ᚋ㸵㸰㸷ศ Aanvullende informatie • Versterkergedeelte RMS-uitgangsvermogen: . . . . . . . . . . . . . . . . . . . 10 W + 10 W (1 kHz, 10 %, T.H.D., 8 :) • Tunergedeelte Diverse • Luidspreker Accessoires (Bij de X-SMC00-W en X-SMC00BT-W bevindt er zich geen inwisselbaar paneel in de behuizing) . . . . . . . . . . . . . . . . . . . . . 2 AAA-batterijen (R03) . . . . . . . . . . . . . . . . . . . . . . . . . . . . . . . . 2 FM-draadantenne . . . . . . . . .
; 60&B6<;( B(V ERRN ࣮࣌ࢪ 㸰㸮㸯㸱ᖺ㸱᭶㸰㸳᪥ࠉ᭶᭙᪥ࠉ༗ᚋ㸵㸱㸮ศ ATENCIÓN PARA PREVENIR EL PELIGRO DE CHOQUE ELÉCTRICO NO REMOVER LA TAPA NI LAS PARTES DENTRO NO UTILIZADAS, LLAMAR UNA PERSONA CUALIFICADA. D3-4-2-1-1_B1_Es ADVERTENCIA Este aparato no es impermeable. Para evitar el riesgo de incendio y de descargas eléctricas, no ponga ningún recipiente lleno de líquido (como pueda ser un vaso o un florero) cerca del aparato ni lo exponga a goteo, salpicaduras, lluvia o humedad.
; 60&B6<;( B(V ERRN ࣮࣌ࢪ 㸰㸮㸯㸱ᖺ㸯᭶㸰㸯᪥ࠉ᭶᭙᪥ࠉ༗ᚋ㸳㸳ศ Información para los usuarios en la recogida y tratamiento de los equipos al final de su vida y de las pilas y baterías usadas. Símbolo para equipos Estos símbolos en los productos, embalaje, y/o en los documentos que los acompañan significa que los productos eléctricos y electrónicos al final de su vida, las pilas y baterías no deben mezclarse con los residuos generales de su hogar.
; 60&B6<;( B(V ERRN ࣮࣌ࢪ 㸰㸮㸯㸱ᖺ㸯᭶㸰㸯᪥ࠉ᭶᭙᪥ࠉ༗ᚋ㸳㸳ศ Gracias por comprar un producto Pioneer. Le sugerimos que lea atentamente este manual de instrucciones a fin de que aprenda a utilizar su equipo de manera adecuada. Después de leer las instrucciones, guárdelas en un lugar seguro para poderlas consultar en el futuro. Índice 01 Antes de comenzar Contenido de la caja . . . . . . . . . . . . . . . . . . . . . . . . . . . . 5 Colocación de las pilas en el mando a distancia . . . . .
; 60&B6<;( B(V ERRN ࣮࣌ࢪ 㸰㸮㸯㸱ᖺ㸱᭶㸰㸳᪥ࠉ᭶᭙᪥ࠉ༗ᚋ㸵㸱㸮ศ Antes de comenzar 01 English Capítulo 1: Antes de comenzar Cierre la tapa trasera. • No utilice ninguna otra pila distinta de las especificadas. Tampoco use una pila nueva junto con otra usada. • Cuando instale las pilas en el mando a distancia, colóquelas en el sentido correcto, según indican las marcas de polaridad ( y ). • No caliente las pilas ni las desmonte, y no las tire al fuego ni al agua.
; 60&B6<;( B(V ERRN ࣮࣌ࢪ 㸰㸮㸯㸱ᖺ㸯᭶㸰㸯᪥ࠉ᭶᭙᪥ࠉ༗ᚋ㸳㸳ศ 01 Antes de comenzar Utilización del mando a distancia El mando a distancia tiene un alcance de unos 7 metros en un ángulo de 30º desde el sensor remoto. 30° 30° 7m Cuando utilice el mando a distancia, recuerde lo siguiente: • Asegúrese de que no haya obstáculos entre el mando a distancia y el sensor remoto de la unidad.
; 60&B6<;( B(V ERRN ࣮࣌ࢪ 㸰㸮㸯㸱ᖺ㸯᭶㸰㸯᪥ࠉ᭶᭙᪥ࠉ༗ᚋ㸳㸳ศ Nombres y funciones de los controles Nombres y funciones de los controles 1 STANDBY/ON 1 2 2 OPEN/CLOSE USB TUNER AUDIO IN iPod BT AUDIO CLOCK/TIMER SLEEP 3 12 3 SLEEP 3 Consulte Empleo del temporizador de desconexión automática en la página 15. P.BASS 4 5 13 6 BASS/TREBLE 7 5 8 REPEAT RANDOM 0 FOLDER TUNE+ 5 CLEAR 14 Permite desactivar la reproducción programada (página 20).
; 60&B6<;( B(V ERRN ࣮࣌ࢪ 㸰㸮㸯㸱ᖺ㸯᭶㸰㸯᪥ࠉ᭶᭙᪥ࠉ༗ᚋ㸳㸳ศ 02 Nombres y funciones de los controles 11 Botones de control Tuner ST/MONO Permiten alternar el modo de sonido entre estéreo y monoaural (página 24). 1 Asegure los tornillos de sujeción mural en la pared, dejando entre ellos la distancia de separación especificada (130 mm).
; 60&B6<;( B(V ERRN ࣮࣌ࢪ 㸰㸮㸯㸱ᖺ㸯᭶㸰㸯᪥ࠉ᭶᭙᪥ࠉ༗ᚋ㸳㸳ศ Nombres y funciones de los controles 02 1 2 3 4 English Panel frontal 5 6 POWER ON TIMER Français Deutsch PUSH OPEN AUDIO IN 8 9 10 11 7 7 Altavoz 8 Terminal de iPod/iPhone 2 Permite conectar un dispositivo de almacenamiento masivo USB o un Apple iPod/iPhone/iPad mini como fuente de audio (páginas 17 y 22). Sensor del mando a distancia Recibe las señales del mando a distancia.
; 60&B6<;( B(V ERRN ࣮࣌ࢪ 㸰㸮㸯㸱ᖺ㸯᭶㸰㸯᪥ࠉ᭶᭙᪥ࠉ༗ᚋ㸳㸳ศ 02 Nombres y funciones de los controles Panel superior/Panel posterior STANDBY/ON INPUT BT AUDIO 1 2 3 – + VOLUME X-SMC00BT 7 1 4 DC IN Botón INPUT 6 Botón de apertura/cierre de la bandeja del disco Botón EQ (X-SMC00) Se emplea al cambiar el modo de sonido (página 14). Botón BT AUDIO (X-SMC00BT) Se utiliza para reproducir música desde un dispositivo con funcionalidad Bluetooth (página 28).
; 60&B6<;( B(V ERRN ࣮࣌ࢪ 㸰㸮㸯㸱ᖺ㸱᭶㸰㸳᪥ࠉ᭶᭙᪥ࠉ༗ᚋ㸵㸱㸮ศ Nombres y funciones de los controles 02 English Cómo cambiar el panel desmontable (X-SMC00-W y X-SMC00BT-W no incluyen un panel intercambiable en la caja) Flechas Italiano Nederlands 2 Para retirar el panel desmontable, deslícelo con ambas manos hacia arriba. Deutsch 1 Asegúrese de que la puerta eléctrica deslizante de la unidad de CD está cerrada.
; 60&B6<;( B(V ERRN ࣮࣌ࢪ 㸰㸮㸯㸱ᖺ㸯᭶㸰㸯᪥ࠉ᭶᭙᪥ࠉ༗ᚋ㸳㸳ศ 03 Conexiones Capítulo 3: Conexiones PRECAUCIÓN • Siempre que realice o modifique conexiones deberá apagar la unidad y desenchufar el cable de alimentación de la toma de corriente. • Conecte el cable de alimentación después de que haya llevado a cabo todas las conexiones entre los distintos dispositivos. Conexión de la antena Conecte la antena de hilo de FM según se ilustra más abajo.
; 60&B6<;( B(V ERRN ࣮࣌ࢪ 㸰㸮㸯㸱ᖺ㸯᭶㸰㸯᪥ࠉ᭶᭙᪥ࠉ༗ᚋ㸳㸳ศ Primeros pasos 04 English Capítulo 4: Primeros pasos Nota Pulse 1 STANDBY/ON para conectar la alimentación. Después del uso: Para colocar la unidad en el modo de espera, pulse 1 STANDBY/ON. Nota Ajuste del reloj CD USB TUNER AUDIO IN iPod BT AUDIO CLOCK/TIMER SLEEP TUNE+ FOLDER MEMORY /PROGRAM EQUALIZER 2 3 TUNE– VOLUME 1 Pulse 1 STANDBY/ON para conectar la alimentación. 2 Pulse CLOCK/TIMER en el mando a distancia.
; 60&B6<;( B(V ERRN ࣮࣌ࢪ 㸰㸮㸯㸱ᖺ㸯᭶㸰㸯᪥ࠉ᭶᭙᪥ࠉ༗ᚋ㸳㸳ศ 04 Primeros pasos Muting Al pulsar MUTE en el mando a distancia, el volumen se silenciará temporalmente. Púlselo otra vez para restablecer el volumen. Controles de sonido Al pulsar EQUALIZER, se mostrará el ajuste del modo en curso. Para cambiar a otro modo, pulse EQUALIZER varias veces hasta que se muestre el modo de sonido deseado. ACTIVE DIALOGUE NIGHT Un sonido básico, plano. Un sonido potente que realza los tonos bajos y altos.
; 60&B6<;( B(V ERRN ࣮࣌ࢪ 㸰㸮㸯㸱ᖺ㸯᭶㸰㸯᪥ࠉ᭶᭙᪥ࠉ༗ᚋ㸳㸳ศ Primeros pasos Se puede reutilizar un ajuste de temporizador existente. Uso de auriculares 1 Siga los pasos 1 a 3 en “Setting the wake-up timer”. Conecte los auriculares en el terminal de PHONES. Cuando se conecta un par de auriculares, los altavoces no emiten ningún sonido. 2 Pulse H I para seleccionar “TIMER ON” y, a continuación, pulse ENTER. POWER ON TIMER Français Cómo cancelar el despertador Desactive el despertador.
; 60&B6<;( B(V ERRN ࣮࣌ࢪ 㸰㸮㸯㸱ᖺ㸯᭶㸰㸯᪥ࠉ᭶᭙᪥ࠉ༗ᚋ㸳㸳ศ 05 Reproducción de un iPod/iPhone/iPad mini Capítulo 5: Reproducción de un iPod/iPhone/iPad mini Conectando simplemente su iPod/iPhone/iPad mini a este aparato, podrá escuchar el sonido de alta calidad del iPod/ iPhone/iPad mini. La configuración de reproducción de música de un iPod/iPhone/iPad mini se puede realizar en esta unidad o en el propio iPod/iPhone/iPad mini.
; 60&B6<;( B(V ERRN ࣮࣌ࢪ 㸰㸮㸯㸱ᖺ㸯᭶㸰㸯᪥ࠉ᭶᭙᪥ࠉ༗ᚋ㸳㸳ศ Reproducción de un iPod/iPhone/iPad mini Reproducción de un iPod/iPhone/ iPad mini 1 PUSH OPEN 2 Pulse iPod o USB como fuente de entrada. En el display principal se mostrará “IPOD” o “USB/IPOD”. 3 Cuando el reconocimiento haya terminado, comenzará a reproducirse automáticamente. 1 Conecte el cable del iPod/iPhone/iPad mini al terminal de iPod/iPhone que encontrará en la parte frontal de la unidad.
; 60&B6<;( B(V ERRN ࣮࣌ࢪ 㸰㸮㸯㸱ᖺ㸯᭶㸰㸯᪥ࠉ᭶᭙᪥ࠉ༗ᚋ㸳㸳ศ 06 Reproducción de discos Capítulo 6: Reproducción de discos Este sistema puede reproducir un CD estándar, CD-R/RW en el formato CD y CD-R/RW con archivos MP3 o WMA, pero no puede grabar en ellos. Es posible que algunos discos CD-R y CD-RW de audio no puedan reproducirse debido al estado del disco o al aparato utilizado para su grabación. MP3: MP3 es una forma de compresión. Es un acrónimo que significa MPEG Audio Layer 3.
; 60&B6<;( B(V ERRN ࣮࣌ࢪ 㸰㸮㸯㸱ᖺ㸯᭶㸰㸯᪥ࠉ᭶᭙᪥ࠉ༗ᚋ㸳㸳ศ Reproducción de discos 06 OPEN/CLOSE USB TUNER iPod BT AUDIO CLOCK/TIMER AUDIO IN SLEEP EQUALIZER 1 2 3 4 5 6 P.BASS MEMORY /PROGRAM PRESET 8 + 9 REPEAT RANDOM 0 DISPLAY MUTE – TUNE+ FOLDER – DIMMER ST/MONO RDS ASPM PTY DISPLAY Búsqueda directa de pistas Nota Para detener la reproducción: Pulse #.
; 60&B6<;( B(V ERRN ࣮࣌ࢪ 㸰㸮㸯㸱ᖺ㸯᭶㸰㸯᪥ࠉ᭶᭙᪥ࠉ༗ᚋ㸳㸳ศ 06 Reproducción de discos Reproducción programada (CD o MP3/ WMA) Sobre la descarga de archivos MP3/ WMA Podrá seleccionar hasta 32 selecciones para la reproducción en el orden que usted prefiera. Existen muchas páginas web que permiten descargar ficheros de música MP3/WMA. Siga las instrucciones de la página web acerca de cómo descargar los archivos de música. Podrá reproducir estos archivos de música descargados grabándolos en un disco CD-R/RW.
; 60&B6<;( B(V ERRN ࣮࣌ࢪ 㸰㸮㸯㸱ᖺ㸯᭶㸰㸯᪥ࠉ᭶᭙᪥ࠉ༗ᚋ㸳㸳ศ Reproducción de discos 06 Cómo cambiar el contenido visualizado Para especificar la carpeta que desea reproducir, lleve a cabo los siguientes pasos. 1 STANDBY/ON 0 OPEN/CLOSE USB TUNER iPod BT AUDIO CLOCK/TIMER DISPLAY FOLDER TUNE+ AUDIO IN SLEEP ENTER EQUALIZER 1 2 3 4 5 6 MEMORY /PROGRAM MENU Visualización del número de pista y del tiempo de reproducción P.
; 60&B6<;( B(V ERRN ࣮࣌ࢪ 㸰㸮㸯㸱ᖺ㸯᭶㸰㸯᪥ࠉ᭶᭙᪥ࠉ༗ᚋ㸳㸳ศ 07 Reproducción USB Capítulo 7: Reproducción USB Reproducción de dispositivos de almacenamiento USB Es posible escuchar audio de dos canales utilizando la interfaz USB de la parte delantera de este receptor. • Pioneer no garantiza que todos los ficheros grabados en un dispositivo de almacenamiento USB puedan reproducirse, ni que se suministrará alimentación a un dispositivo de almacenamiento USB.
; 60&B6<;( B(V ERRN ࣮࣌ࢪ 㸰㸮㸯㸱ᖺ㸯᭶㸰㸯᪥ࠉ᭶᭙᪥ࠉ༗ᚋ㸳㸳ศ Reproducción USB 07 El archivo del dispositivo de almacenamiento USB se puede reproducir en orden aleatorio automáticamente. Para reproducir aleatoriamente todas las pistas: Para cancelar la reproducción aleatoria: Pulse RANDOM varias veces hasta que se muestre “RDM OFF”. Pulse ENTER. La unidad puede reproducir en el orden deseado carpetas guardadas en un dispositivo de almacenamiento USB.
; 60&B6<;( B(V ERRN ࣮࣌ࢪ 㸰㸮㸯㸱ᖺ㸯᭶㸰㸯᪥ࠉ᭶᭙᪥ࠉ༗ᚋ㸳㸳ศ 08 Uso del sintonizador Capítulo 8: Uso del sintonizador • Si ha sintonizado una emisora RDS (sistema de radiodifusión de datos), la frecuencia se mostrará en primer lugar. Finalmente, aparecerá el nombre de la emisora. • Las emisoras RDS se pueden sintonizar de forma totalmente automática utilizando la Memoria Automática de Estaciones Programadas (ASPM). Consulte página 26.
; 60&B6<;( B(V ERRN ࣮࣌ࢪ 㸰㸮㸯㸱ᖺ㸯᭶㸰㸯᪥ࠉ᭶᭙᪥ࠉ༗ᚋ㸳㸳ศ Uso del sintonizador Nota Para recuperar una emisora memorizada Para explorar las emisoras preajustadas 1 Pulse y mantenga pulsado PRESET +/–. Se mostrará el número de la emisora presintonizada y las emisoras programadas se podrán sintonizar de forma secuencial, durante 5 segundos cada una de ellas. Para borrar toda la memoria preconfigurada Búsqueda de programas RDS 1 Pulse TUNER en el mando a distancia.
; 60&B6<;( B(V ERRN ࣮࣌ࢪ 㸰㸮㸯㸱ᖺ㸯᭶㸰㸯᪥ࠉ᭶᭙᪥ࠉ༗ᚋ㸳㸳ศ 08 Uso del sintonizador 1 Nota • Si la pantalla ha dejado de parpadear, empiece de nuevo desde el paso 2. Si la unidad encuentra un tipo de programa deseado, el número de canal correspondiente se encenderá durante unos 8 segundos; luego se mostrará el nombre de la emisora. • Si desea escuchar el mismo tipo de programa en otra emisora, pulse RDS PTY mientras el número de canal o el nombre de la emisora está parpadeando.
; 60&B6<;( B(V ERRN ࣮࣌ࢪ 㸰㸮㸯㸱ᖺ㸯᭶㸰㸯᪥ࠉ᭶᭙᪥ࠉ༗ᚋ㸳㸳ศ Otras conexiones Otras conexiones Conexión de componentes auxiliares Italiano POWER ON Deutsch Conecte la minitoma de AUDIO IN que encontrará en el panel frontal al componente de reproducción auxiliar. • Este método se puede utilizar para reproducir música en esta unidad desde un iPod/iPhone/iPad mini que no sea compatible con el uso de una estación de acoplamiento de iPod y terminal de iPod/iPhone.
; 60&B6<;( B(V ERRN ࣮࣌ࢪ 㸰㸮㸯㸱ᖺ㸯᭶㸰㸯᪥ࠉ᭶᭙᪥ࠉ༗ᚋ㸳㸳ศ 10 Reproducción de audio con Bluetooth® Capítulo 10: Reproducción de audio con Bluetooth® Reproducción de música empleando la tecnología inalámbrica Bluetooth Dispositivo habilitado con tecnología Bluetooth inalámbrica: teléfono móvil Dispositivo habilitado con tecnología Bluetooth inalámbrica: Reproductor de música digital Dispositivo no equipado con tecnología Bluetooth inalámbrica: Reproductor de música digital + Transmisor de audio Bluetooth® (de ve
; 60&B6<;( B(V ERRN ࣮࣌ࢪ 㸰㸮㸯㸱ᖺ㸯᭶㸰㸯᪥ࠉ᭶᭙᪥ࠉ༗ᚋ㸳㸳ศ Reproducción de audio con Bluetooth® 1 Pulse BT AUDIO. La unidad cambiará a la entrada de BT AUDIO. 2 Se creará una conexión Bluetooth entre el dispositivo habilitado para Bluetooth y la unidad. Pyccкий Esta unidad está diseñada para un uso doméstico. (Las distancias de transmisión pueden reducirse dependiendo del ambiente de comunicación).
; 60&B6<;( B(V ERRN ࣮࣌ࢪ 㸰㸮㸯㸱ᖺ㸯᭶㸰㸯᪥ࠉ᭶᭙᪥ࠉ༗ᚋ㸳㸳ศ 10 Reproducción de audio con Bluetooth® • En un lugar expuesto a un campo magnético, electricidad estática o interferencias de ondas de radio por parte de equipos de radiocomunicaciones que usen la misma banda de frecuencia (2,4 GHz) que esta unidad, tales como dispositivos LAN inalámbricos de 2,4 GHz (IEEE802.11b/g) u hornos de microondas.
; 60&B6<;( B(V ERRN ࣮࣌ࢪ 㸰㸮㸯㸱ᖺ㸯᭶㸰㸯᪥ࠉ᭶᭙᪥ࠉ༗ᚋ㸳㸳ศ Información adicional 11 Información adicional Problemas generales Solución ¿Ha desenchufado el cable de alimentación? Cuando el cable de alimentación se ha desenchufado, los ajustes realizados se borran. Ajuste de nuevo el reloj. Si no desea que los ajustes se borren, no desenchufe el cable de alimentación. Diferencia de volumen entre CD, MP3, WMA, iPod/ iPhone/iPad mini, Tuner y AUDIO IN. Éste no es un problema de esta unidad.
; 60&B6<;( B(V ERRN ࣮࣌ࢪ 㸰㸮㸯㸱ᖺ㸯᭶㸰㸯᪥ࠉ᭶᭙᪥ࠉ༗ᚋ㸳㸳ศ 11 Información adicional Problema Verificación No se puede conectar a un dispositivo habilitado con Bluetooth, no se escucha ningún sonido en absoluto o el sonido se corta al efectuar la conexión. ¿Hay algún dispositivo cercano que En tal caso, aleje esos dispositivos de la unidad, o deje de usar emita ondas electromagnéticas en la otros dispositivos que emitan ondas electromagnéticas.
; 60&B6<;( B(V ERRN ࣮࣌ࢪ 㸰㸮㸯㸱ᖺ㸯᭶㸰㸯᪥ࠉ᭶᭙᪥ࠉ༗ᚋ㸳㸳ศ Información adicional Verificación Solución Los nombres de carpetas o Los nombres de las carpetas o de los El número máximo de caracteres que se pueden visualizar para los de archivos no se visualizan o archivos, ¿contienen más de nombres de carpetas y de archivos es de 30. no se visualizan 30 caracteres? correctamente. Éste no es un problema de esta unidad.
; 60&B6<;( B(V ERRN ࣮࣌ࢪ 㸰㸮㸯㸱ᖺ㸯᭶㸰㸯᪥ࠉ᭶᭙᪥ࠉ༗ᚋ㸳㸳ศ 11 Información adicional Discos y formatos que pueden reproducirse Audio CD • CD de audio de venta en establecimientos comerciales • Discos CD-R/-RW/-ROM con música grabada en el formato CD-DA WMA Archivos WMA grabados en discos CD-R /-RW /-ROM o en dispositivos de almacenamiento USB MP3 Archivos MP3 grabados en discos CD-R /-RW /-ROM o en dispositivos de almacenamiento USB • Sólo pueden reproducirse los discos que han sido finalizados.
; 60&B6<;( B(V ERRN ࣮࣌ࢪ 㸰㸮㸯㸱ᖺ㸯᭶㸰㸯᪥ࠉ᭶᭙᪥ࠉ༗ᚋ㸳㸳ศ Información adicional No ponga ningún objeto encima de esta unidad. No obstruya los orificios de ventilación. No utilice la unidad encima de alfombras, camas, sofás, etc., ni tampoco envuelta en un paño, etc. En tal caso, el calor no se disipará y podrían producirse daños. Acerca de la condensación Cómo limpiar los discos • Si los discos contienen huellas dactilares o polvo es posible que no pueda reproducirlos. En tal caso, utilice una gamuza, etc.
; 60&B6<;( B(V ERRN ࣮࣌ࢪ 㸰㸮㸯㸱ᖺ㸯᭶㸰㸯᪥ࠉ᭶᭙᪥ࠉ༗ᚋ㸳㸳ศ 11 Información adicional Sobre los discos con formas especiales Los discos con formas especiales (en forma de corazón, hexagonales, etc.) no se pueden reproducir en esta unidad. No intente reproducir tales discos porque podrían dañar la unidad.
; 60&B6<;( B(V ERRN ࣮࣌ࢪ 㸰㸮㸯㸱ᖺ㸱᭶㸰㸳᪥ࠉ᭶᭙᪥ࠉ༗ᚋ㸵㸱㸮ศ Información adicional 11 • Sección del amplificador Potencia de salida RMS: . . . . . . . . . . . . . . . . . . . 10 W + 10 W (1 kHz, 10 %, T.H.D., 8 :) • Sección del sintonizador Varios • Altavoz Italiano Tipo Radiador pasivo Altavoz de gama completa . . . . . . . . . . . . . . . Cono de 6,6 cm Radiador pasivo . . . . . . . . . . . . . . . . . . . . . . . . Cono de 7,7 cm Rango de frecuencia de reproducción. . . . . . .
; 60&B6<;( B5X ERRN ࣮࣌ࢪ 㸰㸮㸯㸱ᖺ㸱᭶㸰㸳᪥ࠉ᭶᭙᪥ࠉ༗ᚋ㸵㸱㸯ศ http://www.pioneer-rus.ru http://www.pioneer.eu ВНИМАНИЕ ВО ИЗБЕЖАНИЕ ПОРАЖЕНИЯ ЭЛЕКТРИЧЕСКИМ ТОКОМ НЕ СНИМАЙТЕ КРЫШКУ (ИЛИ ЗАДНЮЮ СТЕНКУ). ВНУТРИ НЕ СОДЕРЖАТСЯ ДЕАТЛИ, ПРЕДНАЗНАЧЕННЫЕ ДЛЯ РЕМОНТА ПОЛЬЗОВАТЕЛЕМ. ДЛЯ ОБСЛУЖИВАНИЯ ОБРАТИТЕСЬ К КВАЛИФИЦИРОВАННОМУ СОТРУДНИКУ СЕРВИСНОЙ СЛУЖБЫ. D3-4-2-1-1_B1_Ru K041_A1_Ru ПРЕДУПРЕЖДЕНИЕ Данное оборудование не является водонепроницаемым.
; 60&B6<;( B5X ERRN ࣮࣌ࢪ 㸰㸮㸯㸱ᖺ㸯᭶㸰㸯᪥ࠉ᭶᭙᪥ࠉ༗ᚋ㸳㸯㸮ศ Информация для пользователей по сбору и утилизации бывшего в эксплуатации оборудования и отработавших элементов питания Обозначение для оборудования Обозначения для элементов питания Эти обозначения на продукции, упаковке, и/или сопроводительных документах означают, что бывшая в эксплуатации электротехническая и электронная продукция и отработанные элементы питания не должны выбрасываться вместе с обычным бытовым мусором.
; 60&B6<;( B5X ERRN ࣮࣌ࢪ 㸰㸮㸯㸱ᖺ㸯᭶㸰㸯᪥ࠉ᭶᭙᪥ࠉ༗ᚋ㸳㸯㸮ศ Ȼɥɚɝɨɞɚɪɢɦ ɡɚ ɩɨɤɭɩɤɭ ɷɬɨɝɨ ɢɡɞɟɥɢɹ ɤɨɦɩɚɧɢɢ Pioneer. ɑɬɨɛɵ ɭɡɧɚɬɶ, ɤɚɤ ɩɪɚɜɢɥɶɧɨ ɨɛɪɚɳɚɬɶɫɹ ɫ ɞɚɧɧɨɣ ɦɨɞɟɥɶɸ, ɩɨɠɚɥɭɣɫɬɚ, ɩɪɨɱɬɢɬɟ ɧɚɫɬɨɹɳɢɟ ɢɧɫɬɪɭɤɰɢɢ ɩɨ ɷɤɫɩɥɭɚɬɚɰɢɢ. ɉɨɫɥɟ ɬɨɝɨ ɤɚɤ ɜɵ ɨɡɧɚɤɨɦɢɬɟɫɶ ɫ ɢɧɫɬɪɭɤɰɢɟɣ, ɫɨɯɪɚɧɢɬɟ ɟɟ ɜ ɧɚɞɟɠɧɨɦ ɦɟɫɬɟ ɞɥɹ ɨɛɪɚɳɟɧɢɹ ɤ ɧɟɣ ɜ ɛɭɞɭɳɟɦ. ɋɨɞɟɪɠɚɧɢɟ 01 ɉɟɪɟɞ ɧɚɱɚɥɨɦ ɪɚɛɨɬɵ 07 ȼɨɫɩɪɨɢɡɜɟɞɟɧɢɟ ɫ USB Ʉɨɦɩɥɟɤɬ ɩɨɫɬɚɜɤɢ . . . . . . . . . . . . . . . . . . . . . . . . . . . . . .
; 60&B6<;( B5X ERRN ࣮࣌ࢪ 㸰㸮㸯㸱ᖺ㸱᭶㸰㸳᪥ࠉ᭶᭙᪥ࠉ༗ᚋ㸵㸱㸯ศ 01 ɉɟɪɟɞ ɧɚɱɚɥɨɦ ɪɚɛɨɬɵ English Ɋɚɡɞɟɥ 1: ɉɟɪɟɞ ɧɚɱɚɥɨɦ ɪɚɛɨɬɵ Ɂɚɤɪɨɣɬɟ ɡɚɞɧɸɸ ɤɪɵɲɤɭ. • ɇɟ ɢɫɩɨɥɶɡɭɣɬɟ ɥɸɛɵɟ ɞɪɭɝɢɟ ɬɢɩɵ ɛɚɬɚɪɟɟɤ, ɤɪɨɦɟ ɭɤɚɡɚɧɧɵɯ ɛɚɬɚɪɟɟɤ. Ɍɚɤɠɟ ɧɟ ɢɫɩɨɥɶɡɭɣɬɟ ɧɨɜɭɸ ɛɚɬɚɪɟɣɤɭ ɜɦɟɫɬɟ ɫɨ ɫɬɚɪɨɣ. • ɉɪɢ ɭɫɬɚɧɨɜɤɟ ɛɚɬɚɪɟɟɤ ɜ ɩɭɥɶɬ ɞɢɫɬɚɧɰɢɨɧɧɨɝɨ ɭɩɪɚɜɥɟɧɢɹ ɜɫɬɚɜɥɹɣɬɟ ɢɯ ɜ ɩɪɚɜɢɥɶɧɨɣ ɨɪɢɟɧɬɚɰɢɢ ɜ ɫɨɨɬɜɟɬɫɬɜɢɢ ɫ ɨɛɨɡɧɚɱɟɧɢɹɦɢ ɩɨɥɹɪɧɨɫɬɢ ( ɢ ). • ɇɟ ɧɚɝɪɟɜɚɣɬɟ ɛɚɬɚɪɟɣɤɢ, ɧɟ ɪɚɡɛɢɪɚɣɬɟ ɢ ɧɟ ɤɢɞɚɣɬɟ ɢɯ ɜ ɨɝɨɧɶ ɢɥɢ ɜ ɜɨɞɭ.
; 60&B6<;( B5X ERRN ࣮࣌ࢪ 㸰㸮㸯㸱ᖺ㸯᭶㸰㸯᪥ࠉ᭶᭙᪥ࠉ༗ᚋ㸳㸯㸮ศ 01 ɉɟɪɟɞ ɧɚɱɚɥɨɦ ɪɚɛɨɬɵ ɂɫɩɨɥɶɡɨɜɚɧɢɟ ɩɭɥɶɬɚ ɞɢɫɬɚɧɰɢɨɧɧɨɝɨ ɭɩɪɚɜɥɟɧɢɹ ɉɭɥɶɬ ɞɢɫɬɚɧɰɢɨɧɧɨɝɨ ɭɩɪɚɜɥɟɧɢɹ ɢɦɟɟɬ ɞɚɥɶɧɨɫɬɶ ɞɟɣɫɬɜɢɹ ɨɤɨɥɨ 7 ɦ ɩɪɢ ɭɝɥɟ ɨɬɤɥɨɧɟɧɢɹ ɨɬ ɞɚɬɱɢɤɚ ɞɢɫɬɚɧɰɢɨɧɧɨɝɨ ɭɩɪɚɜɥɟɧɢɹ 30°. 30° 30° 7ɦ ɇɟ ɡɚɛɵɜɚɣɬɟ ɨ ɫɥɟɞɭɸɳɢɯ ɦɨɦɟɧɬɚɯ ɩɪɢ ɢɫɩɨɥɶɡɨɜɚɧɢɢ ɩɭɥɶɬɚ Ⱦɍ: • ɋɥɟɞɢɬɟ ɡɚ ɬɟɦ, ɱɬɨɛɵ ɦɟɠɞɭ ɩɭɥɶɬɨɦ ɞɢɫɬɚɧɰɢɨɧɧɨɝɨ ɭɩɪɚɜɥɟɧɢɹ ɢ ɧɚɯɨɞɹɳɢɦɫɹ ɧɚ ɨɫɧɨɜɧɨɦ ɭɫɬɪɨɣɫɬɜɟ ɩɪɢɟɦɧɵɦ ɞɚɬɱɢɤɨɦ ɧɟ ɛɵɥɨ ɧɢɤɚɤɢɯ ɩɪɟɩɹɬɫɬɜɢɣ.
; 60&B6<;( B5X ERRN ࣮࣌ࢪ 㸰㸮㸯㸱ᖺ㸯᭶㸰㸯᪥ࠉ᭶᭙᪥ࠉ༗ᚋ㸳㸯㸮ศ 02 ɇɚɡɜɚɧɢɹ ɱɚɫɬɟɣ ɢ ɮɭɧɤɰɢɢ ɇɚɡɜɚɧɢɹ ɱɚɫɬɟɣ ɢ ɮɭɧɤɰɢɢ 1 STANDBY/ON 1 2 2 OPEN/CLOSE USB TUNER AUDIO IN iPod BT AUDIO CLOCK/TIMER SLEEP 12 3 2 SLEEP 3 ɋɦ. ɂɫɩɨɥɶɡɨɜɚɧɢɟ ɬɚɣɦɟɪɚ ɨɬɤɥɸɱɟɧɢɹ ɧɚ ɫɬɪ. 15. P.BASS 4 5 13 6 BASS/TREBLE 7 8 REPEAT RANDOM 0 FOLDER TUNE+ 15 CLEAR ɂɫɩɨɥɶɡɭɣɬɟ ɞɥɹ ɨɱɢɫɬɤɢ ɡɚɩɪɨɝɪɚɦɦɢɪɨɜɚɧɧɨɝɨ ɜɨɫɩɪɨɢɡɜɟɞɟɧɢɹ (ɫɬɪ. 20).
; 60&B6<;( B5X ERRN ࣮࣌ࢪ 㸰㸮㸯㸱ᖺ㸯᭶㸰㸯᪥ࠉ᭶᭙᪥ࠉ༗ᚋ㸳㸯㸮ศ 02 ɇɚɡɜɚɧɢɹ ɱɚɫɬɟɣ ɢ ɮɭɧɤɰɢɢ 11 Ʉɧɨɩɤɢ ɭɩɪɚɜɥɟɧɢɹ Tuner ST/MONO ɂɫɩɨɥɶɡɭɟɬɫɹ ɞɥɹ ɩɟɪɟɤɥɸɱɟɧɢɹ ɪɟɠɢɦɚ ɡɜɭɱɚɧɢɹ ɦɟɠɞɭ ɫɬɟɪɟɨɮɨɧɢɱɟɫɤɢɦ ɢ ɦɨɧɨɮɨɧɢɱɟɫɤɢɦ ɪɟɠɢɦɚɦɢ (ɫɬɪ. 24). 1 ȼɜɢɧɬɢɬɟ ɧɚɫɬɟɧɧɵɟ ɲɭɪɭɩɵ ɜ ɫɬɟɧɭ ɧɚ ɭɤɚɡɚɧɧɨɦ ɪɚɫɫɬɨɹɧɢɢ ɞɪɭɝ ɨɬ ɞɪɭɝɚ (130 ɦɦ). ɇɚɫɬɟɧɧɵɟ ɲɭɪɭɩɵ (ɢɦɟɸɬɫɹ ɜ ɩɪɨɞɚɠɟ) 2 ɦɦ ɞɨ 3 ɦɦ RDS ASPM ɂɫɩɨɥɶɡɭɣɬɟ ɞɥɹ ɩɨɢɫɤɚ ɚɜɬɨɦɚɬɢɱɟɫɤɨɣ ɧɚɫɬɪɨɣɤɢ ɧɚ ɩɪɟɞɜɚɪɢɬɟɥɶɧɨ ɡɚɩɨɦɧɟɧɧɵɟ ɩɪɨɝɪɚɦɦɵ (ɪɚɞɢɨɫɬɚɧɰɢɢ) ɞɥɹ ɫɢɫɬɟɦɵ RDS (ɫɬɪ. 25).
; 60&B6<;( B5X ERRN ࣮࣌ࢪ 㸰㸮㸯㸱ᖺ㸯᭶㸰㸯᪥ࠉ᭶᭙᪥ࠉ༗ᚋ㸳㸯㸮ศ 02 ɇɚɡɜɚɧɢɹ ɱɚɫɬɟɣ ɢ ɮɭɧɤɰɢɢ 1 2 3 4 English ɉɟɪɟɞɧɹɹ ɩɚɧɟɥɶ 5 6 POWER ON TIMER Français Deutsch PUSH OPEN AUDIO IN 8 1 ɋɞɜɢɝɚɸɳɚɹɫɹ ɤɪɵɲɤɚ ɨɬɫɟɤɚ CD ɫ ɷɥɟɤɬɪɨɩɪɢɜɨɞɨɦ 2 Ⱦɚɬɱɢɤ ɞɢɫɬɚɧɰɢɨɧɧɨɝɨ ɭɩɪɚɜɥɟɧɢɹ 10 11 7 7 Ƚɪɨɦɤɨɝɨɜɨɪɢɬɟɥɶ 8 Ɋɚɡɴɟɦ iPod/iPhone ɂɫɩɨɥɶɡɭɟɬɫɹ ɞɥɹ ɩɨɞɤɥɸɱɟɧɢɹ ɜ ɤɚɱɟɫɬɜɟ ɢɫɬɨɱɧɢɤɚ ɚɭɞɢɨ ɡɚɩɨɦɢɧɚɸɳɟɝɨ ɭɫɬɪɨɣɫɬɜɚ ɛɨɥɶɲɨɣ ɟɦɤɨɫɬɢ USB ɢɥɢ ɭɫɬɪɨɣɫɬɜɚ Apple iPod/iPhone/iPad mini (ɫɬɪ. 17 ɢ 22).
; 60&B6<;( B5X ERRN ࣮࣌ࢪ 㸰㸮㸯㸱ᖺ㸯᭶㸰㸯᪥ࠉ᭶᭙᪥ࠉ༗ᚋ㸳㸯㸮ศ 02 ɇɚɡɜɚɧɢɹ ɱɚɫɬɟɣ ɢ ɮɭɧɤɰɢɢ ȼɟɪɯɧɹɹ ɩɚɧɟɥɶ/ɡɚɞɧɹɹ ɩɚɧɟɥɶ STANDBY/ON INPUT BT AUDIO 1 2 3 – + VOLUME X-SMC00BT 7 1 4 DC IN Ʉɧɨɩɤɚ 1 STANDBY/ON ɂɫɩɨɥɶɡɭɟɬɫɹ ɞɥɹ ɜɤɥɸɱɟɧɢɹ ɪɟɫɢɜɟɪɚ ɢɥɢ ɟɝɨ ɩɟɪɟɤɥɸɱɟɧɢɹ ɜ ɪɟɠɢɦ ɨɠɢɞɚɧɢɹ (ɫɬɪ. 13). 2 Ʉɧɨɩɤɚ INPUT ɂɫɩɨɥɶɡɭɟɬɫɹ ɞɥɹ ɜɵɛɨɪɚ ɢɫɬɨɱɧɢɤɚ ɜɯɨɞɚ. 3 Ʉɧɨɩɤɚ EQ (X-SMC00) ɂɫɩɨɥɶɡɭɟɬɫɹ ɞɥɹ ɩɟɪɟɤɥɸɱɟɧɢɹ ɪɟɠɢɦɚ ɡɜɭɤɚ (ɫɬɪ. 14).
; 60&B6<;( B5X ERRN ࣮࣌ࢪ 㸰㸮㸯㸱ᖺ㸱᭶㸰㸳᪥ࠉ᭶᭙᪥ࠉ༗ᚋ㸵㸱㸯ศ 02 ɇɚɡɜɚɧɢɹ ɱɚɫɬɟɣ ɢ ɮɭɧɤɰɢɢ English Ɂɚɦɟɧɚ ɫɦɟɧɧɨɣ ɩɚɧɟɥɢ (X-SMC00-W ɢ X-SMC00BT-W ɧɟ ɢɦɟɸɬ ɫɦɟɧɧɨɣ ɩɚɧɟɥɢ ɜ ɤɨɪɨɛɤɟ) ɋɬɪɟɥɤɢ Italiano Nederlands 2 ɑɬɨɛɵ ɫɧɹɬɶ ɫɦɟɧɧɭɸ ɩɚɧɟɥɶ, ɫɞɜɢɝɚɣɬɟ ɟɟ ɞɜɭɦɹ ɪɭɤɚɦɢ. Deutsch 1 ɋɥɟɞɢɬɟ ɡɚ ɬɟɦ, ɱɬɨɛɵ ɫɞɜɢɝɚɸɳɚɹɫɹ ɤɪɵɲɤɚ ɨɬɫɟɤɚ CD ɫ ɷɥɟɤɬɪɨɩɪɢɜɨɞɨɦ ɛɵɥɚ ɡɚɤɪɵɬɚ. 3 ɋɨɜɦɟɫɬɢɬɟ ɥɢɧɢɸ ɧɢɠɟ ɫɬɪɟɥɤɢ ɢ ɧɢɠɧɸɸ ɱɚɫɬɶ ɫɦɟɧɧɨɣ ɩɚɧɟɥɢ, ɡɚɬɟɦ ɫɞɜɢɝɚɣɬɟ ɩɚɧɟɥɶ ɜɧɢɡ, ɩɨɤɚ ɧɟ ɭɫɥɵɲɢɬɟ ɳɟɥɱɨɤ.
; 60&B6<;( B5X ERRN ࣮࣌ࢪ 㸰㸮㸯㸱ᖺ㸯᭶㸰㸯᪥ࠉ᭶᭙᪥ࠉ༗ᚋ㸳㸯㸮ศ 03 ɉɨɞɤɥɸɱɟɧɢɹ Ƚɥɚɜɚ 3: ɉɨɞɤɥɸɱɟɧɢɹ ɉɊȿȾɍɉɊȿɀȾȿɇɂȿ • Ɉɛɹɡɚɬɟɥɶɧɨ ɜɵɤɥɸɱɢɬɟ ɩɢɬɚɧɢɟ ɢ ɨɬɫɨɟɞɢɧɢɬɟ ɤɚɛɟɥɶ ɩɢɬɚɧɢɹ ɨɬ ɪɨɡɟɬɤɢ ɩɪɢ ɜɵɩɨɥɧɟɧɢɢ ɩɨɞɤɥɸɱɟɧɢɣ ɢɥɢ ɢɡɦɟɧɟɧɢɢ ɫɨɟɞɢɧɟɧɢɣ. • ɉɨɞɤɥɸɱɢɬɟ ɤɚɛɟɥɶ ɩɢɬɚɧɢɹ ɩɨɫɥɟ ɜɵɩɨɥɧɟɧɢɹ ɜɫɟɯ ɫɨɟɞɢɧɟɧɢɣ ɦɟɠɞɭ ɭɫɬɪɨɣɫɬɜɚɦɢ. ɉɨɞɤɥɸɱɟɧɢɟ ɚɧɬɟɧɧɵ ɉɨɞɤɥɸɱɢɬɟ ɩɪɨɜɨɥɨɱɧɭɸ ɚɧɬɟɧɧɭ FM, ɤɚɤ ɩɨɤɚɡɚɧɨ ɧɢɠɟ. Ⱦɥɹ ɭɥɭɱɲɟɧɢɹ ɩɪɢɟɦɚ ɢ ɤɚɱɟɫɬɜɚ ɡɜɭɤɚ ɩɨɞɤɥɸɱɢɬɟ ɜɧɟɲɧɢɟ ɚɧɬɟɧɧɵ (ɫɦ. ɪɚɡɞɟɥ ɂɫɩɨɥɶɡɨɜɚɧɢɟ ɜɧɟɲɧɢɯ ɚɧɬɟɧɧ ɧɢɠɟ).
; 60&B6<;( B5X ERRN ࣮࣌ࢪ 㸰㸮㸯㸱ᖺ㸯᭶㸰㸯᪥ࠉ᭶᭙᪥ࠉ༗ᚋ㸳㸯㸮ศ 04 ɇɚɱɚɥɨ ɪɚɛɨɬɵ English Ƚɥɚɜɚ 4: ɇɚɱɚɥɨ ɪɚɛɨɬɵ ɉɪɢɦɟɱɚɧɢɟ ɇɚɠɦɢɬɟ ɤɧɨɩɤɭ 1 STANDBY/ON ɞɥɹ ɜɤɥɸɱɟɧɢɹ ɩɢɬɚɧɢɹ. ɉɨɫɥɟ ɢɫɩɨɥɶɡɨɜɚɧɢɹ: ɇɚɠɦɢɬɟ ɤɧɨɩɤɭ 1 STANDBY/ON, ɱɬɨɛɵ ɜɨɣɬɢ ɜ ɪɟɠɢɦ ɨɠɢɞɚɧɢɹ. ɉɪɢɦɟɱɚɧɢɟ Ɉɛɳɟɟ ɭɩɪɚɜɥɟɧɢɟ Ɏɭɧɤɰɢɹ ɜɜɨɞɚ ɉɪɢ ɧɚɠɚɬɢɢ ɤɧɨɩɤɢ INPUT ɧɚ ɨɫɧɨɜɧɨɦ ɛɥɨɤɟ ɬɟɤɭɳɚɹ ɮɭɧɤɰɢɹ ɢɡɦɟɧɢɬɫɹ ɧɚ ɞɪɭɝɨɣ ɪɟɠɢɦ. ɇɚɠɦɢɬɟ ɤɧɨɩɤɭ INPUT ɧɟɫɤɨɥɶɤɨ ɪɚɡ, ɱɬɨɛɵ ɜɵɛɪɚɬɶ ɧɭɠɧɭɸ ɮɭɧɤɰɢɸ.
; 60&B6<;( B5X ERRN ࣮࣌ࢪ 㸰㸮㸯㸱ᖺ㸯᭶㸰㸯᪥ࠉ᭶᭙᪥ࠉ༗ᚋ㸳㸯㸮ศ 04 ɇɚɱɚɥɨ ɪɚɛɨɬɵ ɉɊȿȾɍɉɊȿɀȾȿɇɂȿ • ɍɪɨɜɟɧɶ ɡɜɭɤɚ ɩɪɢ ɡɚɞɚɧɧɨɣ ɧɚɫɬɪɨɣɤɟ ɝɪɨɦɤɨɫɬɢ ɡɚɜɢɫɢɬ ɨɬ ɤɩɞ ɝɪɨɦɤɨɝɨɜɨɪɢɬɟɥɟɣ, ɪɚɫɩɨɥɨɠɟɧɢɹ ɢ ɞɪɭɝɢɯ ɪɚɡɥɢɱɧɵɯ ɮɚɤɬɨɪɨɜ. Ɋɟɤɨɦɟɧɞɭɟɬɫɹ ɢɡɛɟɝɚɬɶ ɜɨɡɞɟɣɫɬɜɢɹ ɜɵɫɨɤɢɯ ɭɪɨɜɧɟɣ ɝɪɨɦɤɨɫɬɢ. ɉɪɢ ɜɤɥɸɱɟɧɢɢ ɭɫɬɪɨɣɫɬɜɚ ɧɟ ɜɤɥɸɱɚɣɬɟ ɝɪɨɦɤɨɫɬɶ ɧɚ ɩɨɥɧɭɸ ɦɨɳɧɨɫɬɶ. ɋɥɭɲɚɣɬɟ ɦɭɡɵɤɭ ɩɪɢ ɫɪɟɞɧɢɯ ɭɪɨɜɧɹɯ ɝɪɨɦɤɨɫɬɢ. ɂɡɛɵɬɨɱɧɨɟ ɡɜɭɤɨɜɨɟ ɞɚɜɥɟɧɢɟ ɢɡ ɧɚɭɲɧɢɤɨɜ ɢ ɝɨɥɨɜɧɵɯ ɬɟɥɟɮɨɧɨɜ ɦɨɠɟɬ ɜɵɡɜɚɬɶ ɩɨɬɟɪɸ ɫɥɭɯɚ.
; 60&B6<;( B5X ERRN ࣮࣌ࢪ 㸰㸮㸯㸱ᖺ㸯᭶㸰㸯᪥ࠉ᭶᭙᪥ࠉ༗ᚋ㸳㸯㸮ศ 04 ɇɚɱɚɥɨ ɪɚɛɨɬɵ ȼɵɡɨɜ ɬɚɣɦɟɪɚ ɜɤɥɸɱɟɧɢɹ 1 ȼɵɩɨɥɧɢɬɟ ɲɚɝɢ ɫ 1 ɞɨ 3 ɜ ɪɚɡɞɟɥɟ «Setting the wake-up timer». ɂɫɩɨɥɶɡɨɜɚɧɢɟ ɧɚɭɲɧɢɤɨɜ ɉɨɞɤɥɸɱɢɬɟ ɪɚɡɴɟɦ ɧɚɭɲɧɢɤɨɜ ɤ ɝɧɟɡɞɭ PHONES. ɉɪɢ ɩɨɞɤɥɸɱɟɧɢɢ ɧɚɭɲɧɢɤɨɜ ɡɜɭɤ ɧɟ ɛɭɞɟɬ ɜɨɫɩɪɨɢɡɜɨɞɢɬɶɫɹ ɱɟɪɟɡ ɝɪɨɦɤɨɝɨɜɨɪɢɬɟɥɢ. 2 ɇɚɠɦɢɬɟ H I ɜɵɛɟɪɢɬɟ «TIMER ON» ɢ ɧɚɠɦɢɬɟ ENTER. POWER ON English Ɍɟɤɭɳɭɸ ɭɫɬɚɧɨɜɤɭ ɬɚɣɦɟɪɚ ɦɨɠɧɨ ɢɫɩɨɥɶɡɨɜɚɬɶ ɦɧɨɝɨɤɪɚɬɧɨ. TIMER Français Ɉɬɦɟɧɚ ɬɚɣɦɟɪɚ ɜɤɥɸɱɟɧɢɹ ȼɵɤɥɸɱɟɧɢɟ ɬɚɣɦɟɪɚ.
; 60&B6<;( B5X ERRN ࣮࣌ࢪ 㸰㸮㸯㸱ᖺ㸯᭶㸰㸯᪥ࠉ᭶᭙᪥ࠉ༗ᚋ㸳㸯㸮ศ 05 ȼɨɫɩɪɨɢɡɜɟɞɟɧɢɟ iPod/iPhone/iPad mini Ƚɥɚɜɚ 5: ȼɨɫɩɪɨɢɡɜɟɞɟɧɢɟ iPod/iPhone/iPad mini ɉɪɨɫɬɨɟ ɩɨɞɫɨɟɞɢɧɟɧɢɟ iPod/iPhone/iPad mini ɤ ɞɚɧɧɨɦɭ ɭɫɬɪɨɣɫɬɜɭ ɩɨɡɜɨɥɹɟɬ ɩɪɨɫɥɭɲɢɜɚɬɶ ɜɵɫɨɤɨɤɚɱɟɫɬɜɟɧɧɵɣ ɡɜɭɤ ɫ iPod/iPhone/iPad mini. ɇɚɫɬɪɨɣɤɚ ɜɨɫɩɪɨɢɡɜɟɞɟɧɢɹ ɦɭɡɵɤɢ ɞɥɹ iPod/iPhone/iPad mini ɦɨɠɟɬ ɜɵɩɨɥɧɹɬɶɫɹ ɫ ɞɚɧɧɨɝɨ ɚɩɩɚɪɚɬɚ ɢɥɢ ɫɚɦɨɝɨ ɭɫɬɪɨɣɫɬɜɚ iPod/iPhone/iPad mini.
; 60&B6<;( B5X ERRN ࣮࣌ࢪ 㸰㸮㸯㸱ᖺ㸯᭶㸰㸯᪥ࠉ᭶᭙᪥ࠉ༗ᚋ㸳㸯㸮ศ ȼɨɫɩɪɨɢɡɜɟɞɟɧɢɟ iPod/iPhone/iPad mini ȼɨɫɩɪɨɢɡɜɟɞɟɧɢɟ iPod/iPhone/iPad mini 1 PUSH OPEN ɉɨɞɤɥɸɱɟɧɢɟ iPod/iPhone/iPad mini ɫ ɢɫɩɨɥɶɡɨɜɚɧɢɟɦ ɩɪɢɥɚɝɚɟɦɨɣ ɩɨɞɫɬɚɜɤɢ iPhone 3 ɉɨɫɥɟ ɡɚɜɟɪɲɟɧɢɹ ɪɚɫɩɨɡɧɚɜɚɧɢɹ ɚɜɬɨɦɚɬɢɱɟɫɤɢ ɧɚɱɧɟɬɫɹ ɜɨɫɩɪɨɢɡɜɟɞɟɧɢɟ. • ɂɦɟɸɳɢɟɫɹ ɧɚ ɞɚɧɧɨɦ ɚɩɩɚɪɚɬɟ ɨɪɝɚɧɵ ɭɩɪɚɜɥɟɧɢɹ ɜɨɫɩɪɨɢɡɜɟɞɟɧɢɟɦ iPod/iPhone/iPad mini - ɷɬɨ !, + ), * ,.
; 60&B6<;( B5X ERRN ࣮࣌ࢪ 㸰㸮㸯㸱ᖺ㸯᭶㸰㸯᪥ࠉ᭶᭙᪥ࠉ༗ᚋ㸳㸯㸮ศ 06 ȼɨɫɩɪɨɢɡɜɟɞɟɧɢɟ ɞɢɫɤɚ Ƚɥɚɜɚ 6: ȼɨɫɩɪɨɢɡɜɟɞɟɧɢɟ ɞɢɫɤɚ ȼ ɷɬɨɣ ɫɢɫɬɟɦɟ ɦɨɝɭɬ ɜɨɫɩɪɨɢɡɜɨɞɢɬɶɫɹ ɫɬɚɧɞɚɪɬɧɵɟ ɞɢɫɤɢ CD, CD-R/RW ɜ ɮɨɪɦɚɬɟ CD ɢ CD-R/RW ɫ ɮɚɣɥɚɦɢ MP3 ɢɥɢ WMA, ɧɨ ɡɚɩɢɫɶ ɧɚ ɧɢɯ ɧɟɜɨɡɦɨɠɧɚ. ɇɟɤɨɬɨɪɵɟ ɞɢɫɤɢ ɚɭɞɢɨ CD-R ɢ CD-RW ɦɨɝɭɬ ɧɟ ɜɨɫɩɪɨɢɡɜɨɞɢɬɶɫɹ ɢɡ-ɡɚ ɫɨɫɬɨɹɧɢɹ ɞɢɫɤɚ ɢɥɢ ɭɫɬɪɨɣɫɬɜɚ, ɢɫɩɨɥɶɡɭɟɦɨɝɨ ɞɥɹ ɡɚɩɢɫɢ. MP3: MP3 ɹɜɥɹɟɬɫɹ ɮɨɪɦɚɬɨɦ ɫɠɚɬɢɹ. ɗɬɨ ɚɛɛɪɟɜɢɚɬɭɪɚ, ɤɨɬɨɪɚɹ ɨɛɨɡɧɚɱɚɟɬ MPEG Audio Layer 3.
; 60&B6<;( B5X ERRN ࣮࣌ࢪ 㸰㸮㸯㸱ᖺ㸯᭶㸰㸯᪥ࠉ᭶᭙᪥ࠉ༗ᚋ㸳㸯㸮ศ 06 ȼɨɫɩɪɨɢɡɜɟɞɟɧɢɟ ɞɢɫɤɚ Ɋɚɡɥɢɱɧɵɟ ɮɭɧɤɰɢɢ ɞɥɹ ɞɢɫɤɨɜ ɇɚɡɧɚɱɟɧɢɟ ɉɭɥɶɬ Ⱦɍ ȼɨɫɩɪɨɢɡɜɟɞɟɧɢɟ ɋɬɨɩ ɉɚɭɡɚ ɇɚɠɦɢɬɟ ɜ ɪɟɠɢɦɟ ɜɨɫɩɪɨɢɡɜɟɞɟɧɢɹ. ɇɚɠɦɢɬɟ ɤɧɨɩɤɭ !, ɱɬɨɛɵ ɜɨɡɨɛɧɨɜɢɬɶ ɜɨɫɩɪɨɢɡɜɟɞɟɧɢɟ ɫ ɦɟɫɬɚ ɨɫɬɚɧɨɜɤɢ. ɇɚɠɦɢɬɟ ɜ ɪɟɠɢɦɟ ɜɨɫɩɪɨɢɡɜɟɞɟɧɢɹ ɢɥɢ ɪɟɠɢɦɟ ɨɫɬɚɧɨɜɤɢ. ȿɫɥɢ ɷɬɚ ɤɧɨɩɤɚ ɧɚɠɢɦɚɟɬɫɹ ɜ ɪɟɠɢɦɟ ɨɫɬɚɧɨɜɤɢ, ɧɚɠɦɢɬɟ ɤɧɨɩɤɭ !, ɱɬɨɛɵ ɧɚɱɚɬɶ ɜɨɫɩɪɨɢɡɜɟɞɟɧɢɟ ɠɟɥɚɟɦɨɣ ɞɨɪɨɠɤɢ.
; 60&B6<;( B5X ERRN ࣮࣌ࢪ 㸰㸮㸯㸱ᖺ㸯᭶㸰㸯᪥ࠉ᭶᭙᪥ࠉ༗ᚋ㸳㸯㸮ศ 06 ȼɨɫɩɪɨɢɡɜɟɞɟɧɢɟ ɞɢɫɤɚ ɉɪɢɦɟɱɚɧɢɟ ɉɪɢɦɟɱɚɧɢɟ • ȿɫɥɢ ɤɧɨɩɤɚ , ɧɚɠɢɦɚɟɬɫɹ ɜɨ ɜɪɟɦɹ ɜɨɫɩɪɨɢɡɜɟɞɟɧɢɹ ɜ ɫɥɭɱɚɣɧɨɣ ɩɨɫɥɟɞɨɜɚɬɟɥɶɧɨɫɬɢ, ɦɨɠɧɨ ɩɟɪɟɣɬɢ ɧɚ ɫɥɟɞɭɸɳɭɸ ɜɵɛɪɚɧɧɭɸ ɞɨɪɨɠɤɭ ɜ ɪɟɠɢɦɟ ɜɨɫɩɪɨɢɡɜɟɞɟɧɢɹ ɜ ɫɥɭɱɚɣɧɨɣ ɩɨɫɥɟɞɨɜɚɬɟɥɶɧɨɫɬɢ. ȼ ɬɨ ɠɟ ɜɪɟɦɹ, ɤɧɨɩɤɚ + ɧɟ ɩɨɡɜɨɥɹɟɬ ɩɟɪɟɣɬɢ ɧɚ ɩɪɟɞɵɞɭɳɭɸ ɞɨɪɨɠɤɭ. Ȼɭɞɟɬ ɨɩɪɟɞɟɥɟɧɨ ɦɟɫɬɨ ɧɚɱɚɥɚ ɜɨɫɩɪɨɢɡɜɨɞɢɦɨɣ ɞɨɪɨɠɤɢ.
; 60&B6<;( B5X ERRN ࣮࣌ࢪ 㸰㸮㸯㸱ᖺ㸯᭶㸰㸯᪥ࠉ᭶᭙᪥ࠉ༗ᚋ㸳㸯㸮ศ 06 ȼɨɫɩɪɨɢɡɜɟɞɟɧɢɟ ɞɢɫɤɚ КОРНЕВАЯ (ПАПКА 1) ПАПКА A (ПАПКА 2) ФАЙЛ 3 ФАЙЛ 4 ФАЙЛ 5 ПАПКА D (ПАПКА 5) ФАЙЛ 6 ФАЙЛ 7 ФАЙЛ 8 ПАПКА E (ПАПКА 6) ФАЙЛ 9 ФАЙЛ 10 OPEN/CLOSE USB TUNER iPod BT AUDIO CLOCK/TIMER FOLDER TUNE+ AUDIO IN SLEEP ENTER EQUALIZER 1 2 3 MEMORY /PROGRAM MENU P.
; 60&B6<;( B5X ERRN ࣮࣌ࢪ 㸰㸮㸯㸱ᖺ㸯᭶㸰㸯᪥ࠉ᭶᭙᪥ࠉ༗ᚋ㸳㸯㸮ศ 07 ȼɨɫɩɪɨɢɡɜɟɞɟɧɢɟ ɫ USB Ɋɚɡɞɟɥ 7: ȼɨɫɩɪɨɢɡɜɟɞɟɧɢɟ ɫ USB ȼɨɫɩɪɨɢɡɜɟɞɟɧɢɟ ɡɚɩɨɦɢɧɚɸɳɢɯ ɭɫɬɪɨɣɫɬɜ USB ɋ ɩɨɦɨɳɶɸ ɢɧɬɟɪɮɟɣɫɚ USB ɧɚ ɩɟɪɟɞɧɟɣ ɩɚɧɟɥɢ ɷɬɨɝɨ ɪɟɫɢɜɟɪɚ ɦɨɠɧɨ ɩɪɨɫɥɭɲɢɜɚɬɶ ɞɜɭɯɤɚɧɚɥɶɧɵɣ ɡɜɭɤ ɫ USB ɭɫɬɪɨɣɫɬɜ. • Pioneer ɧɟ ɝɚɪɚɧɬɢɪɭɟɬ, ɱɬɨ ɛɭɞɟɬ ɜɨɫɩɪɨɢɡɜɨɞɢɬɶɫɹ ɥɸɛɨɣ ɮɚɣɥ, ɡɚɩɢɫɚɧɧɵɣ ɧɚ ɡɚɩɨɦɢɧɚɸɳɟɦ ɭɫɬɪɨɣɫɬɜɟ USB, ɢɥɢ ɱɬɨ ɛɭɞɟɬ ɩɨɞɚɜɚɬɶɫɹ ɩɢɬɚɧɢɟ ɧɚ ɡɚɩɨɦɢɧɚɸɳɟɟ ɭɫɬɪɨɣɫɬɜɨ USB.
; 60&B6<;( B5X ERRN ࣮࣌ࢪ 㸰㸮㸯㸱ᖺ㸯᭶㸰㸯᪥ࠉ᭶᭙᪥ࠉ༗ᚋ㸳㸯㸮ศ 07 ȼɨɫɩɪɨɢɡɜɟɞɟɧɢɟ ɫ USB Ɏɚɣɥ ɜ ɡɚɩɨɦɢɧɚɸɳɟɦ ɭɫɬɪɨɣɫɬɜɟ USB ɦɨɠɧɨ ɚɜɬɨɦɚɬɢɱɟɫɤɢ ɜɨɫɩɪɨɢɡɜɨɞɢɬɶ ɜ ɫɥɭɱɚɣɧɨɣ ɩɨɫɥɟɞɨɜɚɬɟɥɶɧɨɫɬɢ. Ⱦɥɹ ɜɨɫɩɪɨɢɡɜɟɞɟɧɢɹ ɜɫɟɯ ɞɨɪɨɠɟɤ ɜ ɫɥɭɱɚɣɧɨɣ ɩɨɫɥɟɞɨɜɚɬɟɥɶɧɨɫɬɢ: Ⱦɥɹ ɨɬɦɟɧɵ ɜɨɫɩɪɨɢɡɜɟɞɟɧɢɹ ɜ ɫɥɭɱɚɣɧɨɣ ɩɨɫɥɟɞɨɜɚɬɟɥɶɧɨɫɬɢ: Ⱥɩɩɚɪɚɬ ɦɨɠɟɬ ɜɨɫɩɪɨɢɡɜɨɞɢɬɶ ɩɚɩɤɢ, ɫɨɯɪɚɧɟɧɧɵɟ ɜ ɡɚɩɨɦɢɧɚɸɳɟɦ ɭɫɬɪɨɣɫɬɜɟ USB ɜ ɧɭɠɧɨɣ ɩɨɫɥɟɞɨɜɚɬɟɥɶɧɨɫɬɢ. ɉɨɞɪɨɛɧɟɟ, ɫɦ. Ɂɚɩɪɨɝɪɚɦɦɢɪɨɜɚɧɧɨɟ ɜɨɫɩɪɨɢɡɜɟɞɟɧɢɟ (CD ɢɥɢ MP3/WMA) ɧɚ ɫɬɪ. 20.
; 60&B6<;( B5X ERRN ࣮࣌ࢪ 㸰㸮㸯㸱ᖺ㸯᭶㸰㸯᪥ࠉ᭶᭙᪥ࠉ༗ᚋ㸳㸯㸮ศ 08 ɂɫɩɨɥɶɡɨɜɚɧɢɟ ɬɸɧɟɪɚ Ɋɚɡɞɟɥ 8: ɂɫɩɨɥɶɡɨɜɚɧɢɟ ɬɸɧɟɪɚ ɉɪɨɫɥɭɲɢɜɚɧɢɟ ɪɚɞɢɨɩɟɪɟɞɚɱ ȼ ɩɪɢɜɟɞɟɧɧɵɯ ɧɢɠɟ ɩɭɧɤɬɚɯ ɨɩɢɫɵɜɚɟɬɫɹ ɩɪɨɰɟɞɭɪɚ ɧɚɫɬɪɨɣɤɢ ɧɚ ɪɚɞɢɨɫɬɚɧɰɢɸ ɞɢɚɩɚɡɨɧɚ FM ɫ ɢɫɩɨɥɶɡɨɜɚɧɢɟɦ ɮɭɧɤɰɢɣ ɚɜɬɨɦɚɬɢɱɟɫɤɨɣ (ɩɨɢɫɤ) ɢɥɢ ɪɭɱɧɨɣ (ɩɨɲɚɝɨɜɨɣ) ɧɚɫɬɪɨɣɤɢ. ȼɵɩɨɥɧɢɜ ɧɚɫɬɪɨɣɤɭ ɧɚ ɪɚɞɢɨɫɬɚɧɰɢɸ, ɟɟ ɱɚɫɬɨɬɭ ɦɨɠɧɨ ɫɨɯɪɚɧɢɬɶ ɜ ɩɚɦɹɬɢ ɞɥɹ ɩɨɫɥɟɞɭɸɳɟɝɨ ɜɵɡɨɜɚ. ɉɨɞɪɨɛɧɵɟ ɢɧɫɬɪɭɤɰɢɢ ɨɛ ɷɬɨɦ ɫɦ. ɧɢɠɟ ɜ ɪɚɡɞɟɥɟ ɋɨɯɪɚɧɟɧɢɟ ɡɚɩɪɨɝɪɚɦɦɢɪɨɜɚɧɧɵɯ ɪɚɞɢɨɫɬɚɧɰɢɣ ɧɢɠɟ.
; 60&B6<;( B5X ERRN ࣮࣌ࢪ 㸰㸮㸯㸱ᖺ㸯᭶㸰㸯᪥ࠉ᭶᭙᪥ࠉ༗ᚋ㸳㸯㸮ศ 08 ɂɫɩɨɥɶɡɨɜɚɧɢɟ ɬɸɧɟɪɚ 1 ɇɚɠɦɢɬɟ ɤɧɨɩɤɭ PRESET +/–, ɱɬɨɛɵ ɜɵɛɪɚɬɶ ɠɟɥɚɟɦɭɸ ɫɬɚɧɰɢɸ. ɋɬɚɧɰɢɢ, ɫɨɯɪɚɧɟɧɧɵɟ ɜ ɩɚɦɹɬɢ, ɦɨɝɭɬ ɫɤɚɧɢɪɨɜɚɬɶɫɹ ɚɜɬɨɦɚɬɢɱɟɫɤɢ. (ɋɤɚɧɢɪɨɜɚɧɢɟ ɩɪɟɞɭɫɬɚɧɨɜɥɟɧɧɨɣ ɩɚɦɹɬɢ) 1 ɇɚɠɦɢɬɟ ɢ ɭɞɟɪɠɢɜɚɣɬɟ ɤɧɨɩɤɭ PRESET +/–. 2 ɉɨɜɬɨɪɧɨ ɧɚɠɦɢɬɟ ɤɧɨɩɤɭ PRESET +/– ɩɪɢ ɨɛɧɚɪɭɠɟɧɢɢ ɠɟɥɚɟɦɨɣ ɫɬɚɧɰɢɢ. 1 ɇɚɠɦɢɬɟ TUNER ɧɚ ɩɭɥɶɬɟ ɞɢɫɬɚɧɰɢɨɧɧɨɝɨ ɭɩɪɚɜɥɟɧɢɹ. ɉɪɢɦɟɱɚɧɢɟ • ȼɫɟ ɫɬɚɧɰɢɢ ɛɭɞɭɬ ɫɬɟɪɬɵ.
; 60&B6<;( B5X ERRN ࣮࣌ࢪ 㸰㸮㸯㸱ᖺ㸯᭶㸰㸯᪥ࠉ᭶᭙᪥ࠉ༗ᚋ㸳㸯㸮ศ 08 ɂɫɩɨɥɶɡɨɜɚɧɢɟ ɬɸɧɟɪɚ ɉɪɢɦɟɱɚɧɢɟ • ȿɫɥɢ ɢɧɞɢɤɚɰɢɹ ɧɚ ɞɢɫɩɥɟɟ ɩɟɪɟɫɬɚɥɚ ɦɢɝɚɬɶ, ɡɚɩɭɫɬɢɬɟ ɨɩɟɪɚɰɢɸ ɫɧɨɜɚ ɫ ɲɚɝɚ 2. ȿɫɥɢ ɚɩɩɚɪɚɬ ɧɚɯɨɞɢɬ ɠɟɥɚɟɦɵɣ ɬɢɩ ɩɪɨɝɪɚɦɦɵ, ɬɨ ɩɪɢɦɟɪɧɨ ɧɚ 8 ɫɟɤɭɧɞ ɡɚɝɨɪɢɬɫɹ ɫɨɨɬɜɟɬɫɬɜɭɸɳɢɣ ɧɨɦɟɪ ɤɚɧɚɥɚ, ɢ ɡɚɬɟɦ ɨɬɨɛɪɚɡɢɬɫɹ ɧɚɡɜɚɧɢɟ ɫɬɚɧɰɢɢ. • ȿɫɥɢ ɧɟɨɛɯɨɞɢɦɨ ɩɪɨɫɥɭɲɚɬɶ ɚɧɚɥɨɝɢɱɧɵɣ ɬɢɩ ɩɪɨɝɪɚɦɦɵ ɞɪɭɝɨɣ ɫɬɚɧɰɢɢ, ɧɚɠɦɢɬɟ ɤɧɨɩɤɭ RDS PTY ɜɨ ɜɪɟɦɹ ɦɢɝɚɧɢɹ ɧɨɦɟɪɚ ɤɚɧɚɥɚ ɢɥɢ ɧɚɡɜɚɧɢɹ ɫɬɚɧɰɢɢ.
; 60&B6<;( B5X ERRN ࣮࣌ࢪ 㸰㸮㸯㸱ᖺ㸯᭶㸰㸯᪥ࠉ᭶᭙᪥ࠉ༗ᚋ㸳㸯㸮ศ Ⱦɪɭɝɢɟ ɩɨɞɤɥɸɱɟɧɢɹ Ⱦɪɭɝɢɟ ɩɨɞɤɥɸɱɟɧɢɹ ɉɨɞɫɨɟɞɢɧɟɧɢɟ ɞɨɩɨɥɧɢɬɟɥɶɧɵɯ ɤɨɦɩɨɧɟɧɬɨɜ Italiano POWER ON Deutsch ɉɨɞɤɥɸɱɢɬɟ ɦɢɧɢ-ɪɚɡɴɟɦ AUDIO IN ɧɚ ɩɟɪɟɞɧɟɣ ɩɚɧɟɥɢ ɤ ɜɫɩɨɦɨɝɚɬɟɥɶɧɨɦɭ ɤɨɦɩɨɧɟɧɬɭ ɜɨɫɩɪɨɢɡɜɟɞɟɧɢɹ. • Ⱦɚɧɧɵɣ ɦɟɬɨɞ ɦɨɠɧɨ ɢɫɩɨɥɶɡɨɜɚɬɶ ɞɥɹ ɩɪɨɢɝɪɵɜɚɧɢɹ ɦɭɡɵɤɢ ɧɚ ɷɬɨɦ ɚɩɩɚɪɚɬɟ ɫ ɭɫɬɪɨɣɫɬɜɚ iPod/iPhone/iPad mini, ɤɨɬɨɪɨɟ ɧɟ ɩɨɞɞɟɪɠɢɜɚɟɬ ɢɫɩɨɥɶɡɨɜɚɧɢɟ ɞɨɤɫɬɚɧɰɢɢ iPod ɢ ɪɚɡɴɟɦɚ iPod/iPhone.
; 60&B6<;( B5X ERRN ࣮࣌ࢪ 㸰㸮㸯㸱ᖺ㸯᭶㸰㸯᪥ࠉ᭶᭙᪥ࠉ༗ᚋ㸳㸯㸮ศ 10 ȼɨɫɩɪɨɢɡɜɟɞɟɧɢɟ Bluetooth® Audio Ƚɥɚɜɚ 10: ȼɨɫɩɪɨɢɡɜɟɞɟɧɢɟ Bluetooth® Audio ȼɨɫɩɪɨɢɡɜɟɞɟɧɢɟ ɦɭɡɵɤɢ ɫ ɩɨɦɨɳɶɸ ɛɟɫɩɪɨɜɨɞɧɨɣ ɬɟɯɧɨɥɨɝɢɢ Bluetooth ɍɫɬɪɨɣɫɬɜɨ ɫ ɛɟɫɩɪɨɜɨɞɧɵɦ ɢɧɬɟɪɮɟɣɫɨɦ Bluetooth: ɋɨɬɨɜɵɣ ɬɟɥɟɮɨɧ ɍɫɬɪɨɣɫɬɜɨ ɫ ɛɟɫɩɪɨɜɨɞɧɵɦ ɢɧɬɟɪɮɟɣɫɨɦ Bluetooth: ɐɢɮɪɨɜɨɣ ɦɭɡɵɤɚɥɶɧɵɣ ɩɪɨɢɝɪɵɜɚɬɟɥɶ ɍɫɬɪɨɣɫɬɜɨ, ɧɟ ɨɫɧɚɳɟɧɧɨɟ ɛɟɫɩɪɨɜɨɞɧɵɦ ɢɧɬɟɪɮɟɣɫɨɦ Bluetooth: ɐɢɮɪɨɜɨɣ ɦɭɡɵɤɚɥɶɧɵɣ ɩɪɨɢɝɪɵɜɚɬɟɥɶ + Ⱥɭɞɢɨɩɟɪɟɞɚɬɱɢɤ Bluetooth®(ɩɪɢɨɛɪɟɬɚɟɬɫɹ ɨɬɞɟɥɶɧɨ) Ɇɭɡɵɤɚɥɶɧɵ
; 60&B6<;( B5X ERRN ࣮࣌ࢪ 㸰㸮㸯㸱ᖺ㸯᭶㸰㸯᪥ࠉ᭶᭙᪥ࠉ༗ᚋ㸳㸯㸮ศ ȼɨɫɩɪɨɢɡɜɟɞɟɧɢɟ Bluetooth® Audio 1 ɇɚɠɦɢɬɟ ɤɧɨɩɤɭ BT AUDIO. Ⱥɩɩɚɪɚɬ ɩɟɪɟɤɥɸɱɢɬɫɹ ɧɚ ɜɯɨɞ BT AUDIO. 2 Ɇɟɠɞɭ ɭɫɬɪɨɣɫɬɜɨɦ ɫ ɩɨɞɞɟɪɠɤɨɣ Bluetooth ɢ ɚɩɩɚɪɚɬɨɦ ɛɭɞɟɬ ɫɨɡɞɚɧɨ ɩɨɞɤɥɸɱɟɧɢɟ Bluetooth. Español Pyccкий Ɋɚɦɤɢ ɞɟɣɫɬɜɢɹ Nederlands 3 ȼɨɫɩɪɨɢɡɜɟɞɟɧɢɟ ɦɭɡɵɤɢ ɫ ɭɫɬɪɨɣɫɬɜɚ ɫ ɩɨɞɞɟɪɠɤɨɣ Bluetooth.
; 60&B6<;( B5X ERRN ࣮࣌ࢪ 㸰㸮㸯㸱ᖺ㸯᭶㸰㸯᪥ࠉ᭶᭙᪥ࠉ༗ᚋ㸳㸯㸮ศ 10 ȼɨɫɩɪɨɢɡɜɟɞɟɧɢɟ Bluetooth® Audio • ȼ ɭɫɥɨɜɢɹɯ ɜɨɡɞɟɣɫɬɜɢɹ ɦɚɝɧɢɬɧɨɝɨ ɩɨɥɹ, ɫɬɚɬɢɱɟɫɤɨɝɨ ɷɥɟɤɬɪɢɱɟɫɬɜɚ, ɜɵɫɨɤɨɱɚɫɬɨɬɧɵɯ ɪɚɞɢɨɩɨɦɟɯ ɨɬ ɭɫɬɪɨɣɫɬɜ, ɪɚɛɨɬɚɸɳɢɯ ɧɚ ɬɨɣ ɠɟ ɱɚɫɬɨɬɟ, ɱɬɨ ɢ ɞɚɧɧɨɟ ɭɫɬɪɨɣɫɬɜɨ (2,4 ȽȽɰ), ɬɚɤɢɟ ɤɚɤ ɭɫɬɪɨɣɫɬɜɚ ɛɟɫɩɪɨɜɨɞɧɵɯ ɥɨɤɚɥɶɧɵɯ ɫɟɬɟɣ 2,4 ȽȽɰ (IEEE802.11b/g) ɢɥɢ ɦɢɤɪɨɜɨɥɧɨɜɵɟ ɩɟɱɢ. • ɉɪɢ ɩɪɨɠɢɜɚɧɢɢ ɜ ɝɭɫɬɨɧɚɫɟɥɟɧɧɨɦ ɠɢɥɨɦ ɤɜɚɪɬɚɥɟ (ɤɜɚɪɬɢɪɚ, ɢɧɞɢɜɢɞɭɚɥɶɧɵɣ ɞɨɦ, ɞɪ.
; 60&B6<;( B5X ERRN ࣮࣌ࢪ 㸰㸮㸯㸱ᖺ㸯᭶㸰㸯᪥ࠉ᭶᭙᪥ࠉ༗ᚋ㸳㸯㸮ศ 11 Ⱦɨɩɨɥɧɢɬɟɥɶɧɚɹ ɢɧɮɨɪɦɚɰɢɹ Ⱦɨɩɨɥɧɢɬɟɥɶɧɚɹ ɢɧɮɨɪɦɚɰɢɹ Ɉɛɳɢɟ ɩɪɨɛɥɟɦɵ ɉɪɨɜɟɪɶɬɟ ɍɫɬɪɚɧɟɧɢɟ ɇɚɫɬɪɨɣɤɢ, ɤɨɬɨɪɵɟ ɜɵ ɜɵɩɨɥɧɢɥɢ, ɭɞɚɥɟɧɵ. Ɉɬɫɨɟɞɢɧɟɧ ɤɚɛɟɥɶ ɩɢɬɚɧɢɹ? ȿɫɥɢ ɨɬɫɨɟɞɢɧɹɟɬɫɹ ɤɚɛɟɥɶ ɩɢɬɚɧɢɹ, ɜɵɩɨɥɧɟɧɧɵɟ ɧɚɫɬɪɨɣɤɢ ɭɞɚɥɹɸɬɫɹ. Ɂɚɧɨɜɨ ɭɫɬɚɧɨɜɢɬɟ ɱɚɫɵ. ȿɫɥɢ ɜɵ ɧɟ ɯɨɬɢɬɟ ɭɞɚɥɹɬɶ ɧɚɫɬɪɨɣɤɢ, ɧɟ ɨɬɫɨɟɞɢɧɹɣɬɟ ɤɚɛɟɥɶ ɩɢɬɚɧɢɹ. ɍɪɨɜɟɧɶ ɝɪɨɦɤɨɫɬɢ ɡɜɭɤɚ ɦɨɠɟɬ ɨɬɥɢɱɚɬɶɫɹ ɜ ɡɚɜɢɫɢɦɨɫɬɢ ɨɬ ɜɯɨɞɧɨɝɨ ɢɫɬɨɱɧɢɤɚ ɢ ɮɨɪɦɚɬɚ ɡɚɩɢɫɢ.
; 60&B6<;( B5X ERRN ࣮࣌ࢪ 㸰㸮㸯㸱ᖺ㸯᭶㸰㸯᪥ࠉ᭶᭙᪥ࠉ༗ᚋ㸳㸯㸮ศ 11 Ⱦɨɩɨɥɧɢɬɟɥɶɧɚɹ ɢɧɮɨɪɦɚɰɢɹ ɇɟɩɨɥɚɞɤɚ ɉɪɨɜɟɪɶɬɟ ɇɟɜɨɡɦɨɠɧɨ ɩɨɞɤɥɸɱɢɬɶ ɭɫɬɪɨɣɫɬɜɨ ɫ ɩɨɞɞɟɪɠɤɨɣ Bluetooth, ɡɜɭɤɚ ɧɟɬ ɫɨɜɫɟɦ ɢɥɢ ɡɜɭɤ ɩɪɟɪɵɜɚɟɬɫɹ ɩɪɢ ɩɨɞɤɥɸɱɟɧɢɢ. ɂɦɟɸɬɫɹ ɥɢ ɩɨɛɥɢɡɨɫɬɢ ɩɪɢɛɨɪɵ, ȿɫɥɢ ɷɬɨ ɬɚɤ, ɨɬɨɞɜɢɧɶɬɟ ɷɬɢ ɭɫɬɪɨɣɫɬɜɚ ɨɬ ɚɩɩɚɪɚɬɚ, ɢɥɢ ɤɨɬɨɪɵɟ ɢɡɥɭɱɚɸɬ ɷɥɟɤɬɪɨɦɚɝɧɢɬɧɵɟ ɩɪɟɤɪɚɬɢɬɟ ɢɫɩɨɥɶɡɨɜɚɬɶ ɞɪɭɝɢɟ ɭɫɬɪɨɣɫɬɜɚ, ɤɨɬɨɪɵɟ ɢɡɥɭɱɚɸɬ ɜɨɥɧɵ ɜ ɞɢɚɩɚɡɨɧɟ 2,4 ȽȽɰ ɷɥɟɤɬɪɨɦɚɝɧɢɬɧɵɟ ɜɨɥɧɵ.
; 60&B6<;( B5X ERRN ࣮࣌ࢪ 㸰㸮㸯㸱ᖺ㸯᭶㸰㸯᪥ࠉ᭶᭙᪥ࠉ༗ᚋ㸳㸯㸮ศ 11 Ⱦɨɩɨɥɧɢɬɟɥɶɧɚɹ ɢɧɮɨɪɦɚɰɢɹ ɉɪɨɜɟɪɶɬɟ ɍɫɬɪɚɧɟɧɢɟ ɇɟ ɨɬɨɛɪɚɠɚɸɬɫɹ ɢɥɢ ɨɬɨɛɪɚɠɚɸɬɫɹ ɧɟɩɪɚɜɢɥɶɧɨ ɢɦɟɧɚ ɩɚɩɨɤ ɢɥɢ ɮɚɣɥɨɜ. ɇɟ ɫɨɞɟɪɠɚɬ ɥɢ ɢɦɟɧɚ ɩɚɩɨɤ ɢɥɢ ɮɚɣɥɨɜ ɛɨɥɟɟ 30 ɫɢɦɜɨɥɨɜ? Ɇɚɤɫɢɦɚɥɶɧɨɟ ɨɬɨɛɪɚɠɚɟɦɨɟ ɱɢɫɥɨ ɫɢɦɜɨɥɨɜ ɞɥɹ ɢɦɟɧ ɩɚɩɨɤ ɢ ɮɚɣɥɨɜ ɪɚɜɧɨ 30. ɂɦɟɧɚ ɩɚɩɨɤ ɢɥɢ ɮɚɣɥɨɜ ɧɟ ɨɬɨɛɪɚɠɚɸɬɫɹ ɜ ɚɥɮɚɜɢɬɧɨɦ ɩɨɪɹɞɤɟ. ɗɬɨ ɧɟ ɹɜɥɹɟɬɫɹ ɧɟɢɫɩɪɚɜɧɨɫɬɶɸ ɭɫɬɪɨɣɫɬɜɚ.
; 60&B6<;( B5X ERRN ࣮࣌ࢪ 㸰㸮㸯㸱ᖺ㸯᭶㸰㸯᪥ࠉ᭶᭙᪥ࠉ༗ᚋ㸳㸯㸮ศ 11 Ⱦɨɩɨɥɧɢɬɟɥɶɧɚɹ ɢɧɮɨɪɦɚɰɢɹ ȼɨɫɩɪɨɢɡɜɨɞɢɦɵɟ ɞɢɫɤɢ ɢ ɮɨɪɦɚɬɵ Audio CD WMA MP3 • ɂɦɟɸɳɢɟɫɹ ɜ ɩɪɨɞɚɠɟ ɡɜɭɤɨɜɵɟ ɤɨɦɩɚɤɬ-ɞɢɫɤɢ (Audio CD) • Ⱦɢɫɤɢ CD-R/ -RW/ -ROM ɫ ɦɭɡɵɤɨɣ, ɡɚɩɢɫɚɧɧɨɣ ɜ ɮɨɪɦɚɬɟ CD-DA Ɏɚɣɥɵ WMA, ɡɚɩɢɫɚɧɧɵɟ ɧɚ ɞɢɫɤɢ CD-R/ -RW/ -ROM ɢɥɢ ɡɚɩɨɦɢɧɚɸɳɢɟ ɭɫɬɪɨɣɫɬɜɚ USB Ɏɚɣɥɵ MP3, ɡɚɩɢɫɚɧɧɵɟ ɧɚ ɞɢɫɤɢ CD-R/ -RW/ -ROM ɢɥɢ ɡɚɩɨɦɢɧɚɸɳɢɟ ɭɫɬɪɨɣɫɬɜɚ USB • Ɇɨɝɭɬ ɜɨɫɩɪɨɢɡɜɨɞɢɬɶɫɹ ɬɨɥɶɤɨ ɮɢɧɚɥɢɡɢɪɨɜɚɧɧɵɟ ɞɢɫɤɢ.
; 60&B6<;( B5X ERRN ࣮࣌ࢪ 㸰㸮㸯㸱ᖺ㸯᭶㸰㸯᪥ࠉ᭶᭙᪥ࠉ༗ᚋ㸳㸯㸮ศ 11 Ⱦɨɩɨɥɧɢɬɟɥɶɧɚɹ ɢɧɮɨɪɦɚɰɢɹ ɇɟ ɪɚɡɦɟɳɚɣɬɟ ɩɪɟɞɦɟɬɵ ɧɚ ɭɫɬɪɨɣɫɬɜɟ ɇɟ ɡɚɤɪɵɜɚɣɬɟ ɜɟɧɬɢɥɹɰɢɨɧɧɵɟ ɨɬɜɟɪɫɬɢɹ. ɇɟ ɢɫɩɨɥɶɡɭɣɬɟ ɞɚɧɧɨɟ ɭɫɬɪɨɣɫɬɜɨ ɧɚ ɜɨɪɫɢɫɬɵɯ ɤɨɜɪɚɯ, ɤɪɨɜɚɬɹɯ, ɞɢɜɚɧɚɯ ɢ ɬ. ɞ. ɢɥɢ ɡɚɜɟɪɧɭɬɵɦ ɜ ɬɤɚɧɶ ɢ ɬ. ɞ. ɗɬɨ ɦɨɠɟɬ ɩɨɦɟɲɚɬɶ ɪɚɫɫɟɢɜɚɧɢɸ ɬɟɩɥɚ, ɱɬɨ ɦɨɠɟɬ ɩɪɢɜɟɫɬɢ ɤ ɩɨɥɨɦɤɟ. • Ⱦɢɫɤɢ ɦɨɝɭɬ ɧɟ ɜɨɫɩɪɨɢɡɜɨɞɢɬɶɫɹ, ɟɫɥɢ ɧɚ ɧɢɯ ɨɫɬɚɸɬɫɹ ɨɬɩɟɱɚɬɤɢ ɩɚɥɶɰɟɜ ɢɥɢ ɩɵɥɶ. ȼ ɷɬɨɦ ɫɥɭɱɚɟ, ɢɫɩɨɥɶɡɭɣɬɟ ɱɢɫɬɹɳɭɸ ɬɤɚɧɶ ɢ ɬ.ɩ.
; 60&B6<;( B5X ERRN ࣮࣌ࢪ 㸰㸮㸯㸱ᖺ㸯᭶㸰㸯᪥ࠉ᭶᭙᪥ࠉ༗ᚋ㸳㸯㸮ศ 11 Ⱦɨɩɨɥɧɢɬɟɥɶɧɚɹ ɢɧɮɨɪɦɚɰɢɹ Ɉ ɞɢɫɤɚɯ ɫɩɟɰɢɚɥɶɧɨɣ ɮɨɪɦɵ Ⱦɢɫɤɢ ɨɫɨɛɨɣ ɮɨɪɦɵ (ɜ ɜɢɞɟ ɫɟɪɞɰɚ, ɲɟɫɬɢɭɝɨɥɶɧɢɤɚ ɢ ɬ. ɩ.) ɧɟ ɦɨɝɭɬ ɜɨɫɩɪɨɢɡɜɨɞɢɬɶɫɹ ɧɚ ɞɚɧɧɨɦ ɭɫɬɪɨɣɫɬɜɟ. ɇɟ ɩɵɬɚɣɬɟɫɶ ɜɨɫɩɪɨɢɡɜɟɫɬɢ ɬɚɤɢɟ ɞɢɫɤɢ, ɬɚɤ ɤɚɤ ɨɧɢ ɦɨɝɭɬ ɩɨɜɪɟɞɢɬɶ ɞɚɧɧɨɟ ɭɫɬɪɨɣɫɬɜɨ. ɋɛɪɨɫ ɜɫɟɯ ɧɚɫɬɪɨɟɤ ɧɚ ɡɧɚɱɟɧɢɹ ɩɨ ɭɦɨɥɱɚɧɢɸ Ⱦɥɹ ɜɨɫɫɬɚɧɨɜɥɟɧɢɹ ɜɫɟɯ ɧɚɫɬɪɨɟɤ ɩɨ ɭɦɨɥɱɚɧɢɸ ɜɵɩɨɥɧɢɬɟ ɞɟɣɫɬɜɢɹ, ɨɩɢɫɚɧɧɵɟ ɧɢɠɟ. 1 ɇɚɠɦɢɬɟ 1 STANDBY/ON, ɱɬɨɛɵ ɜɤɥɸɱɢɬɶ ɩɢɬɚɧɢɟ.
; 60&B6<;( B5X ERRN ࣮࣌ࢪ 㸰㸮㸯㸱ᖺ㸱᭶㸰㸳᪥ࠉ᭶᭙᪥ࠉ༗ᚋ㸵㸱㸯ศ Ⱦɨɩɨɥɧɢɬɟɥɶɧɚɹ ɢɧɮɨɪɦɚɰɢɹ • ɍɫɢɥɢɬɟɥɶ ȼɵɯɨɞɧɚɹ ɫɪɟɞɧɟɤɜɚɞɪɚɬɢɱɟɫɤɚɹ ɦɨɳɧɨɫɬɶ: . . . 10 ȼɬ + 10 ȼɬ (1 ɤȽɰ, 10 % ɤɨɷɮɮɢɰɢɟɧɬ ɝɚɪɦɨɧɢɤ, 8 Ɉɦ) • ɋɟɤɰɢɹ ɬɸɧɟɪɚ Ɉɫɬɚɥɶɧɨɟ • Ƚɪɨɦɤɨɝɨɜɨɪɢɬɟɥɶ Italiano Ɍɢɩ ɉɚɫɫɢɜɧɵɣ ɢɡɥɭɱɚɬɟɥɶ ɉɨɥɧɨɩɨɥɨɫɧɵɣ . . . . . . . . . . . . . . . . . . . . . . . . . . . .6,6 ɫɦ, ɤɨɧɭɫ ɉɚɫɫɢɜɧɵɣ ɢɡɥɭɱɚɬɟɥɶ . . . . . . . . . . . . . . . . . . . . . .7,7 ɫɦ, ɤɨɧɭɫ Ⱦɢɚɩɚɡɨɧ ɱɚɫɬɨɬ ɜɨɫɩɪɨɢɡɜɟɞɟɧɢɹ. . . . . . . . .
; 60&B6<;( B5X ERRN ࣮࣌ࢪ 㸰㸮㸯㸱ᖺ㸱᭶㸰㸳᪥ࠉ᭶᭙᪥ࠉ༗ᚋ㸵㸱㸯ศ Declaration of Conformity with regard to the R&TTE Directive 1999/5/EC Manufacturer: PIONEER CORPORATION 1-1, Shin-ogura, Saiwai-ku, Kawasaki-shi, Kanagawa 212-0031, Japan EU Representative’s: Pioneer Europe NV Haven 1087, Keetberglaan 1, 9120 Melsele, Belgium http://www.pioneer.
; 60&B6<;( B5X ERRN ࣮࣌ࢪ 㸰㸮㸯㸱ᖺ㸱᭶㸰㸳᪥ࠉ᭶᭙᪥ࠉ༗ᚋ㸵㸱㸯ศ Português: Pioneer declara que este [*] está conforme com os requisitos essenciais e outras disposições da Directiva 1999/5/CE. Čeština: Pioneer tímto prohlašuje, že tento [*] je ve shodě se základními požadavky a dalšími příslušnými ustanoveními směrnice 1999/5/ES Eesti: Käesolevaga kinnitab Pioneer seadme [*] vastavust direktiivi 1999/5/EÜ põhinõuetele ja nimetatud direktiivist tulenevatele teistele asjakohastele sätetele.
; 60&B6<;( B5X ERRN ࣮࣌ࢪ 㸰㸮㸯㸱ᖺ㸱᭶㸰㸳᪥ࠉ᭶᭙᪥ࠉ༗ᚋ㸵㸱㸯ศ Примечание: В соответствии со статьей 5 Закона Российской Федерации “О защите прав потребителя” и Указанием Правительства Российской Федерации № 720 от 16 июня 1997 года корпорация Pioneer Europe NV устанавливает условие на следующую продолжительность срока службы официально поставляемых на Российский рынок товаров. Аудио и видеооборудование: 7 лет Переносное аудиооборудование: 6 лет Другое оборудование (наушники, микрофон и т.д.