
Installation Manual


8
En
Overview of the remote control
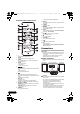
1 Í
• Switch between standby and on.
2SLEEP
• Set the sleep timer in the working mode.
3TIMER
• Use for setting the clock, as well as for setting and
checking the timers.
4MODE
• To select Play Mode.
• Tuning Mode.
• To turn on or off BT menu.
5 :/9
• Skip to the track.
• Press and hold to play forward/reverse quickly within a
track.
• Tune to the station.
• Select a preset radio station.
6 /
• Use to select/switch system settings and modes.
• Use to select a folder (album) on an MP3 disc or USB
device.
• Select a preset radio station.
7DISPLAY
• Display the clock.
• Display the current status or media information.
• Display the available ID3 information of MP3 tracks.
8 REPEAT, ST/MONO
• REPEAT:Use to select the repeat mode of each input
source. (page 10)
• ST/MONO:Use to select FM stereo or monaural
reception. (page 13)
9MEMORY
• Use to program the tracks.
• To preset radio stations in FM function.
10 CLEAR
• Delete the last track or file of the program in Program
Play mode.
11 P.BASS
• Boost bass sound.
12 DIMMER
• Press to dim or brighten the display. The brightness can
be controlled in 3 steps.
13 INPUT
• Use to select the input source (CD, USB ,BT AUDIO (X-
EM26 only), FM, AUDIO IN).
14
• Use to play, pause, or resume playback.
• Use to confirm actions.
15 ∫
• Use to stop playback.
16 VOLUME +/-
• Use to set the listening volume.
17
• Use to mute or restore volume.
18 EQ
• Use to select EQ.
[FLAT] l [POP] l [JAZZ] l [ROCK]l [CLASSIC] l
(Back to beginning)
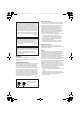
Connections
CAUTION
• Be sure to turn off the power and unplug the power cord
from the power outlet whenever making or changing
connections.
• Connect the power cord after all the connections
between devices have been completed.
Speaker connection
• Both speakers can be used on either the right or the left
side.
CAUTION
• Do not connect any speakers other than those supplied
to this system.
• Do not connect the supplied speakers to any amplifier
other than the one supplied with this system.
Connection to any other amplifier may result in
malfunction or fire.
• Do not attach these speakers to the wall or ceiling. They
may fall off and cause injury.
• Insert speaker cables securely into the terminals and
check that the cable does not come out of easily.
• There is no difference between L and R speakers.
17
16
1
2
4
5
11
10
6
9
5
12
15
14
18
6
7
8
13
3
AUDIO INANTENNA
SPEAKERS
R
FM
L
SPEAKERS
RL
Right speaker
Left speakerThis unit
’s rear panel
SN29402703_X-EM16_26_En(NorthAmerica).book 8 ページ 2016年8月6日 土曜日 午後3時14分