DVD RECEIVER XV-HTD510 SPEAKER SYSTEM S-HTD510 Operating Instructions
WARNING: TO PREVENT FIRE OR SHOCK HAZARD, DO NOT EXPOSE THIS APPLIANCE TO RAIN OR MOISTURE. IMPORTANT CAUTION RISK OF ELECTRIC SHOCK DO NOT OPEN The lightning flash with arrowhead symbol, within an equilateral triangle, is intended to alert the user to the presence of uninsulated "dangerous voltage" within the product's enclosure that may be of sufficient magnitude to constitute a risk of electric shock to persons. CAUTION: TO PREVENT THE RISK OF ELECTRIC SHOCK, DO NOT REMOVE COVER (OR BACK).
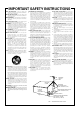
IMPORTANT SAFETY INSTRUCTIONS READ INSTRUCTIONS — All the safety and operating instructions should be read before the product is operated. RETAIN INSTRUCTIONS — The safety and operating instructions should be retained for future reference. HEED WARNINGS — All warnings on the product and in the operating instructions should be adhered to. FOLLOW INSTRUCTIONS — All operating and use instructions should be followed. CLEANING — Unplug this product from the wall outlet before cleaning.
Energy-saving design This system is designed to use 1W of electricity when power is switched to Standby. U We Want You Listening For A Lifetime A We Want You LISTENING For A Lifetime Selecting fine audio equipment such as the unit you’ve just purchased is only the start of your musical enjoyment. Now it’s time to consider how you can maximize the fun and excitement your equipment offers.
Contents 6 Using Surround Sound 1 Before You Start Features What’s in the box Using this manual Putting the batteries in the remote control Using the remote control Hints on installation Avoiding problems with condensation Moving the system Discs compatible with this system DVD Video regions 6 6 6 7 7 7 8 8 8 8 2 Connecting Up Connecting the speakers Placing the speakers Wall mounting the rear speaker system Connecting to your TV Connecting the supplied antennas AM loop antenna FM wire antenna Connecting
1 Before You Start Features • • Superlative audio performance with Dolby Digital* and DTS** software The XV–HTD510 delivers breathtaking sound quality with Dolby Digital and DTS discs. Graphical Setup Navigator Setting up your home theater is easy using the graphical Setup Navigator. Answer the questions that appear on-screen and the Setup Navigator makes the necessary video and language settings for you.
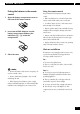
Before You Start Putting the batteries in the remote control 1 Open the battery compartment cover on the back of the remote control. 1 Using the remote control Keep in mind the following when using the remote control: • Make sure that there are no obstacles between the remote control and the remote sensor on the unit. • Use within 7 meters (21 feet) of the remote sensor and at an angle of less than 30º.
1 Before You Start ✗ Use near a television or monitor as you may experience interference—especially if the television uses an indoor antenna. ✗ Use in a kitchen or other room where the system may be exposed to smoke or steam. Audio CD compatibility: ✗ Use on a thick rug or carpet, or cover with cloth— this may prevent proper cooling of the unit. • Linear PCM digital audio ✗ Place on an unstable surface, or one that is not large enough to support all four of the unit’s feet.
Connecting Up 2 Before making or changing any rear panel connections, make sure that all the components are switched off and unplugged from the power supply.
2 Connecting Up Do not connect any of the supplied speakers to any other amplifier. This may result in malfunction or fire. This DVD receiver has been designed for best performance when connected to the supplied speakers. We do not, therefore, recommend that you connect and use other speakers with this system. Placing the speakers Where you put your speakers in the room has a big effect on the quality of the sound. The following guidelines should help you to get the best sound from your system.
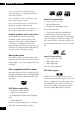
Connecting Up 2 Connecting to your TV REAR FRONT L COAX L DIGITAL IN R R R SUBWOOFER TV/ VCR CENTER AC INLET 240V DIGITAL IN VIDEO OUT 1 H VOLTAGE SELECTOR IN SPEAKERS R TV/ VCR VIDEO OUT 1 L H IN IN IN AUX S-VIDEO OUT S-VIDEO OUT COAX OUT AM LOOP ANTENNA 220230V 110127V Supplied video cord FM UNBAL 75Ω H AUX OUT H VIDEO IN S-VIDEO IN S-Video cord (not supplied) 1 Use the supplied yellow video cord to connect the VIDEO OUT jack to a video input on your TV.
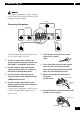
2 Connecting Up Connecting the supplied antennas FM wire antenna It’s also possible to fix the AM antenna to a wall. When installing on a wall or other surface, perform steps 4 and 5 after first securing the stand with screws. Before fixing, make sure that the reception is satisfactory.
Connecting Up 2 Connecting other components FRONT REAR L L R R SUBWOOFER OAX SPEAKERS R L TV/ VCR R AC INLET VOLTAGE SELECTOR 240V DIGITAL IN VIDEO OUT 1 L IN CENTER 1 COAX R TV/ VCR IN IN IN L H AM LOOP ANTENNA 220230V 110127V H AUX AUX S-VIDEO OUT OUT OUT FM UNBAL 75Ω H H Tape deck, VCR, MD recorder, etc. OUT (PLAY) Analog IN (REC) 1 Use a stereo audio cable to connect the AUX IN jacks to the analog outputs of an external component.
3 Controls & Displays Remote control DVD /CD TUNER /BAND TV /AUX STANDBY /ON TEST TONE SURROUND CH LEVEL MODE MUTE — VOLUME DVD SETUP 2 3 5 6 7 4 + 8 10 9 SYSTEM SETUP 5 2 1 DSP 12 11 3 ENTER 14 13 15 16 TOP MENU ∞ MENU SOUND 17 18 19 20 21 22 RETURN 7 — PREV 6 e STEP/SLOW E NEXT + 4 1 ¡ ¢ CONDITION LAST MEMO SEARCH DVD DISP 1 2 3 CLEAR ANGLE MONO SLEEP FL DIMMER 4 5 6 >10 PROGRAM RANDOM REPEAT REP A—B 7 8 9 10/0 CD MODE AUDIO SUBTITL
Controls & Displays 3 Front panel 1 2 3 4 5 DISC SKIP EXCHANGE 1 2 3 4 6 0 OPEN/CLOSE 5 VIDEO VOLUME DVD RECEIVER XV-HTD510 STANDBY/ON STANDBY CD MODE ADVANCED THEATER DISC DSP 1 2 3 4 5 1 DVD/CD TUNER/BAND TV/AUX 7 CD MODE 3/8 4.1 ¡.
4 Setting Up Switching on and setting the clock Setting up for surround sound This system has a built-in clock, which needs to be set to be able to use the timer features. You can use this system right out of the box for surround sound with just the default settings. However, for really great surround sound, we recommend that you spend a few minutes making some settings that match this system to your listening room.
Setting Up 4 Press 3 to move on to the CENTER speaker setting. 5 Use the 5 and ∞ buttons to set the distance from your main listening position to the center speaker. The default setting is 3m. You can adjust the range from 0.3m to 9.0m in steps of 0.3m. 6 Press 3 to move on to the SURROUND speakers setting. 7 Use the 5 and ∞ buttons to set the distance from your main listening position to the surround speakers. Ideally, your listening position should be equidistant from the surround speakers.
4 Setting Up Using the Setup Navigator Before playing any discs, we strongly recommend using the Setup Navigator. This makes all the basic DVD system settings for you. 3 Select START. • If you decide not to use the Setup Navigator, select Auto Start Off here instead. 4 Choose an OSD menu language. Video Language General Setup Navigator Language English OSD Language français Español Select the On Screen Language DVD SETUP 2 Move ENTER Select SETUP Exit 5 ENTER 3 ∞ 5 Select the type of TV you have.
Getting Started 5 Playing DVDs, CDs and Video CDs The basic controls for playing discs are covered here. Further functions are detailed in the chapter 7. DVD /CD STANDBY /ON DSP — VOLUME + 5 2 3 ENTER • Do not place discs in the two partially accessible disc spaces, as it’s easy to misalign them. Use only the front-most space.
5 Getting Started Numbers >10 If the disc is stopped, playback starts from the selected track or title number. If the disc is playing, playback jumps to the start of the selected track or chapter number. Selects tracks/titles/chapters 11 and over. (For example, for 24, press >10 , 2, 4.) DISC 1–5 Starts playing the selected disc. (On the front panel use: 1–5) Navigating DVD disc menus Some DVD discs contain menus.
Getting Started 5 Exchanging discs Listening to the radio You can change any of the discs not in the play position using the EXCHANGE button. Because the disc in the play position is unaffected, you can use this button to change discs even during playback. The following steps show you how to tune in to FM and AM radio broadcasts using the automatic (search) and manual (step) tuning functions.
5 Getting Started • Manual tuning To change the frequency one step at a time, press the 1 / ¡ buttons. When you locate a station signal, the (tuned) indicator lights in the display. • High-speed tuning Press and hold the 1 or ¡ button for high speed tuning, releasing the button once you reach the frequency you want. When you stop on a station signal, the (tuned) indicator lights in the display.
Using Surround Sound 6 Adjusting the bass and treble Using sound modes The simplest way to shape the sound is by adjusting the amount of bass and treble. The sound modes allow you to add various surround and room-type sound effects to your DVDs, CDs and other sources. These effects process the sound in various ways to simulate different spaces such as a theater, or concert hall.
6 Using Surround Sound • Surround Off (SUR.OFF) – All sources are played through only the front left and right speakers, and the subwoofer. No effects are added. • The surround modes cannot be used in combination with DSP effects or with 96kHz digital sources. • You cannot change the surround mode when Record mode is active (see Direct recording on the following page). 1 Press SURROUND MODE.
Using Surround Sound Listening at low volume When the volume is low, surround effects tend to become less than satisfactory. Turn the Midnight listening mode on to enjoy quality surround sound even at low volumes. 1 Press SOUND. 2 Use the 2 or 3 buttons to select M.NIGHT. 3 Use the 5 and ∞ buttons to turn ON or OFF. 4 Press ENTER. 6 Direct recording This feature let’s you record directly to an external recorder, without worrying about the various sound settings.
7 Playing Discs Introduction • • Most of the functions covered in this chapter apply to DVD discs, Video CDs and CDs, although the exact operation of some varies slightly with the kind of disc loaded. or icon • When playing DVD discs, if the appears on-screen when you try and use a particular function, either the player or the disc doesn’t allow the use of that function. • When playing Video CDs, some of the functions are not available in PBC mode.
Playing Discs 7 Making a program list Making a program list means telling the player which tracks, and in what order, you want played. You can program a sequence of up to 24 tracks/chapters to play from any of the discs loaded in the disc changer. The discs can be any combination of DVD, Video CD and audio CD. Chapters/tracks can appear more than once in the playlist, or can be left out entirely. 1 Press PROGRAM (SHIFT & 7).
7 Playing Discs • The playlist remains active even if you open the disc tray and change discs. If a step in the program list cannot be played (because the track number is too high, for example), that step is automatically skipped. • To delete the playlist, stop playback, then press CLEAR. • You may see an asterisk (*) appear on-screen when program play of some DVD discs starts.
Playing Discs • • • • Track Repeat 1 Disc Repeat All Discs Repeat Repeat off 7 2 Press 6. The player automatically starts playing the first CD loaded. Once all the CDs loaded have played, the player automatically stops. • The Repeat All function repeats all tracks on all audio and Video CDs loaded. If, during repeat play, the unit encounters a DVD disc, it will start playing, but the repeat mode will be canceled.
7 Playing Discs Memorizing disc settings If you have a particular set of preferences for a disc, you can memorize them using the Condition Memory function. Once memorized, your settings will be recalled automatically whenever you load that disc. The player can store settings for 15 discs; after this, memorizing another replaces the oldest one stored. • When a disc is stopped, all title/chapter, or track information for the disc loaded appears on-screen.
Using the Timer Using the wake up timer You can use the timer as an alarm clock to wake up to the sound of a disc loaded or the radio. If you have an external component operated by a separate timer, you can also set it as the source function. Once the timer is active, it will switch the system on everyday at the set time. Unlike an ordinary alarm clock, you need to set a system switch off time, as well as a switch on time. 1 Select the source that you’d like to wake up to.
8 Using the Timer Checking the timer settings Using the sleep timer If you’ve set the wake-up timer, you can check the settings anytime. The sleep timer switches the system into standby after a specified amount of time so that you can fall asleep without worrying about the stereo being left on all night. If you've also set the wake up timer this is important since the wake up timer will only work if the system is in standby. 1 Press SYSTEM SETUP. 2 Press 2 or 3 until you see TIMER in the display.
Advanced Sound Setup 9 Advanced sound settings Dynamic Range Control This chapter covers advanced settings to further optimize the sound of your system. The dynamic range of a source is the difference between the quietest and the loudest sounds. The dynamic range of Dolby Digital soundtracks can be very great. This makes them exciting, but it also means that when you turn the volume down you can easily lose quiet dialog. Switch on Dynamic Range Control to even out the soundtrack volume.
9 Advanced Sound Setup Dual-mono setting Adjusting channel volume levels The dual-mono setting applies only to Dolby Digital discs that feature dual-mono material—see the disc box for details. Depending on your room and where you’re sitting, you may want to adjust the relative volumes of one or more speakers for a more balanced sound. You can do this in any mode, including the surround, DSP, and stereo modes.
DVD Setup Menu 10 Using the DVD Setup menu Video settings TV Screen • Set in Setup Navigator (Default: 16:9 (Wide)) DVD SETUP 2 Video Language General 5 ENTER 3 TV Screen Picture Quality ∞ 4:3(Letter Box) 4:3(Pan&Scan) 16:9(Wide) RETURN Select your display preference Move SETUP Exit If you have a widescreen TV, select the 16:9 (Wide) setting—widescreen DVD software is then shown using the full screen area.
10 DVD Setup Menu S-Video Out • Default setting: S2 Video Language General TV Screen – Picture Quality – S-Video Out Still Picture – On Screen Display – Angle Indicator – 16:9(Wide) Standard S1 S2 Position Normal On Move SETUP When watching DVD discs recorded in 4:3 format (‘regular’ TV size) on a widescreen TV, it can be difficult to see the operation displays (Play, Stop, Resume, etc.) at the top of the screen. If you find them hard to read, select Position – Wide.
DVD Setup Menu 10 Audio Language disc, the system automatically plays the disc with those subtitles (although this depends on the Auto Language setting—see Auto Language on page 37).
10 DVD Setup Menu You can still switch audio and subtitle languages on playback using the AUDIO and SUBTITLE buttons. DVD Language • Default Setting: w/Subtitle Language Set to On, the player displays subtitles according to the Subtitle Language and Auto Language settings above. Set to Off to switch subtitles off altogether (although see Subtitle Off on this page for special cases). Set to Assist Subtitle to have the player display the extra assistive subtitles recorded on to some DVD discs.
DVD Setup Menu 10 Parental Lock Changing the parental lock level • Default level: 8 1 Select Level Change. • Default password: none Video Language General Setup Menu Mode — Basic Setup Navigator Parental Lock Level Change Password Change Video Language General Parental Lock: Register Code Number Setup viewing restrictions Move 2 Use number buttons to register a new password or confirm your existing password, then press ENTER.
10 DVD Setup Menu 3 Input a new password, then press ENTER. Video Language General Select Other if you want to make your own background color. Follow the on-screen display to create a color from the red, green and blue bars. Parental Lock: Password Change Video Language General Background color Enter 4–Digit Code Move +/– RETURN Return SETUP Exit If you forget your password, resetting the player will clear the password. See page 45 for more on this.
Additional Information 11 Switching the AM frequency interval Taking care of your system As its default setting, the tuner jumps in steps of 10kHz when tuning in AM stations. If you find that this is unsuitable in your area (if you can’t tune into stations successfully), you can change the tuning interval to 9kHz for AM. Here’s how to switch the setting. To clean this unit, wipe with a soft, dry cloth.
11 Additional Information Storing discs Although CDs and DVDs are more durable than vinyl records, you should still take care to handle and store discs correctly. When you’re not using a disc, return it to its case and store upright. Avoid leaving discs in excessively cold, humid, or hot environments (including under direct sunlight). Don’t glue paper or put stickers on discs, or write on them using a pencil, ball-point pen or other sharptipped writing instrument.
Additional Information 11 Language code list Language/Langue Japanese/japonais ( ja ) Code 1001 Language/Langue Hausa ( ha ) Code 0801 Language/Langue Quechua ( qu ) Code 1721 English/anglais ( en ) 0514 Hindi ( hi ) 0809 Rhaeto-Romance ( rm ) 1813 French ( fr) 0618 Croatian (hr ) 0818 Kirundi ( rn ) 1814 German ( de ) 0405 Hungarian ( hu ) 0821 Romanian ( ro ) 1815 Italian ( it ) 0920 Armenian ( hy ) 0825 Kinyarwanda ( rw ) 1823 Spanish ( es ) 0519 Interlingua ( ia ) 0901
11 Additional Information Troubleshooting Incorrect operation is often mistaken for trouble or malfunction. If you think that there is something wrong with this component, check the points below. Sometimes the trouble may lie in another component. Inspect the other components and electrical appliances being used. If the trouble cannot be rectified after checking the items below, ask your nearest Pioneer authorized service center or your dealer to carry out repair work.
Additional Information Problem Noticeable difference in DVD and CD volume. 11 Remedy • DVDs and CDs use different recording methods. This is not a malfunction. Tuner Noisy radio reception • Check that the frequency is correct. • Check that the antennas are connected properly. For FM, make sure that the antenna is fully extended and positioned to give the best reception. For AM, make sure that the loop antenna is pointing in the best direction.
11 Additional Information Screen sizes and disc formats The table below shows the effect of various TV Screen settings on the different kinds of disc available. When viewing a widescreen TV or monitor When viewing a standard size TV or monitor Setting and appearance Setting and appearance Screen format of disc 16:9 (Wide) Screen format of disc Standard (TV programs, etc) The program is presented correctly, regardless of the setting. Widescreen (movies, etc.
Additional Information Specifications Amplifier Section Continuous power output (RMS) Front ............................................... 100 W, per channel (1 kHz, 10 % T.H.D., 8 Ω) Rear .................................................. 33 W, per channel (1 kHz, 10 % T.H.D., 8 Ω) Center ............................................... 34 W, per channel (1 kHz, 10 % T.H.D., 8 Ω) Subwoofer ................. 100W (100Hz 10% T.H.D., 8Ω) DVD Player (Audio)Section S/N ratio ...................................
Should this product require service in the U.S.A. and you wish to locate the nearest Pioneer Authorized Independent Service Company, or if you wish to purchase replacement parts, operating instructions, service manuals, or accessories, please call the number shown below. 800–421–1404 Please do not ship your product to Pioneer without first calling the Customer Service Department at the above listed number for assistance. PIONEER ELECTRONICS SERVICE, INC. CUSTOMER SERVICE DEPARTMENT P.O.