
Assembly Instructions


ENGLISH
8
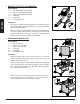
Remove the pre-installed screws from the lid
handle. From inside the barrel lid, insert
one screw to protrude to the outside. Add a
bezel on the screw, then hand-tighten the
screw (from the inside) into the lid
handle.Repeat same installation for other
end of lid handle.
4.
Parts Required:
1 x Lid Stopper (#5)
Installation:
• Secure the Lid Stopper onto the top of the Main Barrel using the
pre-installed screw on top of the Main Barrel.
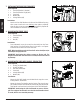
5.
Parts Required:
2 x Lid Handle Bezel (#14)
1 x Lid Handle (#15)
Installation:
• Remove the pre-installed screws from the Lid Handle. From inside the
barrel lid, insert one screw to protrude to the outside. Add a Lid Handle
Bezel on the screw, then hand-tighten the screw (from the inside) into the
Lid Handle. Repeat the same installation for the other end of Lid Handle.
6. ,
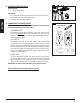
Parts Required:
1 x Spice Box (#7)
1 x Bottle Opener (#6)
2 x Screw (#D)
Installation:
• Align and place the Spice Box onto the bottom two screws on the side of
the Hopper, below the hopper handle. Push down into place, then install
two top screws to secure the Spice Box onto the Hopper.
• Remove the two pre-mounted screws for the Bottle Opener on the side
of the Hopper, above the hopper handle. Install the Bottle Opener in the
same location using the two screws previously removed.
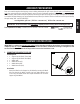
Remove the pre-installed screws from the lid
handle. From inside the barrel lid, insert
one screw to protrude to the outside. Add a
bezel on the screw, then hand-tighten the
screw (from the inside) into the lid
handle.Repeat same installation for other
end of lid handle.
Secure the lid stopper onto the
top of the main barrel using the
pre-installed screw on the top
of the main barrel.
5
4
15
14
14
5
D*2
Hang the spice box on the step screw
that has been preinstalled on the
lower left of the hopper, and then
lock the spice box on the hopper
with 2 screws.
6
6
7