Using USPS® Confirmation Services with Digital Mailing Systems DM100i, DM125, DM225, DM200L, DM300c, DM400c, DM450c, DM475, DP100i, DP200L, DP300C, DP400C, DP450C, DP475 Reference Manual
SV61156 Rev. F June 2011 ©2004, 2010, 2011 Pitney Bowes Inc. All rights reserved. This book may not be reproduced in whole or in part in any fashion or stored in a retrieval system of any type or transmitted by any means, electronically or mechanically, without the express, written permission of Pitney Bowes.
USING USPS CONFIRMATION SERVICES ® 1. INTRODUCTION .................................................. 2 2. ABOUT USPS CONFIRMATION SERVICES .............. 3 3. USING CONFIRMATION SERVICES—AN OVERVIEW ... 8 4. STEP-BY-STEP INSTRUCTIONS .......................... 11 5. ABOUT LABELS ............................................... 22 6. TRACKING MAIL ON THE INTERNET ..................... 24 7. FREQUENTLY ASKED QUESTIONS .......................
Digital Mailing Systems 1. Introduction About this Book This book explains how to use your mailing system to take full advantage of USPS® confirmation services. It explains what these services are and how to use them. Equipment Covered This book provides instructions for using confirmation services with these mailing systems: • • DM100i, DM125, DM200L, DM225, DM300c, DM400c, DM450c, and DM475. DP100i, DP200L, DP300C, DP400C, DP450C, DP475.
Using USPS Confirmation Services ® 2. About USPS Confirmation Services Delivery Confirmation— Green Label Delivery Confirmation allows you to verify the date and time of delivery of your mail pieces or, if the delivery was unsuccessful, the date and time of the delivery attempt. The service is currently available for First Class Mail parcels, Priority Mail parcels, Standard Mail parcels and Package Services parcels, which include Parcel Post, Library Mail, Media Mail, and Bound Printed Matter.
Digital Mailing Systems 2. About USPS Confirmation Services Signature Confirmation— Pink Label (cont.) You may combine Signature Confirmation with COD Insured mail, Registered Mail, and special handling. It may also be combined with restricted delivery if purchased with insurance for more than $220, COD, or Registered Mail service. This is an additional cost for Signature Confirmation service. As an add-on service to Delivery Confirmation, there is an additional cost.
Using USPS Confirmation Services ® 2. About USPS Confirmation Services Certified Mail— Dark Hunter Green Label (cont.) If you decide you want a return receipt after you’ve mailed your Certified Mail piece, go to your local Post Office and ask for this service. The Post Office will give you a scanned image of the recipient’s signature, along with the date of delivery. Be sure to provide the 22-digit barcode used on the mail piece. There is a fee for this service.
Digital Mailing Systems 2. About USPS Confirmation Services USPS Forms Obtaining a Mailer ID (MID) from USPS for Electronic Return Receipt (ERR) Meters that use an ERR (Electronic Return Receipt) feature must be programed with a MID number in order for the mailer to receive e-receipt files from the USPS. Before October 2010, the MID was requested from the USPS via the 5053/5051 postal forms that were filled out and faxed to the USPS.
Using USPS Confirmation Services ® 2. About USPS Confirmation Services USPS Forms PS Form 5051, Confirmation Services — Electronic Option Application This is an administrative application used to establish mailers in the confirmation services database. This form is required of any customer who wishes to use Delivery Confirmation, Signature Confirmation or Certified Mail.
Digital Mailing Systems 3. Using Confirmation Services—an Overview How USPS Confirmation Services Work HINT: When you use Delivery or Signature confirmation services with your mailing system and send barcodes electronically, you get a discount on the cost of the service. Remember: The discount applies only if you use the barcode labels provided by Pitney Bowes and send the records electronically. The diagrams on the next two pages show the confirmation services process.
Using USPS Confirmation Services ® 3. Using Confirmation Services—an Overview Before You Start Make sure you have an adequate supply of pre-printed labels provided by your Pitney Bowes or SECAP dealer (see Section 5 for ordering instructions). Please do not use retail labels supplied by your Post Office – they won’t work with your system.
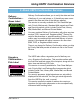
1 2 3 4 5 6 7 8 9 Weigh the Envelope or Package Weigh the mail piece on the scale. Select Class Select the class of mail, for example, Priority Mail. Select Service Select the service you want, for example, E-Del Con. A check mark appears. Press Yes. Enter Destination ZIP Code Type in the 5-digit destination ZIP Code. Press Yes. SERVICES √E-Del Con ◄Insurance ◄Done $3.
Using USPS Confirmation Services ® 4. Step-By-Step Instructions Using Confirmation Services – All Models The instructions below explain how to include confirmation services for your mail piece. 1. Place the piece of mail or package on the scale. 2. Select the class (for example, Priority Mail) using the corresponding selection key on the control panel. 3. At the Services screen, press down arrow key until you see the confirmation service you want (for example, E-Del Con).
Digital Mailing Systems 4. Step-By-Step Instructions Using Confirmation Services – All Models (cont.) 7. If this is the first time you are entering a confirmation service or you have just started a new package of labels, enter the 22-digit barcode number. NOTE: If you have the optional hand-held scanner connected to your mailing machine, you can use it to scan the barcode pattern instead of manually entering the barcode numbers.
Using USPS Confirmation Services ® 4. Step-By-Step Instructions Using Confirmation Services – All Models (cont.) 9. If prompted, apply the barcode label to the piece of mail (see page 22 for information on label placement). NOTE: Make sure to use labels in the order they come off the roll. This ensures that the barcode label matches the barcode in the system. 10. Select Continue. Insert the tape sheet or place the piece of mail on the feeder to print postage.
Digital Mailing Systems 4. Step-By-Step Instructions Using Confirmation Services – All Models (cont.) HINT: If possible, leave your mailing system in a “ready to connect” state for easy uploads to the Data Center. IMPORTANT NOTE FOR DM100i, DM200L, DM125, DM225, DP100i, and DP200L Users: Your mailing systems DO NOT support the ERR feature or external printers. HINT: Many find it handy to print a receipt to record the recipient with the tracking number.
Using USPS Confirmation Services ® 4. Step-By-Step Instructions DM100i, DM125, DM200L, DM225, and DP100i, DP200L Systems Only Managing Confirmation Services Records The instructions below explain how to manage confirmation services records on your system. 1. Press Options. 2. Press Page Down twice and select Advanced Features. 3. Select Manage Conf Records to display the Manage Records screen. Press Page Down for more options.
Digital Mailing Systems 4. Step-By-Step Instructions DM100i, DM125, DM200L, DM225, and DP100i, DP200L Systems Only (cont.) Manage Conf Records Screen Description of Options Option Description Add Record Select to add a new record (for a mail piece that has had postage applied, but you want to add a confirmation service to it). The system prompts you to select a class and fee, and enter the ZIP Code and barcode number. It will then print postage equal to the base class plus the confirmation service fee.
Using USPS Confirmation Services ® 4. Step-By-Step Instructions DM100i, DM125, DM200L, DM225, and DP100i, DP200L Systems Only (cont.) Sending Confirmation Services Records at a Later Time Your system stores barcode records in memory. If your mailing system’s connection to the PB Data Center was not available when you created your confirmation records, you can upload (send) them at a later time. Your system will also prompt you when you’ve processed the maximum number of pieces the memory can store—200.
Digital Mailing Systems 4. Step-By-Step Instructions DM100i, DM125, DM200L, DM225, and DP100i, DP200L Systems Only (cont.) 4. Select Upload Records. The system dials into the Data Center (this may take a few moments). Various screens are displayed, letting you know the status of the process. 5. After uploading the records, you will be prompted to print receipts. Insert envelope(s) or tape sheet(s) to print the receipts. You return to the Home screen when finished.
Using USPS Confirmation Services ® 4. Step-By-Step Instructions DM300c, DM400c, DM450c, DM475 and DP300C, DP400C, DP450C, DP475 Systems Only Setting Up Confirmation Services 1. Press Menu. 2. Select Setup. 3. If necessary, press the green down arrow key to scroll through the menu screens. 4. Select Confirmation Service. The screen below is displayed. Display Following During Confirmation Records ◄ Apply Labels ◄ Upload Records ◄ Print Receipt : ON : ON : ON Done [Enter] 5.
Digital Mailing Systems 4. Step-By-Step Instructions DM300c, DM400c, DM450c, DM475 and DP300C, DP400C, DP450C, DP475 Systems Only (cont.) Managing Confirmation Records 1. Press Menu. 2. If necessary, press the green down arrow key to scroll through the menu screens. 3. Select Advanced Features. 4. Select Confirmation Records. The Manage Confirmation Records screen is displayed. You have a choice to upload, add, view or edit records.
Using USPS Confirmation Services ® 4. Step-By-Step Instructions DM300c, DM400c, DM450c, DM475 and DP300C, DP400C, DP450C, DP475 Systems Only (cont.) SV61156 Rev. F C. If you want to delete a record, select Delete Record. A list of records by barcode numbers is displayed. • Select the record you want to delete. You are prompted to delete the record. • Select Yes, delete. • If you want to delete additional records, select Yes. If you do not want to delete additional records, select No. D.
Digital Mailing Systems 5. About Labels Applying Labels to Your Mail Pieces Whenever you apply a label to a package, place it on the address side of the package. Place preprinted barcode labels either above the delivery address and to the right of the return address or to the left of the delivery address. DO NOT cover the label with tape or plastic wrap. Barcode scanners cannot read plastic wrap labels that are bent or wrapped around the package. See the illustration below.
Using USPS Confirmation Services ® 5. About Labels Ordering Additional Preprinted Labels Order your preprinted barcode labels directly from your system supplier.
Digital Mailing Systems 6. Tracking Mail on the Internet Using the Internet Use the Internet to make inquiries about individual shipments. You’ll find tracking information at both the Pitney Bowes and USPS web sites as explained below. Information is posted the evening of the date of delivery or attempted delivery. It remains available for thirteen months at the Pitney Bowes web site, 180 days at the USPS site. Use the Pitney Bowes web site to track your packages.
Using USPS Confirmation Services ® 6. Tracking Mail on the Internet The Pitney Bowes Web Site 1. Go to www.pb.com 2. If you a registered user, enter your user name and password and click “login”. Otherwise, click on “My Account” to become a Pitney Bowes registered user. Create a username and password. 3. After logging on to My Account, click on “Delivery Tracking System”. • If the Delivery Tracking System option is not displayed, click on “My Account”.
Digital Mailing Systems 7. Frequently Asked Questions About Confirmation Services 1. Do USPS confirmation services provide the opportunity for enroute tracking and tracing? No. The Postal Service may perform enroute scans but they are not a part of the Confirmation service. Tracking and tracing, which provide customers with enroute information scanned at multiple points as well as delivery information, is regularly provided only with Express Mail. 2.
Using USPS Confirmation Services ® 7. Frequently Asked Questions About Confirmation Services (cont.) 4. If I combine confirmation services with another special service, which article number do I use to get information on my mailed item—the insured mail number or the confirmation number? Both numbers are valid for separate purposes. Use the USPS confirmation services number to get delivery status information through the USPS web page or our web page. Use the insurance number for claims. 5.
Digital Mailing Systems 7. Frequently Asked Questions Electronic Filing of Certified Mail 1. What is the benefit of electronically filing Certified Mail? Similar to Delivery and Signature Confirmation, our system transfers tracking information about Certified Mail to the Post Office. This information is matched with actual delivery information, and is sent back for posting on our web site at: www.pb.com Using the Delivery Tracking System on our web site, you have complete access to delivery information.
Using USPS Confirmation Services ® 7. Frequently Asked Questions Electronic Filing of Certified Mail (cont.) 5. Why would I use Return Receipt After Mailing? After mailing, if you decide that you want a document for proof of mailing, you can get a Return Receipt. The cost for a Return Receipt after mailing is higher than one obtained at the time of mailing. 6. Can I use the Certified Mail feature of the mailing system if I need “Proof of Mailing”? No.
Digital Mailing Systems 7. Frequently Asked Questions Using the Internet for Tracking 1. What if there is no delivery information available when I visit the web site? If there are no delivery or event scans in the system (attempted, forwarded, etc.), you will be told that there is no record of that mail item. If you mailed the item recently, it may not yet have a delivery scan. Try your inquiry again later.
1 Elmcroft Road Stamford, Connecticut 06926-0700 www.pitneybowes.com For Service or Supplies SV61156 Rev.