This guide describes total operation features and specifications.
Options and functions vary depending on the model. ComColor 9150/9150R ComColor 9110/9110R ComColor 7150/7150R ComColor 7110/7110R ComColor 3150/3150R ComColor 3110/3110R Maximum Print Area 314 mm × 548 mm (12 3/8” × 21 9/16”) 314 mm × 548 mm (12 3/8” × 21 9/16”) 314 mm × 548 mm (12 3/8” × 21 9/16”) 314 mm × 548 mm (12 3/8” × 21 9/16”) 210 mm × 544 mm (8 1/4” × 21 7/16”) 210 mm × 544 mm (8 1/4” × 21 7/16”) Printable Area (Margin) Standard: 3 mm (1/8”) Maximum: 1 mm (0.
About This Guide Preface Thank you for using the ComColor Series product. This ComColor Series is an inkjet printer that is network-compatible and performs high-speed, color printing. You can use the various functions of this printer to print data and monitor printer operations from a computer. And with the optional scanner, you can copy originals, save and use scanned data, and use various functions. The following five guides are supplied with this machine.
Symbols, Notations, and Screenshots Used in This Guide ■ Symbols Used in This Guide Indicates cautions that should be noted for safe use of this machine. Indicates important items that should be noted or are prohibited. Indicates useful information or additional information. ■ Names of Keys and Buttons The names of hard keys on the operation panel and buttons on the touch panel screen or computer window are indicated with square brackets [ ].
Contents About This Guide ..................................................................................... 1 Symbols, Notations, and Screenshots Used in This Guide .............................................. 2 Part Names and Functions ...................................................................... 7 Main Unit and Optional Scanner ........................................................................ 7 Face Down Offset Stapler (optional) .....................................................
Environment Settings .........................................................................1-33 [Environment] Tab ......................................................................................... 1-33 Chapter 2 Copy ..............................................................................................................2-1 Overview of Copy Operations ..............................................................2-2 Procedure ..................................................................
Output tray .................................................................................................... 2-48 Paper guide control ....................................................................................... 2-49 Jump wing control ......................................................................................... 2-50 Head cleaning ............................................................................................... 2-50 Front door release ..................................
Printer Function Settings ...................................................................4-15 Online ............................................................................................................ 4-15 Feed tray ....................................................................................................... 4-15 Head cleaning ............................................................................................... 4-16 Paper guide control .......................................
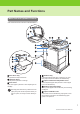
Part Names and Functions Main Unit and Optional Scanner a Face Down Tray d Standard Tray The printouts are output face-down. b Operation Panel Load special paper (thick paper, envelopes, etc.) here. Plain paper can also be loaded in the standard tray. Use to perform operations or settings. e Paper Feed Pressure Adjustment Lever c Front Cover Use to adjust the paper feed pressure to suit the paper type in the standard tray.
h Main Power Switch o Scanner Lamp (green/red) Use to turn the main power ON and OFF. Usually the power is left ON. Lights up in green when the scanner is ready to be used. Flashes in green when starting up or while reading, and flashes in red when an error occurs. When the high capacity feeder is connected, use its main power switch. For details, see "High Capacity Feeder (optional)" (p. 10). p Platen Glass Set the original face down and aligned with the position of the arrow in the top left.
Part Names and Functions Face Down Offset Stapler (optional) If the optional face down offset stapler is connected, you can staple printed sheets, or perform the offset output by print unit. a Stacking tray c Jam Release Cover Printouts are output face down. If paper jamming occurs during paper transfer from the printer to the face down offset stapler, open this cover and remove the jammed sheet. The output tray slides. For normal output, align X and W indicated by b to use the tray.
High Capacity Feeder (optional) If the optional high capacity feeder is connected, you can load approximately 4,000 sheets (plain paper, recycled paper). a Paper Feed Pressure Adjustment Lever g Envelope Guide Use to set the paper feed pressure to either "Standard" or "Card" to suit the paper type in the high capacity feeder. Use to print an envelope. Adjust the inclination angle to suit the type of envelope you are using.
Part Names and Functions Stacking Tray (optional) The auto-control stacking tray and wide stacking tray are available as optional stacking trays. • With the auto-control stacking tray, the paper guides adjust automatically to fit the paper size. • With the wide stacking tray, move the paper guides (sides and end) to match the size of the paper for printing.
High Capacity Stacker (optional) If the optional high capacity stacker is connected, you can stack approximately 4,000 sheets (plain paper, recycled paper). You can retrieve the output printouts with the carriage. a Stacking Tray Descent Button e Carriage Press to remove printouts from the stacking tray. If you press the stacking tray descent button, the stacking tray lowers to the bottom (the position of the carriage).
Part Names and Functions Multifunction Finisher (optional) If you connect the optional multifunction finisher, you can staple or punch the printed paper or create a booklet. a Top Tray e Right Cover The printouts are output here when punching is performed. Open to replace the staple cartridge or if paper is jammed. b Stacking Tray f Left Cover The printouts are output here when the staple or offset output function is used.
Operation Panel Various operations and settings can be performed using the operation panel. You can also identify the machine status or errors such as paper jamming from the lamp colors and whether the lamps light up or flash. a Power Schedule Lamp m Data Receive Lamp Lights up when you set the "Power schedule". Flashes when data is being received. b Main Power Lamp n Numeric Keys Lights up when the main power is "ON". Press to enter numbers.
Part Names and Functions Touch Panel e Mode Buttons Press these buttons to access screens for each mode. Lock icons in the upper left corner of a button indicate that you must log in to access that mode. ● Mode Screen ● The mode buttons are not displayed unless the optional equipment has been connected. ● Buttons for modes that the current user is not authorized to use are grayed out. f [Status] Press this button to check General, System, or User information.
■ Copy Mode Screen (Optional) Control copying on this screen. ■ Scanner Mode Screen (Optional) Control scanning on this screen. ● System Screen Enables you to check the model of the machine, MAC and IP addresses and other information. ● User Screen Enables you to check the logged in user name and group. This screen is displayed only when a user is logged in. ■ Status Screen ● General Screen Enables you to check the status of the consumables, such as paper or ink. ● License Info.
Touch Panel Operations You can operate the machine by using the touch panel and keys on the operation panel. To use a button on the touch panel, touch it with your finger. That action is referred to as "press" in step-by-step instructions in this guide. Using the Touch Panel ■ Buttons To select a button on the touch panel, press the button. ■ Confirming or Canceling Settings When [OK] is displayed on a screen, you must press [OK] to save the settings.
● How to Log In When using an optional IC card reader, you can log in by holding the IC card over the card reader. 1 2 ● Changing Login Passwords 1 Once you are logged in, press [Status] on the mode screen. 2 On the [User] screen, press [Password change]. 3 Enter the new password and press [Next]. 4 On the [Password change (input again)] screen, enter the new password again and press [OK]. Press [Login]. On the [Login] screen, select your name.
Touch Panel Operations Entering Text When entering user names or passwords, enter the required information on the text input screen. 1 Select the type of text to enter. 2 Press each character you want to enter. To move the cursor, press [ ] or [ ]. To erase the character to the left of the cursor, press [Clear]. The maximum number of characters to be entered is displayed above the text input field. 3 Press [OK] when input is complete. To cancel information you have entered, press [Cancel].
List of Settings for Each Mode ● Printer Driver Setting Description See [Basic] tab Color mode Select color or monochrome printing. p. 1-7 Duplex print Specify simplex or duplex printing. p. 1-7 Original size Specify the paper size and orientation of the original. p. 1-8 Specify this when the original has multiple sizes. p. 1-8 Zoom Specify enlargement or reduction of original images before printing, if needed. p. 1-9 Paper size Specify the size of paper for printing. p.
List of Settings for Each Mode Setting Add cover* 1 Description See Specify this to add front and/or back cover. p. 1-21 Booklet binding Specify the type of booklet printing. (When using the optional multifunction finisher) p. 1-21 Binding side Specify the position for stapling and punching. (When using the optional multifunction finisher) p. 1-23 Staple Select the stapling method. (When using the optional multifunction finisher or face down offset stapler) p.
● Copy Mode Setting See Color mode Select color or monochrome printing. p. 2-9 Reproduction size Use this to reduce or enlarge the copied image. p. 2-10 Feed tray Change the feed tray, paper type, and feed control settings according to the paper to be copied. p. 2-10 Original Select the original type to perform the appropriate image processing and print the scanned data. p. 2-13 Scanning level Adjust the scanning density of originals. p.
List of Settings for Each Mode Setting [Functions] *1 *2 *3 Description See Base color level Make the background color (base color) lighter so that the text is easier to read. p. 2-34 Print density Specify the print density. p. 2-35 Program Specify this when the number of required copies varies by group (such as corporate division or classes). You can quickly print exactly the number of copies of the number of sets you need. p.
● Scanner Mode Setting [Basic] [Functions] * Description See File format Specify the file format, compression level and resolution for saving the scanned data. p. 3-9 Reproduction size Enlarge or reduce the scanned data. p. 3-10 Scanning size Specify the scanning size for originals to be scanned. p. 3-10 Color mode Specify the color mode of the data to be scanned. p. 3-10 Scanning level Adjust the scanning density for originals. p.
List of Settings for Each Mode ● Printer Mode Setting [Active] See Confirm details of, print, and delete active jobs. p. 4-6 [Waiting] Confirm details of, print, and delete waiting jobs. p. 4-7 [Finished] Confirm details of, print, and delete finished jobs. p. 4-8 [Folder] Confirm details of, print, and copy folder jobs or print jobs saved in a USB flash drive. p. 4-9 Online Set the machine online or offline. p.
Print Preparations Before printing, load the paper, set the stacking tray (optional) so the machine is ready for use. ● When using the feed tray, you do not need to set the standard tray. ● With the RISO console, you can check the status of the machine on your computer. (p. 5-1 "RISO Console") Turning the Power On/Off 3 The machine has two power switches: [Main power] switch and [Sub power] key. The [Main power] switch turns the printer unit on and off. Press the [Sub power] key to operate the machine.
Print Preparations ■ Power-saving features If you leave the machine unattended for some time, it automatically goes to power saving mode according to the "Admin. Settings". ● In the Feed Trays 1 Pull a tray out, toward the front. 2 Push the right side of the locking lever (in back) to free. Holding the front tab, spread the guides fully apart. 3 Move the stopper to make space. The power saving mode has backlight off and sleep states. In the "Admin.
4 Load the paper. Be sure to move the stopper against the edge of the paper. The machine determines the size of the paper based on the stopper position. When using paper with different characteristics on the front and back sides, load the printing side face-down. Do not load too many sheets. To set A3 paper and B4 paper, install the A3/B4 paper guide properly for each type. If you pinch both sides of the A3/B4 paper guide, you can slide it out and place it in each paper size hole.
Print Preparations 2 Spread the guides. 4 Set the paper feed guide levers (in two positions on both sides) to unlock the guides and slide the guides. 3 Move the guides against the edges of the paper, and push the lever to lock. Load the paper. Load paper with the printing side face-up. The machine detects the paper size at the positions of the guides. Move the guides against the edges of the paper, and push the lever to lock. 5 Set the paper feed pressure adjustment lever.
● Adding or Switching Paper in the Standard Tray Press the standard tray descent button when loading additional sheets or when switching paper. Note that the standard tray is automatically lowered when all paper is removed. 1 ● Closing the Standard Tray 1 Remove the loaded paper. The standard tray starts lowering. Press the standard tray descent button to lower the standard tray. Hold the button down until the tray reaches the desired position. Make sure the machine is on.
Print Preparations ● In the High Capacity Feeder 1 ● To load envelopes, leave their flaps open and load them so that they will be fed from the bottom. Use the envelope guide angle adjustment lever to adjust the inclination angle of the envelope guide. Adjust the feeding pressure according to the quality of envelopes you use. For adjustment, use the envelope guide feeding pressure adjustment lever. Lift the lever and slide it.
4 Adjust the feeding pressure adjustment lever. Set it to “Standard” for normal use, and set it to "Card" for thick paper, special paper, etc. ● Adding Paper in the High Capacity Feeder To add paper, use the standard tray descent button. The downward position of the standard tray varies depending on how the standard tray descent button is pressed. The tray lowers automatically if you remove all paper from the standard tray. 1 Press the standard tray descent button to lower the standard tray.
Print Preparations 2 Add paper. 2 Lift the paper guides (side) to stand them upright. 3 Adjust the paper arranger. ■ If you add many sheets Press and hold the standard tray decent button to lower the standard tray to the bottom, and you can load more sheets. Normally, the paper arranger should be extended when printing on paper that is B4 size or smaller. How paper is stacked after printing varies depending on stiffness and other factors. Adjust the arranger as needed.
● Closing the Stacking Tray 1 4 After confirming that there are no printouts in the stacking tray, press the paper guides open button. Lower the paper guides (side) inward, and then close the stacking tray. The paper guides (side and end) now move into position for storage. Setting the Corrugators to the High Capacity Stacker 2 Lower the paper guide (end) toward the stacking tray to fold it up.
Print Preparations 2 Lower the back corrugator while pressing it toward the machine (to the left). ● If you remove printouts along with the carriage 1 ■ When you perform normal printing (with the corrugator upright) 1 2 Press the stacking tray descent button. If you output approximately 3,200 to 4,000 (full) sheets, the stacking tray automatically lowers to the bottom. Lift the front corrugator while pressing it toward the machine (to the left).
3 Pull out the carriage along with the stacking tray on it. ● If you remove only printouts 1 Hold the handle, and pull out the carriage slowly. Printouts may fall if you move the carriage too quickly. 4 5 ● You can specify the downward position of the stacking tray in [High capacity stacker] of the "Admin. Settings". To change the downward position, contact the administrator. Remove printouts from the carriage.
Print Preparations 3 Close the right cover of the high capacity stacker. If you pulled out the carriage in step 2, place the carriage to the high capacity stacker, and close the right cover. If you specify [Do not lower stacking tray.] in [High capacity stacker], and if paper is on the stacking tray, the paper guides cannot move. Therefore, the paper guides cannot adjust to the paper size of the next job.
38 ComColor Series User’s Guide 03
Printer Driver 1 ComColor Series User’s Guide 03
1 Printer Driver Printer Overview of Print Operations This chapter describes how to use the machine as a printer from a computer when it has been connected to the machine via network. Printer Driver Screen Use the printer driver screen to configure the various settings. Tabs Print image Output trays • Tab • Print image • Output trays : Click a tab to switch the screens. : Displays a preview image of the document to be printed. The color mode icon is displayed at the top left of the preview image.
Overview of Print Operations The following are the components of the printer driver screen. Tabs Description See Basic Specify basic print settings, such as for the color mode and paper used. p. 1-7 Layout Specify settings to impose, or to print images rotated. p. 1-12 Image Specify the image quality and density. p. 1-15 Finishing Specify finishing settings, such as for collation and booklet binding. p.
1 Printer Driver ● 1 Displaying the Printer Driver Screen 1 Select the print option in the application on the computer. The print dialog box is displayed. 2 Confirm that this machine has been selected for [Printer name] and click [Properties] or [Details]. The button names are different depending on the application. ● 2 Configuring the Settings as Needed For information on the settings that can be configured, see "List of Settings" (p. 1-5). • A job with mixed-size originals cannot be output.
Overview of Print Operations List of Settings The following is a list of the settings on the printer driver screen. ● The settings displayed on the screen vary depending on the selected item and how the administrator has configured the settings. ● An option setting is displayed only when optional equipment required for that setting has been connected. Setting Description 1 See [Basic] tab Color mode Select color or monochrome printing. p. 1-7 Duplex print Specify simplex or duplex printing. p.
1 Printer Driver Setting Add cover* 1 Description See Specify this to add front and/or back cover. p. 1-21 Booklet binding Specify the type of booklet printing. (When using the optional multifunction finisher) p. 1-21 Binding side Select the stapling and punching. (When using the optional multifunction finisher) p. 1-23 Staple Select the stapling method. (When using the optional multifunction finisher or face down offset stapler) p. 1-24 Punch Select the punching method.
Basic Settings This section describes how to configure the basic settings of the printer driver, such as for color mode, duplex printing, and paper type. [Basic] Tab 1 ● Duplex print Specify simplex or duplex printing. [OFF] Simplex printing is performed. [Long edge] Duplex printing is performed with the long edge as the binding position. . ● Color mode [Short edge] Select color or monochrome printing. Duplex printing is performed with the short edge as the binding position.
1 Printer Driver ● Original size 2 Specify the paper size and orientation of the original. Select from the following. [A3W], [A3], [A4], [A5], [A6], [B4], [B5], [B6], [Foolscap], [Tabloid], [Ledger], [Legal], [Letter], [Statement], [C4], [C5], [C6], [DL-R], [Envelope 1], [Envelope 2], [No.10 envelope], [custom] Enter the size of the original. Specify a width between 90 mm (3 9/16") and 340 mm (13 3/8"). Specify a length between 148 mm (5 13/16") and 550 mm (21 5/8"). 3 Click [OK].
Basic Settings ■ Using This Function with Duplex Printing When using this function with duplex printing, you can set the binding position for each paper size. Select the [Mixed size original] check box and click [Details], and the [Details] dialog box is displayed. Select the binding position for each size-mixed page. [Smaller page]: Long edge / Short edge ● Paper size Specify the size of paper for printing. Select from the following.
1 Printer Driver ● Input tray Specify the input tray to use for printing. [Auto] The feed tray is selected automatically according to the [Paper type] and [Paper size] settings. [Feed tray1] - [Feed tray3] The paper loaded in the specified tray is used for printing. [Standard tray] or the optional [High capacity feeder] The paper loaded in the standard tray is used for printing.
Basic Settings ● Depending on the administrator setting, the folder and USB flash drive functions may not be usable. ● Do not remove the USB flash drive before saving is finished. During data saving, a printer icon appears in the taskbar shown on the computer. When saving is completed, the icon disappears. Before removing the USB flash drive, make sure that the icon has disappeared. ● Data saved in folders can be printed from the [Folder] Screen in printer mode (p.
1 Printer Driver ■ Retrieving Settings 1 5 The selected settings are saved. Select the necessary settings in the [Save/Call setting] pull-down menu. The selected settings become the output settings of the printer driver. Click [Save]. ■ Reading Settings from a Computer You can retrieve and use settings saved to a computer. ■ Clearing Settings 1 Click [Entry/Clear] for [Save/Call setting]. The [Entry/Clear] dialog box is displayed. 1 Click [Entry/Clear] for [Save/Call setting].
Basic Settings ● Imposition ■ Multi-up (Single) Setting Impose an original with several pages onto one sheet. The setting items differ depending on the imposition type. ● Pages/sheet [OFF] Select the number of pages per sheet. [2 pages], [4 pages], [8 pages] Example: When "Pages/sheet" is set to [4 pages] No imposition is performed. [Multi-up (Plural)] 1 Continuous multiple pages are printed in order on one sheet. Select the number of pages per sheet and the layout order.
1 Printer Driver ● Rotate ● Image position Specify this option when rotating the original. Select from the following. You can adjust the print position ± 20 mm (13/16") up, down, left, or right. When performing duplex printing, the front and back sides are adjusted separately. [Auto], [0 degree], [90 degrees], [180 degrees], [270 degrees] Select the [Image position] check box and click [Details] to display the [Image position] dialog box.
Basic Settings [Image] Tab ● Line smoothing Supplement the intermediate colors of drawing and background colors in outline sections of text or illustrations (line drawing) to make the outlines smoother. You can select either of two different image processing types. [OFF] 1 Select this if you do not want to perform line smoothing. [Low] Select this to make outlines smoother. This is appropriate for originals with slants lines that do not need fine processing.
1 Printer Driver ● Gamma control ● Screening Adjust the lightness, chroma, contrast, and RGB gamma value. Specify the method of halftone processing. Select the [Gamma control] check box and click [Details] to display the [Gamma control] dialog box. Specify a value between -25 and +25 for each item. ● Lightness The smaller the value, the darker (blackish) the color. The larger the value, the brighter (whitish) the color.
Basic Settings ● Image quality ● Barcode area definition Specify the image resolution. Specify the method of processing barcodes. [Standard (300 × 300dpi)] Suitable for documents and other originals with text. Click [Details] to display the [Details] dialog box. The [Draft] or [Data compression] functions enable you to specify the ink amount and data size. [Standard] Do not configure the data size or ink amount. [Draft] Prints so that you consume less ink.
1 Printer Driver If the specified area is not neatly aligned, correct the "a barcode area definition file" with the attached barcode area definition application. ■ The flow of printing a barcode original 1 Request for Toner Collection Set [Output] to [Save as a file] in the [Basic] tab, and specify a directory from [Details]. Perform the output setting as needed. 2 3 Correct Specification ● Surround the barcode with a margin of around 1 mm (0.
Basic Settings ■ How to register to the default 1 Select ComColor (9150/9110/7150/ 7110/3150/3110) printer from [Printers and FAX] in the [Start] menu, and click [Properties]. 2 Start the printer driver in [Print setting] to display the [Image] tab screen. 3 Perform each setting necessary for barcode printing, and click [Apply]. The referred "Barcode area file" is registered as the default value. From now on, you can perform barcode printing just by selecting the printer driver.
1 Printer Driver ● Slip sheet [A B C ...] Insert a slip sheet between print units when printing multiple copies. You can stamp a number or letter on slip sheets. Letters are stamped on slip sheets in alphabetical order up to three digits (A, B, C...Z, AA, AB, AC...). (Up to ZZZ) Select the unit to insert a slip sheet and click [Details] to display the [Slip sheet] dialog box. Select the tray for slip sheets and specify the text to stamp. [OFF] Slip sheets are not inserted.
Basic Settings ● This setting is not available for paper sizes that cannot be output to the face down offset stapler, stacking tray or high capacity stacker. (p. 2-42 "Configuring the Offset Output Setting" in "Copy") ● When using the face down offset stapler, you cannot use this setting with stapling. ● Normally, two-layer offsetting is used. When this setting has been combined with "Staple", three-layer offsetting is used. ● When using the high capacity stacker, the output position slides vertically.
1 Printer Driver [OFF] Booklet binding is not performed. Example: When "ON" has been selected for [Separate books] and [Paper folding] has been set for a 60-page original [Fold] Printing paper is folded in two. p.41-60 [Fold + Staple] p.21-40 Printing paper is folded in two and bound in the middle with staples. p.1-20 When [Booklet binding] has been set to [Fold] or [Fold + Staple], [Imposition] is set to [Booklet] automatically.
Basic Settings 3 Send the printing command. The printer prints only the covers and the remaining data is set to [Waiting] status. 4 5 6 Load the printed covers in the tray specified with [Feed tray for cover]. On the operation panel of the printer, press [Waiting] in printer mode, and select a job from the list. ● Binding side Specify the position for stapling and punching and specify the binding margin. Select the binding side and click [Details] to display the [Binding side] dialog box.
1 Printer Driver ■ Prioritizing speed when stapling simplex printouts When using the multifunction finisher, expedite the stapling process for simplex printouts. Output is faceup; therefore, both ends of a staple come out on the front. Specify this when processing speed has higher priority over finish.
Basic Settings * ● Punch When using plain paper and recycled paper (85 g/m2 (23- lb bond)) Specify the number of holes to be punched. Punch holes at the position specified in [Binding side]. Select from the following. ■ When using the face down offset stapler [OFF], [2 holes], [3 holes], [4 holes] The number of holes that can be punched varies depending on the connected finisher.
1 Printer Driver ● Paper folding 2-fold Select this when folding paper in two. Select [2-fold] and click [Details] to display the [Details] dialog box. Specify the paper fold direction. Print inside Print outside The optional multifunction finisher is required to use the "Paper folding" setting. • A3, B4, A4, Ledger, Legal, Letter, Foolscap and custom size* * The administrator must register the paper size in advance. Ask your administrator.
Basic Settings ■ Face up/down Specify whether to output printouts face-up or face-down to the tray. [Face-up], [Face-down] ● Print and pause When printing an original with a large number of pages or sheets, the first page or first set is printed (except for the specified number of sheets), printing stops to allow you to check the printout, and then printing can be resumed. After you check the printout, press the [START] key on the printer to continue printing. Select the check box to enable this setting.
1 Printer Driver ■ Entering the number of copies and sets Specify up to 9,999 copies and 99 sets per group. For example, to distribute a document to four divisions in an office, you can use [Program] to print by the number of sheets per division with a single operation. Division General Affairs 1 General Affairs 2 Accounting Management No. of employees 10 6 24 6 ■ Number on slip sheet When you have selected this check box, numbers are stamped on the slip sheets.
Basic Settings ● Continuous output ■ Character decoration Switch the output tray automatically when the tray is full. You must set [Output tray] to [Auto], and [Collate] to [Group] on the [Finishing] tab. ● Font An optional multifunction finisher, auto-control stacking tray, or high capacity stacker is required to use this setting. ● Watermark Add a watermark of the desired size and at the desired position on printouts.
1 Printer Driver ■ Print position ● Stamp Page/Date ● Character angle Stamp the page number and date on the header or footer. Select the angle of the text. You can also enter the numerical angle of the text. [Horizontal (0 deg)], [Vertical (90 deg)], [Vertical (270 deg)], [Oblique (45 deg)], [Oblique (315 deg)], [custom (0-360 deg)] ● Print position Select the print position of the watermark. You can also enter the values for the positions in the X and Y directions.
Basic Settings ● Stamp start page Enter the stamp start page (1 to 9999). To not stamp on the cover, set "Stamp start page" to "2". Set this to "3" in some cases such as duplex printing. ● Stamped date [Today's date] Stamp the date based on the date information of the computer. [Specified date] Enter up to 20 numeric characters in the text box. 1 ■ Stamp date To stamp the date, select [ON] on the [Stamp date] tab screen. ● Stamp position ● Job name You can input a job name.
1 Printer Driver ● Save/Call setting The current settings on the printer driver screen can be saved and retrieved later as needed. See "Save/Call setting" (p. 1-11) in "[Basic] tab" for details. [About] Tab Check the version and color profile of the printer driver and the model name of the printer.
Environment Settings This section describes how to configure the environment settings, including the configuration of optional equipment connected to the machine. When using the printer driver for the first time or adding optional equipment to the machine, configure the printer configuration. [Environment] Tab To display the [Environment] tab, on your computer click [Start] [Control Panel] [Printers and Faxes], and open the [Properties] dialog box of the printer.
1 Printer Driver ■ Configuring the Printer Configuration Manually You can change the configuration of options that you obtain from the printer. ● Custom paper entry Register up to 99 non-standard paper sizes. The sizes registered here are displayed in [Original size] and [Paper size]. Specify the following settings manually. ● Paper feeder Select whether there is a high capacity feeder. ● Finisher/Basic unit Select the type of optional output equipment connected to the machine.
Environment Settings ■ Configuring the Paper Size Manually ■ Saving the Paper Size to a Computer You can save the registered paper size to a computer. 1 Click [Custom paper entry]. The [Custom paper entry] dialog box is displayed. 2 Enter the paper width and length. Specify a width between 90 mm - 340 mm (3 9/ 16"-13 3/8"). Specify a length between 148 mm - 550 mm (5 13/ 16"-21 5/8"). • The size of paper that can be fed into the machine is different when a multifunction finisher has been connected.
1 Printer Driver ■ Deleting a Paper Size 1 Click [Custom paper entry]. ■ Configuring the Register Folder 1 The [Custom paper entry] dialog box is displayed. 2 Select the paper size to delete from the list box on the [Custom paper entry] dialog box. 3 Click [Clear]. Click [Register folder]. The [Register folder] dialog box is displayed. The selected paper size is deleted. ● Register folder Register destination folders for print data on the printer driver.
Environment Settings ● Barcode area file entry Register a barcode area definition file to the printer driver. A barcode area definition file that you register here is displayed in the [Barcode area definition] pull-down menu in the [Image] tab. For details, see "Using the Barcode Area Definition Application" in the "Basic Guide". 1 1 Click [Barcode area file entry]. The [Barcode area file entry] dialog box is displayed. 2 Click [Add] on the [Barcode area file entry] screen.
1 Printer Driver 1-38 ComColor Series User’s Guide 03
Copy 2 ComColor Series User’s Guide 03
2 Copy Copy Overview of Copy Operations You can use the machine as a copier by connecting the optional scanner. You can save scanned data in folders for printing as necessary. If you connect an optional multifunction finisher, you can create a booklet or fold, staple, or punch the printed paper. Procedure The copy workflow is as follows.
Overview of Copy Operations ● 1 Loading Originals 3 For information on the types of originals that can be loaded, see "Originals" in the "Safety Information". ■ In the ADF 1 Close the original cover. Open and close the original cover gently. ● 2 Selecting Copy Mode Load the original in the ADF. Align the originals and place them face up. 1 Press [Copy] on the mode screen. 2 2 Slide the original guides to match the width of the originals. The copy mode screen is displayed.
2 Copy ● 3 Configuring the Functions When using the high capacity stacker Specify the copy finishing settings. When outputting printouts to the high capacity stacker, make sure that the carriage has been attached, and that there is no paper left on the stacking tray. Also, remove printouts after you finish a job. For information on the functions that can be configured, see "List of Settings" (p. 2-7).
Overview of Copy Operations ● 5 Press the [START] Key The [Copying in progress] screen is displayed, and copying of the original starts. The current status, including the number of copied pages, is displayed on the screen. ■ Loading the Next Copy Job During copying, once scanning of the original has been completed, you can begin scanning of another original. 1 Press [Close] while the [Copying in progress] screen is displayed. 2 Load the next original and press the [START] key.
2 Copy ■ Changing the Settings During Copying 1 Press the [STOP] key. The [Confirm] screen is displayed. 2 Press [Setting chg.]. The [Suspending] screen is displayed. 3 Change Settings. You can modify the following settings. • Image position (p. 4-13 "Image position" in "Printer") • Feed tray (p. 2-10 "Feed tray" in "Copy") • Print density (p. 4-14 "Print density" in "Printer") ● To confirm the settings of the job, press [Settings]. Press [S] and [T] to scroll the list.
Overview of Copy Operations List of Settings The following is a list of copy mode settings. ● The settings displayed on the screen vary depending on the selected item and how the administrator has configured the settings. ● An option setting is displayed only when optional equipment required for that setting has been connected. Setting See Color mode Select color or monochrome printing. p. 2-9 Reproduction size Use this to reduce or enlarge the copied image. p.
2 Copy Setting See Gamma control Adjust the color balance (CMYK) of scanned data. p. 2-33 Image control Specify the image processing of the original. p. 2-34 Base color level Make the background color (base color) lighter so that the text is easier to read. p. 2-34 Print density Configure the printer density. p. 2-35 Program Specify this when the number of required copies varies by group (such as corporate division or classes).
Basic Settings This section describes the copy functions that are configured with the [Basic] screen. 2 Color mode 1 Press [Color mode]. The [Color mode] screen is displayed. Select color or monochrome printing. [Auto] Determine the color of the original automatically and copies in color (cyan, magenta, yellow, and black) or black and white. [Full color] Convert and copy the data into four colors (cyan, magenta, yellow, and black).
2 Copy Reproduction size Copy at the specified reproduction ratio. [Auto] The reproduction ratio is set automatically based on the original size and paper size. [100% (1:1)] Copy at 100%. Preset Scaling Copy by enlarging or reducing a standard size original to another standard size paper. [Zoom] Specify the reproduction ratio to enlarge or reduce the original when copying. Specify the reproduction ratio from 50% to 200%. 1 Feed tray Select the feed tray.
Basic Settings 2 3 Select the feed tray. 3 Press [Details]. The [Paper size] screen for the selected feed tray is displayed. Press [OK]. The settings are confirmed and the previous screen is displayed. ● Changing the Feed Tray Setting To change the tray setting, select a feed tray and press [Details]. When changing the paper loaded in a tray, be sure to change the [Feed tray] settings.
2 Copy 2 Press [Paper type]. 4 The [Paper type] screen is displayed. Press [OK]. The settings are confirmed and the previous screen is displayed. ■ D-Feed Check Select whether to detect the feeding of multiple sheets of paper. Normally, select [ON]. This function uses light permeability to detect multiple sheets of paper, so when using paper printed on the back or paper with a dark base color or envelopes, select [OFF]. [ON], [OFF] 1 3 Follow Steps 1 to 3 in "Changing the Feed Tray Setting".
Basic Settings ● Configuring the [Tray selection] Setting When you have selected [Auto] on the [Feed tray] screen, the machine automatically selects the feed tray to use from among the feed trays with [Tray selection] set to [Auto]. [Map/Pencil] Select this for originals with a lot of subtle colors or fine lines, such as a map, or for originals with pencil drawings. When you have selected [Line/Photo], [Photo], or [Map/Pencil], specify the dot process.
2 Copy Scanning level You can adjust the scanning density of originals. Select from the following. [1] - [5] Duplex/Simplex Specify the sides of the original to be read and the sides of the paper to be printed on. The current settings (the original scanning side and output) are displayed on the screen. The lower the setting (toward [1]), the lighter the density. The higher the setting (toward [5]), the darker the density. 1 Press [Scanning level]. The [Scanning level] screen is displayed.
Basic Settings ■ Output Paging Direction When copying both sides of the original, select how pages are turned. [Left / Right], [Top / Bottom] ● Duplex Copying 1 ● Simplex Copying of a Twosided Original Load the original in the ADF. 1 Press [Duplex/Simplex]. 2 In [Original], press [Duplex]. 3 In [Original], select the [Paging Direction] setting. Press [Duplex/Simplex]. The [Duplex/Simplex] screen is displayed. 4 Select the original orientation. 5 In [Output], press [Simplex]. 6 Press [OK].
Direct Access/Selections entry You can register frequently used functions to the direct access area of the [Basic] screen or to the [Selections] screen. The user who is logged in can register the user's own functions to the direct access area or the [Selections] screen when [Login setting] has been set to [Required]. The functions configured by the administrator are displayed in the direct access area and the [Selections] screen when [Login setting] has been set to [Not required].
Direct Access/Selections entry Direct Access entry 6 Press [Close]. The previous screen is displayed. Up to 4 frequently used functions can be registered to the direct access area of the [Basic] screen. 1 Press [Entry]. The [Direct Access entry] screen is displayed. Selections entry Up to 16 frequently used functions can be registered to the [Selections] screen. 1 Press [Selections]. 2 Press [Entry]. 2 The [Selections entry] screen is displayed.
Copying Functions This section describes the copy functions that are configured with the [Functions] screen. You can register frequently used functions to the [Basic] screen or the [Selections] screen. (p. 2-17 "Direct Access entry", p. 2-17 "Selections entry") Press [S] and [T] scroll the list. Save as default Register the current settings to each user as a personal default value.
Copying Functions ● Confirming the Settings and Printing a List of the Settings 2 The current settings are registered as the default values of copy mode for the user that is currently logged in. Confirm the settings and print the settings as a list. 1 2 Press [Functions] on the copy mode screen. Press [Save as default]. 3 Press [OK]. The settings are confirmed and the previous screen is displayed. Press [Check setting]. The [Check setting] screen is displayed. Check the current settings.
2 Copy "Color mode" (p. 2-9) "Scanning level" (p. 2-14) 3 "Duplex/Simplex" (p. 2-14) Press [Save/Call setting]. The [Save/Call setting] screen is displayed. "Copy and pause" (p. 2-23) "Save to folder" (p. 2-24) "Save to archive" (p. 2-25) "ADF scan & pause" (p. 2-26) "Scanning size" (p. 2-27) "Mixed size original" (p. 2-28) "Book shadow erase" (p. 2-28) "Multi-up" (p. 2-29) "Stamp Page/Date" (p. 2-31) "Image quality" (p. 2-33) "Gamma control" (p. 2-33) "Image control" (p.
Copying Functions 7 Press [Close]. 2 The previous screen is displayed. Press a button to rename. The [Setting call] screen is displayed. ● Retrieving Settings 1 Press [Save/Call setting]. Follow Steps 2 and 3 in "Saving Settings". 2 Press the button of the setting to retrieve. 2 The [Setting call] screen is displayed. Confirm the setting. 3 Press [Rename]. The [Rename] screen is displayed. 3 Press [Retrieve]. The setting is retrieved and the copy mode screen is displayed.
2 Copy ● Deleting Settings Users without administrative authority cannot delete shared registered settings (buttons with the shared mark ). 1 Select layout Set various finishing settings by selecting an output image. Display the [Save/Call setting] screen. Follow Steps 2 and 3 in "Saving Settings". 2 Press the button of the setting to delete. The [Setting call] screen is displayed. 3 Press [Delete].
Copying Functions 4 Select the [Paging Direction] (when selecting [Duplex]) and [Original orientation] settings. Copy and pause This function is useful for high-volume copying. One sheet is copied and then copying stops, enabling you to check the result of the settings. When [Collate] has been set to [Sort], you can use Copy and pause to copy only one set. (p. 2-41 "Collate/slip sheet") 1 2 Press [Functions] on the copy mode screen. 2 Press [Copy and pause]. Copy and pause is set. 5 Press [OK].
2 Copy Additional copies Print one or more copies of previously copied original data. (You do not need to scan the original again.) You can also change the setting as needed. Additional copies cannot be made in the following cases: • When the administrator has set "Additional copies" to [OFF] • When auto reset has been executed after copying the original • When the owner is logged out 1 2 Immediately after completing copying, press [Functions] on the copy mode screen.
Copying Functions ■ PIN code Select whether to assign a PIN code for data to save. 7 Specify the PIN code. To add a PIN code when saving the data, press [Use]. [Not use] Do not specify a PIN code. [Use] Specify a PIN code (up to eight numbers). 1 Press [Functions] on the copy mode screen. 2 Press [Save to folder]. 2 The [Save to folder] screen is displayed. Use the numeric keys to enter a PIN code (up to 8 numbers) on the [PIN code] screen, and press [OK].
2 Copy ■ Owner Specify the owner of data to save. ■ Job name Type or edit the job name of data to save. 1 2 ADF scan & pause When copying a quantity of originals that cannot be loaded at one time in the ADF, these can be copied as one job. Up to 1,000 one-sided originals or 500 two-sided originals can be copied as one job. ● The maximum number of sheets that can be loaded at one time in the ADF is 100 sheets (with a paperweight of 80 g/m2 (21.3-lb bond)). Press [Functions] on the copy mode screen.
Copying Functions ● Entering the Size of the Original Scanning size Specify the scanning size for originals. ● Selecting standard size or registered size When the original is a non-standard size that is not registered, specify the size of the original to be scanned. 1 Select a standard paper size or registered paper size by the administrator. Display the [Scanning size] screen. Follow Steps 1 and 2 in "Selecting standard size or registered size".
2 Copy Mixed size original Specify this option when loading originals with multiple sizes. ● Only originals with one side of equivalent length (A4-LEF and A3, B4 and B5, Ledger and Letter-LEF) can be scanned together. ● You cannot use "Mixed size original" and "Booklet", "Book shadow erase", or "Multi-up" at the same time. (p. 2-46 "Booklet", p. 2-28 "Book shadow erase", p. 2-29 "Multi-up") Book shadow erase Erase shadows that appear in the center of copies when copying an open book.
Copying Functions ■ Erasure width [10mm](3/8"), [20mm](13/16"), [30mm](1 3/16"), [40mm](1 9/16"), [50mm](1 15/16") 1 2 Press [Functions] on the copy mode screen. Multi-up Impose several pages of an original onto one sheet. You can select [Plural] or [Single] You cannot use "Multi-up" and "Mixed size original" at the same time. (p. 2-28 "Mixed size original") Press [Book shadow erase]. The [Book shadow erase] screen is displayed. ● Setting Multi-up (Plural) 2 Impose continuous pages onto one sheet.
2 Copy 2 Press [Multi-up]. The [Multi-up] screen is displayed. ● Setting Multi-up (Single) This imposes multiple copies of the same original onto one sheet. ■ Original orientation [Top side up] Select this option when loading originals in an orientation from which they can be read normally. [Top side left] Select this option when loading originals so that the top of the original is aligned with the left edge. [Output image] displays an output image that reflects the settings.
Copying Functions Stamp Page/Date 1 Press [Functions] on the copy mode screen. 2 Press [Stamp Page/Date]. Stamp the page number and date on the header or footer. ● The page number and date cannot be stamped together in the same position. The [Page] screen is displayed. ● The page number and date cannot be stamped on slip sheet paper or cover paper. (p. 2-40 "Add cover", p.
2 Copy ● Stamping the Date 3 Press [ON]. 4 Select the date stamp position. Print the date on the header or footer. ■ Stamp position • You cannot select the position for stamping the page number. [Top L], [Top C], [Top R], [Bottom L], [Bottom C], [Bottom R] ■ Transparency [OFF] Remove images in the stamp area to create a white space, and stamp the date in that white space. [ON] 5 Select the transparency. 6 Select the pages to apply. 7 Select the date to be stamped.
Copying Functions Image quality Specify the resolution for scanning originals. [Standard (300 × 300dpi)] Gamma control Adjust the color balance (CMYK) of scanned images. Select this when the original has mostly text. C [1] to R [7] [Fine (300 × 600dpi)] The lower the setting (toward [1]), the stronger the cyan (C) and the weaker the red (R) in the image. The higher the setting (toward [7]), the stronger the red (R) and the weaker the cyan (C) in the image. Select this when the original has photos.
2 Copy 3 Select the balance for each color. 4 [Output image] displays a preview of the image with the adjusted color balance. 4 Press [OK]. The settings are confirmed and the previous screen is displayed. Image control Press [OK]. The settings are confirmed and the previous screen is displayed. Base color level Make the background color (base color) lighter so that the text is easier to read when copying text originals with a background color or colored paper.
Copying Functions Print density Adjust the print density to any of the five levels. Select from the following. [-2] to [+2] Light Dark Select a small value for light print and a large value for dark print. 1 2 Press [Functions] on the copy mode screen. Press [Print density]. The [Print density] screen is displayed. Program This option is convenient when the number of required copies varies by group (such as corporate division or classes).
2 Copy ■ Slip sheet Specify how slip sheets are inserted. [OFF] ● Configuring the Program Configure new settings (copies, sets, etc.) for each group (01G to 60G). Do not insert a slip sheet. [Between sets] 1 Press [Functions] on the copy mode screen. 2 Press [Program]. Insert a slip sheet between sets. [Between groups] Insert a slip sheet between groups. [Select tray] The [Program (1)] screen is displayed.
Copying Functions 5 Configure the [Collate], [Slip sheet], and [Offset output] settings. 4 Press [Register] on the [Program list] screen. The [Registration name] screen is displayed. You cannot use this function with "Collate/slip sheet" on the [Functions] screen. 6 Press [OK]. The settings are confirmed and the copy mode screen is displayed. 2 ● Saving a Program Save settings to retrieve and use later. Up to 12 program settings can be saved and recalled later as needed.
2 Copy ● Retrieving a Program Retrieve a saved program. 1 1 Display the [Program (1)] screen. Follow Steps 1 and 2 in "Configuring the Program". 2 ● Renaming a Program Follow Steps 1 and 2 in "Configuring the Program". 2 Press [Save/Call]. The [Program list] screen is displayed. Display the [Program (1)] screen. Press [Save/Call]. The [Program list] screen is displayed. 3 Select the program to rename. Select one program. 4 Press [Rename]. The [Rename] screen is displayed.
Copying Functions ● Changing the program settings Change the number of copies and sets for the program. 1 4 2 Press [Save/Call]. 3 Select the program to delete. You can also select multiple programs. Select the program with the settings to change. 4 5 The changes are saved. Press [Delete]. Press [Yes]. The program is deleted and the [Program list] screen is displayed. Enter the number of copies and sets. Press [Overwrite]. 2 The message "Selected setting will be deleted.
2 Copy Add cover Add preprinted sheets or colored paper that has been loaded in the tray, to the front and back of the printouts as covers. 4 Configure the cover settings. Select [Yes] or [No] for [Front cover] and [Back cover]. 5 Press the select tray button. Press [Yes] to display the [Select tray] screen. ■ Binding side Select the binding side of the paper. [Left], [Right], [Upper] ■ Front cover [No] [Yes] A cover is added to the front of the printouts. Select the feed tray to use.
Copying Functions Collate/slip sheet ● Configuring the Slip Sheet Setting Insert a slip sheet between sets or jobs. Specify the paper output method when copying multiple copies. You can configure the [Slip sheet] and [Offset output] settings. ■ Slip sheet [OFF] [Between sets] ● Configuring the Collate Setting Specify the collate method when copying multiple copies. [Auto] Copies are collated in sets when the original is loaded on the ADF and by page when the original is loaded on the platen glass.
2 Copy 2 3 Select the position where slip sheets are to be inserted. Select the feed tray for slip sheets. ● Configuring the Offset Output Setting This function outputs each printout shifted apart from one another. An optional multifunction finisher, face down offset stapler or high capacity stacker is required to use this setting. Pressing the "Select tray" button will display the [Select tray] screen. [OFF] [Between sets] Stack each collated set shifted apart from one another.
Copying Functions Staple/Punch Configure the staple and punch settings. ● An optional multifunction finisher is required to use this setting. ● If the face down offset stapler has been connected, you can configure only the staple settings. ● You cannot use "Staple/Punch" and "Booklet" at the same time. (p.
2 Copy ■ Original orientation [Top side up] Select this when loading originals in an orientation from which they can be read normally. 4 Select the binding side. 5 Configure the staple setting. 6 Configure [Staple speed priority] in [Details] as needed. [Top side left] Select this when loading originals so that the top of the original is aligned with the left edge. You can configure this only during simplex printing when using the multifunction finisher.
Copying Functions ■ Binding side Select the binding side of the paper. [Left], [Right], [Upper] ■ Punch Specify the number of holes to be punched. [OFF], [2 holes], [3 holes], [4 holes] 1 Display the [Staple/Punch] screen. Follow Steps 1 and 2 in "Configuring the Staple Setting". 2 Select the original orientation. 3 Select the binding side. 4 5 Paper folding Select this when folding paper in two. ● The multifunction finisher is required to use this function.
2 Copy ■ Fold direction When you have selected [2-fold], specify which side is to be printed if the paper is folded. [Print inside] Simplex printing: Fold the paper with the printed surface on the inside. Duplex printing: Fold the paper with the first page on the inside. [Print outside] Simplex printing: Fold the paper with the printed surface on the outside. Duplex printing: Fold the paper with the first page on the outside. 1 Press [Functions] on the copy mode screen. 2 Press [Fold].
Copying Functions ■ Binding side Specify the binding side of the paper. When "ON" has been selected for [Separate books] and [Paper folding] has been set for a 60-page original [Left to right], [Right to left], [Top / Bottom] p.41-60 ■ Separate books p.21-40 When you have selected [Paper folding] or [Fold + Staple], some restrictions apply to the number of sheets you can fold. p.
2 Copy 4 Select the binding side. 2 Press [Output tray]. The [Output tray] screen is displayed. 5 Specify [Separate books]. 6 Enter the center margin value. • Press the input box and enter the number using [S] and [T] or the numeric keys. • To clear the fields, press the [Clear] key. • If part of the printing area is missing due to the center margin setting, press [Auto reduce]. 7 Press [OK]. The settings are confirmed and the previous screen is displayed. Output tray 3 Select the output tray.
Copying Functions ● Configuring the Output Side You can also use the paper guides open button on the auto-control stacking tray when manually removing paper from the tray. Specify whether to output printouts face-up or facedown to the tray. See "Stacking Tray (optional)" (p. 11) in "Part Names and Functions" for details on using the paper guide open button on the auto-control stacking tray.
2 Copy 2 Jump wing control Press [Head cleaning]. The [Head cleaning] screen is displayed. When using an optional stacking tray, you can adjust the position of the jump wings so that the paper is more evenly aligned. Normally, the position of the jump wings is adjusted automatically based on the paper type and size; however, the paper may not be evenly aligned depending on the paper used. In this case, specify jump wing control.
Copying Functions Interrupt copy Pause the job being printed to copy another job. 1 Press the [Interrupt] key. The interrupting screen is displayed. 2 2 Load the original and press the [START] key. • You can make copies continuously while "Ready to Copy (Interrupting)" is displayed in the message area. 3 After the interrupt copy has been completed, press the [Interrupt] key to cancel interrupt copy. Printing of the paused job resumes.
2 Copy 2-52 ComColor Series User’s Guide 03
Scanner 3 ComColor Series User’s Guide 03
3 Scanner Scanner Overview of Scan Operations You can scan a paper original to digitize it. You can also select the format of the scanned data according to how you want to use the data. Select [Format for PC] to read scanned images on a computer, to attach the data to e-mail messages or to save data to a USB flash drive. Select [Printable in this machine (save to folder)] to save images in a folder on the machine and print them when necessary.
Overview of Scan Operations ● 1 Loading Originals ■ On the Platen Glass For information on the types of originals that can be used, see "Originals" in the "Safety Information". Open the original cover and load the original on the glass surface. The machine cannot scan the area within 1 mm (0.04") of the edge of the paper. (Any part of the image within this area will be lost.) 1 Open the original cover. 2 Load the original. Load the original face down on the glass.
3 Scanner ● 2 Selecting Scanner Mode 1 Press [Scanner] on the mode screen. ● 3 Selecting the File Format ■ [Format for PC] Select the file format (PDF, TIFF, or JPEG). You can use the saved data as follows. • Save data to the internal hard disk (Download using RISO Console.) • Save data to a USB flash drive • Save data to a computer on the network • Attach data to an e-mail message 1 Press either [PDF], [TIFF], or [JPEG]. 2 Press [OK]. ● Press the MODE key to display the mode screen.
Overview of Scan Operations ● 4 Selecting the Directory ■ Save Data to the Internal Hard Disk Specify the directory for saving scanned data. RISO KAGAKU CORPORATION is not responsible for the loss of any data on the machine's internal hard disk or on a USB flash drive when used with this machine. For data protection, it is recommended to back up data in advance. You can save scanned data to the internal hard disk of this machine. You can then download the saved data to a user's computer.
3 Scanner ■ Save Data to a USB Flash Drive You can save scanned data to a USB flash drive connected to the USB port of the machine. 1 Press [Directory] on the scanner mode screen. The [Directory] screen is displayed. To save data to a computer not listed in [Networked computer], ask your administrator. ■ Attach Data to an e-mail Message You can attach scanned data to e-mail messages and send them. 1 If the [Mail to] screen is displayed, press [Directory]. 3 Press [USB flash drive]. 4 Press [OK].
Overview of Scan Operations The administrator can register e-mail destinations. You may not be able to enter e-mail addresses directly, depending on how the administrator has configured the settings. 3 ● 6 Press the [START] key The [Scanning] screen is displayed, and scanning of the original starts. The current status, including the number of scanned pages, is displayed on the screen. Press [OK]. The scanner mode screen is displayed. ■ Save Scanned Data in Folders You can save scanned data to a folder.
3 Scanner List of Settings The following is a list of scanner mode settings. ● The buttons displayed on the screen vary depending on the selected item and how the administrator has configured the settings. ● An option setting is displayed only when optional equipment required for that setting has been connected. Setting [Basic] [Functions] * Description See File format Specify the file format, compression level and resolution for saving the scanned data. p.
Basic Settings Use the [Basic] screen to specify the basic settings for scanning. 3 File format Specify the file format, compression level, resolution, and PIN of scanned images. [User PIN] Specify a PIN (1 to 32 alphanumeric characters) for document browsing. [Owner PIN] Specify a PIN (1 to 32 alphanumeric characters) for authorizing document printing and editing. ■ File format ● When [400dpi] or [600dpi] has been selected, the scanned data cannot be enlarged/reduced.
3 Scanner 3 Specify the compression level. The lower the setting (toward [1]), the lower the compression and the higher the quality at which the scanned images are saved, and the higher the setting (toward [5]), the higher the compression and the lower the quality at which the scanned images are saved. 4 Specify the resolution. 5 PIN-protect as needed. Scanning size Specify the size of the original to be scanned. For operations, see "Scanning size" (p. 2-27) in "Copy".
Basic Settings Scanning level 2 Adjust the scanning density for originals. For operations, see "Scanning level" (p. 2-14) in "Copy". Duplex/Simplex Specify the sides of the original to be scanned. Specify the sides of the original to scan. When you have selected [Duplex], select how pages of the original are turned. 3 Select the original orientation. 4 Press [OK]. The settings are confirmed and the previous screen is displayed.
Scanning Functions Save as default Register the current settings as the default values. For operations, see "Save as default" (p. 2-18) in "Copy". Original Select one of the following original types to perform the appropriate image processing and save the scanned data. [Line/Photo] Check setting You can confirm and register the scanner mode settings, and print the settings information. For operations, see "Check setting" (p. 2-18) in "Copy".
Scanning Functions Book shadow erase Remove shadows that appear in the center of copies when an open book is copied. For operations, see "Book shadow erase" (p. 2-28) in "Copy". Image size Specify the image size for saving scanned data. Select a standard image size or enter an image size. 2 Select the image size. 3 Press [OK]. The settings are confirmed and the previous screen is displayed.
3 Scanner Gamma control Adjust the color balance of scanned data. For operations, see "Gamma control" (p. 2-33) in "Copy". When [Color mode] has been set to [Grayscale] or [Black], the gamma value can only be adjusted for K. The gamma value cannot be adjusted between C and R, M and G, or Y and B. (See "Color mode" on p. 3-10) PIN code Assign PIN codes when saving scanned jobs on the internal hard disk. The PIN code set here is required when using the RISO Console to download to a computer.
Scanning Functions Front door release Security You have two ways of authorizing saving scan jobs: using a PIN and using a PIN code. See the descriptions below, and choose the one that meets the needs of your use. For operations, see "PIN protection" (p. 3-9) and "PIN code" (p. 3-14).
3 Scanner 3-16 ComColor Series User’s Guide 03
Printer 4 ComColor Series User’s Guide 03
4 Printer Printer Overview of Printer Mode Operations A list of jobs being processed for printing is displayed. You can use this mode screen to control jobs whose data has already been sent to the machine but not yet printed. ● Each unit of processing for the print, copy, and other modes is called a "job". ● You cannot use this screen to control the data of [Format for PC]. (See "Overview of Scan Operations" (p. 3-2) in "Scanner" for creating scanned data and "Downloading Scanned Jobs to a Computer" (p.
Overview of Printer Mode Operations ● 1 Selecting Printer Mode ■ HDD Usage The used internal hard disk space is displayed in the message area using a 10-bar scale. When the hard disk usage exceeds 91% and the display begins to blink, delete any unnecessary data to free up hard disk space. Less than 20% used More than 51% used More than 91% used The printer mode screen is displayed. ● 3 Selecting a job ● The displayed mode buttons vary depending on the optional equipment connected.
4 Printer Operation Buttons A button is not available when it is grayed out. [Select all] Select all jobs (except jobs with PIN codes) displayed in the list. ● 4 Printing a job Press [Print]. The selected job is printed. Depending on the job, the screen asking you to enter the PIN code may appear. Follow the displayed instructions. [Delete] Delete the selected job from the list. [Details] Display the details of the selected job. There are two [Details] screens.
Overview of Printer Mode Operations List of Settings Setting [Active] See Confirm details of, print, and delete active jobs. p. 4-6 [Waiting] Confirm details of, print, and delete waiting jobs. p. 4-7 [Finished] Confirm details of, print, and delete finished jobs. p. 4-8 [Folder] Confirm details of, print, and copy jobs in a folder or print jobs saved in a USB flash drive. p. 4-9 Online Set the machine online or offline. p.
Managing Jobs This section describes how to confirm details of, print, and delete jobs on the job list of each screen. ● Changing Settings During Printing [Active] Screen Press [Active] to display the [Active] screen. 1 Press the [STOP] key. The confirmation screen is displayed. Operation buttons Active job list The jobs that are being printed and the jobs that are waiting to be printed are displayed. The jobs displayed in the job list are automatically printed in order from top to bottom.
Managing Jobs ● To view the settings, press [Settings]. ● You can enter a job comment that is displayed in a list of the settings on the printer driver. (p. 1-10 "Output and Destination" in "Printer driver") 3 Modify the settings as needed, and then press [Print]. Printing of the job with modified settings starts. • To print the previously printed sheet with the modified settings, press [Proof].
4 Printer ■ Jobs with a PIN Code Operation Buttons Select a job with a PIN code and press [Print] to display the PIN code input screen. Enter the PIN code and press [OK]. Some functions may not be available, depending on how the administrator has configured the settings. (Buttons for these functions are grayed out.) [Select all] Select all jobs (except jobs with PIN codes) displayed in the list. [Delete] Delete the selected job from the list. [Details] Display the details of the selected job.
Managing Jobs [Delete] [Folder] Screen Delete the selected job from the list. [Details] Press [Folder] to display the [Folder] screen. Display the details of the selected job. Folder job list [Select folder] button Operation buttons The jobs saved to the folder or the print jobs saved to a USB flash drive (USB folder jobs) are displayed. Press [Select folder] button and select the folder with the list you want to display.
4 Printer ● Printing Jobs Stored in Folders ● Copying a Job to Another Folder When the destination folder of the job to be printed has already been selected, start from Step 4. 1 On the [Folder] screen, press [Select folder] button. When the destination folder of the job to be copied has already been selected, start from Step 4. 1 The [Select folder] screen is displayed. On the [Folder] screen, press [Select folder] button. The [Select folder] screen is displayed.
Managing Jobs ● Sorting the Job List 1 On the [Folder] screen, press "Sorting" button. The [Sorting] screen is displayed. ● Printing Jobs Stored in USB Folders Print original data (PRN file format) saved to a USB flash drive from the printer driver. See "Output and Destination" (p. 1-10) for information on [Save to USB flash drive], which is on the [Output] pull-down menu of the printer driver. 1 Insert the USB flash drive into the USB port of the machine. The [Select folder] screen is displayed.
4 Printer Press [Details] and change the following settings. • [Image position] (p. 4-13) • [Feed tray] (p. 4-13) Changing Finished Job and Folder Job Settings • [Print density] (p. 4-14) • [Copies] (p. 2-4) Display the preview screen, and you can check the print image. 5 Press [Print]. The selected job is moved to the active job list and printed. 1 Display the job list. Press the screen selection button of the job list to be displayed. 2 Select the job with the settings to change.
Managing Jobs ● To view the current settings, press [Settings]. 2 Press [S] [T] [W] or [X] to adjust the image position. 3 Press [OK]. ● To preview the print image of a folder job, press [Preview]. 4 Press [Print] or [Save]. The specified operation is executed. ● Image position Adjust the printing position of images. You can adjust the printing position ± 20 mm (13/16") up, down, left, or right. When performing duplex printing, the front and back sides can be adjusted separately.
4 Printer ● Print density Adjust the print density. [-2] Light [-1] Somewhat light [0] Standard [+1] Somewhat dark [+2] Dark 1 Select [Print density] on the [Details] (or [Suspending]) screen for the selected job. The lower the setting, the lighter the print density. The higher the setting, the darker the print density.
Printer Function Settings Use the [Functions] screen to configure the user-configurable functions of the main unit (system). 2 Online Press [Feed tray]. The [Feed tray] screen is displayed. 4 Set the machine online or offline. When you set the machine offline, the machine cannot receive print commands from a computer. Set this for exclusive use of the machine. ● When the machine is offline, [ displayed in the status button.
4 Printer Head cleaning Clean the ink heads when you notice a change in image quality, such as blurring in part of a printout, white streaking, or faded colors. For operations, see "Head cleaning" (p. 2-50) in "Copy". Paper guide control Adjust the position of the paper guides of the optional auto-control stacking tray or high capacity stacker. For operations, see "Paper guide control" (p. 2-49) in "Copy".
RISO Console 5 ComColor Series User’s Guide 03
5 RISO Console Console Overview of the RISO Console The RISO Console is software that uses a Web browser to remotely control this machine. With a computer connected to the printer via local area network, you can check the printer status, change the settings of a job, and perform other operations. Status bar Message area Side menu ● When an item on the side menu has the icon, this indicates that you must login before you can access that item.
Overview of the RISO Console Starting the RISO Console ● When [Login setting] has been set to [Required] 1 Start your Web browser. Click [login] to display the login screen of the RISO Console. 2 Enter the IP address of the printer in the address box of your Web browser. • The [Status]-[System] screen on the operation panel shows the IP address of the printer. Enter the user name and password and click [OK] to display the [Monitoring] screen.
[Monitoring] Menu You can click [Monitoring] on the side menu to check paper and ink information, system information, and user information. [General] Screen The amount of remaining ink is not displayed when using Non-Riso ink. The [General] screen displays the printer status. This screen displays information on the machine and its consumables. ● Printer Status Displays a message indicating the current printer status ([Ready to print.], [Sleeping.], etc.).
[Monitoring] Menu [System] Screen The [System] screen displays the serial number, used internal hard disk space, and other system information. [User] Screen The [User] screen displays information about the user currently logged in. [User] is not displayed when [Login setting] has been set to [Not required]. ● ● ● ● ● Model: Machine model Serial No.
5 RISO Console 3 Enter the new password again for confirmation. 4 Click [OK]. The message "Settings have been sent." appears. • To cancel the settings, click [Cancel]. • If an error message appears, enter the password again. [License Info.] Screen The [License Info.] screen displays information about the license of the system in the machine.
[Meter display] Menu Click [Meter display] on the side menu to display the number of printouts on this machine. [Details] Screen The [Details] screen displays the total number of printouts and copies and the number of printouts by paper size. [Limit] Screen The [Limit] screen (button) is displayed when a quantity limit has been specified for the user logged in. You can use this screen to check the quantity limit specified by the administrator and the current print/ copy count.
5 RISO Console [Report] Screen The [Report] screen displays the charge count amounts for monochrome and color jobs per paper size. ● This screen may vary depending on the model of the machine. ● For details on the charge counting, contact your dealer (or authorized service representative). • [Print this list] Click this to print the latest information. • [Download this list as CSV file] Click this to save the total count and details to a computer as a CSV file.
[Printer] Menu You can click [Printer] on the side menu to display the job list on the RISO Console screen and check the status of jobs. You can also operate the printer and change the settings job. ● When an item on the side menu has the icon, this indicates that you must login before you can access that item. When an item has the icon, this indicates that access to that mode is restricted. ● is displayed on the left side of the screen while information on the machine is being collected.
5 RISO Console [Active] Screen The [Active] screen displays the jobs that are being printed and the jobs that are waiting to be printed automatically. • The job list displays the job name, processing status, owner name, number of copies, and receiving date/ time. • To select a job, click the job name and add a check mark. • To select all jobs (except jobs with PIN codes), select the [Job name] check box in the title bar (indicated in blue in the above screenshot).
[Printer] Menu [Finished] Screen The [Finished] screen displays the jobs for which printing is finished and jobs with errors. • The job list displays the job name, status, owner name, and finished date/time. • To select a job, click the job name and add a check mark. • To select all jobs (except jobs with PIN codes), select the [Job name] check box in the title bar (indicated in blue in the above screenshot). • The storage period for jobs is configured by the administrator.
5 RISO Console ● Details Select a job and click [Details] to display the setting details for that job. You can change the following settings. • Job name • Feed tray [Functions] Screen Use the [Functions] screen to configure the userconfigurable functions of the printer main unit (system). • Print density • Copies • Job comment ● Head cleaning Clean the ink head to prevent clogging.
[Scanner] Menu You can click [Scanner] on the side menu to display the scanned job list on the RISO Console screen. You can download scanned data saved on the internal hard disk to a computer. ● When an item on the side menu has the icon, this indicates that you must login before you can access that item. When an item has the icon, this indicates access to that mode is restricted. ● is displayed on the left side of the screen while information on the machine is being collected.
5 RISO Console ● Downloading Scanned Jobs to a Computer 1 Select the check box of the scanned job to download. You can select one job. 2 Click [Download]. The [Download file] dialog box is displayed. For a job with a PIN code, the [Input the PIN code] screen is displayed. Enter the PIN code and click [OK]. 3 Click [Save]. The [Save As] dialog box is displayed. 4 Specify the destination folder and file name, and then click [Save]. The scanned data is saved to the computer.
Appendix 6 ComColor Series User’s Guide 03
6 Appendix Specifications ■ ComColor 9150/9150R/7150/7150R Specifications Basic Functions and Print Functions Model ComColor 9150/9150R: 59A01 ComColor 7150/7150R: 59A03 Type Console Color Support Full color Print Type Line-type inkjet system Ink Type Oil-based pigment ink (Cyan, Magenta, Yellow, Black) Standard: 300 dpi (main scanning direction) × 300 dpi (subscanning direction) Resolution Fine: 300 dpi (main scanning direction) × 600 dpi (subscanning direction) Number of Gray Levels For ea
Specifications A3 Continuous Print Speed*2*7 Ledger ComColor 9150: Simplex: 80 ppm Duplex: 40 sheets/minute (80 ppm) ComColor 7150: Simplex: 66 ppm Duplex: 33 sheets/minute (66 ppm) ComColor 9150: Simplex: 78 ppm Duplex: 39 sheets/minute (78 ppm) ComColor 7150: Simplex: 66 ppm Duplex: 33 sheets/minute (66 ppm) Standard Tray Maximum: 340 mm × 550 mm (13 3/8" × 21 5/8") Minimum: 90 mm × 148 mm (3 9/16" × 5 13/16") Feed Tray Maximum: 297 mm × 420 mm (11 11/16" × 17") Minimum: 182 mm × 182 mm (7 3/
6 Appendix Operating Noise Max. 66 dB (when printing) Operating Environment Temperature: 15ºC to 30ºC (59ºF to 86ºF) Humidity: 40% to 70% RH (non-condensing) Dimensions (W × D × H) In use: 1,220 mm × 705 mm × 1,030 mm (48 1/32" × 27 3/4" × 40 9/16") With cover and tray closed: 1,155 mm × 705 mm × 1,010 mm (45 15/32" × 27 3/4" × 39 3/4") Weight Approx.
Specifications ■ ComColor 9110/9110R/7110/7110R Specifications Basic Functions and Print Functions Model ComColor 9110/9110R: 59A02 ComColor 7110/7110R: 59A04 Type Console Color Support Full color Print Type Line-type inkjet system Ink Type Oil-based pigment ink (Cyan, Magenta, Yellow, Black) Standard: 300 dpi (main scanning direction) × 300 dpi (subscanning direction) Resolution Fine: 300 dpi (main scanning direction) × 600 dpi (subscanning direction) Number of Gray Levels For each CMYK color
6 Appendix Paper Size Standard Tray Maximum: 340 mm × 550 mm (13 3/8" × 21 5/8") Minimum: 90 mm × 148 mm (3 9/16" × 5 13/16") Printable Area Maximum: 314 mm × 548 mm (12 3/8" × 21 9/16") Guaranteed Print Area*3 Standard: Margin width of 3 mm (1/8") Maximum: Margin width of 1 mm (0.
Specifications Safety IEC60950-1 compliant, Indoor, pollution degree 2*, At altitudes of 2000m or lower * The pollution degree of the usage environment due to dirt and dust in the air. Degree "2" corresponds to a general indoor environment.
6 Appendix ■ ComColor 3150/3150R/3110/3110R Specifications Basic Functions and Print Functions Model ComColor 3150/3150R: 59A05 ComColor 3110/3110R: 59A06 Type Console Color Support Full color Print Type Line-type inkjet system Ink Type Oil-based pigment ink (Cyan, Magenta, Yellow, Black) Standard: 300 dpi (main scanning direction) × 300 dpi (subscanning direction) Resolution Fine: 300 dpi (main scanning direction) × 600 dpi (subscanning direction) Number of Gray Levels For each CMYK color (8
Specifications Supported Operating Systems Microsoft® Windows Server® 2012 (64-bit) Microsoft® Windows® 8 (32-bit/64-bit) Network Interface Ethernet 1000BASE-T, 100BASE-TX, 10BASE-T (1ch) Memory Capacity 1 GB Hard Disk*5 Capacity 320 GB Available Space 280 GB Operating System Linux Power Source AC 100-240 V, 10-5 A, 50-60 Hz Power Consumption Max. 1,000 W Ready*4: 150 W or less Sleep*8: 5 W or less Stand-by: 0.5 W or less Operating Noise Max.
6 Appendix ■ Scanner HS5000 (Optional) Copy/Scan Functions Type Flat Bed Scanner with Automatic Document Feeder (ADF) Scanning Modes Color, Monochrome, Auto Scanning Resolution 600 dpi, 400 dpi, 300 dpi, or 200 dpi Maximum Scanning Area 303 mm × 432 mm (11 15/16" × 17") (when using platen glass) 295 mm × 430 mm (11 5/8" × 16 15/16") (when using ADF) Writing Resolution Standard: 300 dpi × 300 dpi Fine: 300 dpi × 600 dpi Copy Paper Size Maximum: 303 mm × 432 mm (11 15/16" × 17") (equivalent to A3)
Specifications Dimensions 650 mm × 560 mm × 255 mm (25 19/32" × 22 1/16" × 10 1/32") Weight Approx.
6 Appendix Punching Creating a Booklet (Center margin/2-fold) Number of Punches 2 holes, 3 holes 2 holes, 4 holes Usable Paper Size 2 holes: A3, B4, A4-LEF, A4, B5-LEF , Ledger, Legal, Letter, Letter-LEF 3 holes: A3, B4, A4-LEF, B5-LEF, Ledger, Letter-LEF 4 holes: A3, A4-LEF, Ledger, Letter-LEF Paper Weight 52 g/m2 (14-lb bond) to 200 g/m2 (53-lb bond) Maximum Number of Sheets*2*5 Center margin: 15 sheets (60 pages) 2-fold: 5 sheets (20 pages) Operating Environment Temperature: 15ºC to 35ºC (59º
Specifications Paper Weight for Staple 52 g/m2 (14-lb bond) to 210 g/m2 (56-lb bond) (plain paper, recycled paper) Staple Position 1 at front side (angle stapling) / 1 at rear side (angle stapling) 2 at center (parallel stapling) Dimensions (W × D × H) 759 mm × 677 mm × 582 mm (29 7/8" × 26 21/32" × 22 29/32") Weight Approx. 30 kg (66 lb) Power Source AC 100-240 V, 1.2-0.6 A, 50-60 Hz Power Consumption Max.
6 Appendix ■ High Capacity Stacker (Optional) Type External Unit Finishing Functions Collating, stacking (offset) Paper Size Maximum: 340 mm × 460 mm (13 3/8" × 18 1/8") Minimum: 90 mm × 148 mm (3 9/16" × 5 13/16") Offset: 182 mm × 257 mm - 297 mm × 432 mm (7 3/16" × 10 1/8" - 11 11/16" × 17") (Envelopes are not acceptable.
Consumables It is recommended that you use consumables manufactured by RISO KAGAKU CORPORATION. Consumable specifications and types are subject to change without notice. For pricing information, contact your dealer (or authorized service representative). Ink Cartridges Type ComColor X1 Ink Cartridge ComColor X1 Ink Cartridge R Color Quantity Cyan Magenta Yellow Black NET. 1,000 ml Cyan Magenta Yellow Black NET.
Features of the Multifunction Finisher ● Finishing functions B Feeding direction Punch Staple ComColor 7150/ 7110 ComColor 9150/ 9110 ComColor 3150/ 3110 ComColor 7150/ 7110 ComColor 9150/ 9110 A4 B5 A3 B4 N/A N/A Booklet ComColor 3150/ 3110 A3 B4 ComColor 7150/ 7110 ComColor 9150/ 9110 4A A3 B4 N/A N/A 4A 5B N/A B5 A4 N/A 3A 4B N/A N/A 3A 4B A4 B5 N/A 4A A4 4A ComColor 3150/ 3110 B5 A4 N/A 3A 4B A4 Foolscap A4 B5 A3 B4 Face up feed 4A 5B N/A N/A 3A 4B Face down
Index A Cyan ...................................................................... 1-7 About tab .............................................................1-32 Active screen ............................................... 4-6, 5-10 Add cover ................................................... 1-21, 2-40 Additional copies ..................................................2-24 Advanced tab .......................................................1-27 Attach data to an e-mail message ......................
6 Appendix G M Gamma control .......................................... 1-16, 2-33 General screen ............................................... 16, 5-4 Grayscale .............................................................3-10 Group ...................................................................2-41 MAC address ........................................ 16, 1-33, 5-5 Magenta ................................................................ 1-7 Main power lamp ........................................
Index Paper type ................................................. 1-10, 2-11 Paper, loading ......................................................... 27 PIN code .......................................... 1-31, 3-14, 3-15 PIN protection .............................................. 3-9, 3-15 Platen glass .............................................................. 8 Power-saving features ............................................ 27 Print and pause ....................................................
Please contact following for supplies and service: Copyright © 2013 RISO KAGAKU CORPORATION