This guide describes the machine settings and options (IC card reader, scanner, etc.) to be performed by the administrator.
CAUTION After reading this guide, keep it in handy for future reference. The "Safety Precautions" are provided in the supplemental Safety Information. Be sure to read through them prior to use.
About This Administrator's Guide Preface Thank you for using the ComColor Series product. This guide describes the administrator settings. You can configure the user and address book registration settings, the settings for allowing and restricting operations, and the usage environment settings according to the usage purpose and usage conditions. Configure an easy-to-use environment for more convenient use of the machine. ● Some of the administrator settings may greatly affect the operations of the machine.
Symbols, Notations, and Screenshots Used in This Guide ■ Symbols Used in This Guide Indicates cautions that should be noted for safe use of this machine. Indicates important items that should be noted or are prohibited. Indicates useful information or additional information. ■ Names of keys and buttons The names of hard keys on the operation panel and buttons on the touch panel screen or computer window are indicated with square brackets [ ].
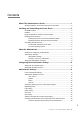
Contents About This Administrator's Guide .......................................................... 1 Symbols, Notations, and Screenshots Used in This Guide ................................ 2 Installing and Uninstalling the Printer Driver ........................................ 5 CD-ROM Contents ............................................................................................. 5 Installers .........................................................................................................
Power schedule ................................................................................................ 31 Non-RISO Ink Setting (Only on the operation panel) ....................................... 33 Network setting (IPv4) ...................................................................................... 34 Network setting (IPv6) ...................................................................................... 34 Network setting (Details) ...................................................
Installing and Uninstalling the Printer Driver CD-ROM Contents The supplied CD-ROM includes an installer and setup maker, each of which is contained in the [Windows 32-bit] and [Windows 64-bit] folders. Select the folder whose bit count matches the bit count your operating system is running. • Standard printer driver installer This is a standard installer. • Setup Maker This utility is used to create a quick installer. Use this utility to create an installer with customized settings.
Installing the Printer Driver ■ Installing the printer driver with the standard installer Insert the CD-ROM into the computer to start the installation wizard. Follow the displayed instructions for installation. After the printer driver has been installed, restart the computer. For more information on this installation method, see "Installing the Printer Driver" in the "Basic Guide". ■ Installing the printer driver with the quick installer Double-click the quick installer [QuickSetup.
About the Administrator Workflow for configuring an administrator The settings the administrator must configure before the machine is available to users are as follows: 1 Set the administrator password 2 Login as a user with administrator authority 3 Configure the network settings (If you connect the machine to a network) 4 Registering Users (See p.
■ Functions only for the administrator There are some functions that can only be used by the administrator when using this machine. These functions can be controlled by logging in as an administrator as follows. 1 Login as a user with administrator authority. 2 Press [Admin mode] on the mode screen. 3 Press a mode button. The following are the functions that can be used only by the administrator in each mode.
About the Administrator Setting the Administrator Password Set the administrator password when using the machine for the first time. Use the following procedure to set the password. 1 2 Press [Login] on the mode screen to display the [Login] screen. Press [Admin]. 4 Enter the new password. The password must be between 0 and 16 alphanumeric characters long. 5 Press [OK]. To change the user name, see p. 25. The screen for entering the old password is displayed.
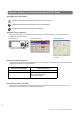
Configuring the Administrator Settings There are two ways to configure the administrator settings. • Setting with the operation panel of the machine • Setting with the RISO Console on your PC The descriptions in this guide are based on operation using the touch panel. To configure the administrator settings, a user must login with administrator authority. Setting with the operation panel 1 3 Press [Settings]. 4 Configure the settings. Login as a user with administrator authority.
Configuring the Administrator Settings Setting with the RISO Console 1 5 Configure the settings. Start the RISO Console. Start your web browser, enter the IP address of the machine in the address bar, and press the [Enter] key. 2 Login as a user with administrator authority. Click [Login], and enter the user name and password. 3 Click [Admin mode]. After configuring the settings, click [Logout] or close the screen to exit the "Admin.". 4 Click [Admin.].
Administrator Settings The following are the administrator settings. If optional equipment required for a setting is not connected, that setting is not displayed. List of Administrator Settings The settings the administrator configures are as follows. The settings are divided into four categories according to function (User ctrl, System, Printer, and Scanner). The list of reference pages shows where you can check the content and values of each function.
Administrator Settings • • • • • • • • • • • • • • • • • • • • Printer Scanner (Configure the printer functions and network) (Configure the scanner functions) Network setting (IPv4)........................ (p. 18, 34) Network setting (IPv6)........................ (p. 18, 34) Network setting (Details) .................... (p. 18, 34) Ext. Controller setting............................... (p. 18) IP address limiting (IPv4) ................... (p. 18, 36) IP address limiting (IPv6) ...................
Setting/Description Set value/Details User setting See p. 25 Use this to resister users who can use this machine. This setting can restrict the mode(s) which a user can enter, the color mode, or number of copies for each user. When [Login setting] has been set to [Not required], users do not have to be registered.
Administrator Settings Setting/Description Set value/Details Account record history (only on the operation panel) • To delete a file: Select the file to delete from the list, and press [Delete]. • To save a file to a USB flash drive: Connect the USB flash drive to the machine, select the file to save from the list, and press [Save to USB flash drive]. Use this to delete account record history files or saves files to a USB flash drive.
Setting/Description Set value/Details Power save setting Switch the machine to power save mode when the machine has not been operated for a fixed period. The power saving setting has [Auto backlight-OFF] and [Auto sleep]. You can select sleep from two different levels of power consumption, [Low/Standard]. ● If you set the power saving in sleep to [Low], you can save more power than you can in [Standard]. However, the following limitations apply. • The RISO Console is not displayed during sleep.
Administrator Settings Setting/Description Set value/Details Initialize (only on the operation panel) Clears the administrator settings and deletes the user information, and returns all settings to their default. • Delete all user information: Deletes all user information registered with user setting and all personal folder. • Clear Admin settings: Returns all administrator settings other than user information to the factory settings.
Printer Setting/Description Set value/Details Network setting (IPv4) See p. 34 Configure this setting for connecting this machine to a network. This is a setting for connecting to an Internet protocol Ver.4 network. If you configure from the RISO Console, you can register the IPv4 and IPv6 network setting and the network setting (details) in the [Network setting] screen. Network setting (IPv6) See p. 34 Set this to use this machine connected to a network.
Administrator Settings Setting/Description Set value/Details IPsec setting (Ext. Ctrl.) (only the touch panel when the ComColorExpress IS1000C or IS950C is connected) You can use data encryption technology to prevent data leaks and fabrication when connecting this machine and an external controller to a network. The setting items vary depending on what network you use. ● Do not turn off the external CI controller while configuring a network.
Setting/Description Set value/Details Envelope feed options When you print on envelopes, set image enhancement and paper feeding to a setting suitable to the envelopes so that you can prevent ink stain and image blur. This works only when you have selected [Envelope] in [Feed ctrl.] of the feed tray. • Feed control Standard/Wide range • Ink droplet control No/Yes ● If you print on thick or curled envelopes, set [Feed control] to [Wide range].
Administrator Settings Setting/Description Set value/Details High capacity stacker (When using high capacity stacker) Specify where the stacking tray lowers when the high capacity stacker output printouts or when printing is suspended. You can specify the stoppage position of the stacking tray to [Down to the carriage] or any position. Do not lower stacking tray.
Setting/Description Set value/Details Mail dest. direct input Prohibited, Permitted Specify whether to permit direct input of e-mail addresses when specifying a directory for scanned data. When this has been set to [Permitted], the direct input button is displayed on the [Directory] screen in scanner mode. When this has been set to [Prohibited], users cannot send e-mail to destination addresses other than those that are registered.
Administrator Settings Configuring When Using an IC Card Reader (Option) If you connect an IC card reader, you need to configure additional settings in the following administrator setting items. Relevant Function Setup Function Details Login setting Specify whether to automatically start printing of waiting jobs. See p. 24 User setting Register IC card information to the machine. See p. 25 Login method Configure login authentication method. See p.
Login setting Specify whether login is required to enter a mode and the Auto logout time. Select [Required] for each mode if you want to restrict those who can use this machine. Always set 2, 3, or 4 in "Registering Users" when "Required" is selected. • Login setting for each mode Set value: Not required, Required (Factory setting: Not required) • Auto logout time Specify the time for automatic logout when the machine is not operated for a fixed period. Set value: 10-3600 sec.
Administrator Settings Index entry Specify the index button name displayed for "User list" and "Mail destination" on the [Login] screen. The index button set here are used with [Index] for [User setting]. 1 Press [Index entry] on the [Admin. Settings] screen. 2 Press an Index button to change. 3 Enter the index name and press [OK]. You can configure this function in the RISO Console. (See p.
1 Press [User setting] on the [Admin. Settings] screen. 2 Press [Add]. 3 Enter the user name and press [Next]. 4 Set the temporary password and press [Next]. 5 Re-enter the temporary password and press [Next]. 6 Configure the settings. ● If [PC login name] is incorrect when [Login setting] in printer mode is set to [Required], jobs cannot be received from a computer. Enter the information and check that it is correct. ● Be sure to configure [Index].
Administrator Settings 7 Press [OK]. When using a scanner unit, you can proceed to configuration of e-mail addresses. Follow the on-screen messages for configuration. When using an IC card reader, the following screen is displayed. Adding a Large Number of Users (User setting) You can use the RISO Console to configure a large number of users from a computer at the same time. Save the format (CSV file) to the computer, enter the user information (User name, PC login name, with/without Admin.
4 Click [Read CSV file], and then read the entered file. If the [Read CSV file] is not properly completed, a message is displayed. Check the CSV file setting and user registration number. When using an IC card reader, you need to register the IC card to the machine. The following are the IC card registration procedure. 5 6 7 Press [IC Card]. The message "Set the IC card." is displayed. 8 Hold the IC card over the IC card reader. The message "Registration of user is complete.
Administrator Settings Configuring Authentication Servers (External Server Authentication) Configure this setting using an external server when you authenticate a user who has an account on an external server. A user without an account on an external server cannot be authenticated. If you have used external server authentication, you do not need to register user information to the printer, and you can manage the information centrally on the server.
■ Setting Items The items you set in [Authentication servers] are as follows. Setting/Description LDAP server: Primary Specify LDAP's primary server's settings and port numbers. LDAP server: Secondary Specify LDAP's secondary server's settings and port numbers. Kerberos server: Primary Specify Kerberos's primary server's settings and port numbers. Kerberos server: Secondary Specify Kerberos's secondary server's settings and port numbers. Realm Specify Kerberos server's realm.
Administrator Settings 1 2 3 Press [Authentication servers] in the [Admin. Settings] screen. Press [ON], and specify each field in authentication server information. Power schedule Configure this machine to automatically turn on and off the machine's "Sub power" at specified times of each day of the week. • OFF, ON When it is [ON], set the power schedule for each day from Monday to Sunday to [ON/OFF].
2 Press [ON]. 6 Press [OK]. When this function is enabled, the [Confirm] screen is displayed on the control panel one minute before the end time. 3 Press a day of the week. 4 Select [ON] in [Start] and [End], and set the time. Press [Suspend] if you do not want to turn the power off. ● If you do not press the [Suspend] button within one minute after the screen is displayed, the end process starts. ● If you press [Suspend], you can close the [Confirm] screen temporarily to suspend the end process.
Administrator Settings Non-RISO Ink Setting (Only on the operation panel) When using Non-RISO ink, configure this setting for each ink color. Prohibited, Permitted ● The following problems may occur when using Non-RISO ink. - Fading of prints and color tone changes due to differences in ink performance.
The following items are displayed only when you configure them in the RISO Console. Network setting (IPv4) • Domain name These settings are required for connecting the machine to an Internet protocol Ver.4 network environment. • Comment • Connect RISO Console through https • Link Speed/Duplex Mode • Printer name Enter a printer name displayed on the network. The name must be within 16 characters.
Administrator Settings 3 Press the [DNS (IPv4)] and [DNS (IPv6)] tabs, and configure each setting. 4 Press [WINS], and configure each setting. When connecting the RISO Console with https, the [RISO Console connection] setting in the [Others] tab is required. 5 Press [OK]. ● When Proxy server is set to [Use], specify a user name and a password. ● You can configure this function in the RISO Console. (See p. 11) If you press [Primary] or [Secondary], the address entry screen is displayed.
● When granting access to a specified computer IP Address Limiting IPv4 / IPv6 Specify the subnet mask of 255.255.255.255 for the IP address of the specified computer. Specify computers that can access the machine. ● When granting access to multiple computers Specify the subnet mask of 255.255.255.0 for the IP address of each computer.
Administrator Settings 2 Press [ON]. ● The setting varies depending on your network environment. Scroll using the [▲] and [▼] buttons, and configure each setting. 3 ● If you press [Name], the [Name] screen is displayed. After entry, press [OK]. Set each security policy to [ON] or [OFF]. ● If you press [Pre-shared key], the [Pre-shared key] screen is displayed. If you press [Next] after entry, the [Pre-shared key (confirm)] screen is displayed. ● You can register up to 10 security policies.
7 8 Press the [Comm.] tab and configure each setting. 2 ● When [Paper out] is set to [3], the standard tray lowers to the bottom when paper runs out. You can load many sheets at once, but to do so you need to crouch down. If you set [Paper out] to [1] or [2], the standard tray does not lower to the bottom; it stops halfway through. Therefore, you can load many sheets standing up. Press [OK]. The details of the security policy setting are set, and the [IPsec setting] screen is displayed again.
Administrator Settings The following settings vary depending on the specified protocol. An entry must be within 256 alphanumeric characters. 5 ● Storage server IP address or URL ● Storage directory The [Add] screen returns. ● Directory shared name ● Storage directory (ex: ¥¥) If communication fails, check the server of the scanner storage directory and the network environment. ● Directory login name ● Directory login password 1 Press [Scanner data directory] on the [Admin. Settings] screen.
Functions affected by Administrator Setting Function Diagram The administrator setting manages the machine and makes it more convenient when you configure the settings to match your use environment. Refer to the following diagrams, and configure settings to match your environment.
Functions affected by Administrator Setting Functions that users can use Save to folder (Shared folder) (Save read data of print and copy to a shared folder.) What you configure in the administrator setting • • • • • Registering a group in [Group setting] Registering a user in [User setting] Setting [Login setting] to [Required] Setting [Folder function] to [ON] Configuring [Folder] If you restrict use of the following functions per user, configure the following settings in the administrator setting.
■ Settings affected by network setting, and what users are affected by If you are using the machine connected to the network, you cannot configure each function without configuring [Network setting (IPv4)/(IPv6)] and [Network setting (Details)] in advance. Be sure that you configure [Network setting (IPv4)/(IPv6)] and [Network setting (Details)] before configuring each setting.
Functions affected by Administrator Setting If you configure the following functions in the administrator setting, access to the network is restricted, and users are affected by the following: What users are affected by What you configure in the administrator setting Sending print jobs and restricting use of the RISO Console using an IP address on the network environment • [Network setting (IPv4)] • [IP address limiting (IPv4)] • [Network setting (IPv6)] • [IP address limiting (IPv6)] Sending print jobs
Appendix Formats of CSV Files to Import Enter user information to CSV files written from the RISO Console. Example) Owner information data The setting of the second line (A-L) corresponds to "Item Name" in the list below (General No.1-12). A B C D E F G H I J 1 CSV File Ver. 2 User name PC login name Admin. authority Printer mode Copy mode Scanner mode Index IC card Temporary Password Group1 3 J.Smith J.Smith admin on on on 6 1001 9638... abcde123 Sales 4 C.Carry C.
Appendix If you configure function restriction for a user that you register to the machine, you need to configure the following settings. Example) Function restriction data The setting of the second line (M-V) corresponds to "Item Name" in the list below (Print/Copy accounting rule No.13-22).
Please contact following for supplies and service: Copyright © 2013 RISO KAGAKU CORPORATION