W983 Power Stacker W863 Ink Dryer for DA Series Printers Operator Guide SV61228 Rev. A Stacker_Dryer Op Guide Book.
FCC Compliance This equipment had been tested and found to comply with the limits for a Class A digital device, pursuant to Part 15 of the FCC rules. These limits are designed to provide reasonable protection against interference when the equipment is operated in a commercial environment. This equipment generates, uses, and can radiate radio frequency energy, and if not installed and used in accordance with the users manuals, may cause harmful interference to radio communications.
W983 Stacker/W863 Dryer Operating Guide Table of Contents Safety Summary ....................................................................3 W983 Power Stacker Controls and Indicators .........................................................5 Operator Panel ...............................................................5 Conveyor Deck ...............................................................6 Connector and Side Panels ............................................7 Optional Stand for Stacker ........
W983 Stacker/W863 Dryer Operating Guide Table of Contents W863 Ink Dryer Controls and Indicators .......................................................21 Technical Specifications ......................................................21 Dryer Operation ...................................................................22 Dryer Job Setup ..................................................................23 Adjust Dryer Height .......................................................
W983 Stacker/W863 Dryer Operating Guide Safety Summary Various messages are used throughout this guide to alert you to potentially hazardous or error causing conditions. The messages are as follows: • WARNING – alerts you to conditions or practices that could cause serious injury. • CAUTION – alerts you to conditions or practices that could cause damage to the equipment or to the material being run.
W983 Stacker/W863 Dryer Operating Guide • • • • • • • • Be certain that the area in front of the wall outlet into which this machine is plugged is free from obstruction. The power cord wall plugs are the primary means of disconnecting the machine from the AC supply. The wall outlet should be near the machine and easily accessible. DO NOT use an adapter plug on the line cord or wall outlet. DO NOT remove the ground pin from the line cord Ground must be properly connected before powering machine.
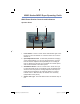
W983 Stacker/W863 Dryer Operating Guide W983 Power Stacker Controls and Indicators Operator Panel 3 1 4 1 2 3 4 2 Power Switch - This is a rocker switch with indicator light. Press the top in to turn the Stacker on. Press the bottom in to turn the Stacker off. Speed Adjustment Knob - To eliminate possible ink smudging of the printed address, you can vary the speed of the conveyor belts so that the mailpieces are separated (do not overlap) as they are delivered to the belt.
W983 Stacker/W863 Dryer Operating Guide Conveyor Deck 1 3 2 4 1 2 3 4 Media Stop - This plate is adjusted so that mailpieces from the printer hit the stop and drop flat onto the conveyor belt. The height adjustment handles materials of varying thicknesses. Stacker Full Arm Fixture - Sets the stop position for mailpieces on the ramp and raises/lowers full arm.
W983 Stacker/W863 Dryer Operating Guide Connector and Side Panels 1 2 3 4 4 5 6 The illustrations above show the Stacker connectors and fuses. 1 2 3 4 5 6 Trip Sensor connector - This is where the cable from the Stacking full arm is connected. This activates when the Stacker is full. Printer Interface connector - This is where the interface cable coming from the printer is connected. Circuit Breaker 1.
W983 Stacker/W863 Dryer Operating Guide WARNING: The Stacker (when used with the Dryer) requires its own separate 15 amp branch circuit for power. Do not plug other appliances (such as your printer) into the same circuit as the Stacker/Dryer. Optional Stand for Power Stacker 1 2 The illustration above shows the location of these stand components. 1 2 Height Adjustment Knob - used to adjust the height of the stacker so it can be aligned with your printer or to operator level.
W983 Stacker/W863 Dryer Operating Guide Stacker Technical Specifications Input Power: 120 AC, 60 Hz, 12 Amps Fuses: Two 1.6 A Slo Blow 250 VAC Dimensions: Conveyor/Stacker: Height: 9” Width: 15” Length: 70” Weight: 58 lbs. Stacker Stand: Height: 30” (maximum) 24” (minimum) Width: 15” Length: 36” Weight: 20 lbs.
W983 Stacker/W863 Dryer Operating Guide Stacker Setup Guidelines The following are guidelines to consider when making your Stacker Job Setup adjustments. Media Stop, Stacker Height and Distance The Stacker height and distance adjustments and the media stop adjustment are set so that the leading edge of the mailpiece contacts the conveyor belt as close to the media stop as possible, while the mailpiece is being released from the output rollers of the printer.
W983 Stacker/W863 Dryer Operating Guide Speed Control The speed adjustment allows the proper amount of spacing between mailpieces. This value varies greatly depending on mailpiece size. Stacker Job Setup You will be required to check and make the following adjustments when you change from one job to another job. Adjust Stacker Height and Distance Depending on the mailpiece, you will have to adjust the height and distance of the Stacker in relation to the output of the printer.
W983 Stacker/W863 Dryer Operating Guide To adjust the distance: 1 2 Unlock wheels if they are locked. Move the Stacker to the recommended distance from the printer output roller and lock the wheels. Refer to tables and graphs on pages 15-19 to determine the value. Adjust Media Stop The media stop is adjusted so that mailpieces from the printer hit the stop and drop flat onto the conveyor belt. There are two adjustments on the media stop: height and depth.
W983 Stacker/W863 Dryer Operating Guide Adjust Stacker Full Arm This consists of making two adjustments: locating the full arm fixture on the ramp and locating a metal tip on the full arm. There is a scale on the ramp and one on the arm that are used to set up for different size material. Refer to the table on page 15 to determine the recommended values.
W983 Stacker/W863 Dryer Operating Guide Adjust Hold Downs The hold downs consists of two rollers and two springs used to keep the media in contact with the conveyor belts. They are adjusted by loosening the knob on each roller and spring and setting the desired distance from the conveyor belt. Tighten the knobs when you are finished. Refer to the table on page 13 to determine the recommended values. Knobs Auto/Manual Switch When the switch is in Auto mode (up), operation is controlled by the printer.
SV61228 Rev. A Stacker_Dryer Op Guide Book.indb 15 0.0 7.5 11.0 11.5 6.5 11.0 11.5 6.5 11.0 11.5 6.5 11.5 11.5 11.5 4.0 11.5 11.5 11.5 11.5 11.5 10.5 10.5 10.5 Full Arm Tip Setting - Scale on Arm 4.0” 4.0” 3.0” 4.0” 4.0” 3.0” 4.25” 3.0” 2.75” 4.0” 3.0” 2.5” 3.5” 1.5” 1.5” 2.0” 1.0” 1.0” 2.0” 1.25” 1.0” DistancePrinter Output Edge to Stacker lip N/U – Not used. Raise or slide springs so that they do not interfere with the pieces. 3/8 0.0 7.5 7.5 0.0 0.
W983 Stacker/W863 Dryer Operating Guide Use the following charts to determine the indicated settings for the Stacker for various material lengths and thicknesses (where applicable). Media Stop Setting 11 10 9 Media Stop Setting 8 7 6 5 4 3 2 1 0 5 Min. 6 7 8 9 10 11 12 13 Max.
W983 Stacker/W863 Dryer Operating Guide Horizontal Distance (in inches) W983 Stacker to DA Printer Output Roller Vertical Distance (in inches) W983 Conveyor Deck to DA Printer Output Roller STACKER HEIGHT AND DISTANCE - SUPER DRAFT & DRAFT MODE 5.5 5.0 4.5 4.0 3.5 3.0 2.5 Max. thickness=3/8” 2.0 1.5 1.0 Min. thickness=0” 0.5 0 5.0 5.5 6.0 6.5 7.0 7.5 8.0 8.5 9.0 9.5 10.0 10.5 11.0 11.5 12.0 12.5 13.0 Material Length (in inches) 5.5 5.0 4.5 Max. thickness=3/8” 4.0 3.5 3.0 2.5 2.0 1.
Vertical Distance (in inches) W983 Conveyor Deck to DA Printer Output Roller W983 Stacker/W863 Dryer Operating Guide STACKER HEIGHT AND DISTANCE - LETTER MODE 5.5 5.0 4.5 Max. thickness=3/8” 4.0 3.5 3.0 2.5 2.0 1.5 Min. thickness=0” 1.0 0.5 0 5.0 5.5 6.0 6.5 7.0 7.5 8.0 8.5 9.0 9.5 10.0 10.5 11.0 11.5 12.0 12.5 13.0 Horizontal Distance (in inches) W983 Stacker to DA Printer Output Roller Material Length (in inches) 5.5 5.0 4.5 Max. thickness=3/8” 4.0 3.5 3.0 2.5 2.0 1.5 Min.
W983 Stacker/W863 Dryer Operating Guide Vertical Distance (in inches) W983 Conveyor Deck to DA Printer Output Roller STACKER HEIGHT AND DISTANCE - EXECUTIVE MODE 5.5 Max. thickness=3/8” 5.0 4.5 4.0 3.5 3.0 2.5 2.0 Min. thickness=0” 1.5 1.0 0.5 0 5.0 5.5 6.0 6.5 7.0 7.5 8.0 8.5 9.0 9.5 10.0 10.5 11.0 11.5 12.0 12.5 13.0 Material Length (in inches) Horizontal Distance (in inches) W983 Stacker to DA Printer Output Roller 5.5 5.0 4.5 4.0 3.5 3.0 2.5 Max. thickness=3/8” 2.0 1.5 1.
W983 Stacker/W863 Dryer Operating Guide Stacker Tips and Troubleshooting Cleaning The Stacker requires a clean environment, free from dust, airborne contaminants and moisture. Operator maintenance is limited to cleaning the belts with a lint-free cloth dampened with a mild soap and water solution. Smudged Addresses You can lift or slide any of the hold down rollers or springs where heavily printed areas of your envelopes may be smudged by running under the rollers/springs.
W983 Stacker/W863 Dryer Operating Guide Optional W863 Ink Dryer Controls and Indicators 2 1 3 4 The illustrations above show the location of the Dryer components. 1 2 3 4 Power On/Off Switch - turns on or off Dryer. Power Cord - where the input power cord is connected. Height Handle - adjusts the height of the Dryer over the material (six position settings). Power Outlet - the other end of the power cord is attached to the Stacker AC outlet labeled "Dryer".
W983 Stacker/W863 Dryer Operating Guide Dryer Operation The Dryer contains only one operator control, a power on/off switch with an associated indicator. This switch is used to turn power to the Dryer on or off. The switch will light when on. Since the Dryer receives its power from a dedicated power outlet on the associated Stacker, this switch will light (if set at on) only when the power switch on the Stacker is switched on.
W983 Stacker/W863 Dryer Operating Guide WARNING: The Dryer with Stacker combination requires its own separate 15 amp branch circuit for power. Do not plug other appliances (such as your printer) into the same circuit as the Dryer/Stacker. Dryer Job Setup You will be required to check and make the following adjustments when you change from one job to another job.
W983 Stacker/W863 Dryer Operating Guide Dryer Tips and Troubleshooting Cleaning The Dryer requires a clean environment, free from dust, airborne contaminants and moisture. Operator maintenance is limited to keeping the vents open and avoiding dust, paper fragments, and material from touching the quartz heater bulb inside. Jams To clear jams under the Dryer, use the height adjustment handle and move it to the highest position to make the material accessible.
W983 Stacker/W863 Dryer Operating Guide Follow these steps to replace the fuse in the Dryer: 1. Turn the Dyer off and unplug the AC power cord from the Stacker outlet. 2. Using a small flat object or screwdriver, lift up the fuse holder by from its slot located directly above the AC input connector. 3. Remove blown fuse and insert replacement fuse, making sure it is the same type and rating. 4. Slide fuse holder back into slot. 5.
W983 Stacker/W863 Dryer Operating Guide Dryer Troubleshooting Table Symptom Possible Cause Remedy Does not run No power Check plug connections. Check power switch. Check Dryer fuse. Check Stacker fuse. Ink not drying Wrong Stacker speed Adjust Stacker speed control for a slower speed to allow more time for mailpiece travel under the Dryer. Incorrect height Reposition the Dryer height for best drying position. No power Check Dryer fuse. Check Stacker fuse.