Operation Guide Introduction 2 About DVD Dubbing 8-12 3 Using DVD Dubbing 8-12 4 Setting Options 14 References 15 What should I do when...
Introduction About This Guide - It is prohibited to reproduce all and a part of this guide without permission. - If you find any defect on this guide, please contact our user support center. For details, please refer to “User Support Center”(P.19). - Menu selection, window operation, etc. are based on general Windows operations. - Some screen captures in this guide are retouched. - This guide features screen captures from the software under development. They may differ from actual software.
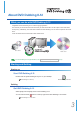
About DVD Dubbing 8-12 What you can do with DVD Dubbing 8-12 ImageMixer mini DVD Dubbing 8-12 is a DVD copying application. The contents you record onto 8cm DVD discs with your DVD camcorders can be copied to 12cm DVD discs as they are(*). Additionally, 12cm DVD discs created with DVD Dubbing 8-12 can also be copied to 12cm DVD discs. *DVD+VR format discs are converted to DVD-Video format. 8cm DVD 12cm DVD For DVD Dubbing 8-12 supported discs, see “Supported Discs by Data Formats” (P.15).
Using DVD Dubbing 8-12 Copying There are two ways to copy with DVD Dubbing 8-12: *Copying method that can be selected depend on data format of the reading disc and drive(s) used. - Writing DVD disc contents directly to a different disc (DVD-Video format only) With this method, a DVD disc contents is written to a different disc as it is. *For making one copy of a DVD, copying is finished faster this way.
Using DVD Dubbing 8-12 Write Directly to Disc (When reading DVD-Video format) The disc contents can be written directly when the reading disc format is DVDVideo, and reading and writing drives are separate. *Connect a reading drive such as a DVD camcorder to your computer before starting up DVD Dubbing 8-12. For how to connect your camcorder and computer, refer to your DVD camcorder instruction manual. When connecting with USB 1.
Using DVD Dubbing 8-12 4 5 Select the writing drive. Click the [ ] button on the right of the writing drive name. The writing drive tray is opened. 6 Set a 12cm disc in the open writing drive tray. 7 Select "Write directly to disc". *Cancel the processing performed by any other applications if those applications start up automatically when a disc is set.
Using DVD Dubbing 8-12 9 10 Enter a name for the disc to burn. You can set [Writing Options] if you wish. (P.14) Click the [Burn] button. *When the disc to write to is a rewritable disc such as a DVD-RW, and already has some data stored, a message asking if you wish to erase the existing contents is displayed. Click the [Yes] button to erase all contents and overwrite with the new contents. The disc is finished and ejected from the drive.
Using DVD Dubbing 8-12 Import to Computer then Write to a Disc (with separate drives for reading and writing) With this copying method, you import DVD disc contents to computer then write to a different disc. Following are the steps for copying a DVD with separate drives for reading and writing, for example reading from your DVD camcorder and writing with a DVD drive on your computer. *Connect a reading drive such as a DVD Scamcorder to your computer before starting up DVD Dubbing 8-12.
Using DVD Dubbing 8-12 4 5 Select the writing drive. Click the [ ] button on the right of the writing drive name. The writing drive tray is opened. 6 Set a 12cm disc in the open writing drive tray. 7 Select "Import to PC then write to disc". *Cancel the processing performed by any other applications if those applications start up automatically when a disc is set. *Change the “Work Drive” when there is not sufficient disk space.
Using DVD Dubbing 8-12 9 10 Enter a name for the disc to burn. You can set [Writing Options] if you wish. (P.14) Click the [Burn] button. *When the disc to write to is a rewritable disc such as a DVD-RW, and already has some data stored, a message asking if you wish to erase the exisiting contents is displayed. Click the [Yes] button to erase all contents and overwrite with the new contents. The disc is finished and ejected from the drive.
Using DVD Dubbing 8-12 Import to Computer then Write to a Disc (with one drive for reading and writing) With this copying method, you import DVD disc contents to computer then write to a different disc. Following are the steps for copying a DVD with one drive, for example reading and writing with a DVD drive on your computer. 1 2 Start up DVD Dubbing 8-12. Set the DVD you wish to copy in the reading drive.
Using DVD Dubbing 8-12 5 Select "Import to PC then write to disc". *Change the “Work Drive” when there is not sufficient disk space. Contents imported to your computer When you select “Import to PC then write to disc”, disc contents is saved on your computer temporarily, and it is erased after disc burning is finished. 6 7 Click the [Read] button. When contents is read, the DVD disc is ejected from the drive and [Writing Drive Setup] dialog is displayed. Set a disc to write to.
Using DVD Dubbing 8-12 9 Click the [Burn] button. *When the disc to write to is a rewritable disc such as a DVD-RW, and already has some data stored, a message if the contents can be erased is displayed. Click the [Yes] button to erase all contents and overwrite with the new contents. The disc is finished and ejected from the drive. *If you wish to make multiple copies with the same contents, click the [Yes] button in the displayed message dialog.
Setting Options About Setting Writing Options Click the [ ] button on the right of the [Writing Options] in the [Writing Drive Setup] dialog to set following options. Item Write Speed Description Select the writing speed. As default, fastest speed is selected. The speed options vary depending on the Quick Erase/Complete Erase writing discs and drives. This option can be selected only when writing to DVDRW discs with existing data.
References Supported Discs by Data Formats DVD Dubbing 8-12 supports reading and writing the following disc types: Data format DVD-Video Reading Disc (8cm/12cm) DVD-R DVD-RW DVD+R DVD+RW Writing Disc (12cm) DVD-R DVD-RW DVD+R DVD+RW DVD-RW DVD-RW DVD-RAM DVD-RAM DVD+RW DVD-R DVD-RW DVD+R DVD+RW DVD-VR DVD+VR Data format DVD-Video DVD-VR DVD-Video * Double/Dual layered disc (DVD-R DL/DVD+R DL) are not supported.
What should I do when... Troubleshooting Troubles in Starting Up No 1 Trouble Measure I get an error message that says Please follow these steps to restart the application. "Other user is using this application. 1. Login as the user using this application. Exit the application used by the other 2. Shutdown the application. user and restart the application.", and 3. Re-login as the user to use this application. cannot start up the application. 4. Start the application.
What should I do when... Error Messages Errors in Main Screen No 1 Error Message or Error display Cause Measure "The selected drive cannot Reading or writing drive does Reselect the reading or writing drive. be found. Select a different not exist. drive." 2 "You do not have the You do not have the Change the work drive. Or set the privileges to access the privileges to read and write in privileges to access in the work drive selected drive. Select a the selected work drive.
What should I do when... No 3 Error Message or Error display Cause Measure "Failed processing data. Not sufficient free space in Increase the free space in the work Not enough space in work the work drive. drive. Or change the work drive. drive." Disk space required in Work Drive: For DVD-Video/DVD-VR: Reading DVD data size + 1GB For DVD+VR: Reading DVD data size times 2 + 1GB Errors when writing data No 1 Error Message or Error display Cause "Failed erasing disc.
No 7 Error Message or Error display "Failed finalizing disc. Cause Measure Writing drive is not connected. Check the writing drive connection. "The disc was not burnt The disc was not burnt Check the status of your discs and properly. Check the status properly. drives again. The drive may not be connected." 8 of your discs and drives again.
User Support Center Online Registration Various services and support are available to registered users. We recommend you access the following website and register before your inquiry. Online registration: https://regist.pixela.co.jp/e/ *For registration, your personal information and your product’s serial number are required. Inquiries For technical inquiries about this product, please contact the PIXELA User Support Center in your region. U.S.