The Best Light Possible INSTALLATION GUIDE - BEVELED LEDFLATLIGHT
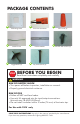
PACKAGE CONTENTS A D G Mounting Plate Ground wire Toggle Bolts (4) STOP B E H Two-wire connector Install Bracket C F Wire nuts (3) Junction box screws (2) Dry wall screws (4) BEFORE YOU BEGIN Read these instructions completely and carefully WARNING RISK OF ELECTRIC SHOCK • Turn power off before inspection, installation or removal. • Properly ground electrical enclosure. RISK OF FIRE • Follow all NEC and local codes. • Use only UL approved wire for input/output connections.
1 Carefully unpack FlatLight from its packaging. Properly inspect for defects before installing. Wear work gloves in order to prevent dirt or oil from being transferred to the FlatLight. 2 Remove mounting plate A from Flatlight. 3 Turn off the electric power to the junction box location at the main fuse or breaker panel. 4 Remove existing lighting fixture or cover plate from junction box. 5 Extract the circuit wires from the junction box and separate the three wires.
ENGLISH HARD SURFACE/CEILING/WALL MOUNT INSTALLATION CONTINUED 7 Attach the two-wire connector B that was provided to the exposed wires from the junction box. Connect the black wires by placing them together and screwing a wire nut C provided onto the ends. 8 Repeat Step 7 for the white wire. 9 **Optional mounting without bracket. Go to step 13 if mounting without bracket 10 Now attach the FlatLight mounting plate to the junction box by using the installation bracket E provided.
13 Connect the bare copper or green grounding wire from the junction box to the green insulated wire from the FlatLight by placing them together and screwing a wire nut onto the ends. 14 Place the connected electrical wires into the junction box and install the FlatLight to the mounting plate by aligning mounting clips to the slots located on the light. Once aligned slide FlatLight into place. Go to step 16 if not using a mounting plate.
1 Desempaque cuidadosamente la FlatLight de su embalaje. Inspeccione bien en busca de defectos antes de instalar. Póngase guantes de trabajo para prevenir manchar la FlatLight con suciedad o aceite. 2 Retire la placa de montaje A de la FlatLight. 3 Desconecte la corriente eléctrica de la caja de conexión en el fusible principal o automático. 4 Remueva el dispositivo de iluminación existente o la cubierta de la caja de conexión.
INSTALACIÓN SUPERFICIE DURA/TECHO/MONTAJE A LA PARED Adjunte el conector de dos cables B que se provee a los cables al descubierto de la caja de conexión. Conecte los cables negros colocándolos juntos y atornillándolos con un conector de torsión C provisto a los extremos. 8 Repita paso 7 con el cable blanco. 9 **Montaje opcional sin el soporte. Vaya al paso 13 si desea el montaje sin soporte.
INSTALACIÓN SUPERFICIE DURA/TECHO/MONTAJE A LA PARED Conecte el conector de dos cables de la FlatLight al conector instalado previamente en la caja de conexión. 13 Conecte el cable de cobre desnudo o cable de tierra verde desde la caja de conexión hasta el cable aislado verde de la FlatLight colocándolos juntos y atornillándolos con un conector de torsión a los extremos.
INSTALLATION SUR SURFACE DURE/ PLAFOND/MONTANT MURAL 1 Déballez soigneusement le FlatLight de son emballage. Faites une inspection pour vous assurer de l’absence de défauts avant de procéder à l’installation. Portez des gants de travail afin de prévenir le transfert de saleté ou de graisse sur le FlatLight. 2 Retirez la plaque de montage A du Flatlight. FRENCH 3 Coupez le courant électrique à la jonction box à partir du coupe-circuit à fusible principal ou du panneau du disjoncteur.
FRENCH INSTALLATION SURFACE DURE/PLAFOND/ MONTAGE-MUR CONTINUEZ 7 Attachez le connecteur bifilaire B qui a été fourni aux fils exposés à partir de la boîte de jonction. Connectez les fils noirs en les plaçant ensemble et en vissant un capuchon de connexion C fourni sur les extrémités. 8 Répétez l’Étape 7 pour le fil blanc. 9 **Montage facultatif sans support.
12 Connectez le connecteur bifilaire du FlatLight au connecteur déjà installé dans la boîte de jonction. 13 Connectez le connecteur bifilaire du FlatLight au connecteur déjà installé dans la boîte de jonction. 14 Placez les fils électriques connectés à l’intérieur de la boîte de jonction et installez le FlatLight à la plaque de montage en alignant les brides de fixation aux fentes qui se trouvent sur la lampe. Une fois alignées, glissez le FlatLight en place.
SPECIFICATIONS 1'x1' Beveled Flatlight 1'x2' Beveled Flatlight 2'x2' Beveled Flatlight Model FLT11R27MD0811 FLT12R27MD1622 FLT22R27MD3644 Fixture Size (inches) 12.0" x 12.0" x 0.55" 12.0" x 24.0" x 0.55" 23.75" x 23.75" x 0.55" Bezel Style Beveled Beveled Beveled Light Output (Lumens, min.) 900 lm 1800 lm 3900 lm Correlated Color Temperature (K) 2700K 2700K 2700K Active Light Area (inches) 8.9" x 20.9" 20.7" x 20.7" Color Rendering Index (CRI, min.) 8.9" x 8.
© 2012 PIXI LIGHTING LLC. ALL RIGHTS RESERVED.