PDP42HD User’s Manual
The information contained in this document is subject to change without notice. This document contains proprietary information that is protected by copyright. All rights are reserved. No part of this document may be reproduced, translated to another language or stored in a retrieval system, or transmitted by any means, electronic, mechanical, photocopying, recording, or otherwise, without prior written permission. Windows is a registered trademark of Microsoft, Inc.
Contents Important Information...........................................................................................................................1 Safety Precautions ...................................................................................................................................2 Product Features ......................................................................................................................................3 Content of Package..................................
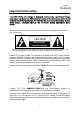
Important Information "CAUTION: If the same image is displayed continuously, a permanent image may remain on the screen. This is due to burning of the fluorescent material and is typical for all Plasma displays. To minimize this, use at least the display picture move feature, selectable through the on-screen display adjustment menu (OSD)." Warning: To reduce the risk of fire or electric shock, do not expose this product to rain or moisture. CAUTION Risk of electric shock. Do not open.
Safety Precautions 1. Read these instructions. 2. Keep these instructions. 3. Heed all warnings. 4. Follow all instructions. 5. Do not use this apparatus near water. 6. Clean only with dry cloth. 7. Do not block any ventilation openings. Install in accordance with the manufacturer's instructions. 8. Do not install near any heat sources such as radiators, heat registers, stoves, or other apparatus (including amplifiers) that produce heat. 9.
Product Features The Product features include: Built-in Screen Move: Screen move feature to reduce the possibility of screen burn. 3-D Digital Comb Filter: Enhances color purity of Composite Video input sources, reducing cross-color artifacts like dot crawl and moiré. Wide Viewing Angle: Over 160 degrees (horizontal and vertical) viewing angle. Picture in Picture: Users may simultaneously watch two images from different video sources.
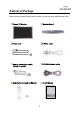
Content of Package When you are unpacking the product, make sure that you have the following items: Plasma TV Monitor Monitor Stand Power cord S-Video cable Analog video signal cable (D-Sub 15 cable) RCA Video/Audio cable Remote Control and AA Battery User’s Manual 4
If you find that any of these items are missing or appear damaged, please contact your dealer immediately. Do not throw away the packing material or shipping carton in case you need to ship or store the plasma TV in the future.
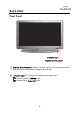
Quick Start Front Panel Indicator Light Remote Control Sensor Remote Control Sensor: Receives infrared signals from the remote control. Aim the remote control within 30 degree left and right. Indicator Light: This LED light indicates the main power status.
Front Panel Controls Menu Volume Up/Down Button Menu Volume Up (X) Down (W) Select Select Channel Up/Down Standby/On Function Displays the OSD menu (1) Adjust volume by pressing "W" to decrease the volume and "X" to increase the volume (2) Change the configurations under the OSD menu Switches between signal sources.
Rear Panel Main Power Switch External Speaker Line Out Video/Audio Connection Interface Power Input Jack Video/Audio Connection Interface: Video connection includes Component Video, Composite Video, S-video, DVI, D-Sub 15, TV Tuner, and Video/Audio Out. Main Power Switch: Master power switch to switch the plasma TV between Power Off mode and Standby mode. Power Input Jack: Power source for the plasma TV. External Speaker Line Out: Allows users to connect external speakers to the plasma TV.
Set-up Instructions Getting Started Power Input Jack: Auto switch power supply accepts input of 100 VAC~240 VAC. Use only UL approved power cord with proper grounding. Main Power Switch: Press the Power Switch on the back of your plasma TV. The Indicator Light on the front will turn to Amber color indicating the plasma TV is in Standby mode. If the plasma TV will not be used for an extended period of time, turn off your plasma TV with the Main Power Switch.
Video/Audio Connection Composite (AV) Input: Single RCA connector to connect with the composite video output of a DVD Player, VCR or any other device with a composite video connection. S-Video Input: Single S-video connector to connect with the S-video output of a DVD Player, VCR or any other device with a S-video connection. Component Video Input: 3 RCA connectors to connect with the component video output of a DVD player, DTV receiver or any other device with a component connection.
External Speakers + + External Speaker Line Out: External speaker output. Please refer to the drawing for the connection details. It is strongly recommend to use only Planar Accessories for performance and safety purposes.
Other Connections DVI: DVI-D connector for high quality digital PC connection. D-Sub 15: Regular analog VGA connection for PC usage. RF: RF input that connects to the antenna, cable box, or CATV cable. Supports NTSC TV system with 125 channels receivable. RS-232: D-Sub 9 Serial port for communication between the display and the PC.
Full Function Remote Control Remote Control Overview 1. Power Button Turns ON or OFF (Standby mode) the Plasma TV 2. Scaling Button Adjusts image aspect ratio 3. Display Button Displays status information 4. Audio Swap Button Switches audio between the main display and the PIP display 5. Swap Button Switches video between the main display and the PIP display 6. PIP Position Button Adjusts the position of the PIP display 7. PIP Size Button Adjusts the size of the PIP display 8.
16. Up/Down/Left/Right Buttons Navigation buttons for the OSD menu (The Right Arrow button also functions as the “ENTER” key) 17. Channel Up/Down Buttons Changes TV channels 18. Recall Button Recalls to the previous channel 19. Mute Button Mutes the volume 20. Volume Up/Down Buttons Changes the volume 21. Numbers Buttons Number keys for channel selection 22. Sleep Button Sleep timer 23. TV Button Direct key to the TV mode 24. YCbCr Button Direct key to the YCbCr mode 25.
Using the Remote Control Inserting Batteries Remove the battery cover from the back of the remote control. Insert two AA batteries by matching + and – sign on both batteries to the diagram inside the remote control battery compartment. Replace the battery back cover. Precaution Always make sure to have the batteries installed correctly. Incorrect installation can cause damage to the remote control. Always replace the batteries in pair. Do not mix an old battery with a new battery.
PIP Size Button: Press the PIP Size button to select through 3 different PIP window sizes. PIP Input Button: Press the PIP Input button to activate the PIP window. Pressing the PIP Input button will cycle the PIP window through all available input sources. The PIP window will deactivate once it cycles through all inputs. Note: The PIP input source cannot be the same with the main window’s input source.
Number Buttons: Use Number buttons to choose specific channel. For example, to select channel 27, first press 2 and then press 7. For channel 101, first press +100 and then press 1. Sleep Button: Press the sleep button repeatedly to set the sleep timer to 30, 60, 90, and 120 minutes. TV Button: Press to switch directly to the TV mode. YCbCr Button: Press to switch directly to Component YCbCr mode. AV Button: Press to switch directly to Composite mode. PC Button: Press to switch directly to PC mode.
On-Screen Display (OSD) Settings OSD Menu Overview PC Mode Display Image Audio Language and Color Temperature OSD Info Video Format Reset Image Scaling Mute Language OSD Position Format Brightness Volume Color Temperature OSD Timeout PIP Set Contrast Treble Red OSD Background Advance Power Management H. Position Bass Green Move Screen Mode V.
OSD Menu Operation How to Operate? Press Menu button to enter OSD Menu. Refer to the picture above; there are six icons on the top and seven options to choose from. For the top icons, icon highlighted in yellow is the one being selected. To change to different icon simply press Menu button repeatedly until correct icon is being selected. To access the options simply press Up/Down button until reaches the correct option and then use Right buttons to change the settings.
Display Settings PC Video The Reset function works the same under both PC mode and Video mode. Use Reset function to recall factory setting. When under PC mode, user may adjust Brightness, Contrast, H/V Position, Phase, Clock, and Reset. When under Video mode, user may adjust Brightness, Contrast, Saturation, Hue, Sharpness and Reset. Image Settings PC Video Normally PC outputs 4:3 aspect ratios. When under PC mode, user may choose between having the image fill the whole screen or one to one.
Language and Color Temp. PC/Video Image color and language functions and selections are identical for both PC mode and Video mode. For OSD language item, user may select from 10 different languages including English, German, French, Italian, Spanish, Portuguese, Netherlands, Traditional Chinese, Simplified Chinese, and Japanese. For the image color, user may adjust the luminance of R/G/B colors and color temperature.
OSD Window Settings PC/Video This menu is for adjusting the OSD menu window. User may change OSD Position, OSD Timeout, OSD Background, and System Reset for back to default. The screen move feature decreases chance of image burn. When a static image is being displayed on the screen for an extended period of time, enable the “move screen mode” feature to protect the screen. Under move screen mode, user may select from 3 different types including off, mode1, and mode2.
Advanced Settings PC Video This menu will also allow user to enter advance mode and change DPMS setting. When under Video mode, user can set up V-Chip and Closed Caption. PC Video When under PC mode, Signal Format will display Resolution, Horizontal/Vertical Frequency, PIP Video Source, and PIP Video Format. When under Video mode, Signal Format will display Main Signal Source, Main Signal Format, and PIP Video Source.
Advanced Settings PC/Video This menu is for changing setting of PIP mode for both PC and Video. User may change setting for PIP Size, Source, Position, Brightness, Contrast, and Saturation. “Swap” feature is not available when under main source of PC or Component. To begin, choose a TV source from either AIR or CATV. Before using the TV mode, user must perform Channel Auto Search for the TV to search through channel.
Parental Control V-Chip Setup V-Chip technology allows parents to block unsuitable programming for under age viewers. First user must set up a password. Press Menu button on the remote control to select Video Information page and then select V-Chip. Press Right button and then key in 111111 to enter the “password change” screen. Enter new password and then exit out of the menu. If you have forgotten your password, you may use reminder code “168168” to go into Change Password Number screen.
To set up parental control, select TV Guidelines Blocking and then press Right button to the set the TV Guidelines Blocking Press Up/Down buttons to select any rating, then press Right button, it will display the different contents of age-defined ratings. For TV-PG, it will display these cycling contents: SHOW, BLOCK, D, S, L, V, DL, DS, DV, LS, LV, SV, DLS, DLV, DSV, LSV, DLSV as the below list. For TV-Rating press “X” key to change to “Rating Off”. Then all the ratings will set to “Show”.
The contents of TV Guidelines rating FV: Fantasy violence D: Sexual suggestive dialog L: Adult language S: Sexual situation V: Violence MPAA Ratings: The MPAA stands for The Motion Picture Association of America system. It is mainly restrictions for the movies. When using V-Chip, TV will automatically block any critical encoding program. To set up MPAA first to select MPAA Rating and then press Up/Down button to select the rating to change. Then choose either Show the rating or Block the rating.
Change Password To change password, enter the Change Password Number option in the V-Chip function, press Right button to change password. Enter six digital password in enter new password number. And then confirm the password by enter same password again. V-chip (Volatile) After finishing setting the restricted channel and Pressing Up/Down button to select the “V-chip(Volatile)” with “ON”, it will be saved in memory to keep original settings when turning on the power at next time.
Closed Caption For some TV programs, the PDP has the de-coding and “Closed Caption” functions. This caption is usually served for the deaf or the foreign language translation. All of the VCRs can record the Closed Caption signals from TV program, so the family video types also serve for “Closed Caption” function. And similarly for business videotapes, you can check “cc” mark on the box of video type.
Technical Information Specifications Model PDP42HD General Specifications and Features Plasma TV Panel Size 42 inch Pixel Resolution 1024 X 768 pixels Display Color 16.
Environment Operating environment Temperature 5°C to 40°C Relative humidity 20% to 85% (non-condensing) Storage environment Temperature -20°C to 60°C(-4o to 140°F) Relative humidity 5% to 95% (non-condensing) Dimension and Weight Dimension 1059 mm (W) x 693.5 mm (H) x 91.5 mm (D) (with Stand and Speakers) Weight 34 kg (without Stand and Speakers) Display Size 933.9 mm (W) X 532.
Video Modes There are total of 15 default timing modes in factory setting listed in the table below: Factory Setting Modes (ANALOG VGA) No Resolution Horizontal Vertical Horizontal Frequency Frequency Dot Frequency Clock (kHz) (Hz) (MHz) Remark 1 640×480 31.50 60.00 25.18 VESA 2 640×480 35.00 67.00 30.24 MAC 3 640×480 37.50 75.00 31.50 VESA 4 640×480 37.86 72.81 31.50 VESA 5 640×480 43.30 85.00 36.00 VESA 6 720×400 31.47 70.09 28.32 VGA 7 800×600 35.16 56.
Troubleshooting Before calling the technical support or service technician, please read through this lists of problems and possible solutions. According to the industrial standards, there are a certain number of defective pixels both bright and dark that are acceptable. Although we produce panel with more than 99.99 percent active cells, there still may be some cells that do not produce light or remain lit. For more information, please contact sales or the technical support.
There is no picture or sound, just noise. • The reception may be weak. • The state of the broadcast may also be bad. • Make sure the antenna is not disconnected. Picture is not clear. • The reception may be weak. • The state of the broadcast may also bad. • Make sure the antenna is not disconnected. Picture is light or improperly tinted. • Check color adjustment. • Check color system setting. The picture is too dark. • Press the Brightness button. • Check PICTURE and BLACK LEVEL adjustment.
The picture is not sharp. • The reception may be weak. • The state of the broadcast may also be bad. • Make sure the antenna is not disconnected. The picture moves. • The reception may be weak. • The state of the broadcast may also be bad. • Make sure the antenna is not disconnected. The picture is doubled or tripled. • Make sure the antenna is facing the right direction. • There may be reflected electric waves from mountains or buildings. The picture is spotted.
Planar Customer FirstTM 1—Year Warranty Plasma display Systems – Standard Warranty Features • Standard 1 year warranty • Replacement Plasma TV1 ships immediately upon determination that customer’s display is non-functional2 • Plasma TV immediately replaced upon confirmation of defect – no returns to depot for repair! Technical Support and Warranty Claim Procedure As a Planar Standard Warranty customer, here is the simple procedure to follow if you have a non-functioning Plasma display: Planar’s custom
1. Plasma TV warranty is valid only for the first customer purchaser (nontransferable). 2. The customer must provide original proof of purchase of the Plasma TV system. 3. Onsite service is only available within the contiguous 48 United States. Planar offers web, mail and phone support for displays worldwide. 4. Any damage or dissatisfaction associated with latent images,” burn-in”, or any other damage determined by Planar to be the result of customer use patterns. 5.
2 In the continental U.S., calls must be received by 12:00 p.m., Eastern Time. Saturday, Sundays and major U.S. holidays excluded. Subject to availability of replacement stock. Delivery in certain areas may be delayed due to the shipper’s practices. 3 Customer agrees to be present for the entire scheduled appointment. Failure to comply may result in refusal of service and/ or service charges.
Exclusion of damages PLANAR’S LIABILITY IS LIMITED TO THE COST OF REPAIR OR REPLACEMENT OF THE PRODUCT. PLANAR SHALL NOT BE LIABLE FOR: 1) DAMAGE TO OTHER PEOPERTY CAUSED BY ANY DEFECTS IN THE PRODUCT, DAMAGESBASED UPON INCONVENIENCE, LOSS OF USE OF THE PRODUCT, LOSS OF TIME, LOSS OF PROFITS, LOSS OF BUSINESS OPPORTUNITY, LOSS OF GOODWILL, INTERFERENCE WITH BUSINESS RELATIONSHIPS, OR OTHER COMMERCIAL LOSS, EVEN IF ADVISED OF THEIR POSSIBILITY OF SUCH DAMAGES.
Maintenance Guidelines It is required to provide proper care to the PDP. Please follow the instructions on the maintaining your PDP. Attention Before cleaning, be sure to unplug the power core. Do not use the PDP near water as it contains sensitive electronic parts and high voltage. Do not use any chemical or alcohol to clean the surface of the PDP. Do not drop liquid of any kind or stick any object into the PDP. Cleaning for Cover and Remote Use soft cotton cloth.
Regulatory Information Agency Approvals European USA CE Mark Safety UL 6500 Emissions FCC Class B Immunity Ergonomic Federal Communications Commissions (FCC) Statement FCC Information The FCC Radio Interface Statement includes the following warning: This equipment has been tested and found to comply with the limits for a Class B digital device, pursuant to part 15 of the FCC rules. These limits are designed to provide reasonable protection against harmful interference in a residential installation.
42
Planar Systems, Inc. Customer Service Online Support:http://planar.custhelp.com Email:desktopmonitors@planar.com Tel:1-866-PLANAR-1 (1-866-752-6271) Hours:m-f, 8am-9pm, Eastern Time ©2004 Planar Systems, Inc. Planar is a registered trademark of Planar Systems, Inc. Other brands and names are the property of their respective owners. Technical information in this document is subject to change without notice.