PL2011 LCD Monitor USER’S GUIDE www.planar.
Table of Contents Table of Contents...............................................................................................................1 Preface ...............................................................................................................................2 Chapter 1 Installation........................................................................................................4 Unpacking .........................................................................................
Preface This manual is designed to assist users in setting up and using the PL2011M LCD Monitor. Information in this document has been carefully checked for accuracy; however, no guarantee is given to the correctness of the contents. The information in this document is subject to change without notice. This document contains proprietary information protected by copyright. All rights are reserved.
Important Safety Instructions Please read the following instructions carefully. This manual should be retained for future use. 1. To clean LCD Monitor screen: -- Power off LCD Monitor and unplug the AC Cord. -- Spray a non-solvent cleaning solution onto a rag. -- Gently clean the screen with dampened rag. 2. Do not place the LCD Monitor near a window. Exposing the monitor to rain water, moisture or sunlight can severely damage it. 3. Do not apply pressure to the LCD screen.
Chapter 1 Installation Unpacking Before unpacking the LCD Monitor, prepare a suitable workspace for your Monitor and computer. You need a stable and clean surface near a wall power outlet. Make sure that LCD Monitor has enough space around it for sufficient airflow. Though the LCD Monitor uses very little power, some ventilation is needed to ensure that the Monitor does not become too hot.
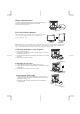
Height Adjustment Stand To unlock the height adjustment feature of the stand, locate the pin on the back of the stand column and turn the pin knob counter-clockwise. (See fig.1-1 ) Figure 1-1 Tilt, Swivel and Pivot Rotation The LCD Monitor is designed to have a tilt range of -5°to +25°, a swivel range of -35°to +35°, and a 90° pivot rotation. (See fig. 1-2) Figure 1-2 Warning: Do not force the LCD Monitor over its maximum viewing angle settings as stated above.
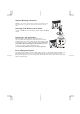
Optional Mounting Alternatives Warning: The monitor stand base may forcefully extend and cause injury. Raise the monitor to its "Full Up" position before removing the monitor stand. Detaching LCD Monitor from Its Stand Unscrew screws n the swivel base support column and pull downo the second. Figure 1-3 Interface for Arm Applications Before installing to mounting device, please refer to Fig.1-3. The rear of this LCD display has four integrated 4 mm, 0.
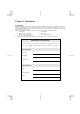
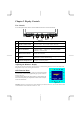
Chapter 2 Display Controls User Controls A brief description and the location of all LCD Monitor functions control and indicator: Figure 2-1 1 Stereo Speakers PC Audio Stereo output. 2 Speaker Volume Control Increase Volume - Turn the knob clock wise. Decrease Volume - Turn the knob counter clock wise. 3 Soft Power Switch Press the soft power switch to switch the monitor ON/OFF. 4 Power-On Indicator LED lights Green color --- Power is ON. LED lights Yellow --- Monitor is in "Power Saving Mode".
Function Description Ico n Function Function Description 101 scales of brightness are available to choose from (0 to 100). Brightness Contrast 101 scales of contrast are available to choose from (0 to 100). Horizontal Position Vertical Position OSD Transparency Phase Clock Color Temperature This function adjusts the display's horizontal position This function adjusts the display's vertical position. This function sets the transparency of the OSD menu.
Chapter 3 Technical Information Specifications LCD Panel PL2011M Size Display Type Resolution Display Dot Display Area (mm) Display Color Brightness Contrast Ratio 20.1" Active matrix color TFT LCD 1600x1200 1600 x (RGB) x 1200 408.0x306.0 (H x V) 16.7M 300 cd/m2 (typical) / 240 cd/m2 (minimum) 1000:1 (typical) Ta=25°C Tr+Tf=16ms Gray to Gray: 8ms 744 Vrms (typical) 7.0 mA rms.
Sync Input Signal Polarity Plug & Play External Connection Power Input (AC input) Video Cable Audio Cable Environment Operating Condition: Storage Condition: Power Supply (AC Input) Input Voltage Input Current Separate TTL compatible horizontal and vertical synchronization Digital TMDS Positive and negative Supports VESA DDC2B functions Power cord 15-pin D-sub connector, 24-pin DVI-D Stereo Jack Temperature Relative Humidity Temperature Relative Humidity 5°C to 40°C/41°F to 104°F 20% to 80% -20°C to
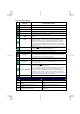
Standard Timing Table If the selected timing is NOT included in table below, this LCD monitor will use the most suitable available timing. FH(KHZ) SYNC TOTAL ACTIVE SYNC FRONT BACK PIXEL TIMING FV(HZ) POLARITY (DOT/ WIDTH PORCH PORCH (DOT/ FOREQ LINE) LINE) (DOT/LINE) (DOT/LINE) (DOT/LINE) (MHZ) 640x350 31.469 + 800 640 96 16 48 25.175 VGA-350 70.087 – 449 350 2 37 60 640x400 24.83 – 848 640 64 64 80 21.05 NEC PC9801 56.42 – 440 400 8 7 25 640x400 31.469 – 800 640 96 16 48 25.175 VGA-GRAPH 70.
Troubleshooting This LCD Monitor has pre-adjusted using factory standard VGA timings. Due to the output timing differences among various VGA cards in the market, users may initially experience an unstable or unclear display whenever a new display mode or new VGA card is selected. Attention This LCD Monitor Supports Multiple VGA Modes. Refer to the Standard Timing Table for a listing of modes supported by this LCD Monitor.