PLANAR LCD MONITOR PL201M MANUAL www.planar.
FCC Information This equipment has been tested and found to comply with the limits for a Class B digital device, pursuant to part 15 of the FCC Rules. These limits are designed to provide reasonable protection against harmful interference in a residential installation. This equipment generates, uses, and can radiate radio frequency energy, and if not installed and used in accordance with the instructions, may cause harmful interference to radio communications.
Important Safety Instructions 1. 2. 3. 4. 5. 6. 7. 8. 9. 10. 11. 12. 13. 14. Read the Safety Instructions carefully and keep it for later use. Beware of all warning and instruction signs marked on the products. When cleaning, cut off the electrical supply at all times. Never use liquid or aerosol detergent, use a damp rag instead. Always keep the product away from heavy moisture. keep this product stable at any time. Otherwise the product may fall, hazarding the safety and causing serious damage.
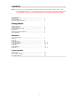
CONTENTS Note: To access our Users Guide Homepage (Page 3) at anytime, simply click on the below Homepage icon or use the arrow icon(s) to browse through each page. When in Homepage, clicking on your desired topic will automatically open each page. FCC Information………………………………………………………. FCC Warning………………………………………………………….. Safety Precautions……………………………………………………. Important Safety Instructions………………………………………… 1 1 1 2 Getting Started Package Contents……………………………………………………..
Getting Started Congratulations on your purchase of a TFT LCD Color Monitor. This section lists package contents, features, precautions, as well as cleaning and installation instructions. Important! Please keep the original box and all packing material for future shipping needs.
Precautions Sit at least 18"(45 cm) away from the TFT LCD Color Monitor. Do not press on the LCD panel as it is very fragile. Do not touch the LCD panel with your bare hands, as the grease from your skin is difficult to remove and may damage the screen. Do not expose the LCD monitor directly under sunlight or other heat sources. When in use, the LCD screen should be facing away from light sources to reduce glare.
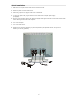
Quick Installation 1. Make sure the computer and the LCD monitor are both turned off. 2. Attach the power cord to the LCD monitor. 3. When using a power cord, plug the male end in a wall socket. 4. If using a PC power cord, plug the male end in the socket of the computer power supply (if equipped). 5. Plug one end of the video cable in the (Analog or Digital) video signal connector of LCD monitor and the other end in video signal connector of the computer. 6. Turn on the computer. 7.
OPERATIONS To turn the TFT LCD COLOR Monitor on, push the power button at the front of the LCD monitor to active. When the power light turns green, the LCD is ready to use. To turn the LCD off, push the power switch button to deactivate the monitor. Front Control Panel To scroll up or down the menu. Earphone jack To display the menu. To adjust the level of the control. Power LED Power Switch To select menu item.
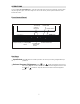
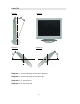
Panel Tilt Diagram 1 O 5 Diagram 2 20 O Diagram 2-2 O 45 45 O Diagram 2-1 Diagram 1 – Illustrates the display can tilt forward or backwards. Diagram 2 – Illustrates the display can rotate left or right.
MAIN MENU The Main Menu is shown below. C ON TRAST / BRIGH TNESS IMAGE ADJUST C OLOR ADJUST ADVAN CED M EN U AUDIO MENU SETUP MENU M EM ORY REC ALL A : EXIT B : SELECT CONTRAST adjusts the difference between the image background (black level) and the foreground (white level). BRIGHTNESS adjusts the background black level of the screen image. CONTRAST = = A : EXIT B : BRIGHTNESS ▽ ] button decreases the Contrast, [ △ ] button increases the Contrast.
IMAGE ADJUST MENU The Image Adjust Menu is shown below. I MAGE ADJUST AUTO TUN E H. / V. POSITION H. SIZE PH ASE ZOOM A : EXIT B : SELECT AUTO – TUNE automatically sizes, enters, and fine-tunes the video signal to eliminate noise and distortion. Press [ B ] button to activate Auto-tune. H POSITION (Horizontal Position) moves the screen image to the left or to the right. ▽] button moves the screen image to the left, [ △ ] button moves the screen image to the right.
H. SIZE (Horizontal Size) adjusts the width of the screen image. H. SIZE = = A : EXI T ▽ ] button decreases the width of the screen image, [ △ ] button increases the width of the screen image. [ PHASE minimizes the video distortion. PH ASE = = A : EXI T Press the [ ▽ ] or [ △ ] button to adjust your preference. Please note: When in Digital Video mode, H./V. Position, H. Size and Phase will not be applicable as they are automatically optimized. ZOOM expands and contacts the entire screen image.
COLOR ADJUST MENU The Color Adjust Menu is shown below: COLOR ADJUST COLOR TEMPERATURE USER COLOR TEM PERATURE A : EXIT B : SELECT COLOR TEMP SELECT provides several color options: several preset color temperatures User Color which allows you to adjust the Red (R), Green (G), and Blue (B). The factory setting for this product is 9300K (9300 Kelvin). C OLOR TEMPERATURE 9300K 6500K 5400K 5000K = = A : EXI T Press [ B : SELECT ▽ ] or [ △ ] button to scroll to your selection.
USER COLOR TEMP. Individual adjustments for red, green, and blue. △ ] button to increase red, blue or green. Press [ ▽] button to decrease Press [ USER C OLOR TEM PERATURE R B G Gamma Press = = A : EXI T GAMMA Press [ / + to Enter B : SELECT Individual adjustments for white, red, blue and green colors. ▽] or [ △ ] to select and make your adjustments.
AUDIO MENU The Audio Menu is shown below. AUDIO MENU VOLUM E M UTE A : EXI T B : SELECT VOLUME adjusts the volume of the audio output. VOLUM E = = A : EXI T Press [ ▽] button to decrease the volume, [ △] button to increase the volume. Shortcut: Press [ ▽] or [ △ ] button at anytime to activate and adjust volume level. MUTE turns Off the volume output. M UTE Off On A : EXIT Press [ ▽] or [ △ ] button to select Off or On.
ADVANCED MENU Selecting the Advanced Menu from the main menu takes you to the submenu shown below. ADVAN CED M EN U SC ALIN G SH ARPNESS INFORM ATI ON A : EXIT B : SELECT SCALING adjusts the video input signal to the screen size using the following options. SC ALIN G Fill All FILL ASPECT RATI O 1:1 A : EXI T Press [ ▽] or [ △ ] button to select from the following options: 1:1 adjusts the video signal so that the height and width of the picture are the same.
SETUP MENU The Setup Menu takes you to the sub-menu shown below. SETUP M ENU I NPUT SELEC T LANGUAGE SELECT OSD POSI TION OSD TI ME OUT A : EXI T B : SELECT INPUT SELECT allows you to toggle between two input ports between an analog and digital signal. I NPUT SELEC T ANALOG DI GI TAL A : EXI T Press [ B : SELECT ▽] or [ △ ] button to select an input signal. LANGUAGE SELECT allows you to choose the language used in the menus and control screens.
OSD POSITION allows you to move the on-screen display menus and control screens. OSD POSI TION H . POSITI ON V . POSI TION = = A : EXI T Press [ ] or [ B : SELECT △] button OSD TIMEOUT sets the length of time the on-screen display screen is displayed. For example, with a “30 second” setting, if a control is not manipulated within 30 seconds, the display screen disappears.
Specifications LCD Type Pixel Pitch Color Filter Color Glass surface Response time 20.1" (full 20.1" viewable diagonal area) TFT (Thin Film Transistor), Active Matrix Panel 0.255mm pixel pitch Pixel RGB vertical stripe 16.7M (8 bit color) Anti-Glare Ton = 15 ms (Typ.), Toff = 10 ms (Typ.) Maximum Viewing Angles Horizontal Vertical 170° @ CR>10 (Min.) 170° @ CR>10 (Min.) Input Signal Video Sync: RGB Analog (0.7 / 1.0Vp-p, 75 ohms) DVI Digital H.V. Separate Sync H.V.
Factory Preset Timing Timing Hor. Freq. (KHZ) Ver. Freq. (HZ) VGA 640 X 350 VGA 720 X 400 VGA 640 X 400 VGA 640 X 480 VESA 640 X 480 VESA 640 X 480 VESA 800 X 600 VESA 640 X 480 VESA 800 X 600 VESA 800 X 600 VESA 800 X 600 VESA 800 X 600 VESA 832 X 624 VESA 1024 X 768 VESA 1024 X 768 VESA 1024 X 768 VESA 1024 X 768 VESA 1024 X 768 VESA 1152 X 864 VESA 1280 X 960 VESA 1280 X 1024 VESA 1280 X 1024 VESA 1600 X 1200 31.47 31.47 31.47 31.47 37.86 37.50 37.50 35.00 35.16 37.88 48.08 46.88 49.72 48.36 56.
3ODQDU 6\VWHPV ,QF Customer Service E-mail: desktopmonitors@planar.com Tel: 1-866-PLANAR-1 (1-866-752-6271) Hours: M-F, 7am - 6pm Pacific Time © 2002 Planar Systems, Inc. 04/02 Planar is a registered trademark of Planar Systems, Inc. Other brands and names are the property of their respective owners. Technical information in this document is subject to change without notice.