PLANAR LCD MONITOR PQ191M MANUAL www.planar.
Important Precautions This unit has been engineered and manufactured to ensure your personal safety, however improper use may result in electrical shock or fire hazards. In order to allow the proper operation of all safeguards incorporated in this display, observe the following basic rules for its installation, use, and servicing. On Safety Use only the power cord supplied with the unit.
Important Precautions On Installation Do not allow anything to rest upon or roll over the power cord, and do not place the display where the power cord is subject to damage. Do not use this display near water such as near a bathtub, washbowl, kitchen sink, laundry tub, in a wet basement, or near a swimming pool. Displays are provided with ventilation openings in the cabinet to allow the release of heat generated during operation.
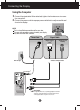
Connecting the Display Using the Computer 1. Connect the signal cable. When attached, tighten the thumbscrews to secure the connection. 2. Connect the power cord into a proper power outlet that is easily accessible and close to the display. NOTE This is a simplified representation of the rear view. This rear view represents a general model; your display may differ from the view as shown. Signal Cable Power Cord Digital signal Analog signal - DVI* D-sub* * Varies according to model.
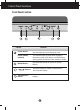
Control Panel Functions Front Panel Controls LightView Control Function Power Button Use this button to turn the display on or off. Power (DPMS) Indicator This Indicator lights up green when the display operates normally. If the display is in DPM (Energy Saving) mode, this indicator color changes to amber. MENU Button Use this button to enter or exit the On Screen Display. Buttons AUTO/SELECT Button Use these buttons to choose or adjust items in the On Screen Display.
Control Panel Functions Control Direct Access Function This function optimizes the brightness, contrast or color value to the surrounding conditions and settings and enables you to enjoy the most suitable picture by adjusting the surroundings (DAY/NIGHT/USER MODE). • TEXT: For viewing letters • MOVIE: For viewing movies • PHOTO: For viewing pictures or the photographs • USER MODE: This function memorizes the manual adjustment -Brightness, Contrast and Color value on the On Screen Display.
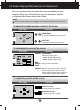
On Screen Display (OSD) Control Adjustment Screen Adjustment Making adjustments to the image size, position and operating parameters of the display is quick and easy with the On Screen Display Control system. A short example is given below to familiarize you with the use of the controls. The following section is an outline of the available adjustments and selections you can make using the OSD. NOTE Allow the display to stabilize for at least 30 minutes before making image adjustments.
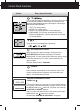
On Screen Display(OSD) Selection and Adjustment The following table indicates all the On Screen Display control, adjustment, and setting menus.
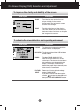
On Screen Display(OSD) Selection and Adjustment You were introduced to the procedure of selecting and adjusting an item using the OSD system. Listed below are the icons, icon names, and icon descriptions of the all items shown on the Menu. NOTE OSD (On Screen Display) menu languages on the monitor may differ from the manual. To adjust the brightness and contrast of the screen OSD Adjust Description BRIGHTNESS / CONTRAST BRIGHTNESS To adjust the brightness of the screen.
On Screen Display(OSD) Selection and Adjustment To improve the clarity and stability of the screen OSD Adjust TRACKING Description CLOCK To minimize any vertical bars or stripes visible on the screen background.The horizontal screen size will also change. PHASE To adjust the focus of the display. This item allows you to remove any horizontal noise and clear or sharpen the image of characters.
Troubleshooting Check the following before calling for service. No image appears Is the power cord of the display connected? Check and see if the power cord is connected properly to the power outlet. Is the power indicator light on? Press the Power button. Is the power on and the power indicator green? Adjust the brightness and the contrast. Is the power indicator amber? If the display is in power saving mode, try moving the mouse or pressing any key on the keyboard to bring up the screen.
Troubleshooting Display image is incorrect Display Position is incorrect. Press the AUTO/SELECT button to automatically adjust your display image to the ideal setting. If the results are unsatisfactory, adjust the image position using the H position and V position icon in the on screen display. Check Control Panel --> Display --> Settings and see if the frequency or the resolution were changed. If yes, readjust the video card to the recommend resolution.
Specifications Flat Panel Active matrix-TFT LCD 19 inch diag viewable, Anti-Glare coating, 0.29 mm pixel pitch Horizontal Viewing Angle: -85 to +85 deg typical Vertical Viewing Angle: -85 to 85 deg typical Horizontal Freq. Analog:30 - 83kHz (Automatic) Sync Input Digital:30 - 71kHz (Automatic) Vertical Freq.
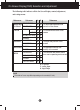
Specifications Preset Modes (Resolution) Display Modes (Resolution) 1 2 3 4 5 6 7 8 9 10 11 12 13 VGA VGA VGA VESA VESA VESA MAC VESA VESA MAC VESA VESA VESA Horizontal Freq. (kHz) 31.469 31.468 31.469 37.500 37.879 46.875 49.725 48.363 60.123 68.681 61.805 63.981 79.976 640 x 350 720 x 400 640 x 480 640 x 480 800 x 600 800 x 600 832 x 624 1024 x 768 1024 x 768 1152 x 870 1152 x 900 1280 x 1024 1280 x 1024 Vertical Freq.
Specifications Signal Connector Pin Assignment 8 C1 C2 C5 16 24 C3 C4 1 9 17 DVI-I Connector Pin 1 2 3 4 5 6 7 8 9 10 11 12 13 14 15 Signal(DVI-I) Pin 16 17 18 19 20 21 22 23 24 C1 C2 C3 C4 C5 T. M. D. S. Data2T. M. D. S. Data2+ T. M. D. S. Data2/4 Shield T. M. D. S. Data4T. M. D. S. Data4+ DDC Clock DDC Data Analog Vertical Sync. T. M. D. S. Data1T. M. D. S. Data1+ T. M. D. S. Data1/3 Shield T. M. D. S. Data3T. M. D. S. Data3+ +5V Power Ground (return for +5V, Signal(DVI-I) Hot Plug Detect T. M. D.
Making use of USB (Universal Serial Bus) - Optional USB (Universal Serial Bus) is an innovation in connecting your different desktop peripherals conveniently to your computer. By using the USB, you will be able to connect your mouse, keyboard, and other peripherals to your display instead of having to connect them to your computer. This will give you greater flexibility in setting up your system.
Making use of USB (Universal Serial Bus) - Optional USB Specifications USB standard Downstream power supply Communication speed USB port Rev. 1.1 complied BUS-powered hub 100mA for each (MAX) 12 Mbps (full), 1.5 Mbps (low) 1 Upstream port 2 Downstream ports IMPORTANT: These USB connectors are not designed for use with high-power USB devices such as a video camera, scanner, etc.
PLANAR SYSTEMS, INC. Customer Service support: http://planar.custhelp.com email: desktopmonitors@planar.com phone: 1-866-PLANAR-1 (1-866-752-6271) hours: M-F, 8am - 9pm EST © 2003 Planar Systems, Inc. Planar is a registered trademark of Planar Systems, Inc. Other brands and names are the property of their respective owners. Technical Information in this document is subject to change without notice.