The information contained in this document is subject to change without notice. This document contains proprietary information that is protected by copyright. All rights are reserved. No part of this document may be reproduced, translated to another language or stored in a retrieval system, or transmitted by any means, electronic, mechanical, photocopying, recording, or otherwise, without prior written permission. Windows is a registered trademark of Microsoft, Inc.
1 Table of Contents Usage Notice Precautions ................................................................................. 2 Introduction About the Product ....................................................................... 3 Package Overview ...................................................................... 4 Installation Product Overview ........................................................................ 5 Start Your Installation ........................................................
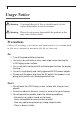
2 Usage Notice Warning- To prevent the risk of fire or shock hazards, do not expose this product to rain or moisture. Warning- Please do not open or disassemble the product as this may cause electric shock. Precautions Follow all warnings, precautions and maintenance as recommended in this users manual to maximize the life of your unit. Do: q q q q q Turn off the product before cleaning. Use only a dry soft cloth or clean room wiper when cleaning the LCD Display screen surface.
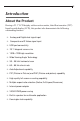
3 Introduction About the Product Having a 23.1 LCD dsiplay with an active matrix, thin-film transistor (TFT) liquid crystal display (LCD), this product also demonstrate the following outstanding features. q Analog and Digital dual signal input q Composite and S-Video signal input q USB port connectivity q 23.
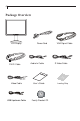
4 Package Overview LCD Display DVI-D Cable Video Cable USB Upstream Cable Power Cord Audio-In Cable User’s Guide Family Product CD VGA Signal Cable S-Video Cable Landing Strip
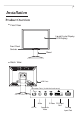
5 Installation Product Overview u Front View Liquid Crystal Display (LCD Display) Front Panel Controls Stand u Back View USB Ports Connector Ports (Inside the back cover) Audio AC-In S-Video DVI Input Port Composite Video Analog Input Port
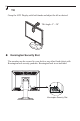
6 u Tilt Grasp the LCD Display with both hands and adjust the tilt as desired. Tilt Angle:-5° ~ 20° u Kensington Security Slot The monitor can be secured to your desk or any other fixed object with Kensington lock security products. Kensington lock is not included.
7 u VESA Mount on your monitor This monitor conforms to the VESA Flat Panel Mounting Physical Mounting Interface Standard which defines a physical mounting interface for flat panel monitors, and corresponding standards for flat panel monitor mounting devices, such as wall and table arms.The VESA mounting interface is located on the back of your monitor. The VESA Mounting slots of this model are located inside the rear cover (shown in the following figure).
8 Start Your Installation u Connecting the Display (Figure 10.1) To setup this display, please refer to the following figure and procedures. 1. Be sure all equipment is turned off. 2. Connect the DC power cord to the power connector; plug one end of the AC power cord into the power adapter, and the other end into an electrical outlet(). 3. For the PC with Analog output: Connect the VGA signal cable from display VGA input connector to the 15-pin connector of your host computer and tighten the screws().
9 Figure 10.
10 User Controls Front Panel Controls No/Icon ❶ MENU ❷ SELECT Control Menu button 1. Auto 2. Select Function To Enter / Exit the OSD menus. 1.To 0 activate the"Auto Adjustment" function to obtain an optimum image. 2.To Select the adjustment items from the OSD menu. ▼ 1. Brightness 2. Adjust 1.Enters the Brightness OSD menu. 2.Allows you to highlight and adjust items in the OSD menu. ▲ 1. Mute 2. Adjust 1. To turn the volume On / Off. 2.
11 How to Use the OSD Menus 1. Press the “MENU” button to pop up the on-screen menu and to select among the six Main Menus. 4 3. Adjust the value of the adjustment items by pressing the “ or “ ” button. 3 2. Choose the adjustment items by pressing the “SELECT” button. 4. After a period of inactivity the OSD menus will automatically disappear.
12 On-Screen Display Menus 1. VGA / DVI Input Main Menu Menu Level 2 Menu Level 3 Function Description Volume To adjust the sound volume. Contrast To adjust the contrast of the image 1. To adjust the color temperature. 2. Allows you to adjust the red, green and blue colors of the display. Color 1. PIP Mode On/Off. 2. Allows you to select PIP, PAP model. PIP Mode PIP Source Allows you to select Video, and S-Video Size Allows you to adjust size of display. H.
13 2. Video Input Main Menu Menu Level 2 Menu Level 3 Function Description Volume To adjust the sound volume. Contrast To adjust the contrast of the image Allows you to adjust the Saturation, Tint, Flesh Tone and Black Level of the display. Color 1. PIP Mode On/Off. 2. Allows you to select PIP, PAP model. PIP Mode Source PIP Allows you to select Video, and S-Video Size Allows you to adjust size of display. H. Position Allows you to move the horizontal position of the PIP window. V.
14 Appendix Troubleshooting If you are experiencing trouble with the LCD display, refer to the following trouble shooting. If the problem persists, please contact your local dealer or our service center. Problem: No image appears on screen. 4 Check that all the I/O and power connectors are correctly and well connected as described in the “Installation” section. 4 Make sure the pins of the connectors are not crooked or broken. Problem: Partial image or incorrectly displayed image.
15 Warning Signal Sometimes you may see warning messages for this LCD Display. This means that the LCD Display cannot correctly receive the signal from the computer graphics card. 4 No Input Signal This message means that the LCD Display has been powered on but it cannot receive any signal from the computer graphics card. Check all the power switches, power cables, and VGA signal cable.
16 Product Dimensions Front View Side View Top View
17 Compatibility Modes Resolution V. Frequency (Hz) H. Frequency (kHz) IBM VGA 640 x 350 70.00 31.46 IBM VGA 720 x 400 70.08 31.46 VESA DMT 640 x 480 59.94 31.46 VESA DMT 640 x 480 75.00 37.50 VESA DMT 640 x 480 85.00 43.26 VESA DMT 800 x 600 60.31 37.87 VESA DMT 800 x 600 75.00 46.87 VESA DMT 800 x 600 85.06 53.67 VESA DMT 1024 x 768 60.00 48.36 VESA DMT 1024 x 768 75.02 60.02 VESA DMT 1024 x 768 84.99 68.67 VESA DMT 1152 x 864 75.00 67.
Planar Systems,Inc. Customer Service Online Support : http://www.planar.com/support Email : PlanarSupport@planar.com Tel : 1-866-PLANAR-1 (1-886-752-6271) Hours : M-F, 8am-8pm Eastern Time (5am-5pm Pacific Time) ©2006 Planar Systems, Inc. Planar is a registered trademark of Planar Systems, Inc. Other brands and names are the property of their respective owners. Technical information in this document is subject to change without notice.