LC1503R /LC1503R‐C USER’S GUIDE www.planar.
The information contained in this document is subject to change without notice. This document contains proprietary information that is protected by copyright. All rights are reserved. No part of this document may be reproduced, translated to another language or stored in a retrieval system, or transmitted by any means, electronic, mechanical, photocopying, recording, or otherwise, without prior written permission. Windows is a registered trademark of Microsoft, Inc.
Table of Contents Usage Notice Precautions ............................................................................... 4 Introduction About Planar’s LC1503R ..............................................................5 Package Overview ..................................................................... 6 Installation Product Overview ....................................................................... 7 Mounting the Display ................................................................
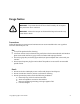
Usage Notice WARNING – To prevent the risk of fire or shock hazards, do not expose this product to rain or moisture. WARNING – Please do not open or disassemble the product as this may cause electric shock. Precautions Follow all warnings, precautions and maintenance as recommended in this user’s guide to maximize the life of your unit. Do: Turn off the product before cleaning.
Introduction About Planar’s LC1503R LC1503R is a smart panel design which is composed of an active matrix, thin‐film transistor (TFT) liquid crystal display (LCD). It has a 15" diagonally measured active display area with XGA resolution (1024 x 768). Features include: 1,600 nits Long Lifetime LED Backlight Powered by Durapixel™ Technology Wide viewing angle Broad operating temperature range Fast response time: 8ms (typ.) High contrast ratio: 600:1 (typ.
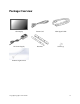
Package Overview LCD Display Power Cord VGA Signal Cable DC Power Supply Brackets Screws (4) Ambient Light Sensor LC1503R/LC1503R‐C User’s Guide 6
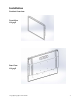
Installation Product Overview Front View LC1503R Rear View LC1503R LC1503R/LC1503R‐C User’s Guide 7
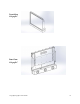
Front View LC1503R‐C Rear View LC1503R‐C LC1503R/LC1503R‐C User’s Guide 8
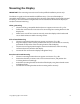
Mounting the Display IMPORTANT! The mounting instructions are for the qualified installation person only! The Planar LC1503R can be mounted three different ways. The rear of the display is compatible with a VESA 75 mounting interface, the sides of the display support side‐oriented mounting, or the enclosed mounting brackets can be attached to the side of the display for rear/front‐oriented mounting. VESA 75 Mounting 1. Choose a VESA 75 compatible bracket that can support a minimum of 13.2 lbs. 2.
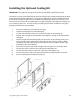
Installing the Optional Cooling Kit IMPORTANT! The optional cooling kit should only be installed by qualified personnel. The Planar LC1503R can be fitted with an optional cooling kit to expand the temperature range of the display for specific applications. The optional cooling kit is typically installed by Planar personnel at assembly time but can be installed in the field under some circumstances.
Connecting the Display (Figure 1.1) To set up this display, please refer to the following figure and procedures. 1. Be sure all equipment is off. 2. Connect the DC adapter to the power connector on the monitor and the other end to the power cord and the power cord into an electrical outlet. 3. Connect the VGA signal cable from the display’s VGA input connector to the VGA port connector of your host computer and tighten the thumb‐screws (1.1). 4. Power on the display and then power on your host computer.
User Controls Panel Controls Button Number 1 2 3 4 Button Name Power On/Off Left/Decrease Menu/Select Right/Increase LC1503R/LC1503R‐C User’s Guide Button Function Turns the display on or off Moves selection left/Decreases selected value Brings up the menu/Selects item Moves selection right/Increases selected value 12
How to Use the On‐Screen Display (OSD) Menus 1. Press the “MENU” button to pop up the “on‐screen menu” shown below. The timing displays the resolution and horizontal/vertical frequency of the display while the version displays the current firmware version installed on the display. 2. Press the “Right” or “Left” buttons to change the selected item. Press the “Menu” button to open the associated sub‐menu or the control to be adjusted. 3.
On‐Screen Display Menu Items Main OSD Menu: OSD Brightness: Adjust the brightness of the on‐screen display menu by using the left/right buttons to decrease/increase the value from zero to 100. Brightness: Adjust the brightness of the display by using the left/right buttons to decrease/increase the brightness setting from zero to 100. Contrast: Adjust the contrast of the display by using the left/right buttons to decrease/increase the contrast value from zero to 100.
Color Menu: Auto‐Color: Configure the display to maintain optimal color configuration automatically. Standard RGB: Configure the display using the sRGB color space standards. Color Temperature: Brings up the following sub‐menu items. User Mode (Default): User configurable RGB settings. Color Temperature 6500K: A standard “warm” color scheme. Color Temperature 9300K: A standard “cold” color scheme. Exit: Exit this sub‐menu and return to the Color Menu.
Tools Menu: OSD Control: Brings up the following sub‐menu items. OSD Time: Sets the timeout for the OSD display from two seconds to 16 seconds. OSD Horizontal Position: Adjusts the horizontal location of the OSD by using the left/right adjustments. OSD Vertical Position: Adjusts the vertical location of the OSD by using the left/right adjustments to move the display down/up. Exit: Exit this sub‐menu and return to the Tools Menu.
Appendix A ‐ Video Modes Mode Resolution H-Frequency (khz) V-Frequency (hz) IBM VGA 720 x 400 31.47 70 IBM VGA 640 x 480 31.47 60 Apple MacII 640 x 480 35.00 66 VESA VGA 640 x 480 37.86 72 VESA VGA 640 x 480 37.50 75 VESA VGA 800 x 600 35.16 56 VESA VGA 800 x 600 37.88 60 VESA VGA 800 x 600 48.08 72 VESA VGA 800 x 600 46.88 75 Apple Mac 832 x 624 49.72 75 VESA XGA 1024 x 768 56.48 70 VESA XGA 1024 x 768 60.
Appendix B ‐ Troubleshooting If you are experiencing trouble with the LCD display, refer to the following. If the problem persists, please contact your local dealer or visit Planar Support at www.planar.com/support. See support contact information on rear cover. Problem: No image appears on screen. Check that all the I/O and power connectors are installed correctly and well connected as described in the “Installation” section. Make sure the pins of the connectors are not crooked or broken.
Appendix C ‐ Warning Signals If you see warning messages on your LCD screen, this means that the LCD display cannot receive a clean signal from the computer graphics card. There may be three sources for this problem. Please check the cable connections or contact your local dealer or our service center for more information. No Signal This message means that the LCD display has been powered on but it cannot receive any signal from the computer graphic card.
Appendix D ‐ Product Dimensions LC1503R ‐ Front View: LC1503R/LC1503R‐C User’s Guide 20
LC1503R ‐ Rear View: LC1503R/LC1503R‐C User’s Guide 21
LC1503R ‐ Side View: LC1503R/LC1503R‐C User’s Guide 22
LC1503R‐C ‐ Front View With Cooling Kit: LC1503R/LC1503R‐C User’s Guide 23 Front View
LC1503R‐C – Rear View with Cooling Kit: LC1503R/LC1503R‐C User’s Guide 24
LC1503R‐C – Side View with Cooling Kit: LC1503R/LC1503R‐C User’s Guide 25
Product Registration Register your Planar products today. Thank you for choosing Planar. To assure you receive all the benefits of your Planar product and services, register your Planar product today. Visit our website to register your product at www.planar.com/support/product_registration.html. Cables, Replacement Lamps and Accessories. To find cables, replacement lamps and accessories for your Planar projector, LCD monitor or touchscreen or other Planar products, visit our online store at www.
Planar Systems, Inc. Customer Service 24x7 Online Technical Support: http://www.planar.com/support Americas Support Tel: 1‐866‐PLANAR1 (866‐752‐6271) or +1 503‐748‐1100 Hours: M‐F, 8am ‐ 8pm Eastern Time | M‐F, 5am ‐ 5pm Pacific Time Europe and Asia‐Pacific Support Tel: +358‐9‐420‐01 Hours: M‐F, 7:00am ‐ 4pm CET © 2012 Planar Systems, Inc. 04/12 Planar is a registered trademark of Planar Systems, Inc. Other brands and names are the property of their respective owners.