CONTENTS Precautions................................................................................................................................................. 1 Take Precaution......................................................................................................................................1 Installation ...................................................................................................................................................2-3 Installation Procedures .....
PRECAUTIONS Take Precaution Some MP3/WMA files may not be playable. Be sure to lower the volume before switching off the unit or the ignition key.
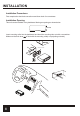
INSTALLATION Installation Procedures First complete the electrical connections and then check for correctness. Installation Opening This unit can be installed in any dashboard Having an opening as shown below. 2.05 inch 7.20 inch Insert mounting collar into the dashboard and bend the mounting tabs out with a screwdriver. Make sure that lock lever is flush with the mounting collar( not projecting outward).
INSTALLATION(CONT.) ! - Only use speakers with 4 ohms impedance. - The maximum current of the auto antenna is 200mA.
CONTROL PANEL BUTTON LOCATIONS OPERATION 1 . Turn Unit on/off (PWR) Press any button to turun on the unit. Press and hold the VOL/PWR/SEL button to turn off the unit. Adjust the volume (VOL) Rotate the VOL knob to increase or decrease the volume level. Adjust Menu Options (SEL) Press SEL button repeatedly to cycle through the following adjustable audio functions: BASS, TREBLE, BALANCE, FADER, EQ OFF, CLASS/ROCK/POP/ FLAT, LOUD ON/OFF, DX/LOC, STEREO/MONO, CLOCK 12/24, AREA US/EU.
OPERATION 4. Change the Source (SRC) Press this button to select the different modes: Radio, BT(Bluetooth), USB(with USB deviceinserted), SD(with SD card inserted) and AUX-IN(auxiliary input) modes. 5. Setting Time Press the CLK button to display time. Press and hold the CLK button again, the hours digits start flashing on the display. Set hours using the / button. Press the CLK button again. The minute digits start flashing. Set minutes using the / button. Press the CLK button to confirm your settings. 6.
OPERATION 15. Loudness on/off Press the LOUD button to turn on the loudness to reinforce the output of bass frequencies, press again to turn it off. 16. Hands-free Microphone To receive your voice when you calling by using this bluetooth handsfree system. 17. Preset EQ (Equalizer) Press the EQ button to toggle between EQ OFF, CLASS, ROCK, POP, FLAT. 18. LCD Display 19. USB Port / Micor SD Card Slot Insert an SD card with the label to the right into the SD card slot, until it “clicks” into place.
BLUETOOTH OPERATION Pair and Connect Prior to using the Bluetooth device as a handsfree system for a Bluetooth-enabled mobile phone for the time, you must pair and connect the two devices as follows: in the LCD indicating 1. In any mode, prior to pairing and connecting, the BT logo that no device is connected. To begin pairing, enable BT mode on your mobile phone. 2. When the phone the car audio system, the PLANET P370MB name will be displayed. 3.
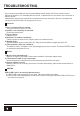
TROUBLESHOOTING If you suspect something is wrong, immediately switch power off. Do not use the unit in abnormal condition, for example without sound, or with smoke or foul smell, can cause fire or electric shock. Immediately stop using it and call the store where you purchased it. Never try to repair the unit by yourself because it is dangerous to do so. General 1) Car's engine switch is not on. Turn you car's key to ACC or ON. 2) Cable is not correctly connected. Check the connection. 3) Fuse is burnt.
SPECIFICATIONS General Power supply Requirement : Maximum power output : DC 12V 50W X 4CH Speaker impedance : Unit Dimensions(WxHxD) : 4 - 8 Ohm 7.0 X 2.0 X 3.8 inch Weight : Fuse : 1.54 Lb (0.7 kg) 15 A RADIO FM Frequency Range USA / EUROPE: Channel step: 87.5 MHz - 107.9 MHz / 87.5 MHz - 108.