-Bay SATA NAS Server NAS-7100 Quick Installation Guide Version:1.
Table of Contents System............................................................................................................ 4 Package Contents................................................................................... 4 System Requirements............................................................................. 4 Front Panel............................................................................................ 4 Rear Panel.........................................
Thank you for purchasing PLANET 1-Bay SATA NAS Server, NAS-7100. In this installation guide, it illustrates the simply installation for user to install a HDD and install NAS-7100 to Windows system. For more information, please also refer to the User’s manual in our CD-ROM.
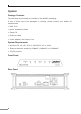
System Package Contents The following items should be included in the NAS65 packaging. If any of these items are damaged or missing, please contact your dealer for replacements. • NAS-7100 • Quick Installation Guide • Setup CD • Ethernet Cable • Power Adapter with Power Core System Requirements • Windows 95, 98, ME, NT 4.0, 2000/2003, XP or Vista. • Ethernet Network employing 10BaseT, 100BaseTX or 1000BaseT. • TCP/IP protocol.
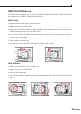
HDD Install/Remove The NAS-7100 supports one 3.5-inch Serial-ATA (SATA) hard drive. NAS-7100 does not support low profile or half high hard drive. HDD Install 1. Make sure the NAS-7100 is powered off 2. Open top cover of NAS-7100 3. Make sure your hard drive is SATA interface and make sure you back up all preexisting data before use it on NAS-7100 4. Pull up the HDD tray then slide and push the HDD into the tray, make sure connector well connecting 5. Push down the HDD tray 6.
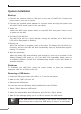
System Installation Boot up 1. Connect the network cable to LAN port on the rear of NAS-7100. Connect the others end to your hub or switch. 2. Connect the supplied power adapter to a power outlet and plug the power cord into NAS-7100’s power input on the rear panel. 3. Power on. Locate the NAS-7100’s power switch on the NAS-7100 real panel. Press it once to power on the NAS 4. The NAS-7100 self-test. The NAS-7100 will run a brief self-test.
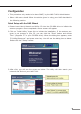
Configuration • This procedure only needs to be done ONCE, by the NAS-7100’s Administrator. • Other LAN users should follow the advice given in using your NAS described in the following section. Quick Setup with the NAS Wizard 1. Please insert User’s Manual and Utility CD into the CD-ROM drive to initiate the autorun program. Once completed a menu screen will appear. 2. Click on “Initial Utility” hyper link to initiate the installation.
A list of all the NAS-7100s on your network will show on the left side. The right side displays details of the currently selected NAS-7100. If the desired NAS-7100 is not listed, check the following: • The NAS-7100 has finished the start up and boot process. • Your PC and the NAS-7100 are on the same IP segment. • Click “Refresh” button to search again. Otherwise, select the desired NAS-7100, and click the "Next" button. 4. The following screen will then be displayed.
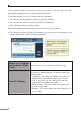
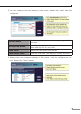
5. You can configure the time settings in this screen. Please click “Next” after the configured. Server Name The Default Name is shown. You may change this if you wish. Workgroup Name Normally, this name should match the Workgroup name used by PCs on your LAN. Time Zone Select your time zone from the list. Local Date/Time Enter the local date (mm/dd/yyyy format) and time. 6. Please check the configured settings of this screen, if all the configure are correct. Please click “Save” button.
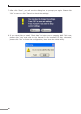
7. After click "Save", you will see the dialog box to prompt you again. Please click “OK” to save or click “Cancel to check the settings. 8. If you would like to install “Flash-Map” to helps you to mapping NAS-7100 now, please click “Yes” and refer to the manual in our bundled CD disk, otherwise, please click “No” to finish the configuration, then close the initial utility.
Using Your NAS-7100 To Use the NAS storage 1. Open Network Neighborhood (or My Network Places). 2. Locate the NAS-7100. If it is not listed, double-click Entire Network. Then double-click the Workgroup that the NAS-7100 is in. (By default, the NAS-7100 is in Workgroup.) 3. Double click on the NAS-7100 icon. You will then see a list of shares (shared folders). You can read and write files to these shares, unless the NAS-7100 administrator has blocked access. 4.
Other Configuration If you want to set more detail settings of NAS-7100, please refer to our manual and configure with your Web Browser. If you have any difficulty on resolving the problem while installing or using NAS-7100, please feel free to contact PLANET for support.